Changing Static Data
Learning Outcome
On successful completion of this lesson, students will understand how to change and add static data for the following modules:
- Boats
- Certifying Agencies
- Clubs
- Club Membership Types
- Companies
- Contact Methods
- Cost Centres
- Course Types
- Currencies
- Customer Types
- Denominations
- Destinations
- Documents
- Employees
- Enquiry Status
- Enquiry Source
- Enrollment Status
- Equipment Items
- Follow Up Actions
- Hotels
- Invoice Types
- Languages
- Locations
- Mailing Lists
- PADI Territories
- Payment Methods
- PC Options
- QuickBook Accounts
- Report Types
- Special Interests
- Stores
- Task Types
- UI Configs
- Vans
Lesson
Boats
- In the Data screen, click on ‘Boat’, ‘New’.
- The ‘New Boat’ dialog box will open. Some information is required, some optional:
- Boat Name (Required)
- Prefix (Required)
- Min No. (Required)
- Max No. (Required)
- Call Sign (Optional)
- Notes (Optional)
- URL (Optional)
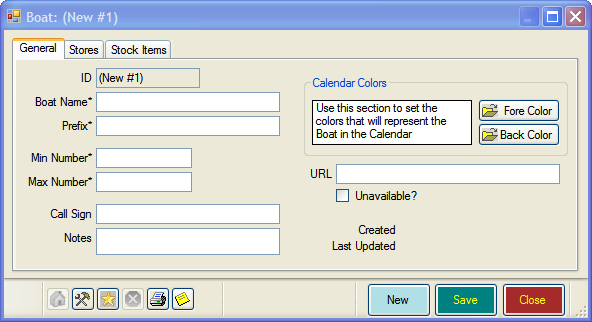
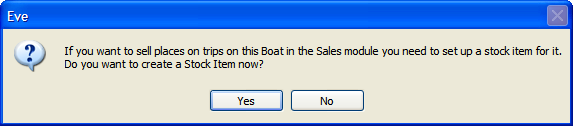
- Once you’ve added your details click the ‘Save’. A dialog box will open asking if you wish to create a stock item. At this stage we are not using EVE as POS, so click ‘No’.
- You will be returned to the ‘New Boat’ box. Click Close
Certifying Agencies
- In the Data screen, click on ‘Certifying Agencies’, ‘New’.
- The ‘Certifying Agency’ box will open.
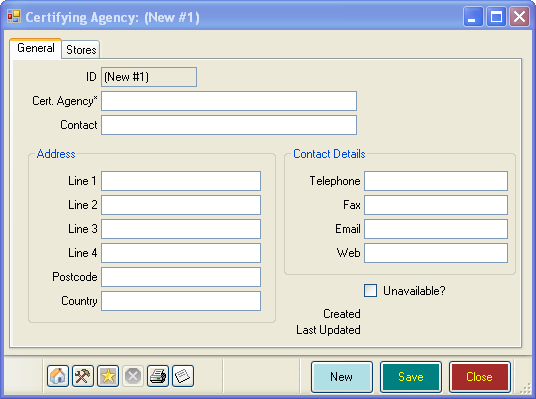
- Here you can add additional training agencies.
Clubs
- In the Data screen, click on ‘Clubs’, ‘New’.
- The ‘New Club’ box will open
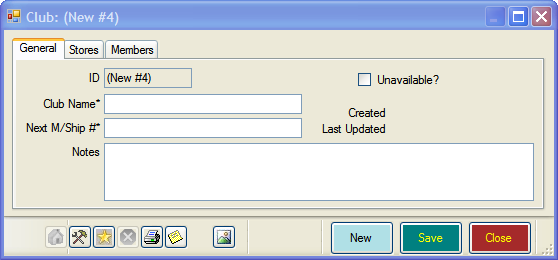
- Add the Club Name and the ‘Next M/Ship #. If this is a new club this will be 1. For existing clubs add the next available number.
- Click the Stores tab to enter the stores to which the Club applies.
- Click on the Members Tab to see your club members.
Club Membership Types
- In the Data screen, click on ‘Club Membership Types’, ‘New’.
- The ‘Club Membership Type’ box will open.
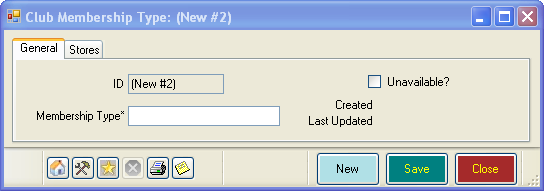
- Enter the new Membership Type, for example gold, silver, bronze.
- Click the Stores tab to enter the stores to which the Club Membership applies.
Companies
You may have different companies running separate parts of your operation. If this is the case, add your details in this section.
- In the Data screen, click on ‘Companies’, ‘New’.
- The ‘Company’ box will open.
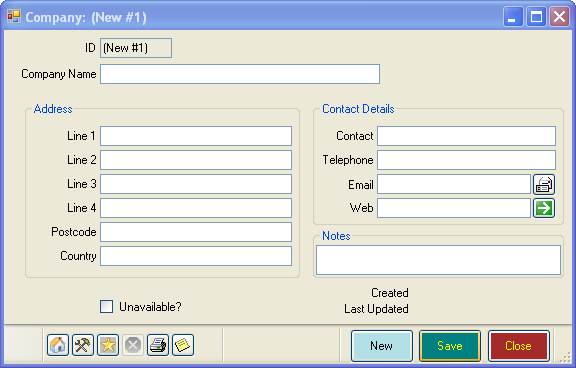
- Enter information about the new company.
Contact Methods
- In the Data screen, click on ‘Contact Methods’, ‘New’.
- The ‘Contact Method’ box will open.
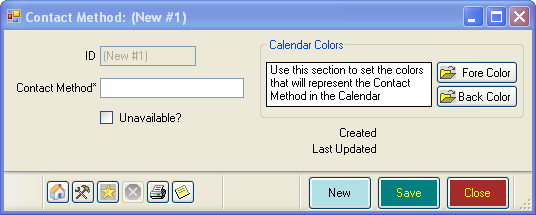
- Enter the new contact method (e.g. Facebook) and any colors you want to use to represent the method in the Calendar.
Cost Centres
- In the Data screen, click on ‘Cost Centres’, ‘New’.
- The ‘Cost Centre’ box will open.
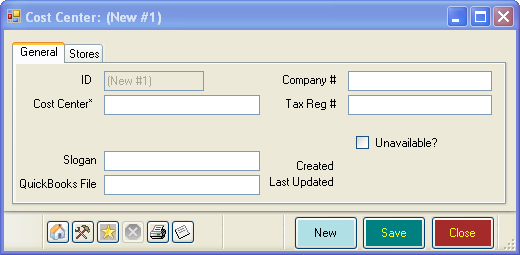
- Enter details of the new Cost Centre.
- Click the Stores tab to enter the stores to which the Cost Centre applies.
Course Types
As new PADI courses are developed, you will want to add them to EVE.
- In the Data screen, click on ‘Course Types’, ‘New’.
- The ‘Course Type’ box will open. There are four tabs available – General, Store, Module Types and Documents.
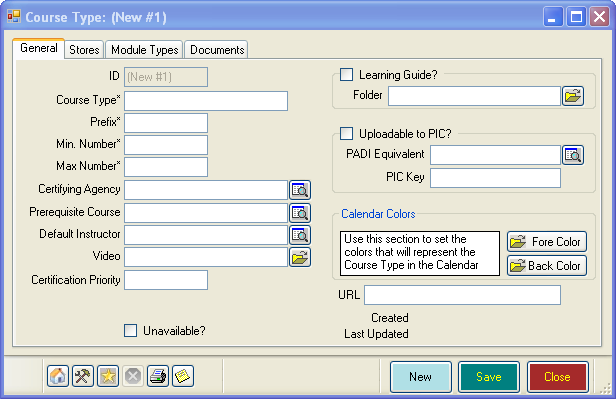
- In the General Tab, you can add the following information, some required, some optional:
- Course Type (Required)
- Prefix (Required) – this will be used in the Calendar to identify the course. For example OW for Open Water Diver.
- Min Number (Required) – the minimum number of students for a course.
- Max Number (Required) – the maximum number of students allowed per course.
- Certifying Agency
- Prerequisite Course
- Default Instructor – if you have one Instructor who normally teaches this course add them here. For example, a Course Director for IDC’s.
- Video – Add a link to a promo video here.
- Certification Priority – Put a number in this box if you want the course type to be included in those that indicate a customer’s certification level once qualified. The highest number certification will be shown, so you may want to keep this to core courses, and use 1 for Open Water, 2 for Advanced, etc.
- Learning Guide – Check the checkbox and add a link to the course Lesson Guide
- Uploadable to PIC – Check the box if this course can be uploaded using PIC Online.
- PADI Equivalent – You might want to add new Course Types to EVE, for example, Open Water Executive. If a customer successfully completes their executive course, they will be certified in Open Water. If you want to upload details of the certification to PADI using PIC Online, EVE needs to know what the PADI equivalent to Open Water Executive is – obviously in this case it is Open Water.
- PIC Key – The PIC Key is required by PADI to process certifications. You will not usually need to change this value. EVE comes preloaded with the PIC Keys for PADI courses. Contact ISSYS if you require a PIC Key – e.g. for a new course type that PADI have introduced. Important – do not change the PIC Key for a pre-existing course, unless specifically advised by ISSYS to do so.
- Click the Stores tab to enter the stores in which the Course Type is used.
- Select the ‘Modules’ tab.
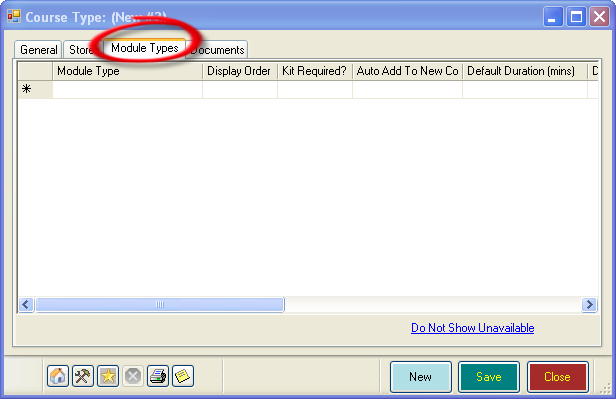
- Add information about specific modules (knowledge development, confined and open water) for the course:
- Module Type – Enter a Description of the module
- Display Order – Modules usually take place in a set order, for example, Open Water Dive 1 occurs before Dive 2. Assign a unique number to each module in ascending order.
- Kit Required – Check the box if equipment is required for the course module.
- Auto Add To New Course – Check Auto Add to New Course checkbox if the module is required for every course.
- Default Duration (Min)
- Default Day Of The Week
- Default Start Time
- Default Location
- Click on the ‘Documents’ tab.
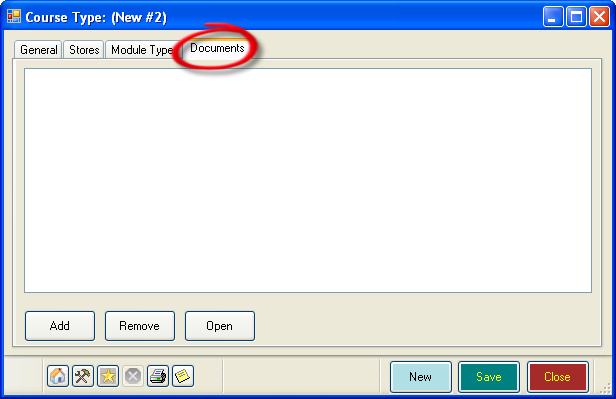
- Add any Documents which you want to print/email each time a customer enrols on this course.
Currencies
- In the Data screen, click on ‘Currencies’, ‘New’.
- The ‘Currency’ box will open.
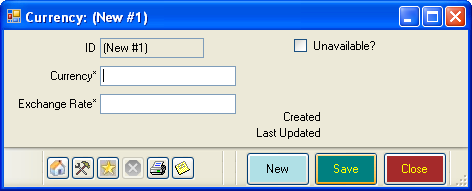
- Enter the Currencies your organization uses for sales or purchasing. You will be able to convert Currencies using the Currency Calculator. Additionally, you can show the price in different currencies on receipts.
Customer Types
Customer Types are groups of customers, such as Instructors or Club Members. Some of these may attract special discounts.
- In the Data screen, click on ‘Customer Types’, ‘New’.
- The ‘Customer Type’ box will open.
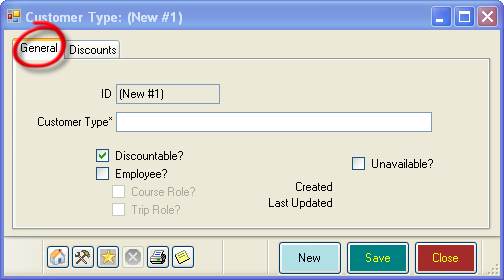
- There are two tabs – General and Discounts.
- The General Tab has the following fields:
- Customer Type
- Discountable? – Check the box if the Customer Type is Discountable. Note: Even if you will not be offering a discount to this Customer Type, you will still need to tick the Discountable box if you want EVE to display the customer type in the general form of the Customers Module. No discounts will be given unless you enter discounts in the Discounts tab
- Employee – Check this box if this is a role potentially held by an Employee. When this box is selected, the Course Role and Trip Role options will be available.
- Click the Discounts Tab if you will be offering discounts to the Customer Type.
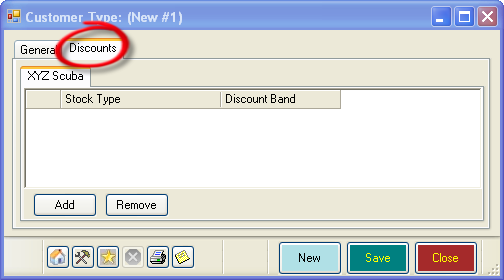
- For example, you may choose to offer all club members a 5% discount on equipment purchases. You can use this section to define discounts by stock type.
Denominations
- In the Data screen, click on ‘Denominations’, ‘New’.
- The ‘Denominations’ box will open.
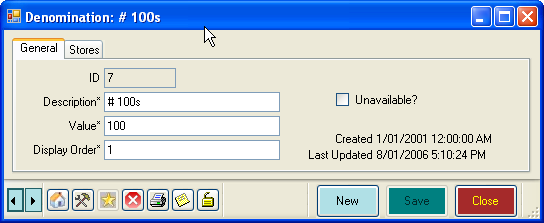
- Click the Stores tab to enter the stores that will use these denominations.
Destinations
- In the Data screen, click on ‘Destinations’, ‘New’.
- The ‘New Destination’ dialog box will open.
- In the General Tab you can add in several pieces of information, some required, some optional:
- Destination (Required)
- Prefix (Required)
- Video (Optional)
- Min No. (Required)
- Max No. (Required)
- URL (Optional)
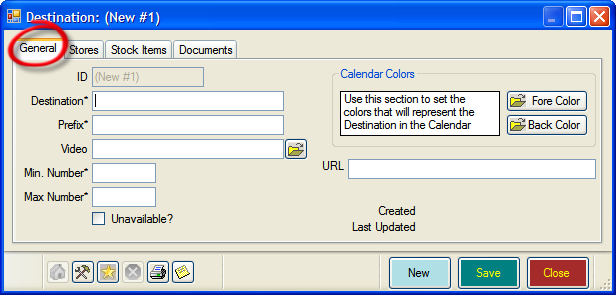
- Click the Stores tab to enter the stores that will use these destinations.
- In the Documents Tab, enter any Documents that you want to print or email each time a customer reserves a place on a trip to this destination.
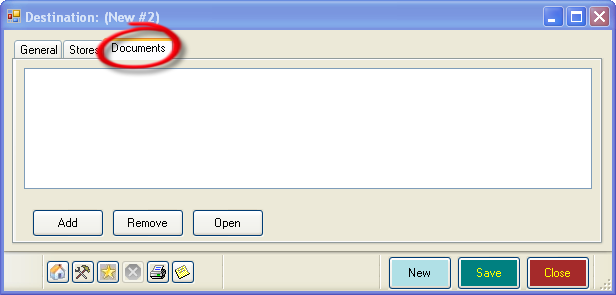
Documents
Documents can be identified in EVE and then linked to other records (for example, Course Types or Stock Items, etc).
- In the Data screen, click on ‘Documents’, ‘New’.
- The ‘Documents’ dialog box will open.
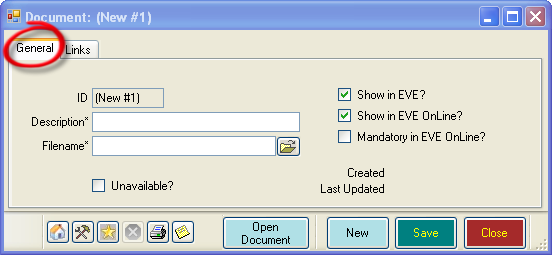
- In the General Tab:
- Enter a Description and Filename for the document.
- Tick whether the document should be shown in EVE and/or EVE Online. You can also make it mandatory in EVE Online.
- The Links tab shows the static data that you have linked this document to. For example, if you have linked a release document to the Open Water course type, it will show here.
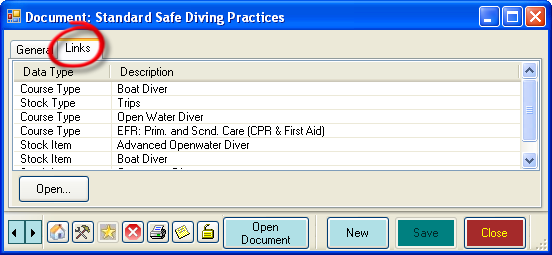
- To review the links, highlight a document and click the Open button.
Employees
This section will take you to a new Customer Record, where you can enter the employee details. See the Customers Module of this User Guide for more information.
Enquiry Status
When you follow up on a Customer Enquiry, there may be a number of responses, such as ‘no longer interested’ or ‘purchased’.
- In the Data screen, click on ‘Enquiry Status’, ‘New’.
- The ‘Enquiry Status’ dialog box will open.
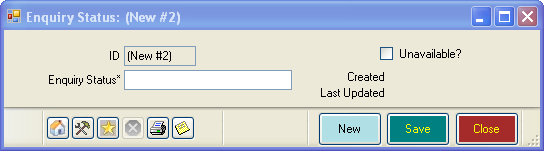
- Enter the description of the Enquiry Status.
Enquiry Source
Enter any new enquiry sources, such as an advertisement you have run. You can then record this in a Customers record, when you ask a customer how they heard about your store.
- In the Data screen, click on ‘Enquiry Source’, ‘New’.
- The ‘Enquiry Source’ dialog box will open.
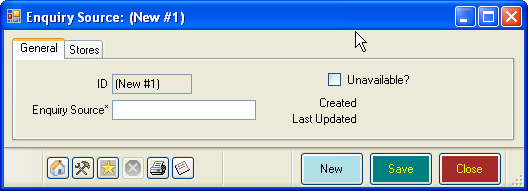
- Enter the name of the Enquiry Source, such as ‘Advert in Local Paper’
- Click the Stores tab to enter the stores to which this enquiry source applies.
Enrollment Status
- In the Data screen, click on ‘Enrolment Status’, ‘New’.
- The ‘Enrolment Status’ dialog box will open.
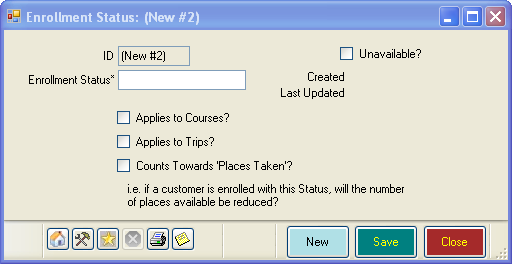
- Enter the name of the Enrolment Status and whether it applies to course and/or trips. You can also determine whether a customer in this status counts towards ‘Places taken’.
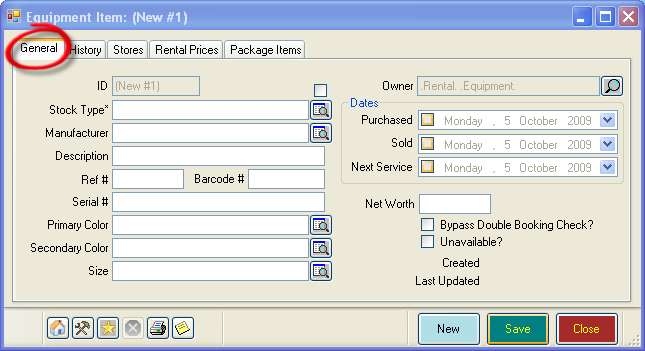
Equipment Items
If you want to add items to your rental equipment stock, do so here.
- In the Data screen, click on ‘Equipment Items, ‘New’.
- The ‘Equipment Item’ box will open.
- In the General Tab, enter the following information:
- Stock Type (Required) – Choose the equipment type, such as BCD, Regulator etc. If a stock type does not appear in this list, you will need to mark it as ‘For Rental’ in Stock Type in the Inventory Module.
- Manufacturer
- Description
- Ref # – If the item has a unique Reference Number you can enter it here.
- Barcode #
- Serial #
- Primary Color
- Secondary Color
- Size
- Owner – The Owner will be identified as Rental Equipment for each piece of gear. Having this unique owner will allow you to book the equipment in the Services Module for repair and maintenance.
- Dates
- Purchased
- Sold
- Next Service
- Net Worth
- Bypass Double-Checking Check? – For a rental booking, you may want EVE to check specific availability of wetsuits, for example, by size on the dates the customer is making the booking. In which case, you would leave this checkbox unchecked. However for items such as weight belts, you may want to bypass the double booking check as you can book any weight belt for the customer and then build a customer belt when they show up. In this case, you would check the Bypass Double Booking Check for weights.
- Click the Stores tab to enter the stores that will use this rental equipment item.
- The History Tab is not used during the set-up of new items. It will display the rental and servicing history of a rental item

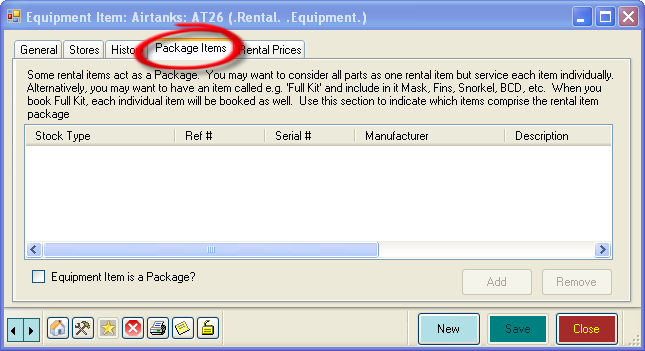
- The Package Items Tab is used to group items of rental equipment together. If certain Equipment Items are always booked together, you can group them together into a package. When the package is added to the rental booking in the Rentals Module, the package is expanded and the constituent parts are added to the rental booking as well.
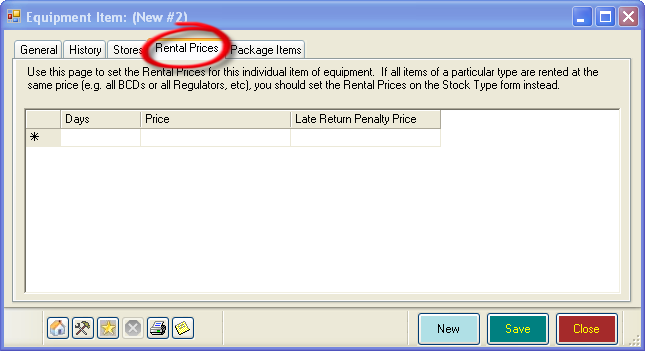
- Use the Rental Prices Tab to set your rental fees for an individual piece of rental equipment. You can also set Rental Prices in Stock Types, which is more effective if all of one type of equipment is rented at the same rate. For example, if you rent all BCDs for the same price set the Rental Prices at the Stock Type level. If you have different prices, set the Rental Prices here at the equipment level.
Follow Up Actions
- In the Data screen, click on ‘Follow Up Actions’, ‘New’.
- The ‘Follow Up Action’ box will open.
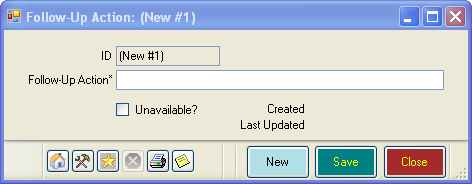
- Enter the name of the follow up action, for example send info, call etc.
Hotels
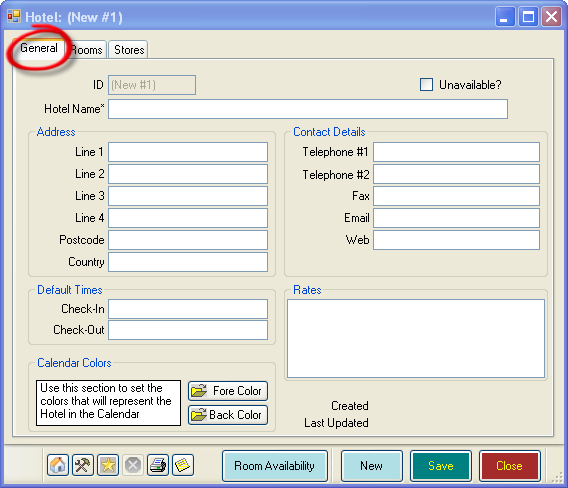
- In the Data screen, click on ‘Hotels’, ‘New’.
- The ‘Hotels’ box will open.
- In the General Tab enter:
- Hotel Name (Required)
- Address
- Default Times for check-in and check-out.
- Calendar Colors
- Contact Details
- Rates
- In the Rooms Tab you can enter
- Pre-defined Rooms – if you want to use EVE’s Room Booking feature, you will need to put a check mark in this box.
- Room #
- Room Type
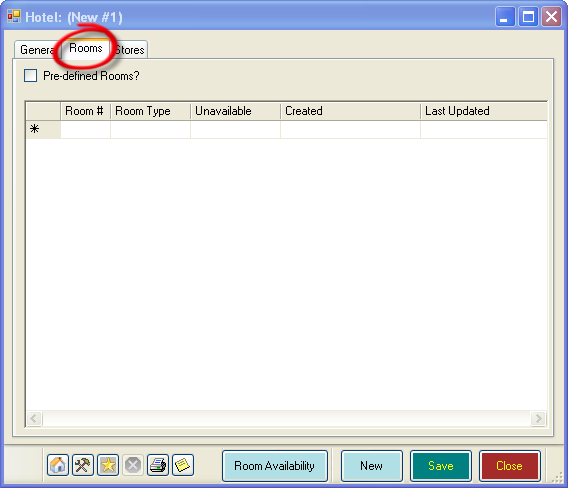
- Click the Stores tab to enter the stores that use this hotel.
Invoice Types
Invoice types are used in the Sales Module and EVE comes preconfigured with several invoice types. Currently you cannot create new Invoice Types, only edit existing ones.
- In the Data screen, click on ‘Invoice Types’, ‘Find’.
- The ‘Invoice Type Search’ box will open.
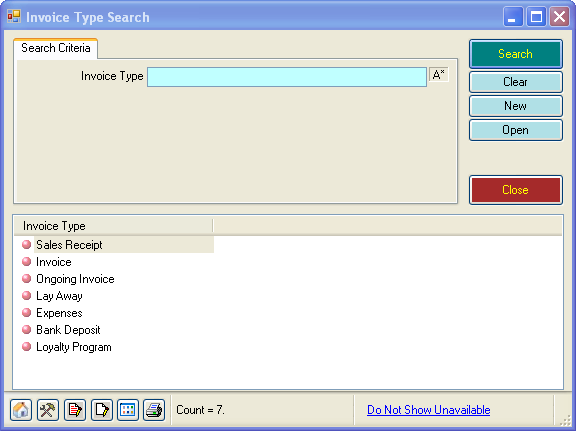
- EVE comes pre-configured with six standard Invoice Types:
- Sales Receipts
- Invoices
- Ongoing Invoices
- Layaways
- Expenses
- Bank Deposits
- Loyalty Program
- Double-click on an ‘Invoice Type’ to open it.
- The ‘Invoice Type’ box will open
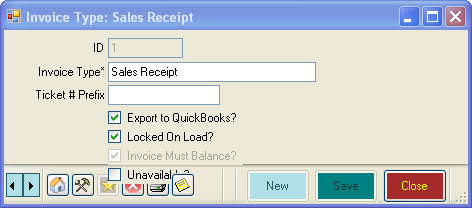
- Enter the following information, as required:
- Invoice Type (Required)
- Ticket # Prefix – Not currently used.
- Export to QuickBooks?
- Locked on Load? – Some types of invoice should be locked (i.e. not editable) when they are opened to avoid accidental altering of data.
- Invoice Must Balance – This value is for information only and indicates whether invoices of this type must balance before they can be saved – i.e. the amount tendered must balance the value of goods in the shopping basket.
Languages
- In the Data screen, click on ‘Languages’, ‘New’.
- The ‘Language’ box will open.
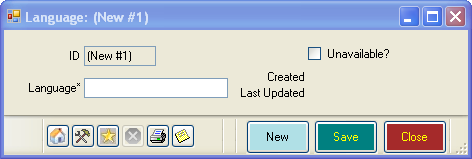
- Enter the name of the new Language.
Locations
- In the Data screen, click on ‘Locations’, ‘New’.
- The ‘Locations’ box will open.
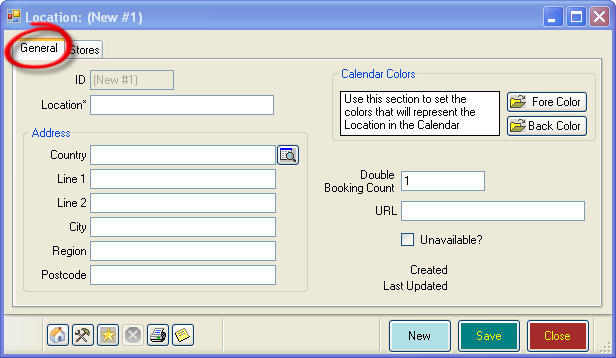
- In the General Tab, you can enter:
- Location (Required)
- Address
- Calendar Colors
- Double Booking Count – This is not currently used. Currently it should be set at 1.
- URL – web site address.
- Click the Stores tab to enter the stores that use this location.
Mailing Lists
- In the Data screen, click on ‘Mailing Lists’, ‘New’.
- The ‘Mailing Lists’ box will open.
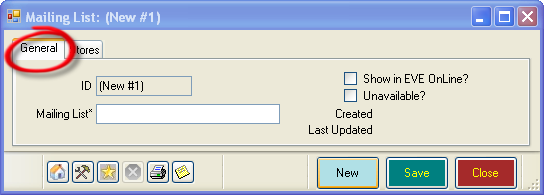
- In the General tab, enter the name of the mailing list.
- Click the Stores tab to enter the stores that use this mailing list.
PADI Territories
- In the Data screen, click on ‘PADI Territories’, ‘Find’.
- The ‘PADI Territories Search’ box will open.
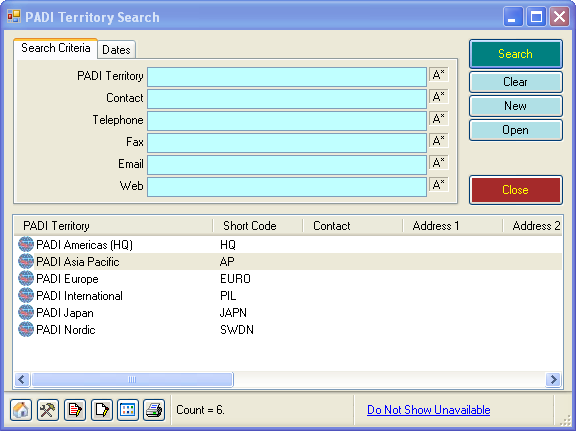
- Double-click on the office you wish to edit. The PADI Territory box will open.

- Add or edit the following information:
- PADI Territory (Required)
- Short Code
- Contact
- Address
- Contact Details
- URL
Payment Methods
- In the Data screen, click on ‘Payment Methods’, ‘New’.
- The ‘Payment Methods’ box will open.
- In the General Tab, you can enter:
- Payment Method (Required)
- Credit/Debit Card – Tick this box if the payment method is a credit or debit card. If this box is ticked, the options below will become available.
- Show Card Details Prompt? – When checked the credit / debit card prompt will be shown when this payment method.
- Card Number Mandatory? – When checked a credit card number must be entered into EVE when this payment method is used.
- Expiry Date Mandatory? – When checked an expiry date must be entered into EVE when this payment method is chosen on an invoice.
- Authorisation Number Mandatory – When checked an authorization number must be entered into EVE when this payment method is used.
- Allow Credit Card Transmission – If you are using automatic credit card processing with EVE, you need to put a check mark in this box.
- Prefixes – Enter the character prefixes that are applicable to this card type.
- Characters – Some types of credit cards have a pre-defined number of characters that are allowed in the account number. You will not normally need to change this value.
- Invoice Text – Enter text you wish to print on an invoice for this payment method.
- Account – If you export data to QuickBooks, you need to choose an account from the list previously defined in QuickBooks accounts.
- Graphic – Select the filename for a graphic to display in the Invoice Cool Bar.
- Additional Print Copies – If additional invoice copies need to be printed indicate the number of copies here.
- Customer Required?
- Customer ID Required?
- Check # Prompt – When checked the Check # Prompt will be shown.
- Check # Mandatory?
- Gift Certificate Prompt? – When checked the Gift Certificate Prompt will be shown.
- Gift Card Prompt? – When checked the Gift Card Prompt will be.
- Voucher Prompt? – When checked the Voucher Prompt will be shown.
- Account Prompt? – When checked the Account Prompt will be shown.
- Open Cash Drawer?
- Card Required on File? – Check this checkbox if a credit card number must be kept on the customer file to accept this payment method.
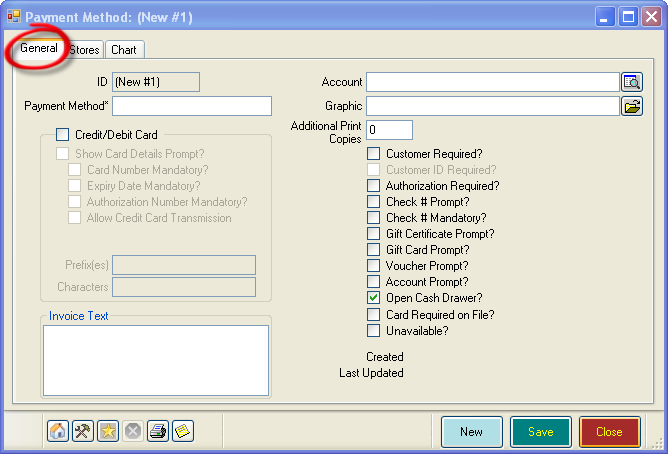
- Click the Stores tab to enter the stores that will use this payment method.
- The Chart Tab is used to display quick information on the payment method use.

- You can choose the following options:
- Bar Chart or Pie Chart
- Type – use the drop down list options to view Amount By Year, etc.
- Dates – set the Between/And dates
- Sales History – a quick summary of the sales made using this payment method.
PC Options
This section lists all computers that are used to run EVE. You will not usually need to add new PC records since EVE will automatically create them for you when new PCs are used for the first time. However, you may want to change the options for an existing PC.
- In the Data screen, click on ‘PC’, ‘Find’.
- The ‘PC Search’ box will open. Search for the PC you want to edit/view.

- Double-click on the PC you want to view/edit.
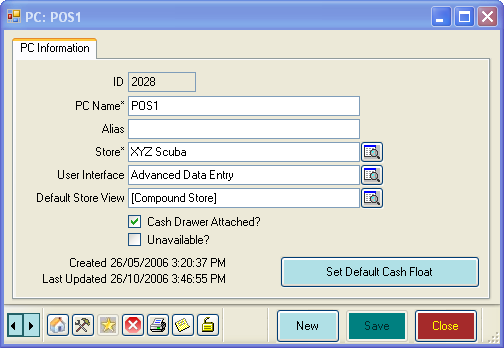
- EVE shows the following information about the PC:
- PC Name (required)
- Alias
- Store (required)
- User Interface – the default User Interface for this PC.
- Default Store View
- Cash Drawer Attached?
- Set Default Cash Float
QuickBooks Accounts
- In the Data screen, click on ‘QuickBooks Accounts’, ‘New’.
- The ‘QuickBooks Accounts’ box will open.
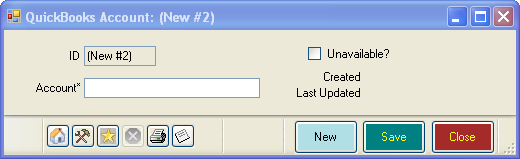
- Enter the name of the QuickBooks Account
NOTE: It is recommended that you use the QuickBooks Setup Wizard to import your QuickBooks Account Names into EVE.
Report Types
You cannot add new Report Types but you can change the attributes of existing ones.
- In the Data screen, click on ‘Report Types’, ‘Find’.
- The ‘Report Types Search’ box will open.
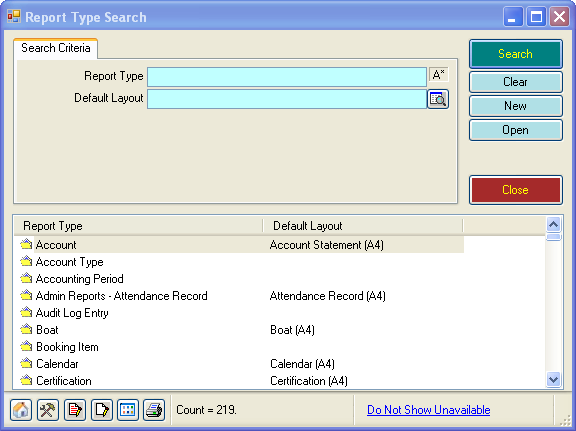
- Search for the Report Type you wish to edit and double-click it to open it.
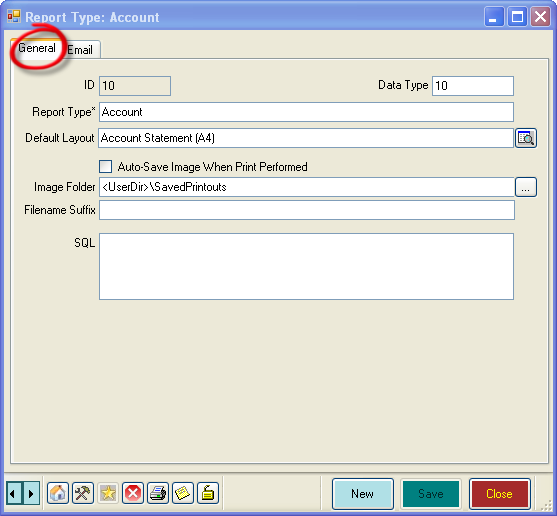
- The Report Type opens in the General Tab. Here you can edit the following:
- Report Type (Required)
- Default Layout –
- Auto-Save Image When Print Performed – Put a checkmark in this box if you want EVE to save a JPEG image of a report when it is saved.
- Image Folder – This specifies the folder where the Images are saved.
- Filename Suffix – When saving image files, you can instruct EVE to add a suffix to the filename.
- SQL – This is not currently used.
- Click on the Emails Tab. Some Reports can be emailed as well as printed. For these report types an Email tab appears on the Print dialog box.
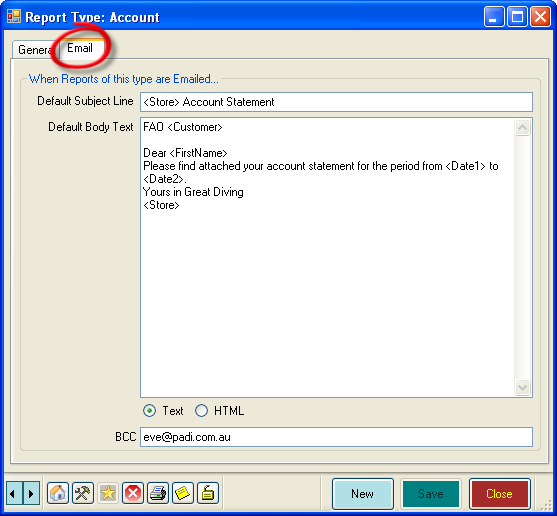
-
- Default Subject Line
- Default Body Text
- Text/HTML – Choose your preferred format for sending these messages.
- BCC – specify which email address will be sent a blind copy of each email.
Special Interests
If you run events unrelated to diving, you may want to record customers’ outside interests in the Customers Module.
- In the Data screen, click on ‘Special Interests’, ‘New’.
- The ‘Special Interest’ box will open.
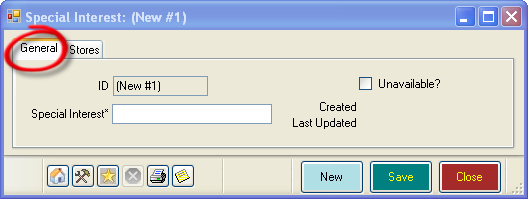
- In the General Tab, enter the name of the Special Interest.
- Click the Stores tab to enter the stores that use this special interest.
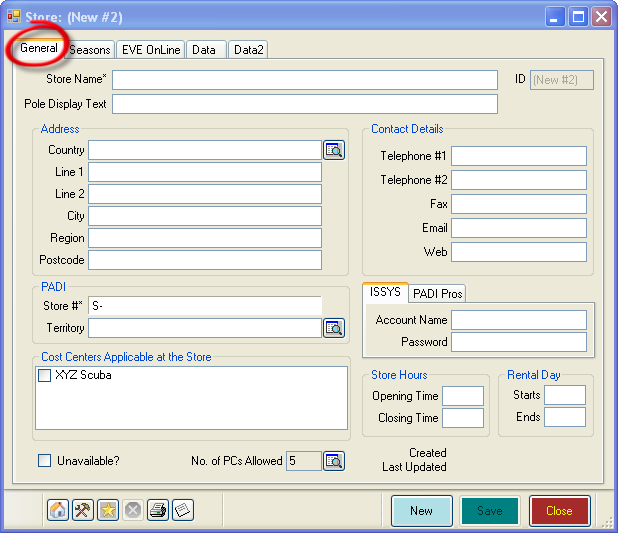
Stores
- In the Data screen, click on ‘Stores’, ‘New’.
- You will be advised to purchase an additional EVE licence for each new store.

- Click OK if you wish to proceed.
- The ‘Store’ box will open in the General Tab. Here you can enter:
- Store Name (Required)
- Pole Display Text – Type the message that you wish to display on the Customer Pole Display if you have one.
- Address
- PADI Store #/Territory
- Cost Centres Applicable at the Store – Use this if you run each sore as a separate company or ‘cost centre’.
- Contact Details
- ISSYS Account Name/Password – These are assigned when you first purchase EVE.
- PADI Pros Account Name/Password – Save your PADI Pros site User Name and Password for use with PIC Online. The password is encrypted on the EVE database.
- Store Hours
- Rental Day – The time rental equipment is usually booked from and to each day.
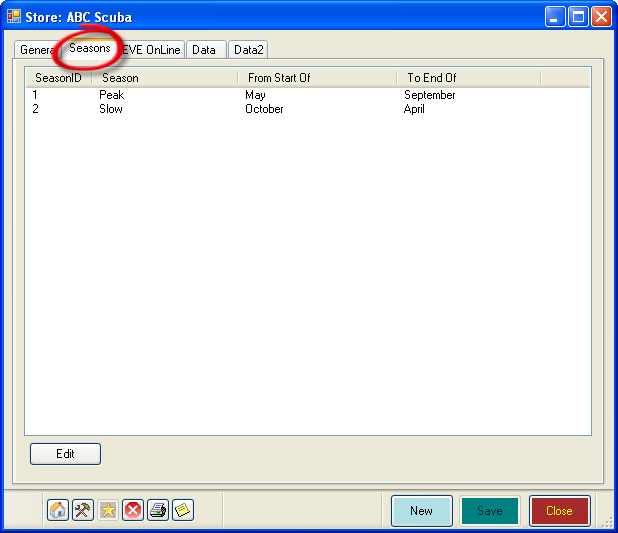
- Use the Seasons Tab to indicate when your Peak and Slow seasons start and end. This is used to determine ideal and minimum stock levels for each stock item.
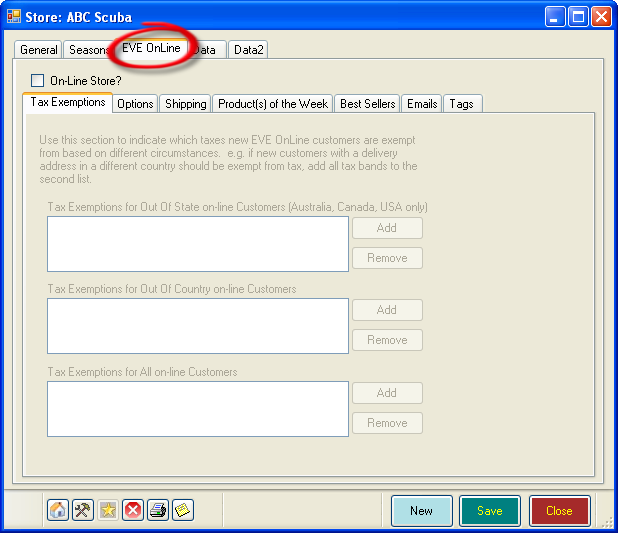
- The EVE Online Tab is used for you EVE Online Store. You will receive details on how to set this up when you purchase EVE Online.
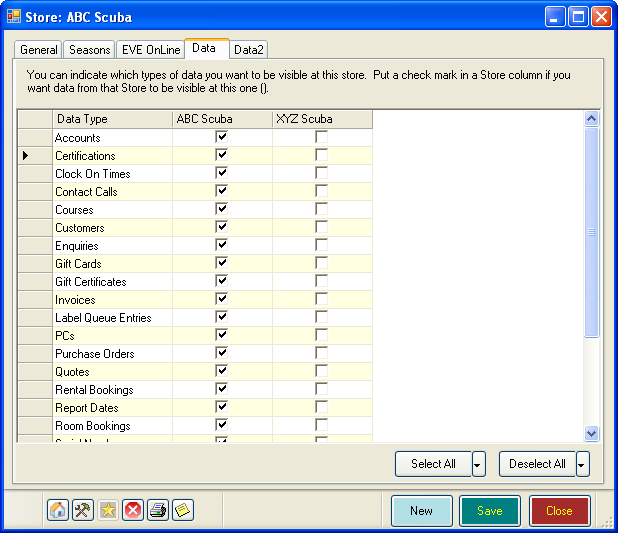
- The Data tab is used only if you have multiple stores. You can use it to indicate which types of data are visible at which store.
- The Data2 Tab is only applicable if you have multiple stores. You can use the Data2 section to indicate which records apply to which store.
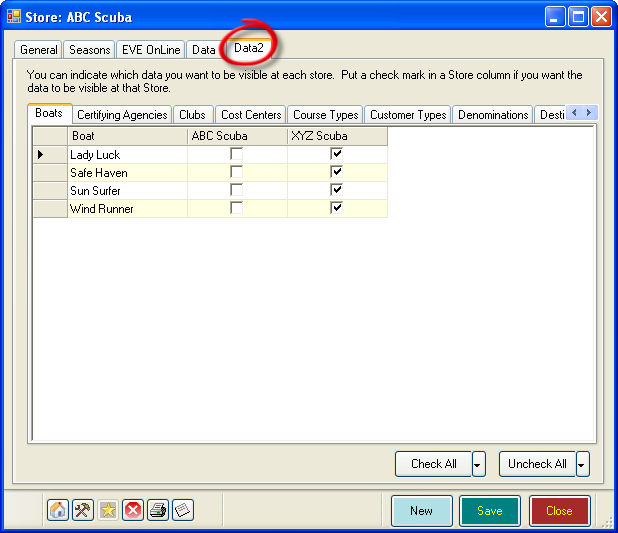
- The Data2 Tab contains the following Tabs:
- Boats
- Certifying Agencies
- Clubs
- Cost Centres
- Course Types
- Customer Types
- Denominations
- Destinations
- Employees
- Equipment Items
- Hotels
- Inventory Locations
- Locations
- Mailing Lists
- Club Membership Types
- Payment Methods
- Enquiry Sources
- Special Interests
- Stock Items
- Stock Types
- Suppliers
- Tax Bands
Task Types
- In the Data screen, click on ‘Task Types, ‘New’.
- The ‘Task Type’ box will open.
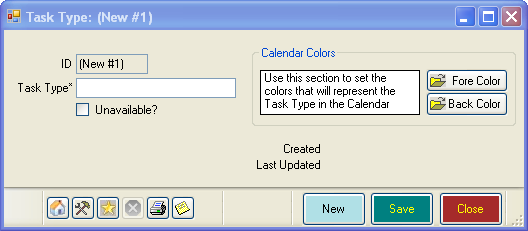
- Enter a Task Type Name. You can also specify Calendar Colors.
UI Configs
EVE has a customizable User Interface that you can configure to meet the needs of your business operation. In this section you can customise UI’s by User or PC.
- In the Data screen, click on ‘UI Configs’, ‘New’.
- The ‘User Interface Config’ box will open in the General Tab. Use the Checkboxes to customise the UI.
- Configuration Name
- Toolbars – Check the checkbox for the navigation tools you want displayed in the top-left hand corner of the main screen of EVE, when this User Interface is in effect.
- Button bar
- Module Buttons
- Coolbar
- Status Bar
- Detail Window
- Button Array
- Hierarchy
- Floater
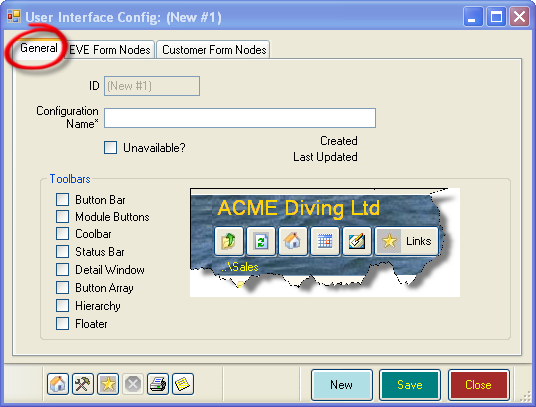
- Click on the EVE Form Nodes Tab. You can use this to select which Modules this UI shows.
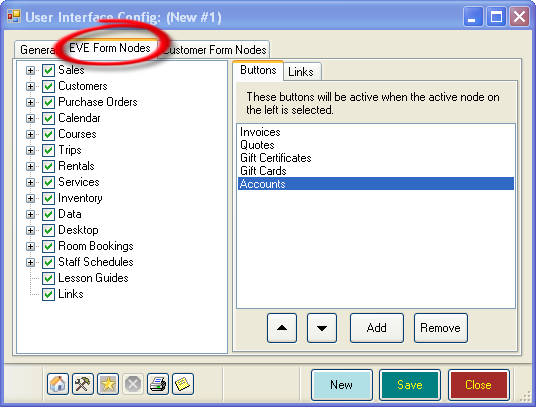
-
- Select the modules that will be displayed
- Buttons
- Links
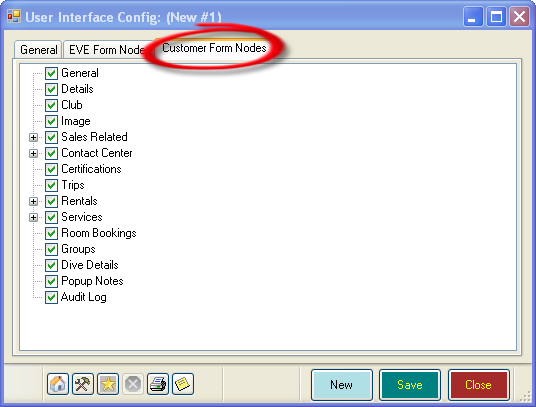
- Click on Customer Form Nodes to specify which sections of the Customer Form should be displayed for this UI.
Vans
You can use Vans to organize pick-ups for customers at resorts.
- In the Data screen, click on ‘Vans’, ‘New’.
- The ‘Vans’ box will open in the General Tab.
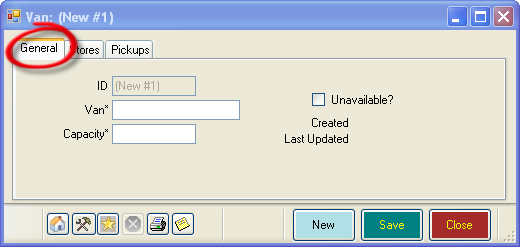
- Enter the Van name and Capacity.
- Click the Stores tab to enter the stores that use this van.
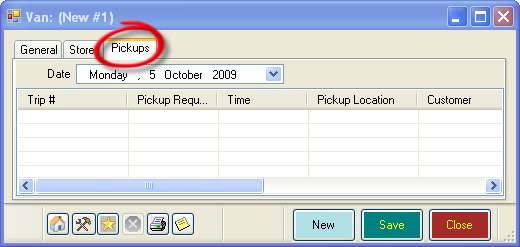
- The Pickups Tab will display the pick-ups required for a specific day.