FAQ Categories Archives: Setup, Settings and Options

What EVE version am I running?

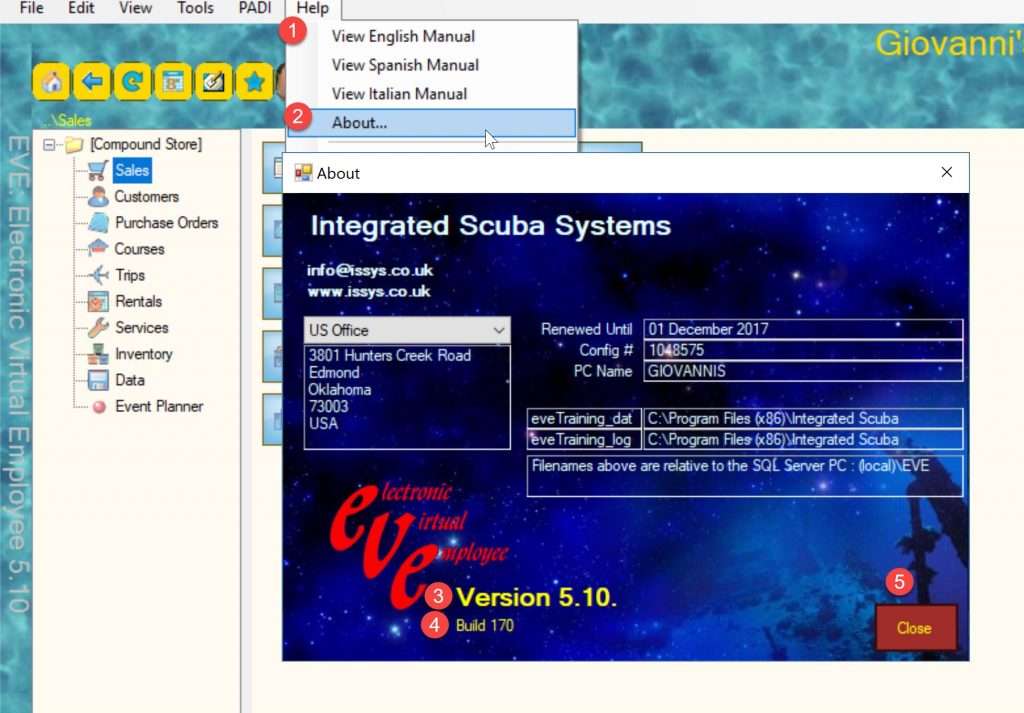
To check what EVE version is currently running in your setup, please follow this simple procedure:

  1. Open EVE and click Help
  2. Click About
  3. Verify EVE version number
  4. Verify EVE build number
  5. Click Close to close the window and return to normal operation

To find out what the latest version of EVE is, please login to our website or contact us


Continue Reading

How do I adjust font sizes in EVE

There is a certain amount on customisability of these font sizes.
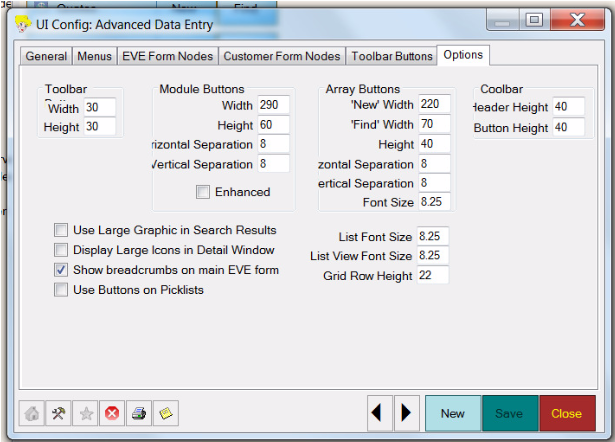
Go to the UI button at the top right of the screen in EVE and open the user interface you use.
Then, on the resulting User Interface form, go to the Options tab and you’ll see as below where you can adjust sizes
FAQSSO4.1
Might be wise to take a screenshot of the settings as they are now before you start doing too many alterations so you can always revert to these.
Continue Reading

Do you have a list of videos about Options in EVE

1. How to Set Up Email Options
This video shows how to set up email options:
https://youtu.be/2Sf_KyrsYwM
2. How to Use the Customer Options
This video shows how to use the customer options:
https://youtu.be/jJ0bxmsrTNI
3. How to Use the Courses Options
This video shows how to use the courses options:
http://www.youtube.com/watch?v=WQvy97w3Xd4
4. How to Set up the Sales Options
This video shows how set up the sales options:
https://youtu.be/Tm86ccLuT9s
5. How to Use the Rentals and Servicing Option
This video shows how use the rentals and servicing options:
https://youtu.be/orxSDoPCRGc
6. How to Use the Trips Options
This video shows how to use the trips options:
https://youtu.be/TXuNhyE8RWg
Continue Reading

What options do I have when using EVE in Multiple Stores

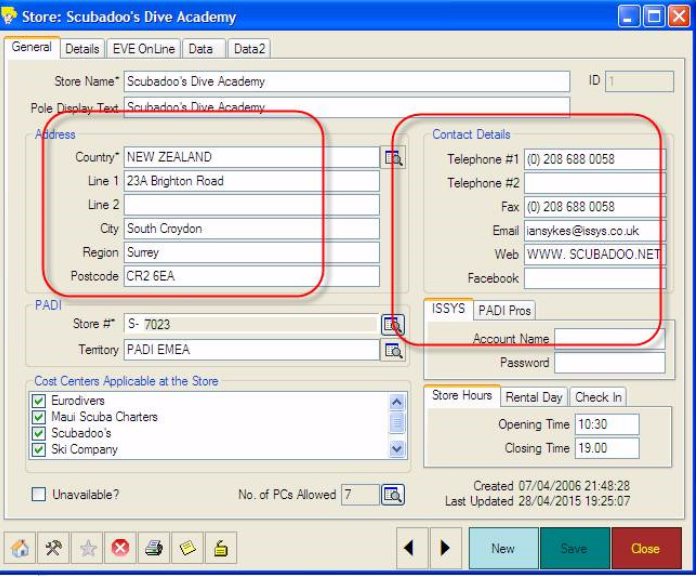
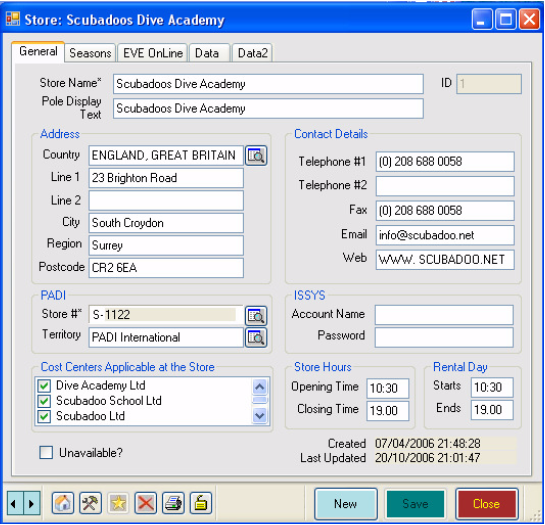
Each PC that you run EVE on is associated with a Store. When you install EVE, one Store record and one PC record is automatically created on the EVE database and the PC is linked to the Store. You will have entered information about the Store on the Welcome screen when EVE was first run. EVE gathers information about the PC – i.e. the name of the PC – at the same time and creates the PC record for you. When you use subsequent PCs to run EVE on a network, if you have one, EVE automatically creates a PC record for each and each is automatically linked by EVE to the same Store record. Each Store record and each PC record (in fact practically every record) in EVE has a number, automatically assigned by EVE, that uniquely identifies it and that will not change for the lifetime of the record.I.e. the initial Store record has an ID value of 1. The initial PC record also has an ID value of 1, th e second has an ID value of 2, etc. Each time EVE starts, it examines the PC it is running on to find the name of the PC. Once it has that, it knows which Store it is linked to. During day-to-day data entry, whenever a Customer or an Invoice or a PO, etc is created, the Store ID of the PC on which it was entered is written to the Customer/Invoice/ PO/etc. This doesn’t affect you if you only have one Store, but is important as multiple stores are added to the database. I.e. it means that later, you can run reports or searches to find which information was entered at which store – for instance, you can run your Closing reports at the end of day to show items sold and payments taken, etc. at each store. It also means that you can keep inventory levels separate for each store, and can assign Employees to work at particular store(s), etc. You can create multiple Store records in the Data section by clicking the Stores: New button. It usually only makes sense to do this if your EVE database is located on a central server that is accessible over the Internet from multiple locations. The form below is displayed so you can enter information about the store, including address, phone number(s), etc.
FAQSSO2.1
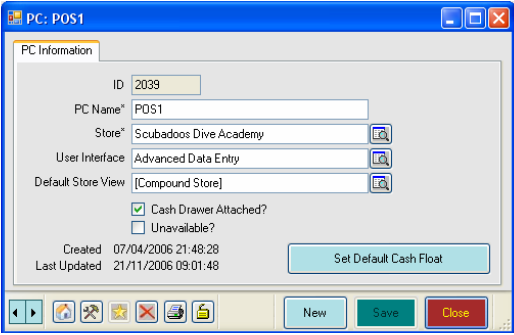
You won’t usually need to manually create PC records since, as described above, EVE will create PC records for you when a PC is used to run EVE for the first time. However, if you need to create a new PC record for any reason, you can do so in the Data section by clicking the PCs: New button. The form below is displayed:
FAQSSO2.2
You may sometimes want to edit existing PC record(s) to set specific parameters for it – e.g. to indicate there is a cash drawer attached to it, etc. Notice in the screenshot above, that there is a field to indicate which Store the PC is in. If you move a PC from one store to another, you can change the Store here.
Multiple Stores
EVE has an extremely flexible means of handling multiple stores. It can be configured to run in one of 3 ‘Views’:
1.Compound Store
2.This Store Only
3.Default Store
You can change which View is active by clicking on the Store View link at the bottom right of the main EVE screen. You will probably want to decide which View best suits your enterprise and stick with that View during day-to-day operation. Which View is active has no effect on the way that data is saved in EVE – i.e. the Store ID is written to new Customers, Invoices, POs, etc. regardless of which View is active. However, the View does have an effect on which data can be viewed later. You can set the Store View that each PC will use by default on the PC form – see above
Compound Store
When the Compound Store View is active, all data can be viewed at all stores regardless of which store it was entered at. E.g. if you enter a customer or an invoice, etc at Store 1 it can be viewed at Store 2 and Store 3.
This Store Only
When the This Store Only View is active, data can only be viewed if it was
entered at the store you are in – or more specifically, if it was entered at the same store that the PC you are using is in. An invoice entered at Store 1 is only visible later at Store 1.
Default Store
The Default Store View lets you define specifically which data is viewable at which store. There are 2 categories of data in EVE that are important when discussing Default Store.
1.Courses, Customers, Gift Cards, Gift Certificates, Invoices, Label Queue Entries, PCs, Purchase Orders, Quotes, Rental Bookings, Serial Numbers, Service Bookings, Special Orders, Tasks, Trips, Vouchers
2.Boats, Certifying Agencies, Clubs, Cost Centers, Course Types, Customer Types, Denominations, Destinations, Employees, Equipment Items, Hotels, Inventory Locations, Locations, Mailing Lists, Club Membership Types, Payment Methods, Profit Centers, Enquiry Sources, Special Interests, Stock Items, Stock Types, Suppliers and Tax Bands.
Category 2 Data
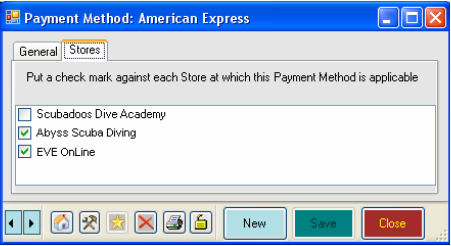
You have fine control over records that are in Category 2. For instance with Stock Types, you could indicate that Surf Boards and Kayaks are sold at Stores 1 and 2 but not at Store 3, while Regulators and Wet Suits are sold at all Stores, etc. Similarly, with Payment Methods, you could indicate that Cash is accepted at all Stores but Amex is only accepted at Stores 2 and 3, etc. When you open a Category 2, record you will see there is a Tab on the form called ‘Stores’ that contains a list of all Stores on the database. You can put a check mark next to each St ore at which the record is applicable.
FAQSSO2.3
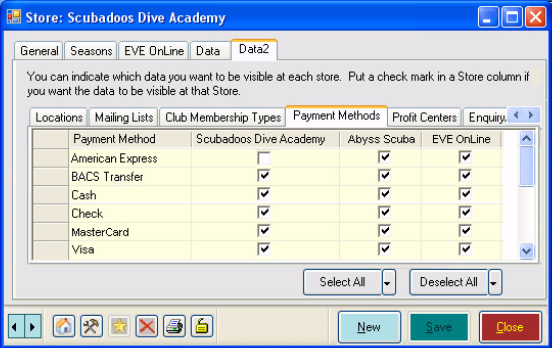
If you prefer, you can approach this from the other angle and look at the Data2 Tab on the Store form – see below.
FAQSSO2.4
Category 1 Data
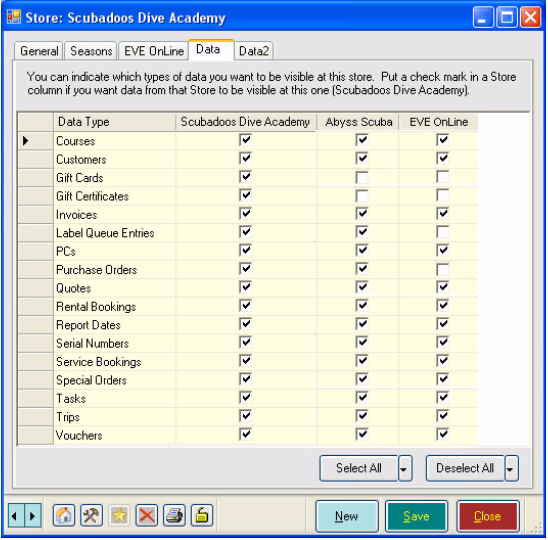
Data in Category 1 works slightly differently since it is not feasible, for instance, to define that Invoice #3423 is visible at store 1 but not store 2, etc while Invoice #3424 is visible at stores 2 and 3, etc. It would take too much time and effort. Instead, you can indicate, for instance, that all Invoices created at Store 1 can be viewed at Store 1 and Store 2 but not at Store 3. Or that all Courses entered at Store 1 can only be viewed at Store 1 but all Courses entered at Store 2 can be viewed at Stores 2 and 3, etc. Use the Data tab on the Store form to define your settings. In the diagram below, the Scubadoos Dive Academy St ore record has been opened. Courses created at Scubadoos can be viewed at all Stores, whilst Gift Cards and Gift Certificates created at Scubadoos can only be used at Scubadoos.
FAQSSO2.5
Continue Reading