Invoices
Learning Outcome
On successful completion of this lesson, students will understand how to:
- Create a new product sale
- Taking payment for a sale
- Creating receipts for a sale
- Recording serial numbers of products
- Creating a new course sale
- Printing documents during a course sale
- Creating a new trip sale
- Find an existing invoice
- Refund an existing invoice
Lesson
Creating a New Product Sale
For courses and trip sales see additional information in the next section
- To create a new sale, click on ‘New’ next to Invoices
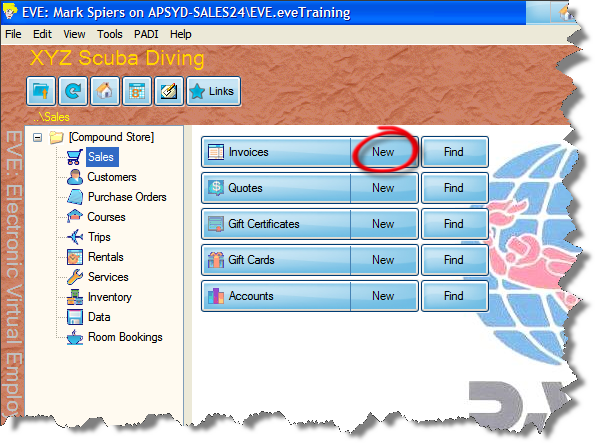
- The screen will change to ‘New Invoice’ – note that the cursor automatically sits in the ‘Customers’ box.
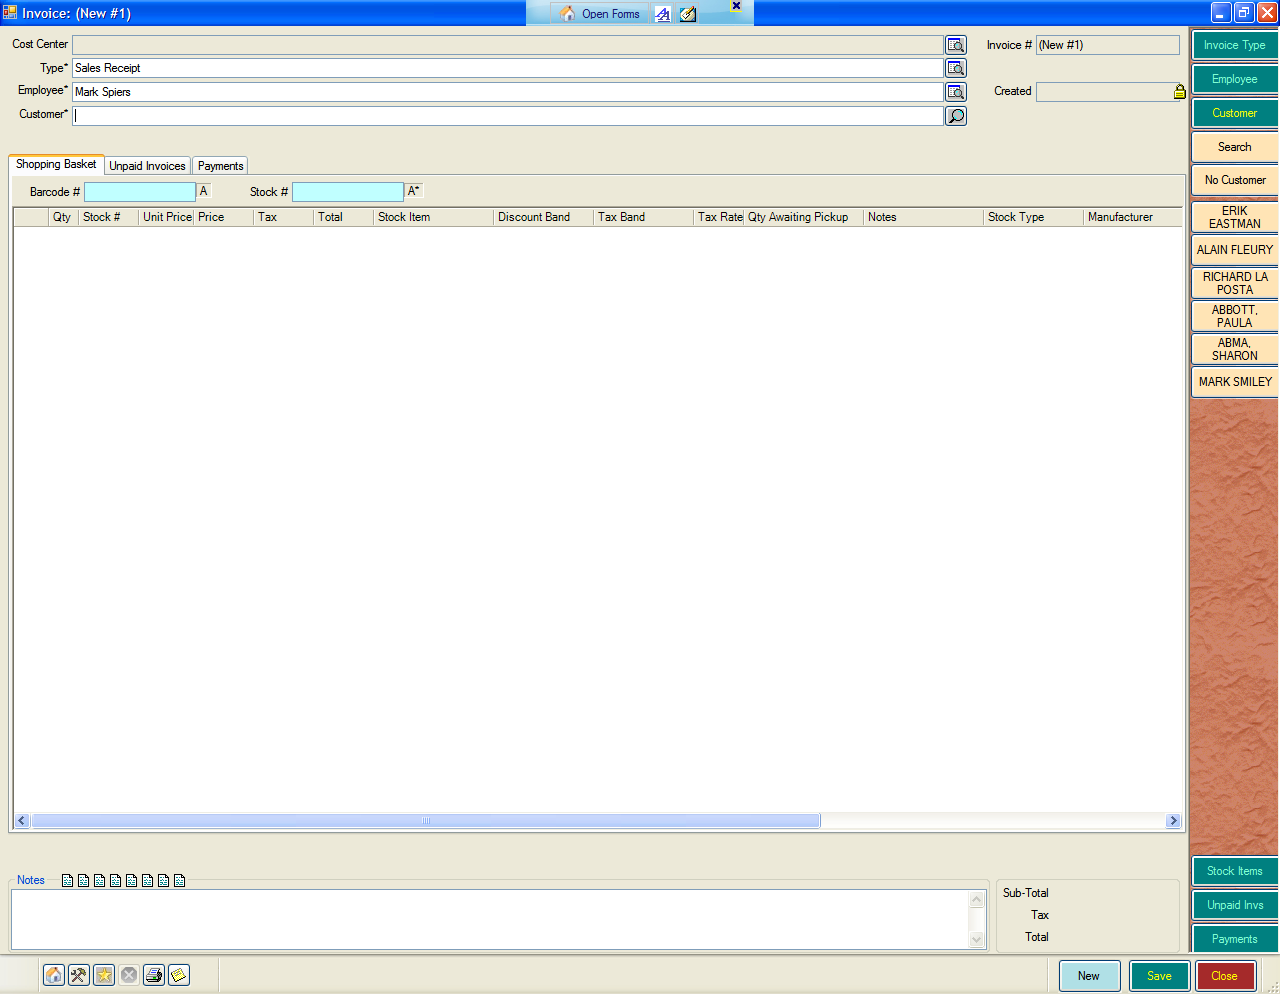
- Select a Customer – you have four options:
- No Customer
- Favourite customer
- Search for a customer
- Add a new Customer
No Customer
Use the button in the ‘Cool Bar’ on the right-hand side of the screen
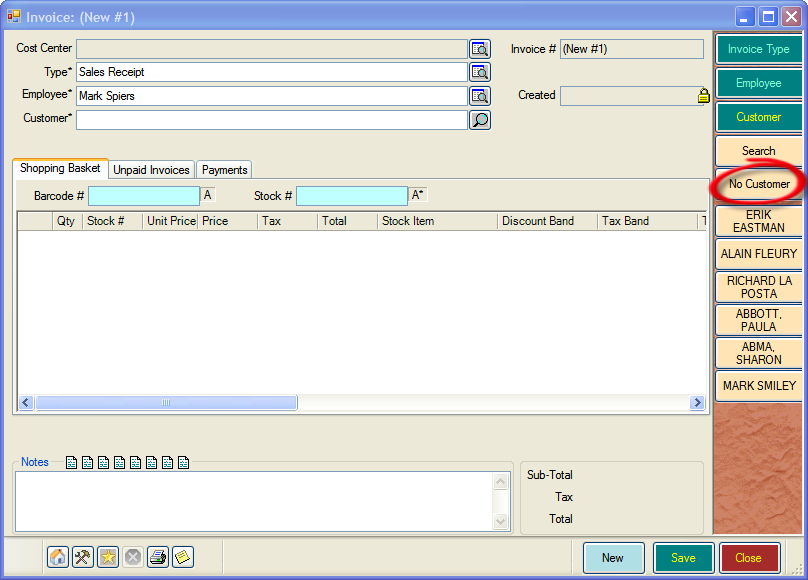
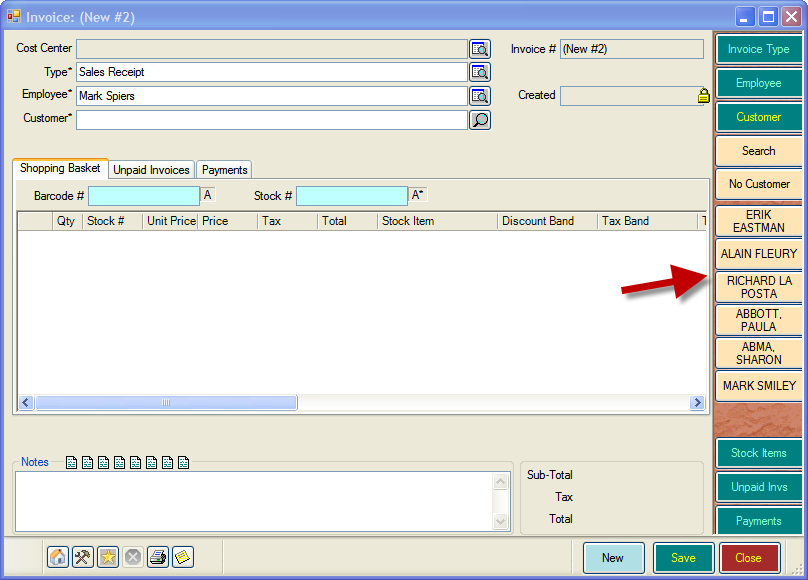
Favourite Customer
Select a customer’s name from the Favourite Customer list in the ‘Cool Bar’ on the right-hand side of the screen
Search for a Customer
- The cursor is already in the customer box, simply start to type the name and the ‘Customer Search’ box will open.
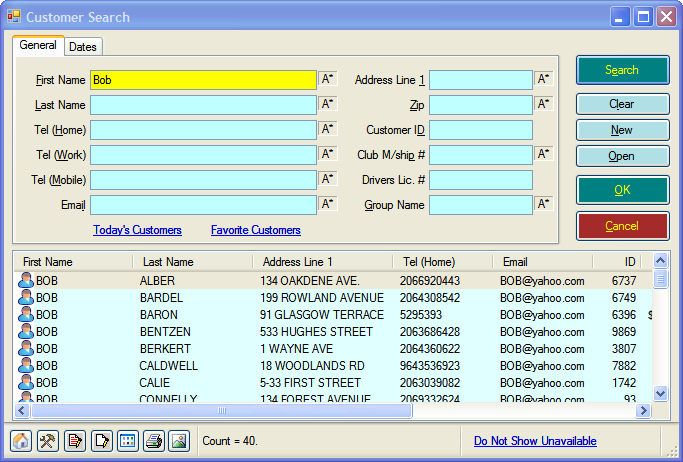
- Type in the first name, and/or last name. As you type, the results screen will be filtered down.
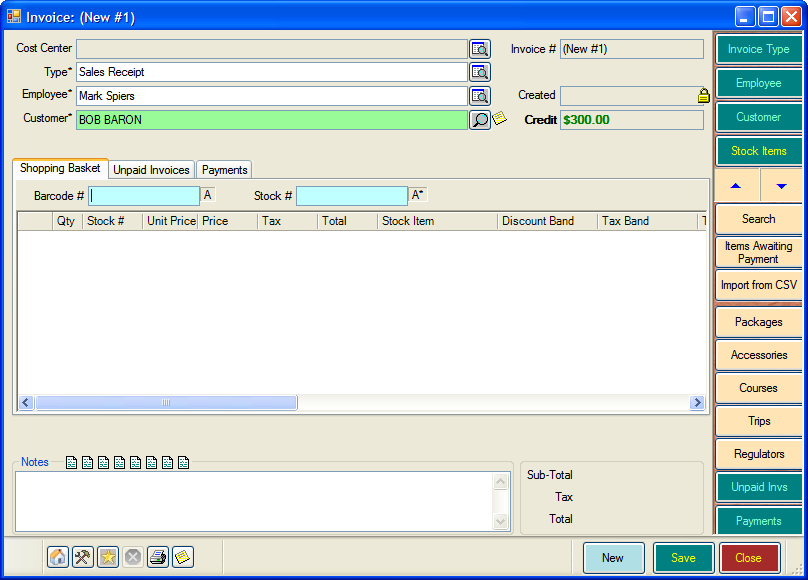
- Select the customer, by double-clicking their name in the Search Results area. You will be returned to the Invoice screen with the customer’s name displayed
Add a New Customer
- The cursor is already in the customer box, simply start to type the name and the ‘Customer Search’ box will open.
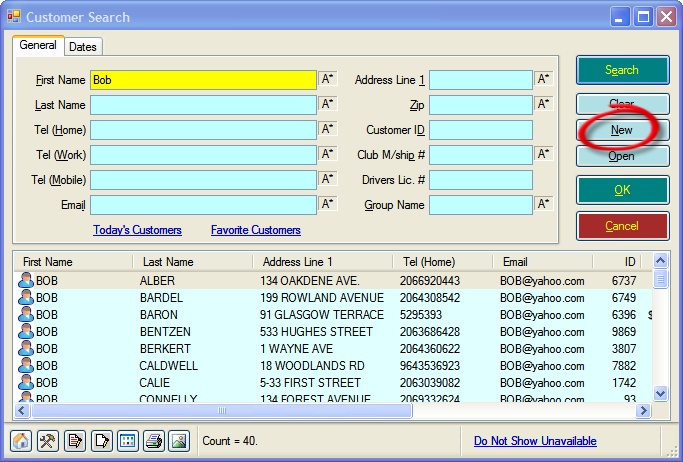
- Click the ‘New’ button and the Customer Record form will open. Any information you have just entered will already be shown.
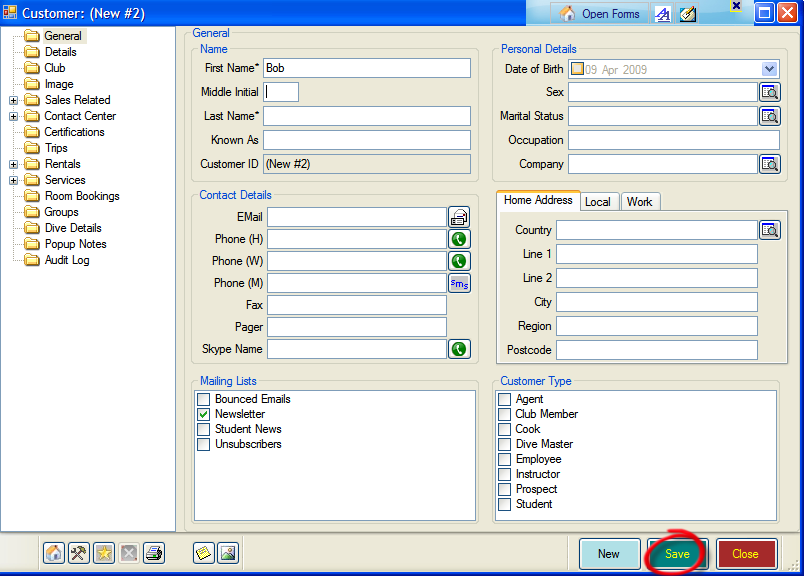
- Only the First and Last Name are required, by default. However, you can add additional information, such as email address if you wish.
- Once you’ve added the information, click ‘Save’ and then ‘Close’
- The customer you have just added will now be highlighted. Double-click the name you have just added and you will be returned to the Invoice screen with the customer’s name displayed

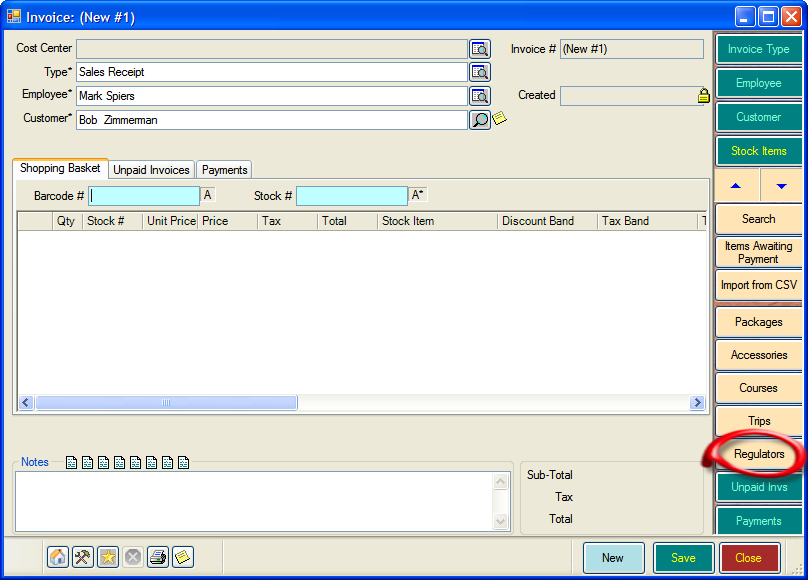
- The Cursor is now in the ‘Barcode field. If you are using a barcode scanner, you can simply scan the product and skip to step 6. If not, follow step 5 below.
- If you are not using a barcode scanner, you will need to select the product you wish to sell. You can either select the item from the cool bar, or search for the item.
- Selecting from the Cool Bar
- The Cool Bar shows your most common product categories. In this example we will use Regulators – simply click the regulator button to select it.
- Selecting from the Cool Bar
-
-
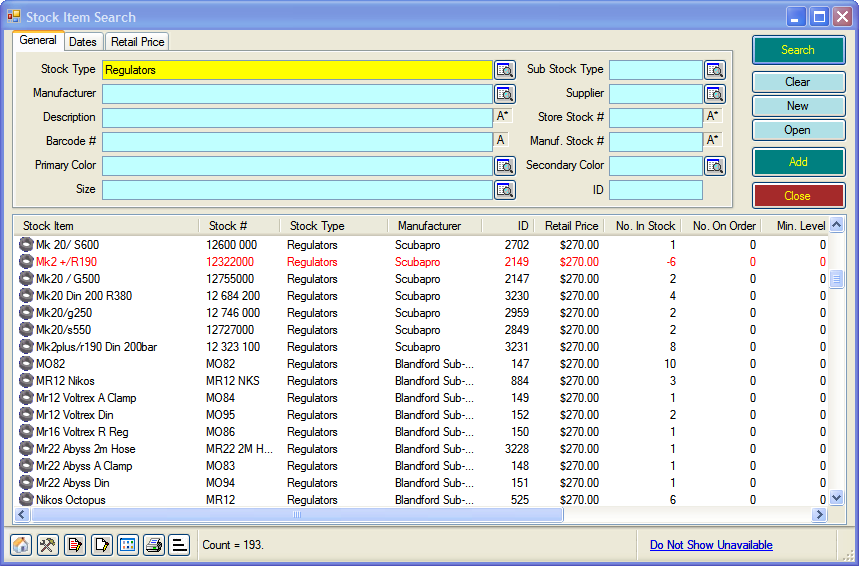
- A list of all the Regulators you sell in your store will appear. If you want to further refine your search, simply type information into any of the fields.
-
-
-
- Double-click on the product you want to sell to select it.
-
-
- Searching for a Product
- Click the ‘Search’ button
- Searching for a Product

-
-
- A list of all the products you sell in your store will appear. To further refine your search simply type information into any of the fields.
-
-
-
- Double-click on the product you want to sell to select it.
- You will be returned to the Invoice with the product added.
- Repeat steps 4 or 5 until all products for the sale have been added.
-
Taking Payment for a Sale
- Create an Invoice and add items as described previously
- Click the ‘Payment’ button
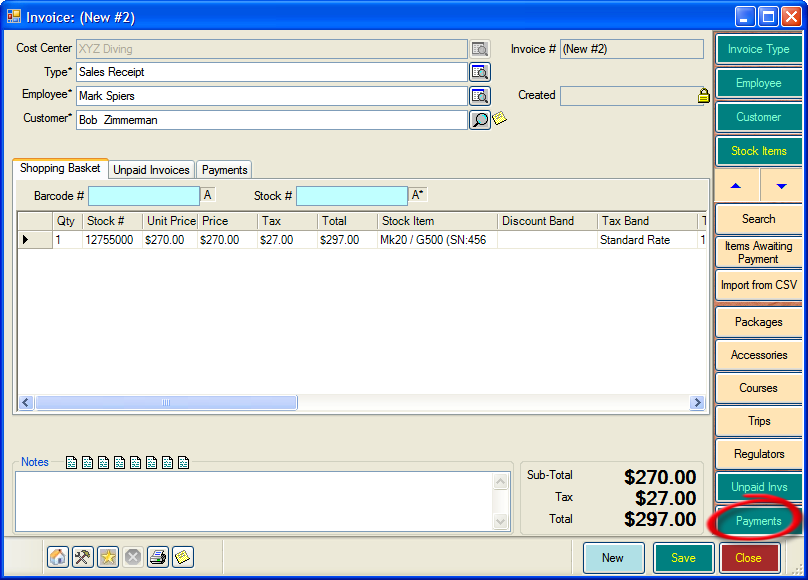
- Note that the ‘Cool Bar’ changes again and now shows all the payment methods that you have available.

- In this example, we’ll use cash. Click on the ‘Cash’ button to select it.
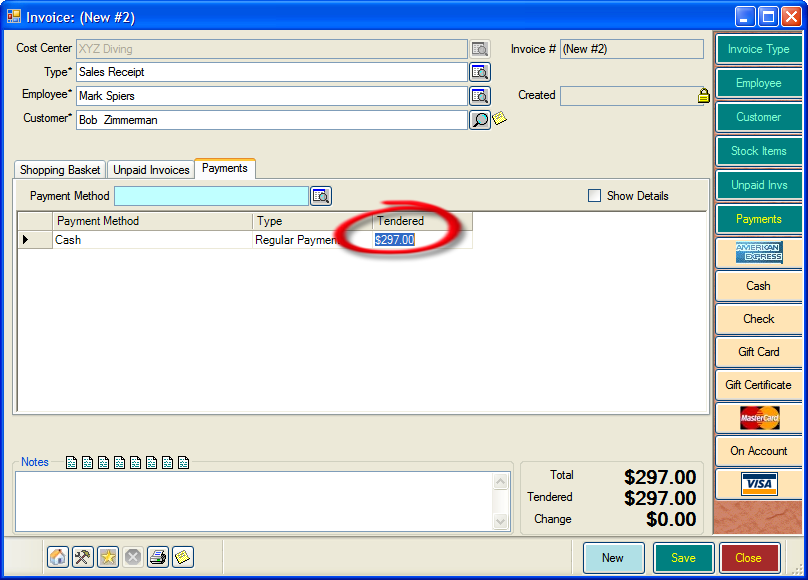
- Note that the tendered section is now highlighted. Simply enter the amount of money the customer has given you and hit the return key.
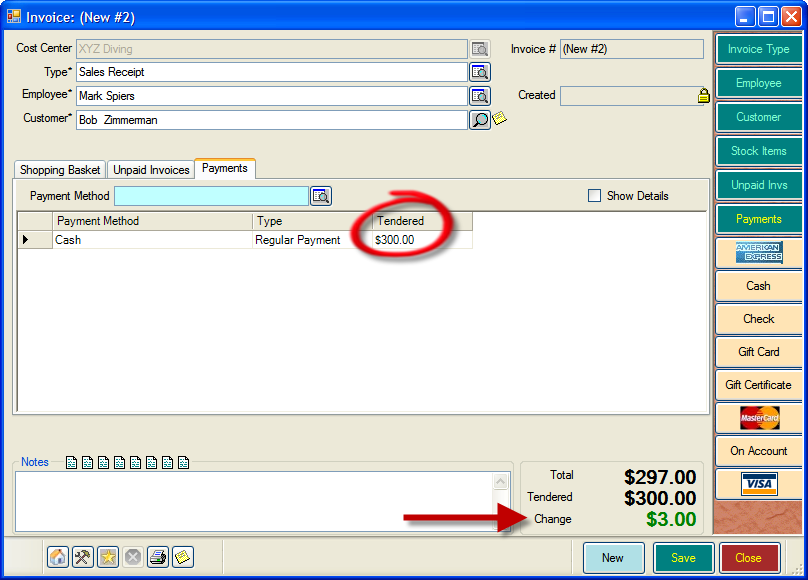
- EVE shows the amount of change to give the customer, plus the total of the invoice and the amount tendered.
- Click the ‘Save’ button.
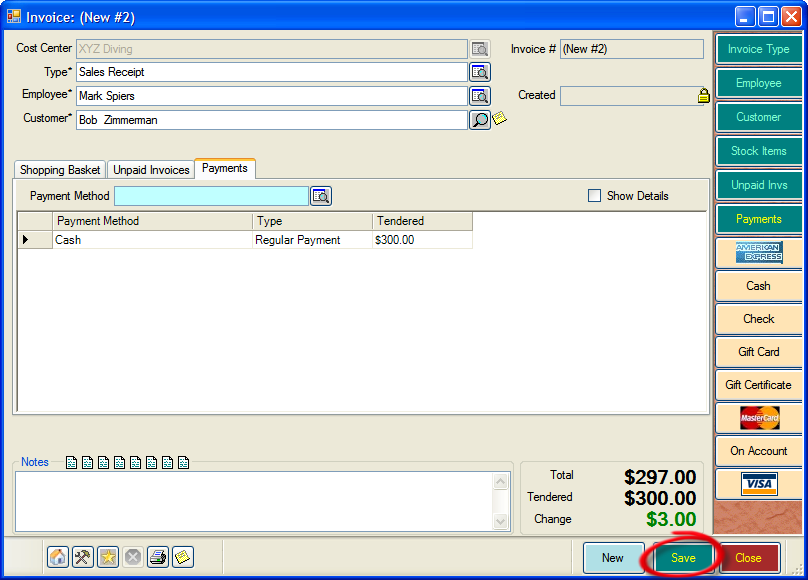
- The ‘Print Invoice’ box will open.
Creating Receipts for a Sale
- Once you have completed your sale, taken payment and clicked Save, EVE will open the ‘Print Invoice’ box.
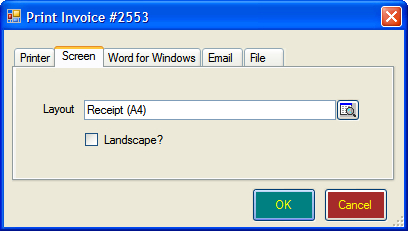
- Use the tabs at the top of the screen to decide on what type of invoice you wish to have. You can choose the following:
- Printer – select the printer you wish to use. Your default printer will already be selected.
- Screen – the Invoice will appear on the screen only.
- Word for Windows – use a template from Microsoft Word.
- Email – Use the ‘Add’ button to open the Search box to find and select the email recipient you wish to send the invoice to.
- File – select a file to save the invoice to.
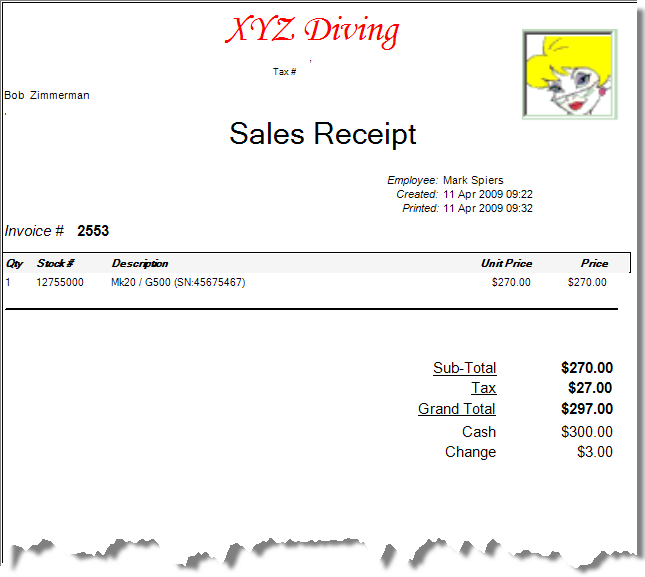
- Whatever choice you decide to make, click ‘OK’ and the following invoice will be created:
Recording Serial Numbers of Products
- If you are selling a product, such as a regulator, and you have elected to track serial numbers (see Inventory section), the select serial number box will open, when you add the item to an invoice.
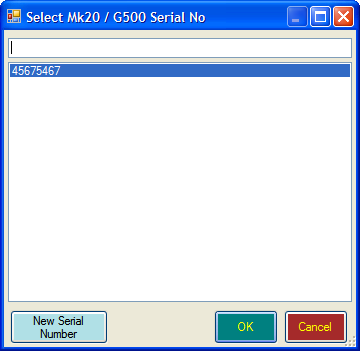
- Simply double-click the serial number you require or click the ‘New Serial Number’ button to add the serial number now.
- You will be returned to the Invoice with the product added.
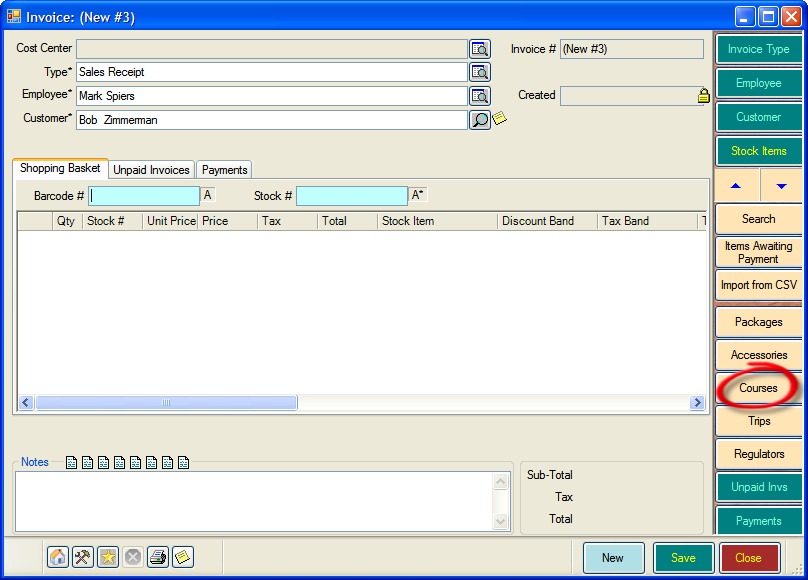
Creating a New Course Sale
- Follow steps 1 through 3 for ‘Creating a New Product Sale’.
- The Cursor is now in the ‘Barcode field. If you are using a barcode scanner, you can create a sheet of barcodes for your courses and simply scan the course and skip ahead to step 4. If not, follow step 3 below.
- If you are not using a barcode scanner, you will need to select the Course you wish to sell. By default, Courses appears in the Cool Bar. If it is not present, use the Search button, as described above, to search for a course.
- Click on ‘Courses’ in the Cool Bar
- A box will open showing all the courses available at your store.
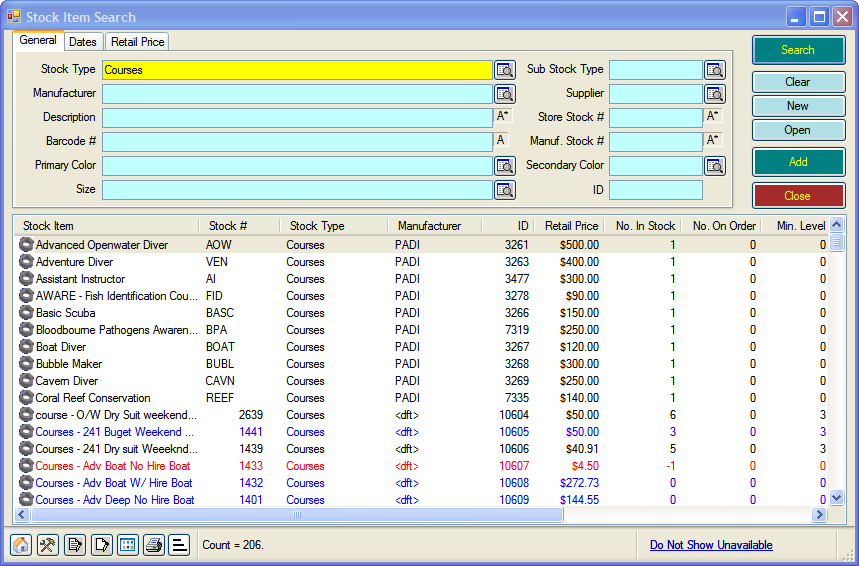
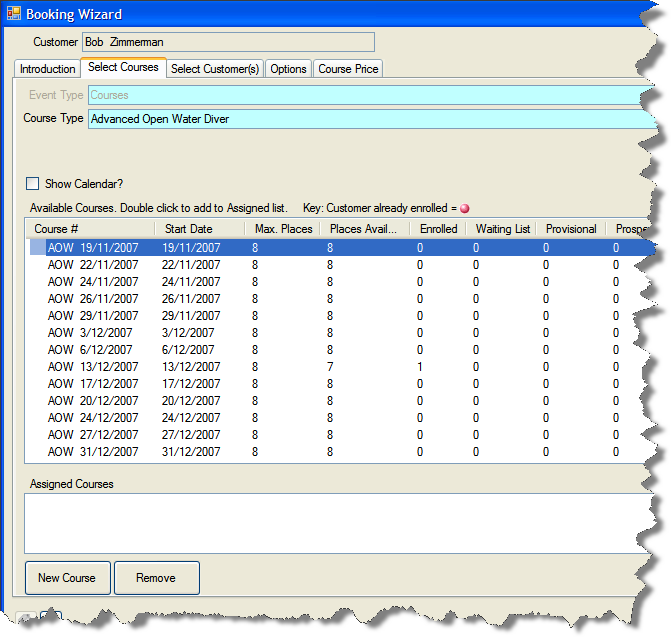
- Double-click on the course you want to sell. In this example we’ll select ‘Advanced Open Water Diver’.
- Another box will open, showing all the ‘Advanced Open Water Diver’ courses that you have scheduled in your store. For more information on scheduling courses, see that ‘Calendar’ section of this User Guide.
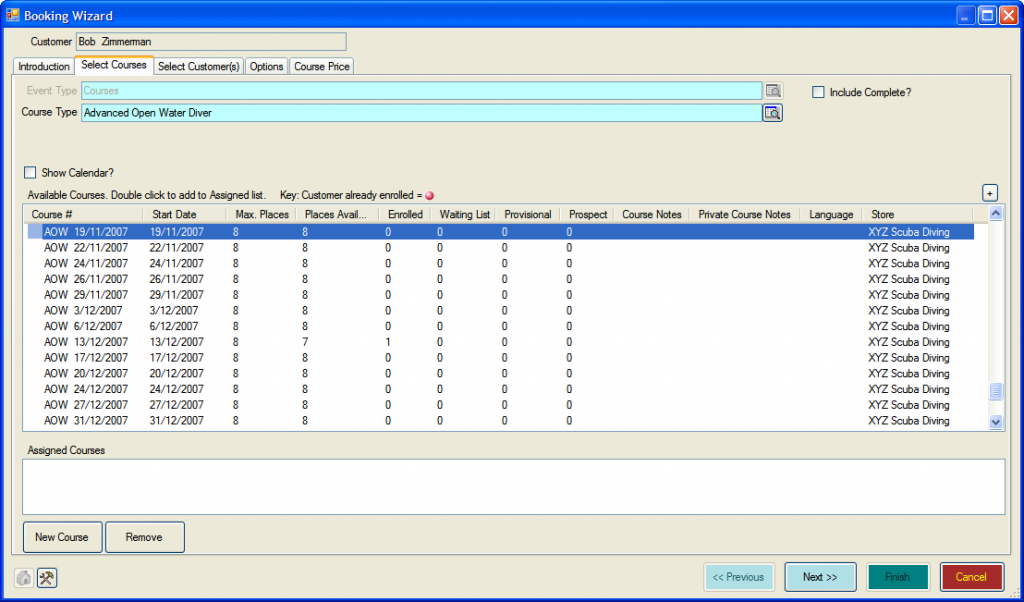
- Let’s take a closer look at the information shown for each module. For each course date listed EVE 5 shows the following information:
-
- Course #
- Start Date
- Places – the maximum no. of places allowed for this course.
- Places available – the number of available places on this course
- Enrolled – the number of students currently enrolled on the course
- Waiting List – If your course is already full you may have placed students on a waiting list. This allows you to move students onto the course, should student who are already booked on drop out of the course. Alternatively, you may monitor the waiting list and schedule another course on the same day once you reach optimum numbers.
- Provisional – students who have booked on the course, but may be waiting for a doctors medical, for example, can be placed on the provisional list
- Prospect – you can use this to identify possible students for the course.
- Course Notes – you can opt to have these print on the invoice. For example, you may want to include meeting times for the boat.
- Private Course Notes – these will not be shown on the invoice.
- Language – shows the primary language that the course will be taught in.
- Store – if you have multiple locations for your dive store, this will show which store the course is available at.
- To select a course, just click the course date you want to put the student on and click ‘Next’.
- If you want to create a new course, just click the ‘New Course’ button and the New Course box will open. For more information, see that ‘Calendar’ section of this User Guide.
- The screen will change to ‘Select Customer(s)’. The customer for the Invoice will already be shown. If you want to add additional customers, click the ‘Add Customers’ button. You can also create a Group of customers.

-
- Alternatively, you can block book place on a course, by selecting ‘The Customer is block booking the Course’ towards the bottom of the screen. This may be used, for example, if an agent is booking a group on a course, but you don’t yet know the names of the students.
- Once you have added the students, click ‘Next’. The ‘Options’ screen will appear.

- This can be used as a prompt to ask students about purchasing related products. Once you’ve finished, click ‘Next’.
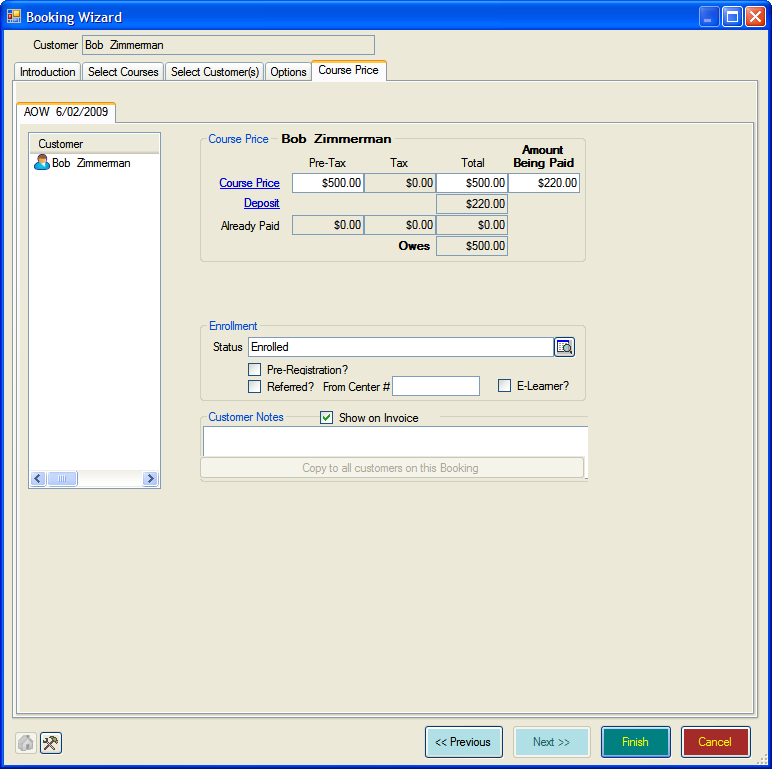
- The ‘Course Price’ tab will show. Let’s take a look at the different sections.
-
- Customer – lists all the customers for this invoice and course booking.
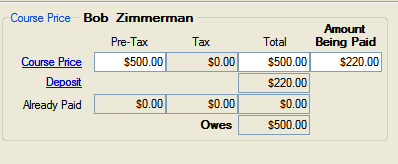
- Course Price
-
-
- This is prefilled with the course price and the deposit. These are set in the Inventory module – see that section of this User Guide for more information. If the customer is paying a different amount, simply enter the amount in the box below ‘Amount Being Paid’
- Enrolment
-

-
-
- Status – by default this is set as ‘Enrolled’, but click on the drop-down box to the right, will enable you to change it to either:
- Enrolled
- Prospect
- Provisional
- Waiting List
- Pre-Registration
- Referred – if the student is a referral tick this box and enter the store number of the referring dive centre.
- E-Learner – tick this box if this is an eLearning student.
- Status – by default this is set as ‘Enrolled’, but click on the drop-down box to the right, will enable you to change it to either:
- Customer Notes
-
- Once completed, click the ‘Finish’ button. You will be returned to the Invoice screen.
Printing Documents during a Course Sale
- When you sell a course and have taken payment and printed a receipt, the ‘Print Documents’ box will appear.
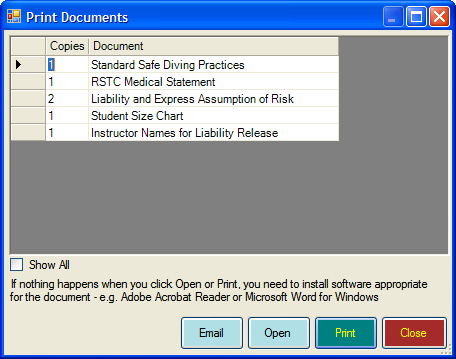
- Here you can choose to print or email all the documents that you have associated with this course.
Creating a New Trip Sale
- Creating a new Trip sale is very similar to Creating a New Course sale, with one important addition. As you complete the booking wizard, after the ‘Options’ tab you will have an additional tab called ‘Requirements’.
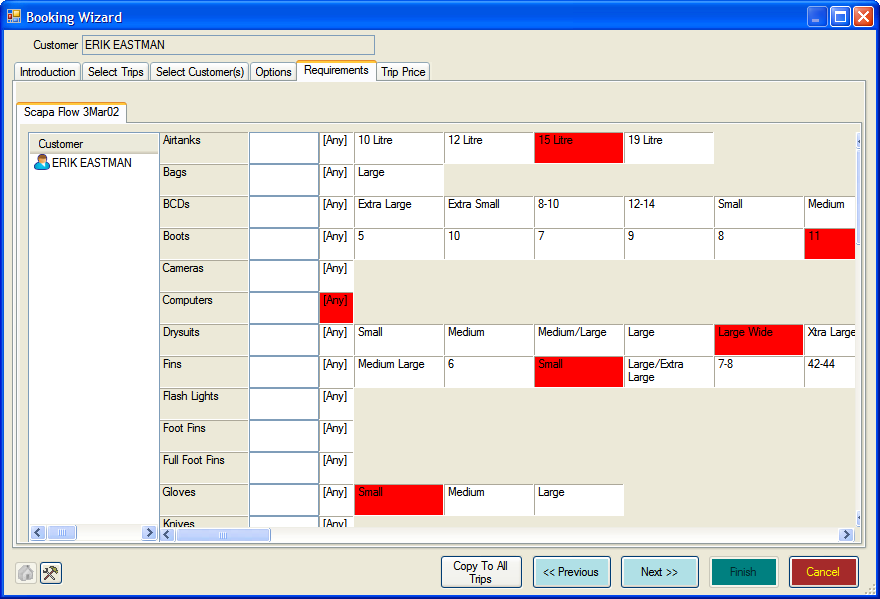
- If you have added your rental equipment into EVE you can allocate it to the student. See the Rentals section of this User Guide for more information.
- If the customer has rented equipment previously this will be indicted by a red box.
- To select equipment, simply click on the size of the equipment the customer wishes to rent.
- Once you have completed this, click ‘Next’ and proceed in the same way as a Course Booking.
Finding an Existing Invoice
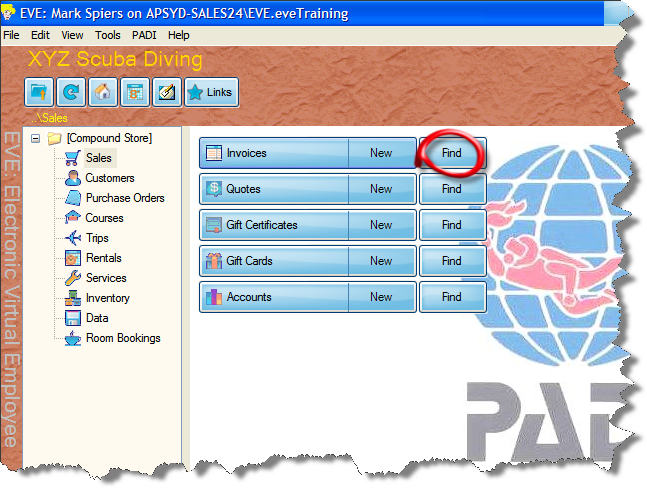
- To find an existing Invoice, go to EVE’s main screen, click on ‘Sales’ and select ‘Find’ next to Invoices
- The Invoice Search box will appear
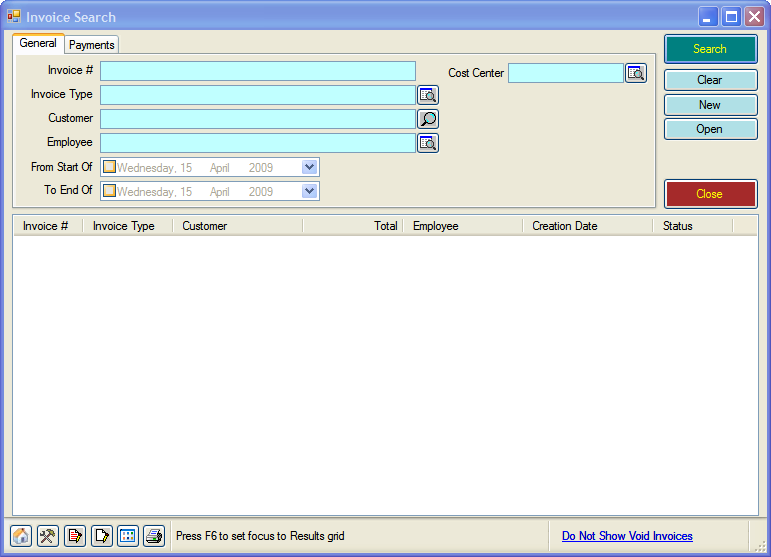
- Enter data into any of the fields and click search.
- A list of Invoices matching the criteria you have entered will appear.
- Double-click the Invoice you wish to view.
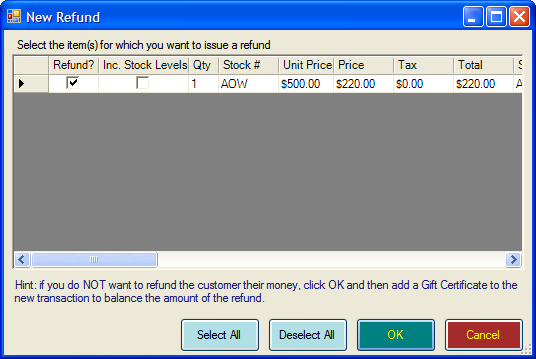
Refunding an Existing Invoice
- Follow the instructions under ‘Finding an Existing Invoice’ to locate and open the Invoice you wish to refund.
- On the Invoice, click the ‘Refund’ button.
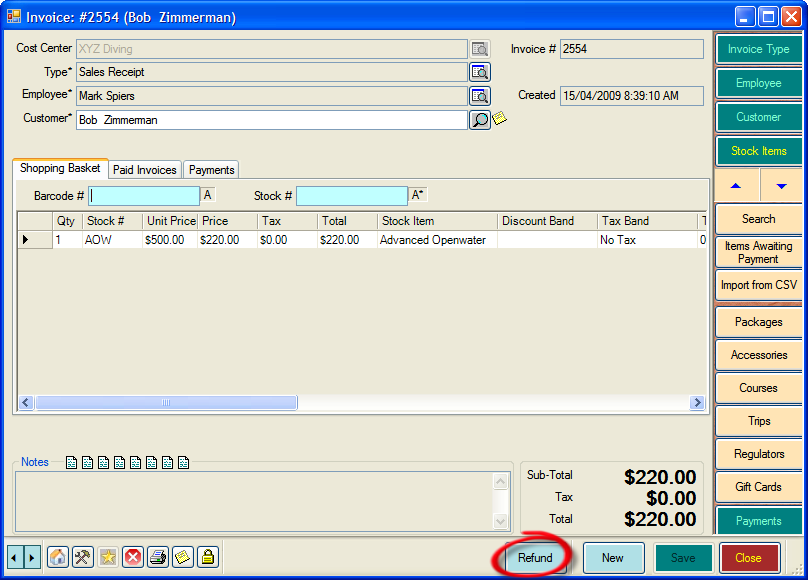
- The ‘New Refund’ box will open. Select the item(s) you wish to refund and click ‘OK’.
- EVE creates a new Invoice, showing the refund. The notes section refers to the original invoice.
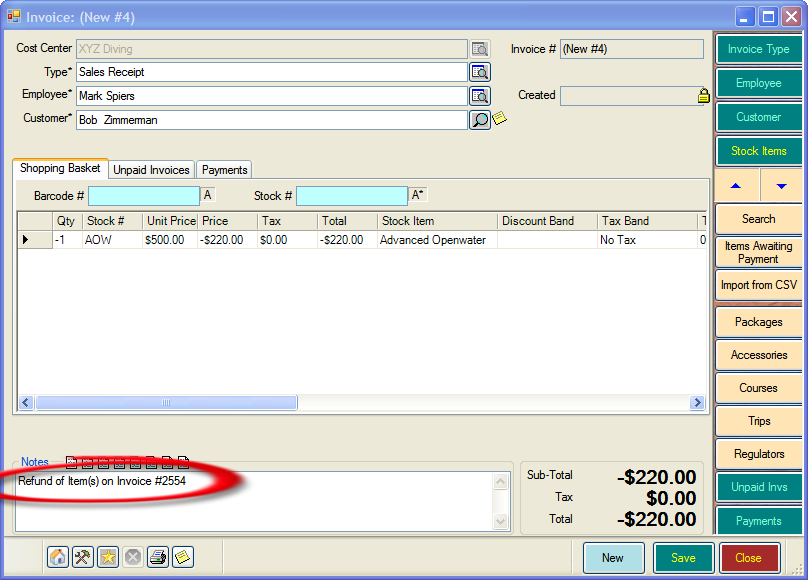
- Click the ‘Payments’ button and select how the refund will be made (cash, credit card, etc.)
- Click ‘Save’ and EVE will produce a receipt.