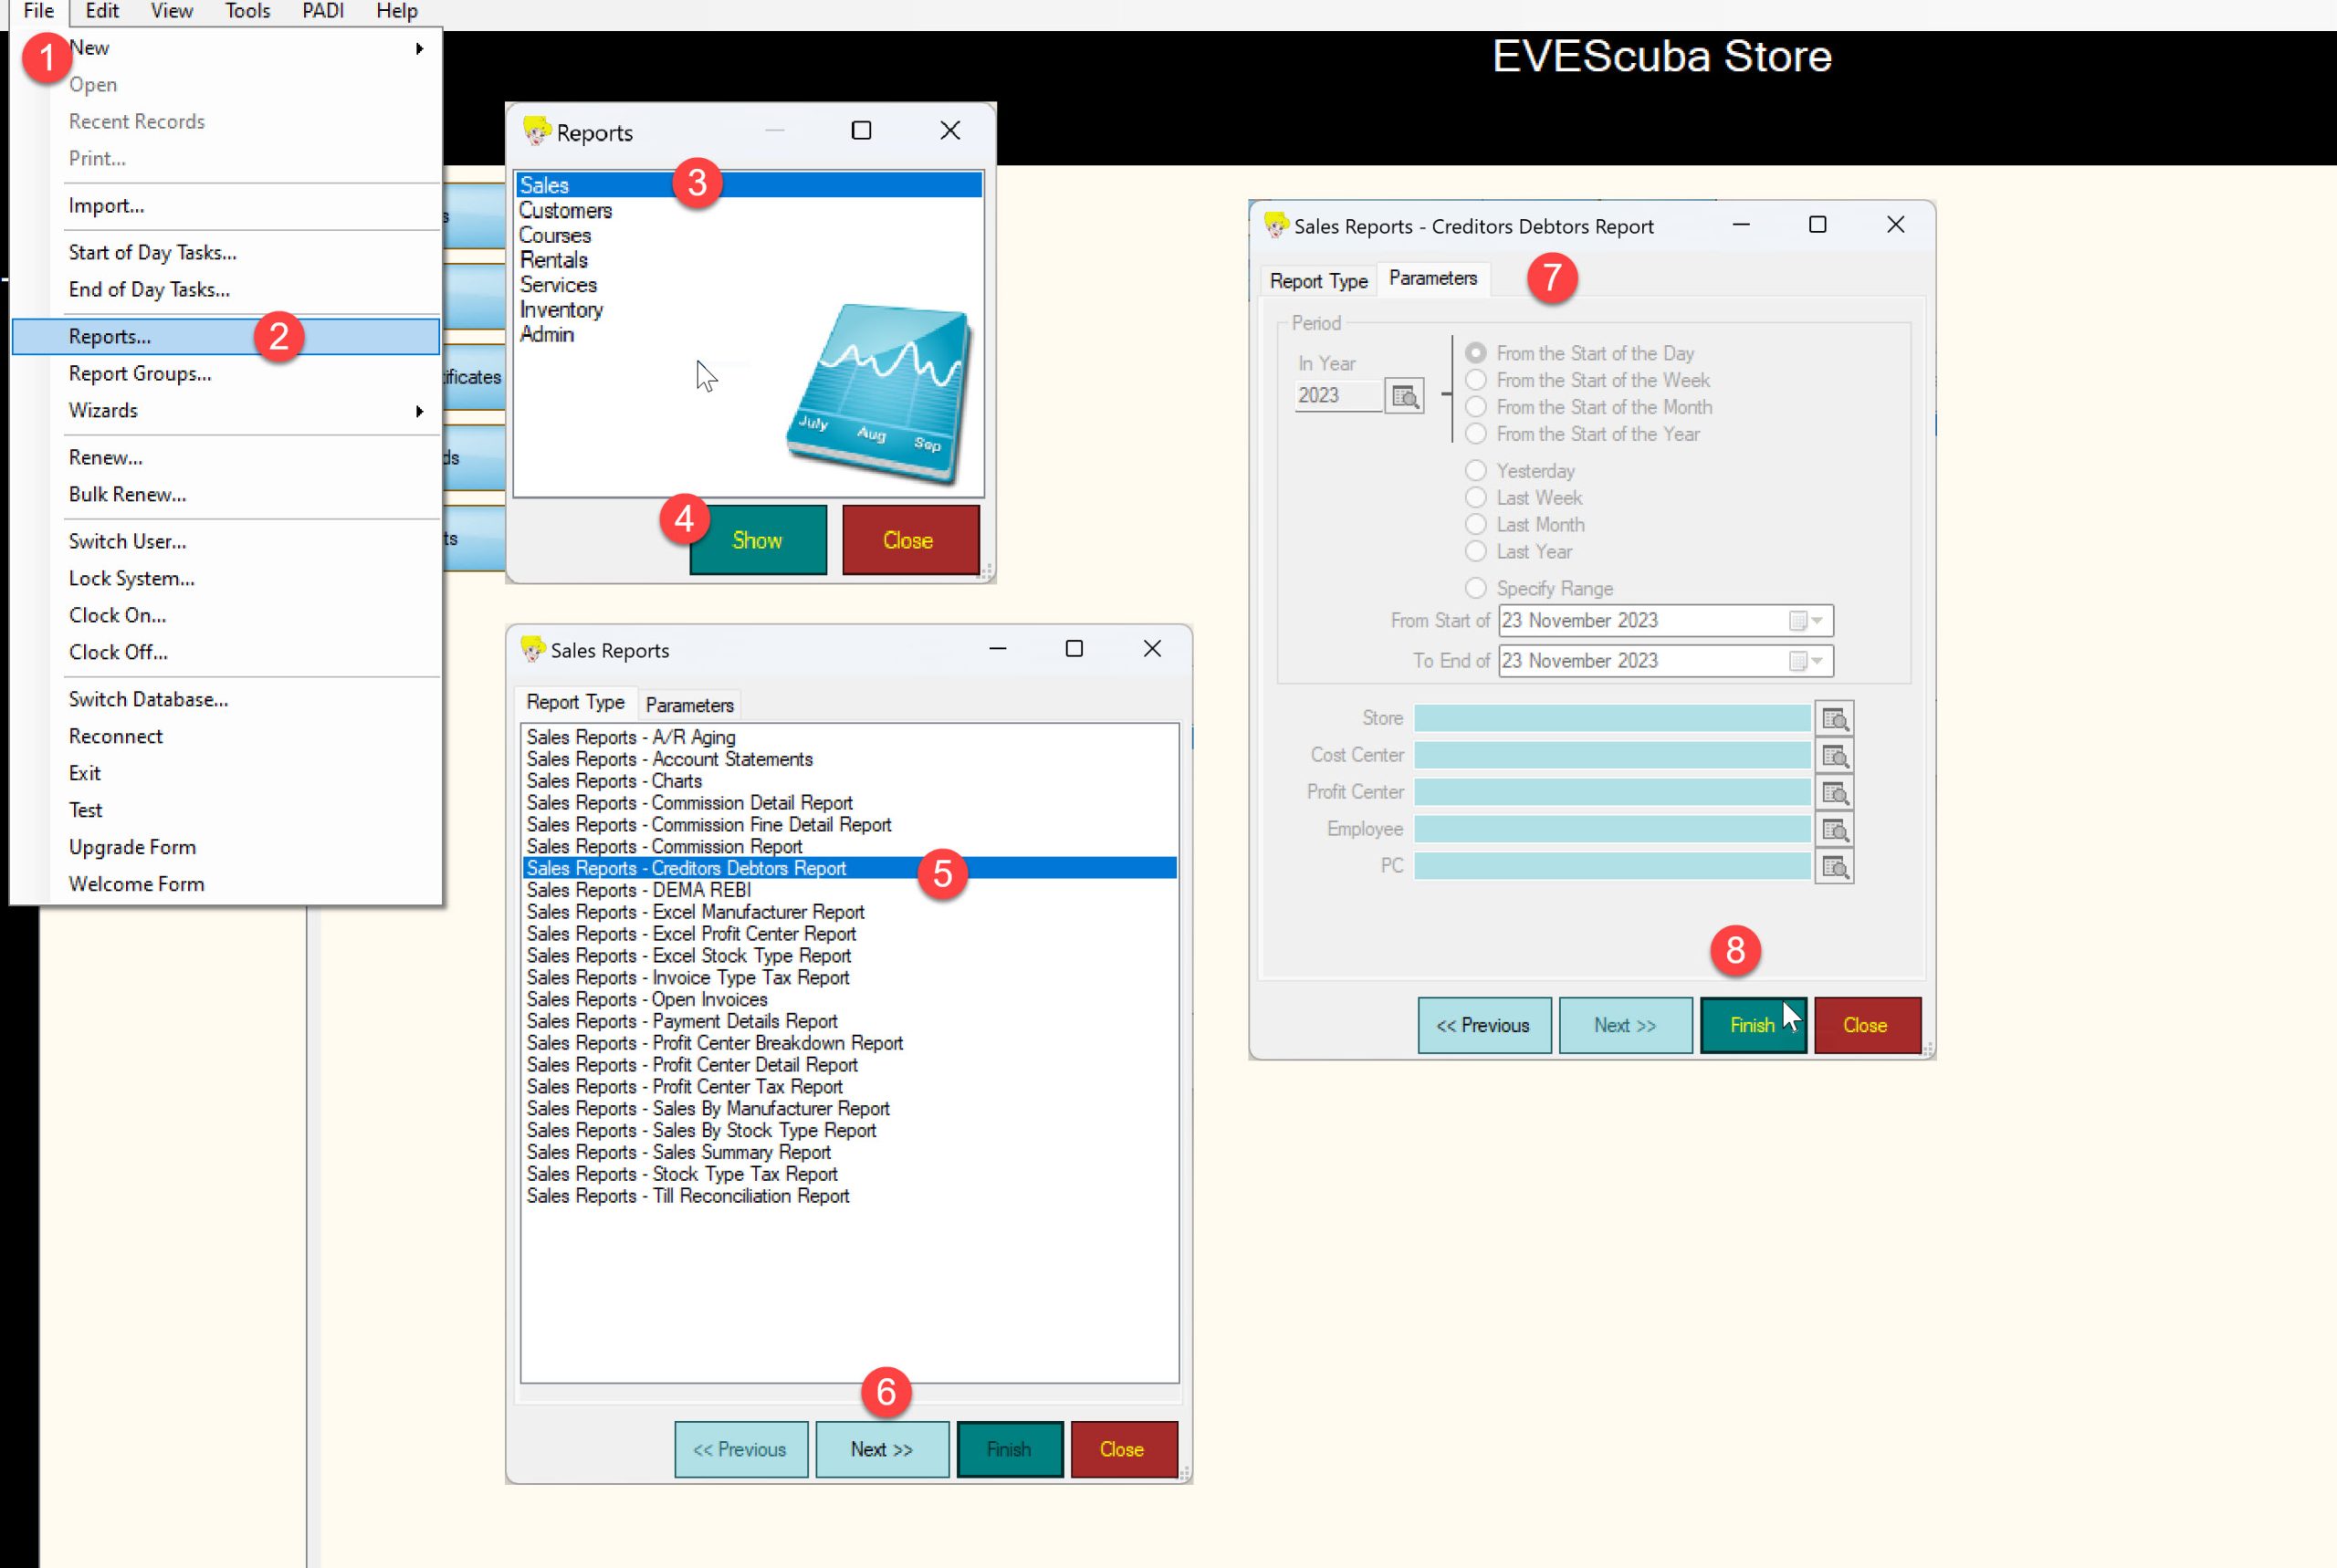
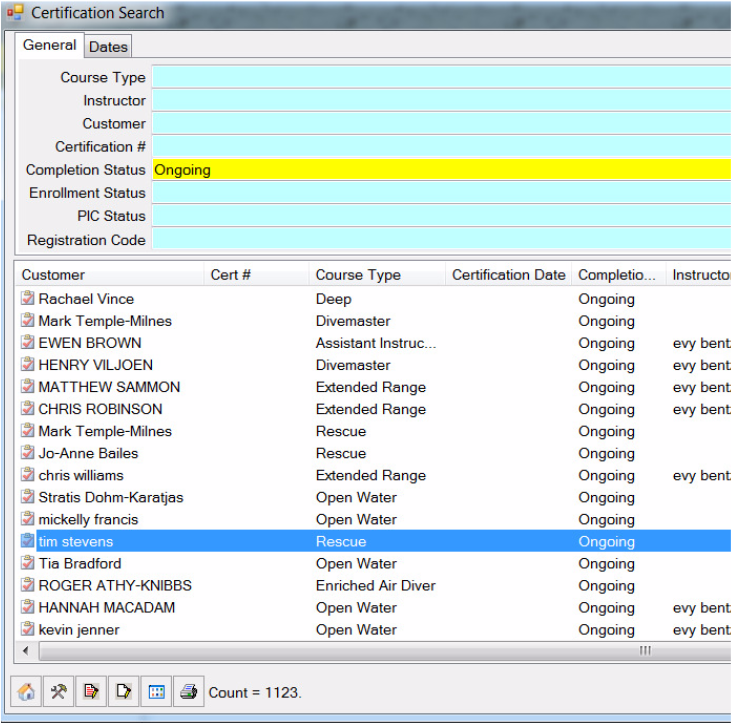
Accounts
Follow this procedure to export the customer Account Balance to Excel
1) Click File
2) Click Reports
3) Select Sales
4) Click Show
5) Select Creditors Debtors Report
6) Click Next
7) No parameters are required
8) Click Finish
9) The Creditors / Debtors report will populate
10) Make sure both the Include Creditors and Include Debtors options are checked
11) Click the Select All icon
12) Click Export
13) Select Microsoft Excel
14) Click Next
15) In the Data tab, check as many fields as necessary.
16) Click Next
17) Make sure the CreditorsDebtorsSearchResults.xls file is selected
18) Click New Worksheet
19) Click Next
20) If the file already exists, choose to overwrite it
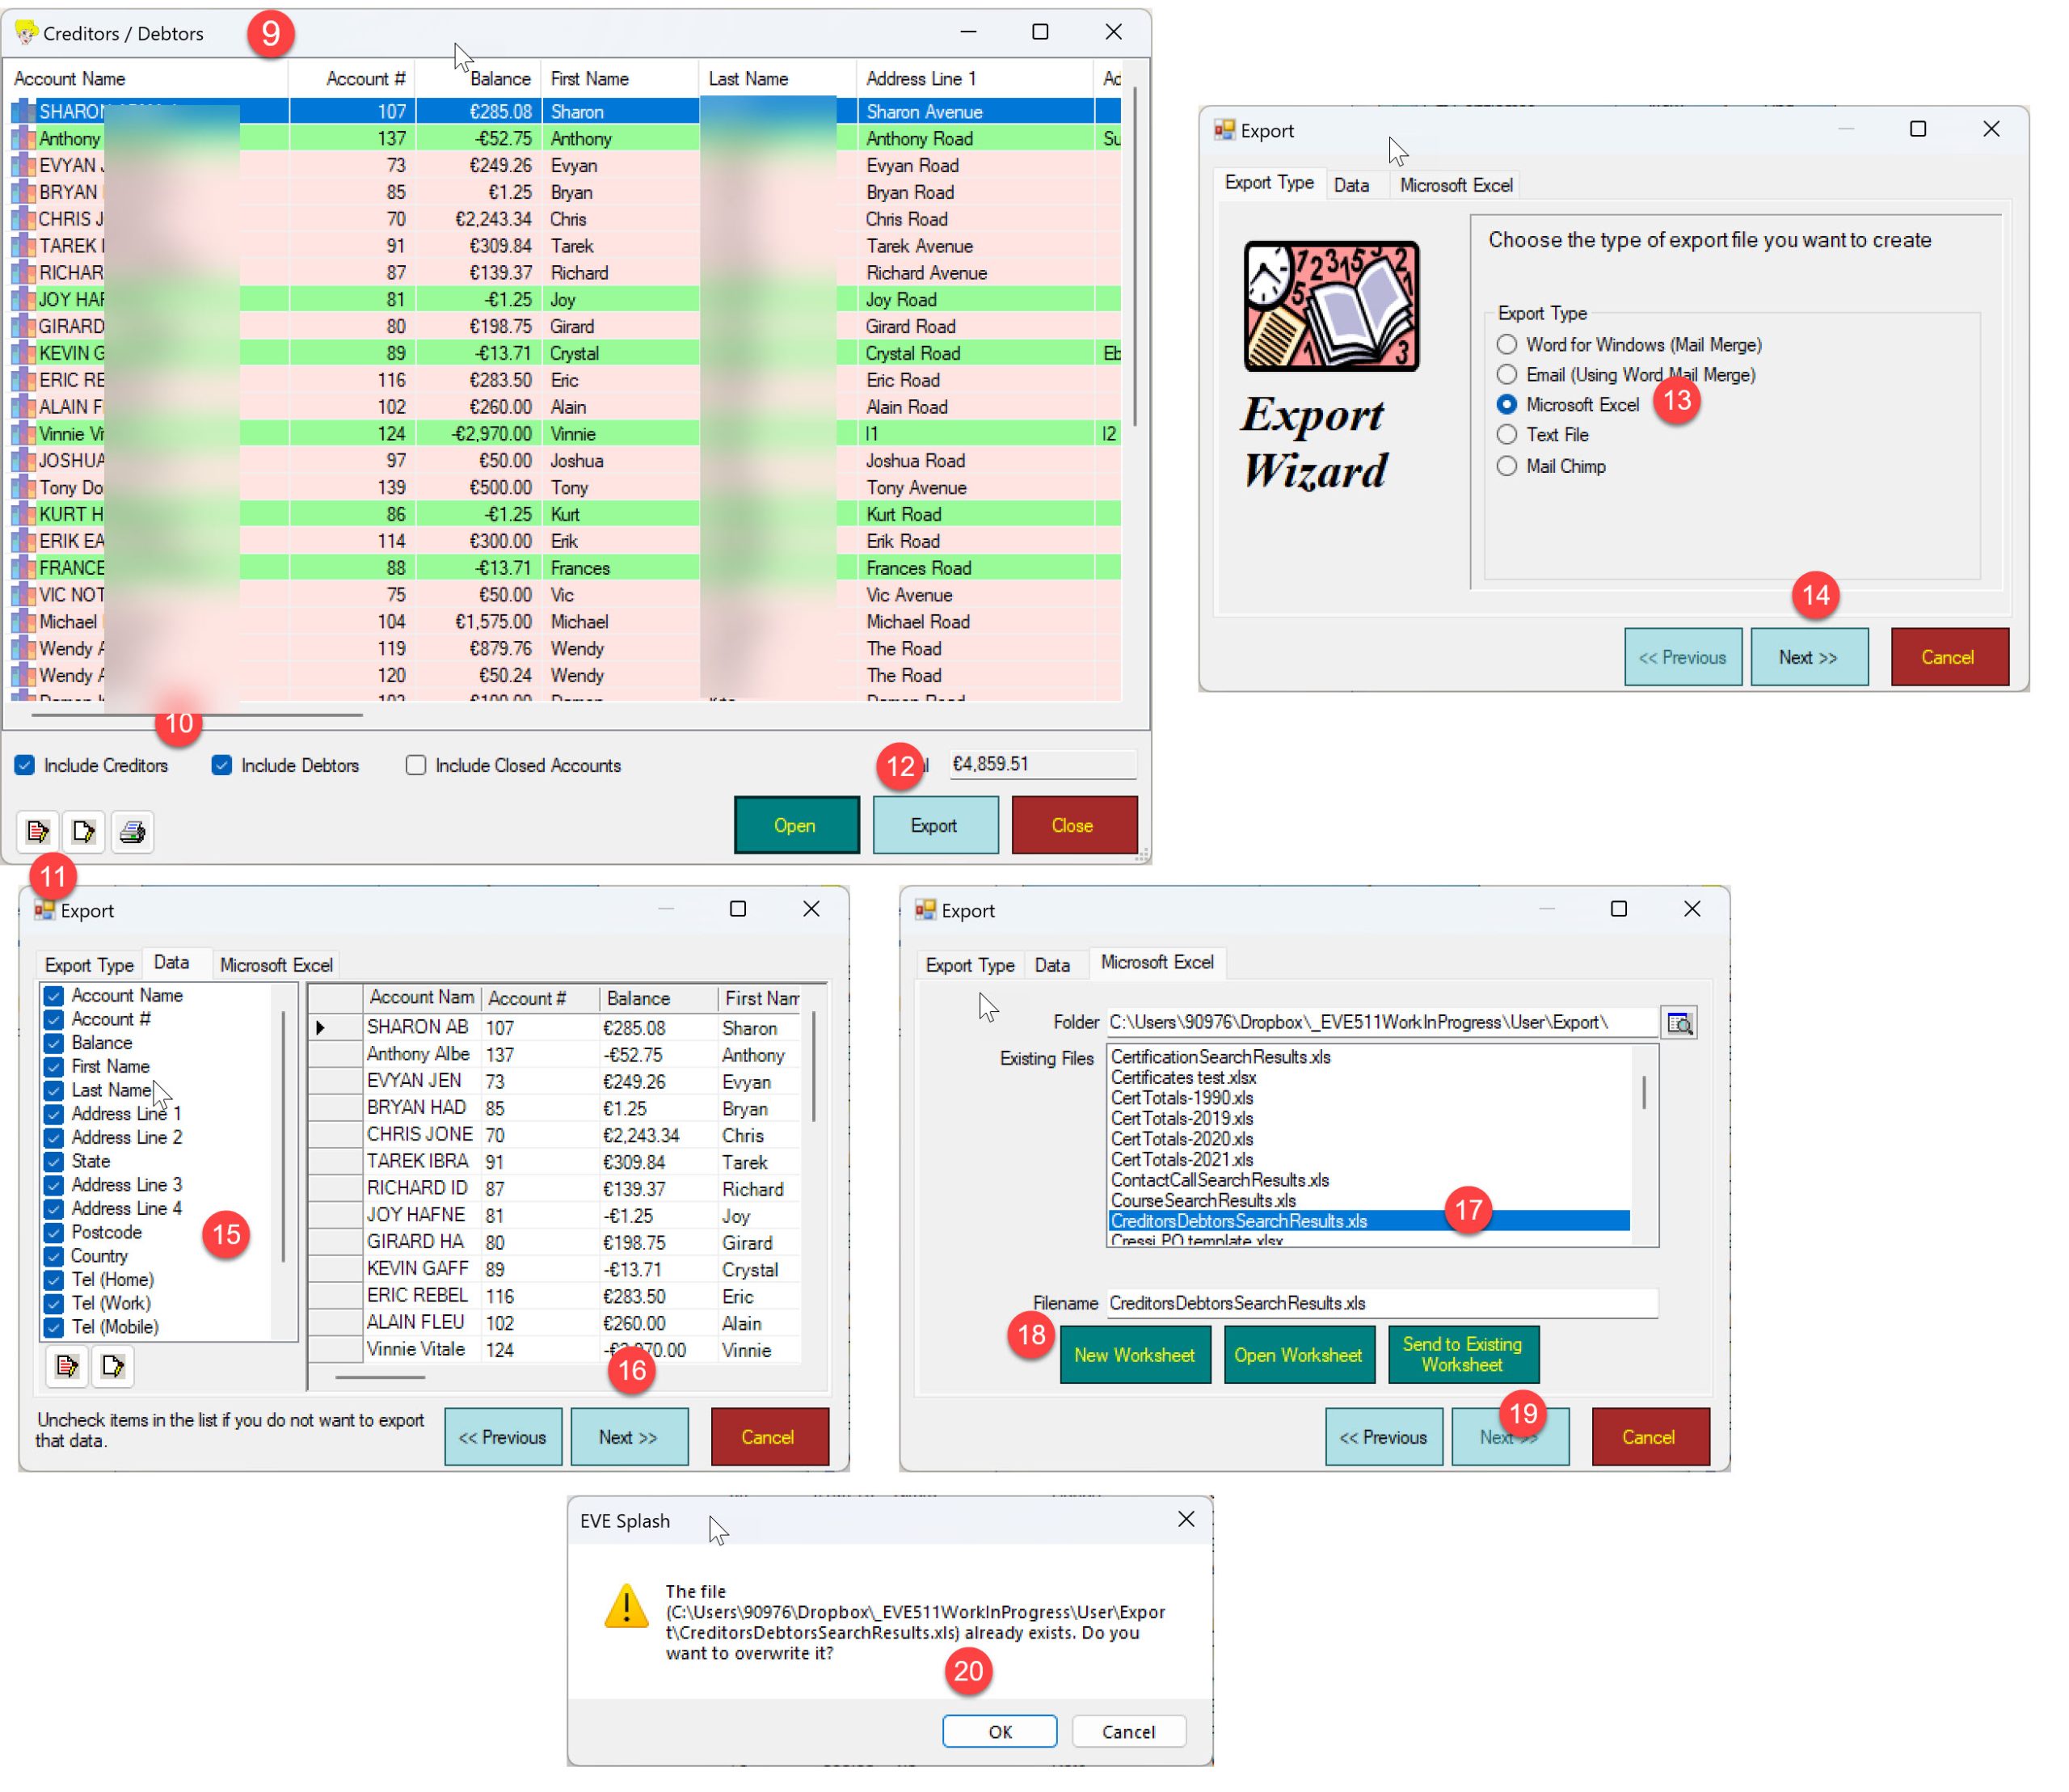
Excel will open and list the results, the Balance will be in column D. Save the file to a folder and share it with the Dive Shop 360 Team.
For any assistance on this procedure, email us at support@evediving.com

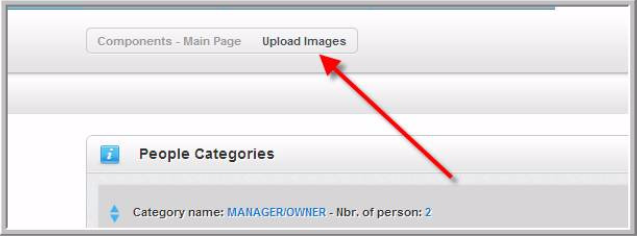
Categories
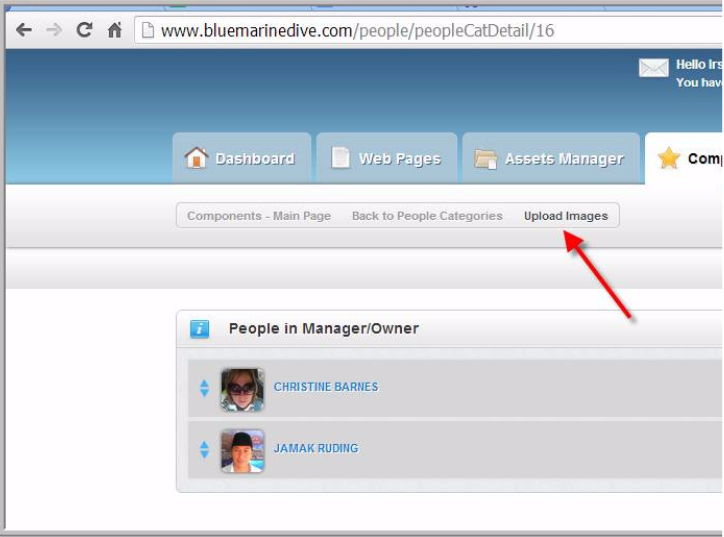
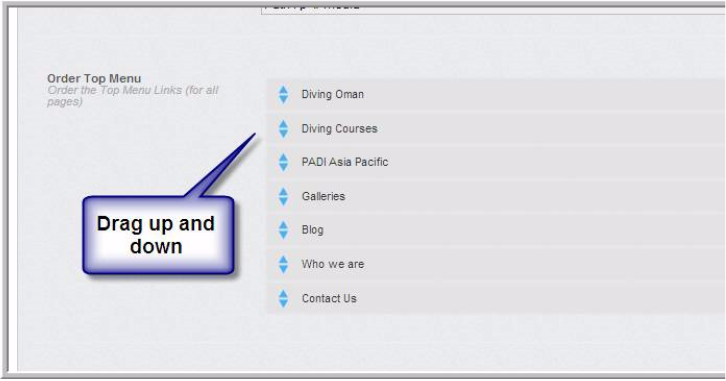
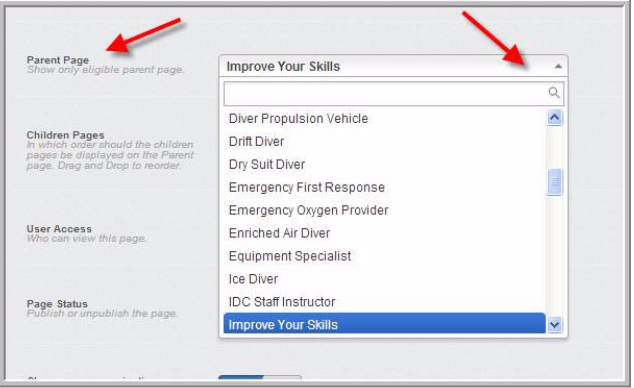
To remove stock item(s) from a category and therefore from the online shop, please open your online shop record and follow the procedure outlined below:
- Click EVE OnLine tab
- Click Filters tab
- Click a menu tab tab
- Select the category containing the item(s) you wish to remove
- Right Click on the item you wish to remove
- Click Remove
- Click Save

Cloud Integration
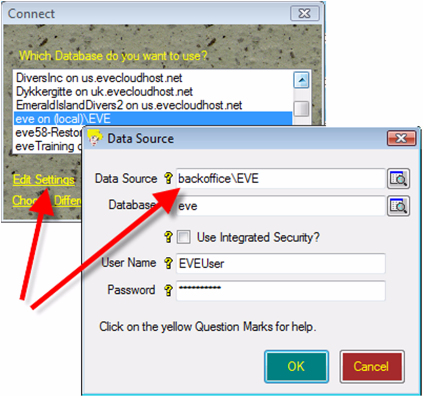
Whether you just migrated to EVE Cloud or wish to setup a new EVE Client PC, then please follow this procedure:
- start your VPN connection
- launch EVE
- click on Choose Different Database and enter the connection credentials as provided by email
- Data Source: it is the address of our server
- Database: it is the name of your database
- Make sure Use Integrated Security is not checked
- UserName: it is the username to access the database
- Password: as emailed to you separately from other data
- Click OK
- Select your newly added database from the list
- Click OK
You will be successfully connected to your EVE database in the cloud.

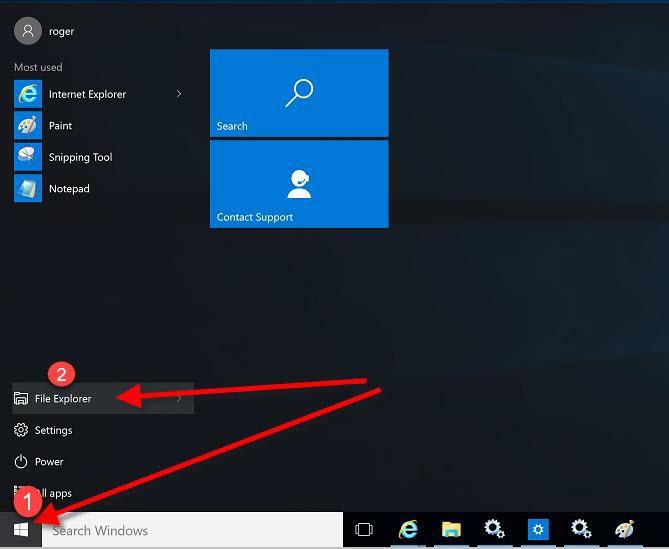
This procedure will guide you trough the steps required to map your network drive on your PC running Windows 10. Before you start the procedure, please make sure your VPN is running
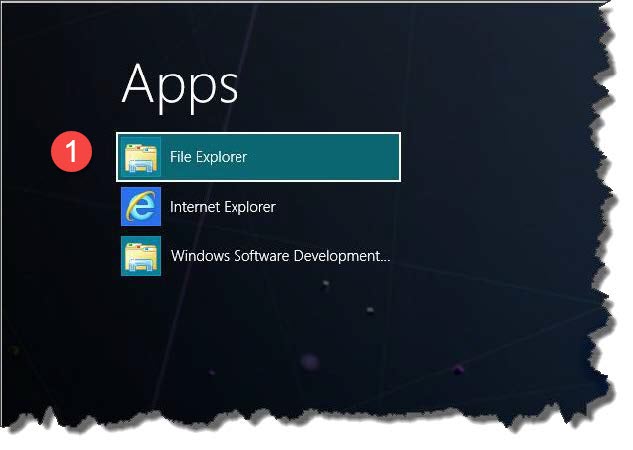
1) Click Start
2) Click File Explorer
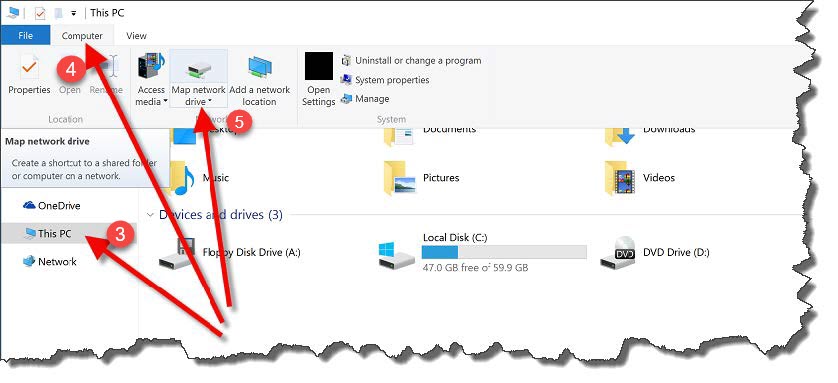
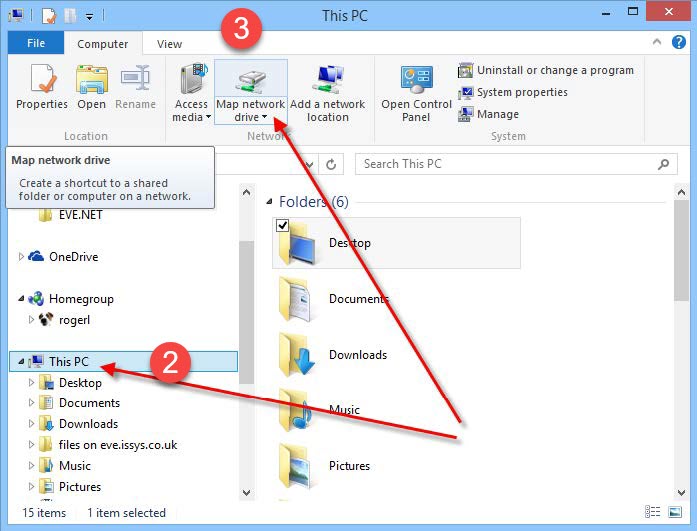
3) Make sure This PC is selected
4) Click Computer
5) Click Map Network Drive
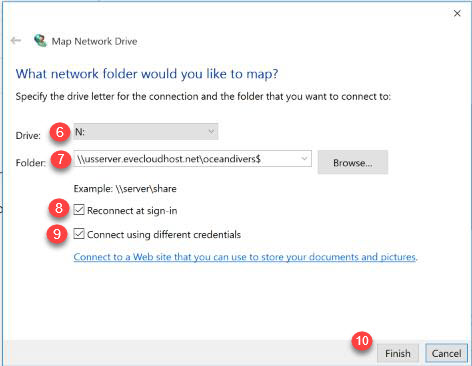
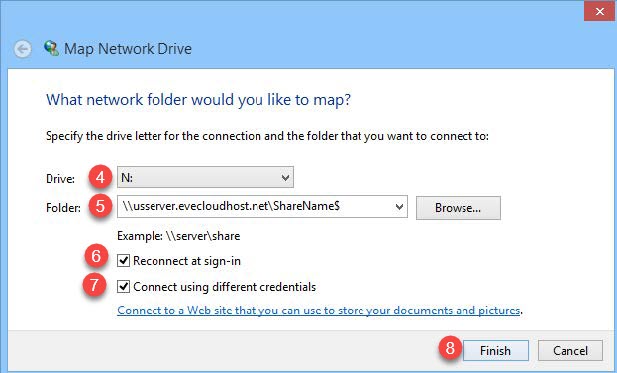
6) In the Drive picklist, choose N: if that is available. Otherwise, choose an available drive letter.
7) In the Folder box type:
- if you are located in the Americas, enter \\usserver.evecloudhost.net\ShareName$
- if you are located in Europe, Middle East or Africa, enter \\ukserver.evecloudhost.net\ShareName$
- if you located in Asia Pacific, enter \\auserver.evecloudhost.net\ShareName$
and replace ShareName$ with the name provided by EVE Diving team
8) Make sure Reconnect at sign-in is ticked
9) Make sure Connect using different credentials is ticked
10) Click Finish
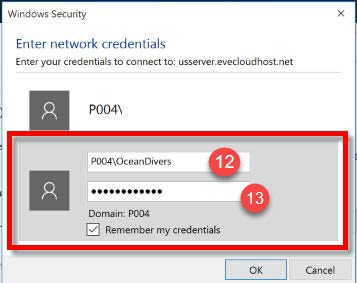
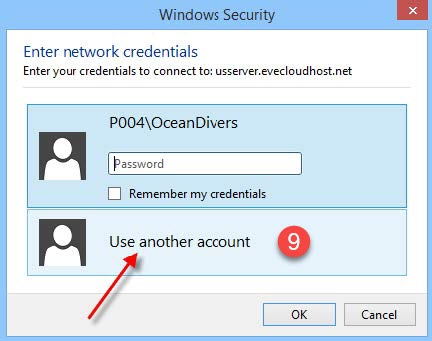
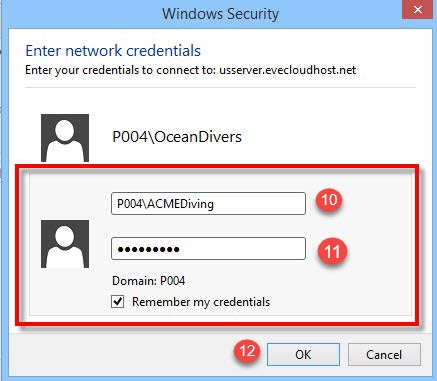
11) Click on Use another account
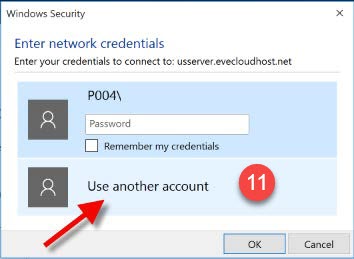
12) Enter the username we provided to you. This will be of the form: P004\Username
13) Enter the password we provided to you and click OK
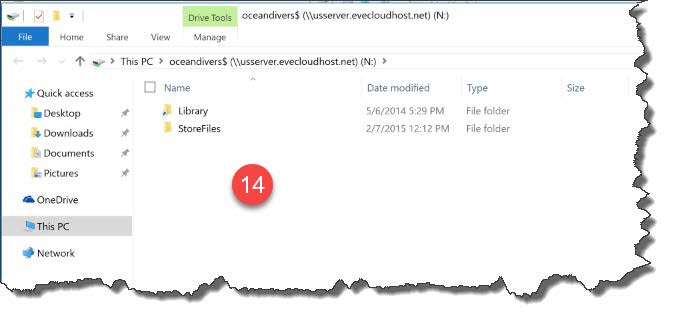
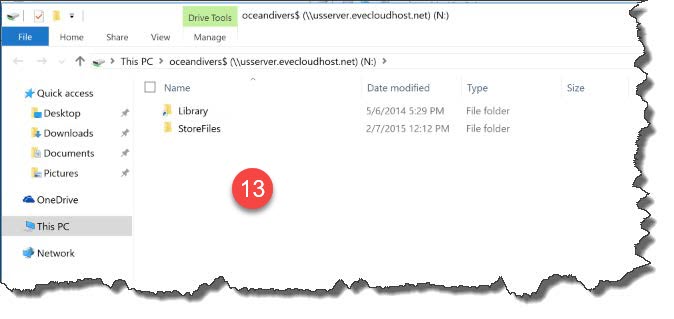
14) You’ll now have a drive mapping that contains Library and StoreFiles folders. Library is read-only and contains some standard images and documents that you can reference. StoreFiles is your own area where you can copy files such as product images and waivers and releases, etc.
This procedure will guide you trough the steps required to map your network drive on your PC running Windows 7. Before you start the procedure, please make sure your VPN is running
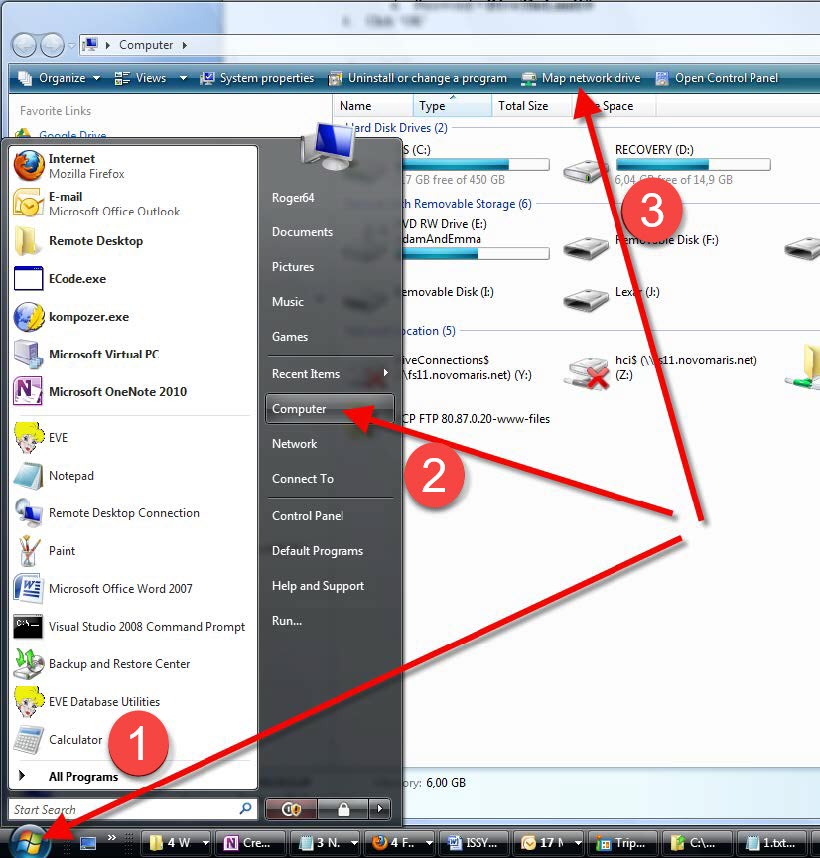
1) Click Start then Computer.
2) When Computer starts
3) click ‘Map network drive’ at the top.
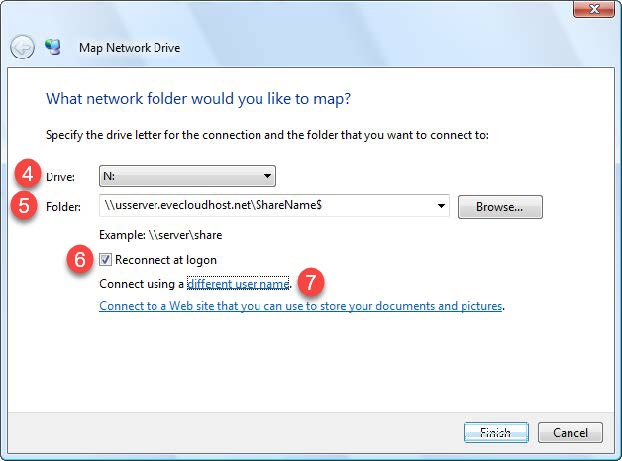
4) In the Drive picklist, choose N: if that is available. Otherwise, choose an available drive letter.
5) In the Folder box type:
- if you are located in the Americas, enter \\usserver.evecloudhost.net\ShareName$
- if you are located in Europe, Middle East or Africa, enter \\ukserver.evecloudhost.net\ShareName$
- if you located in Asia Pacific, enter \\auserver.evecloudhost.net\ShareName$
and replace ShareName$ with the name provided by EVE Diving team
6) Make sure Reconnect at sign-in is ticked
7) Click different user name
8) On the Connect As form, enter the username we provided to you. This will be of the form: P004\UserName
9) Enter the password we provided to you
10) Click OK and then Finish

This procedure will guide you trough the steps required to map your network drive on your PC running Windows 8 or Windows 8.1. Before you start the procedure, please make sure your VPN is running
1) On your Windows Start screen, type Explorer and then click File Explorer.
2) Make sure This PC is highlighed and click ”Map network drive” at the top.
3) When Computer starts, click ‘Map network drive’ at the top.
4) In the Drive picklist, choose N: if that is available. Otherwise, choose an available drive letter.
5) In the Folder box type:
- if you are located in the Americas, enter \\usserver.evecloudhost.net\ShareName$
- if you are located in Europe, Middle East or Africa, enter \\ukserver.evecloudhost.net\ShareName$
- if you located in Asia Pacific, enter \\auserver.evecloudhost.net\ShareName$
and replace ShareName$ with the name provided by EVE Diving team
6) Make sure Reconnect at sign-in is ticked
7) Make sure Connect using different credentials is ticked
8) Click Finish
11) Click on Use another account
10) Enter the username we provided to you. This will be of the form: P004\Username
11) Enter the password we provided to you
12) Click OK
13) You’ll now have a drive mapping that contains Library and StoreFiles folders. Library is read-only and contains some standard images and documents that you can reference. StoreFiles is your own area where you can copy files such as product images and waivers and releases, etc.
This page provides you with the instructions to download the Any Connect app from the Microsoft Store on a Windows PC and set it up for EVE. It applies only to stores located in the EMEA region.
Prerequisites:
- If any previous version of the Cisco Any Connect application is already installed on your PC, then it must be first uninstalled. After you uninstalled Cisco Any Connect, restart your PC.
- have the Microsoft Store app available on your PCs. It is usually installed by default
Procedure:
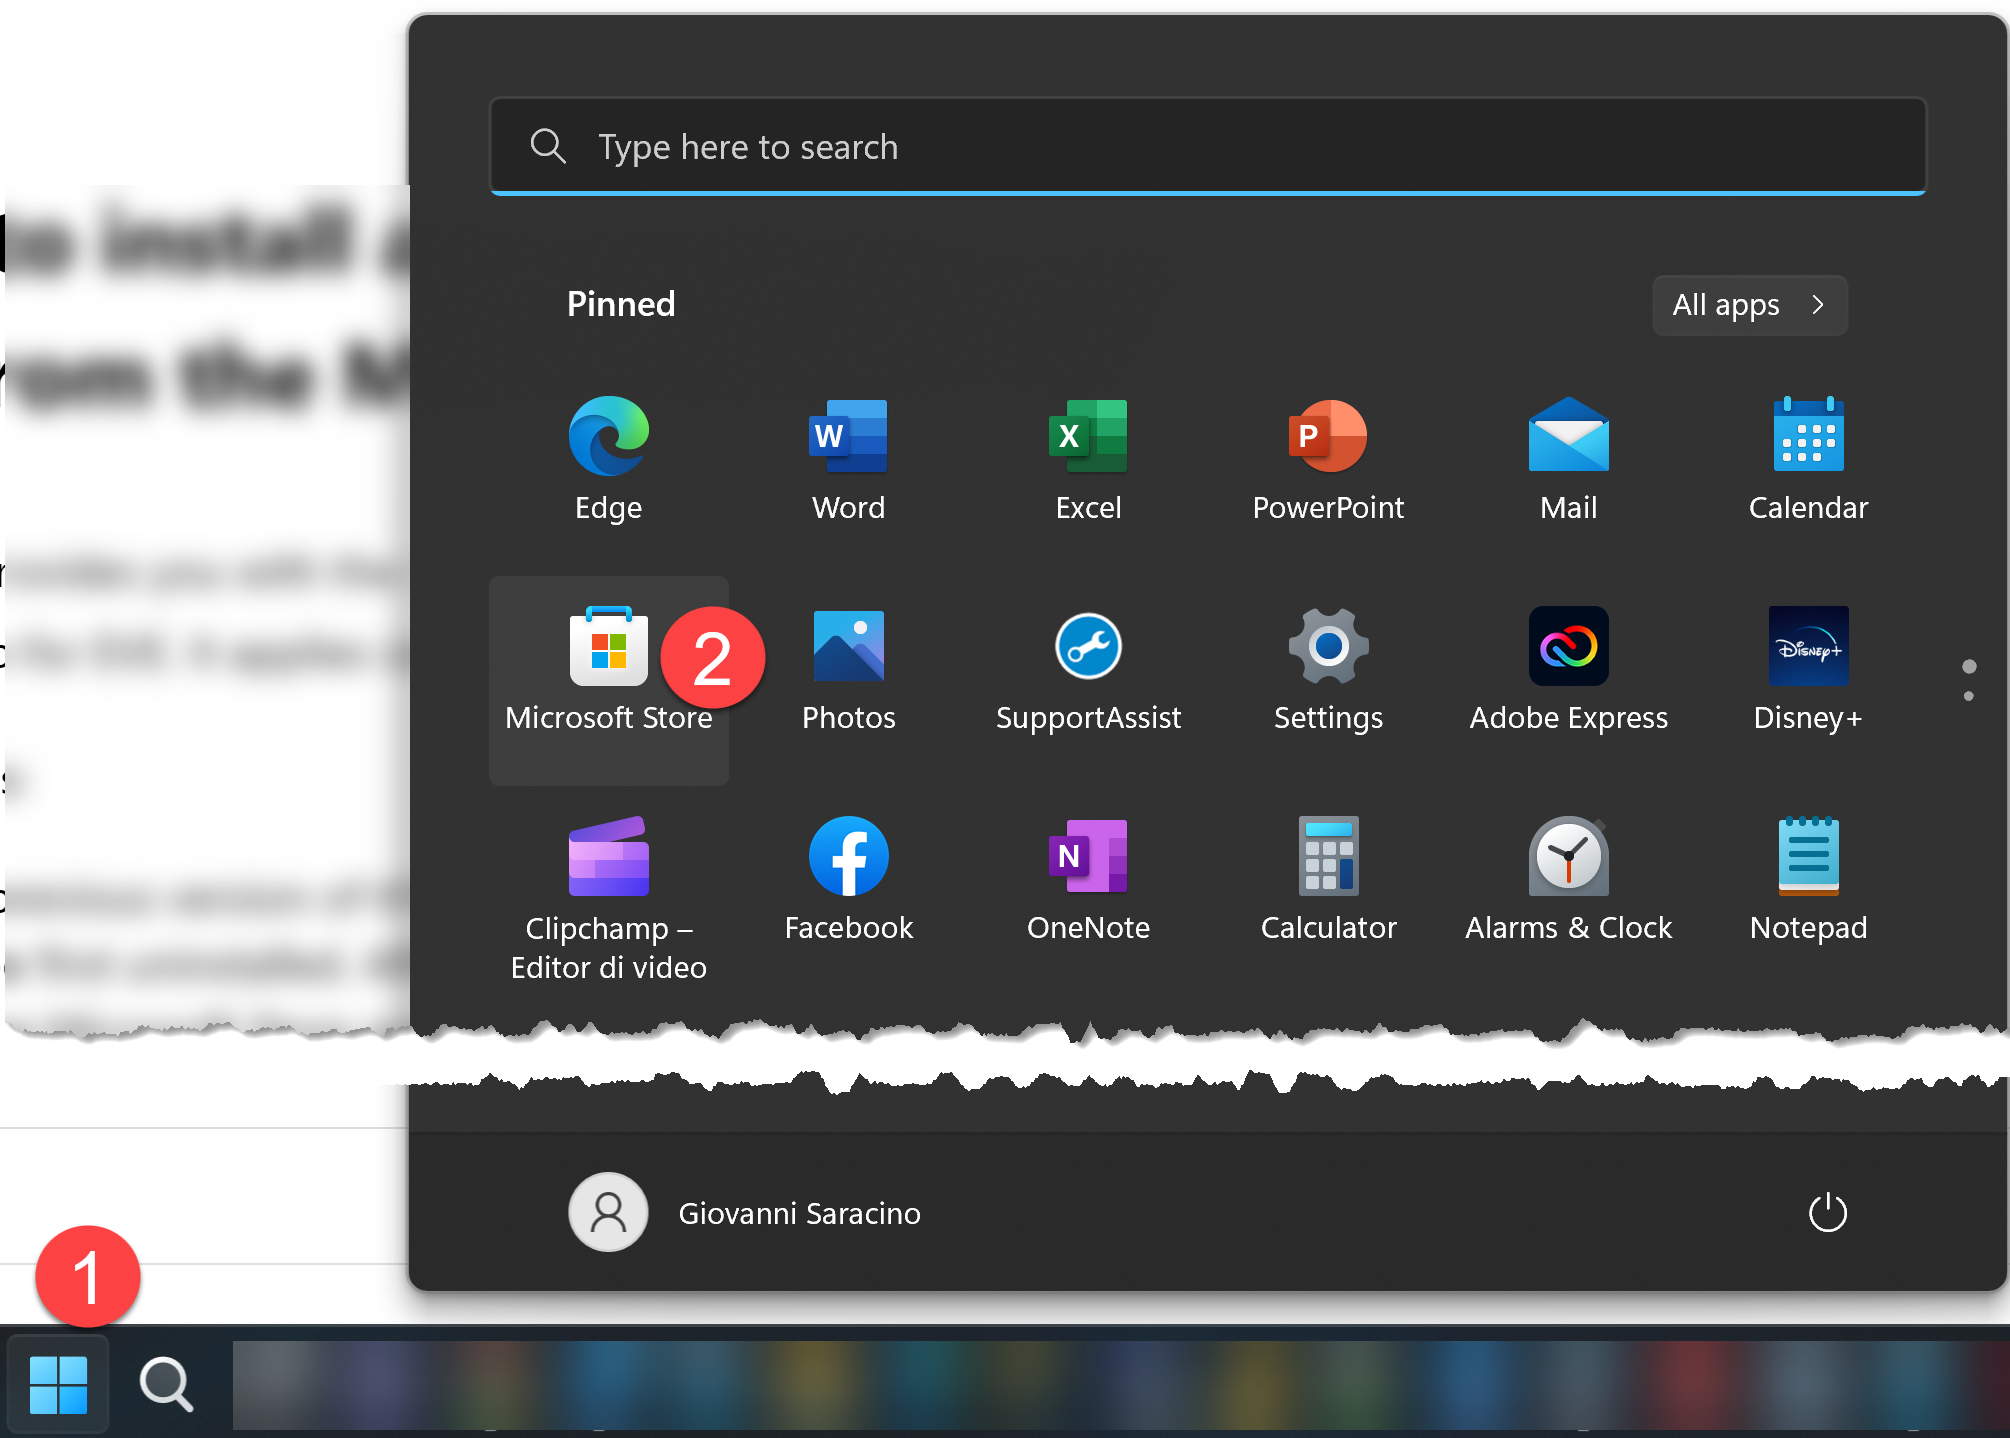
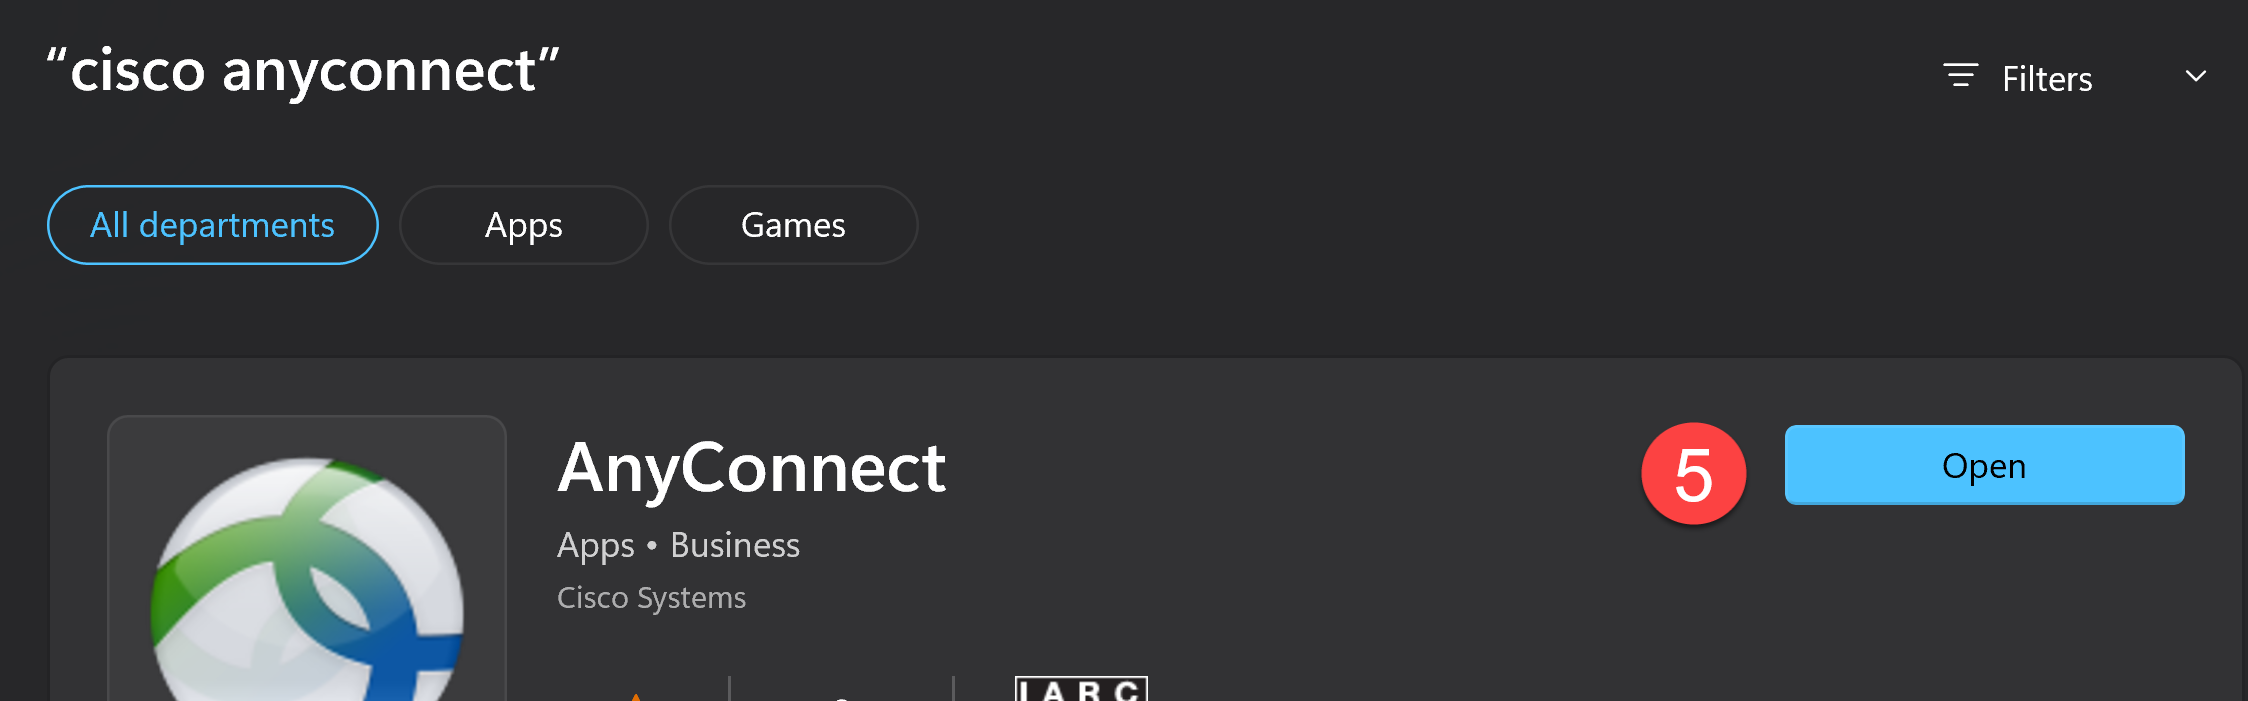
1) On your PC, click the Start button
2) Click the Microsoft Store app. If necessary, use the search option
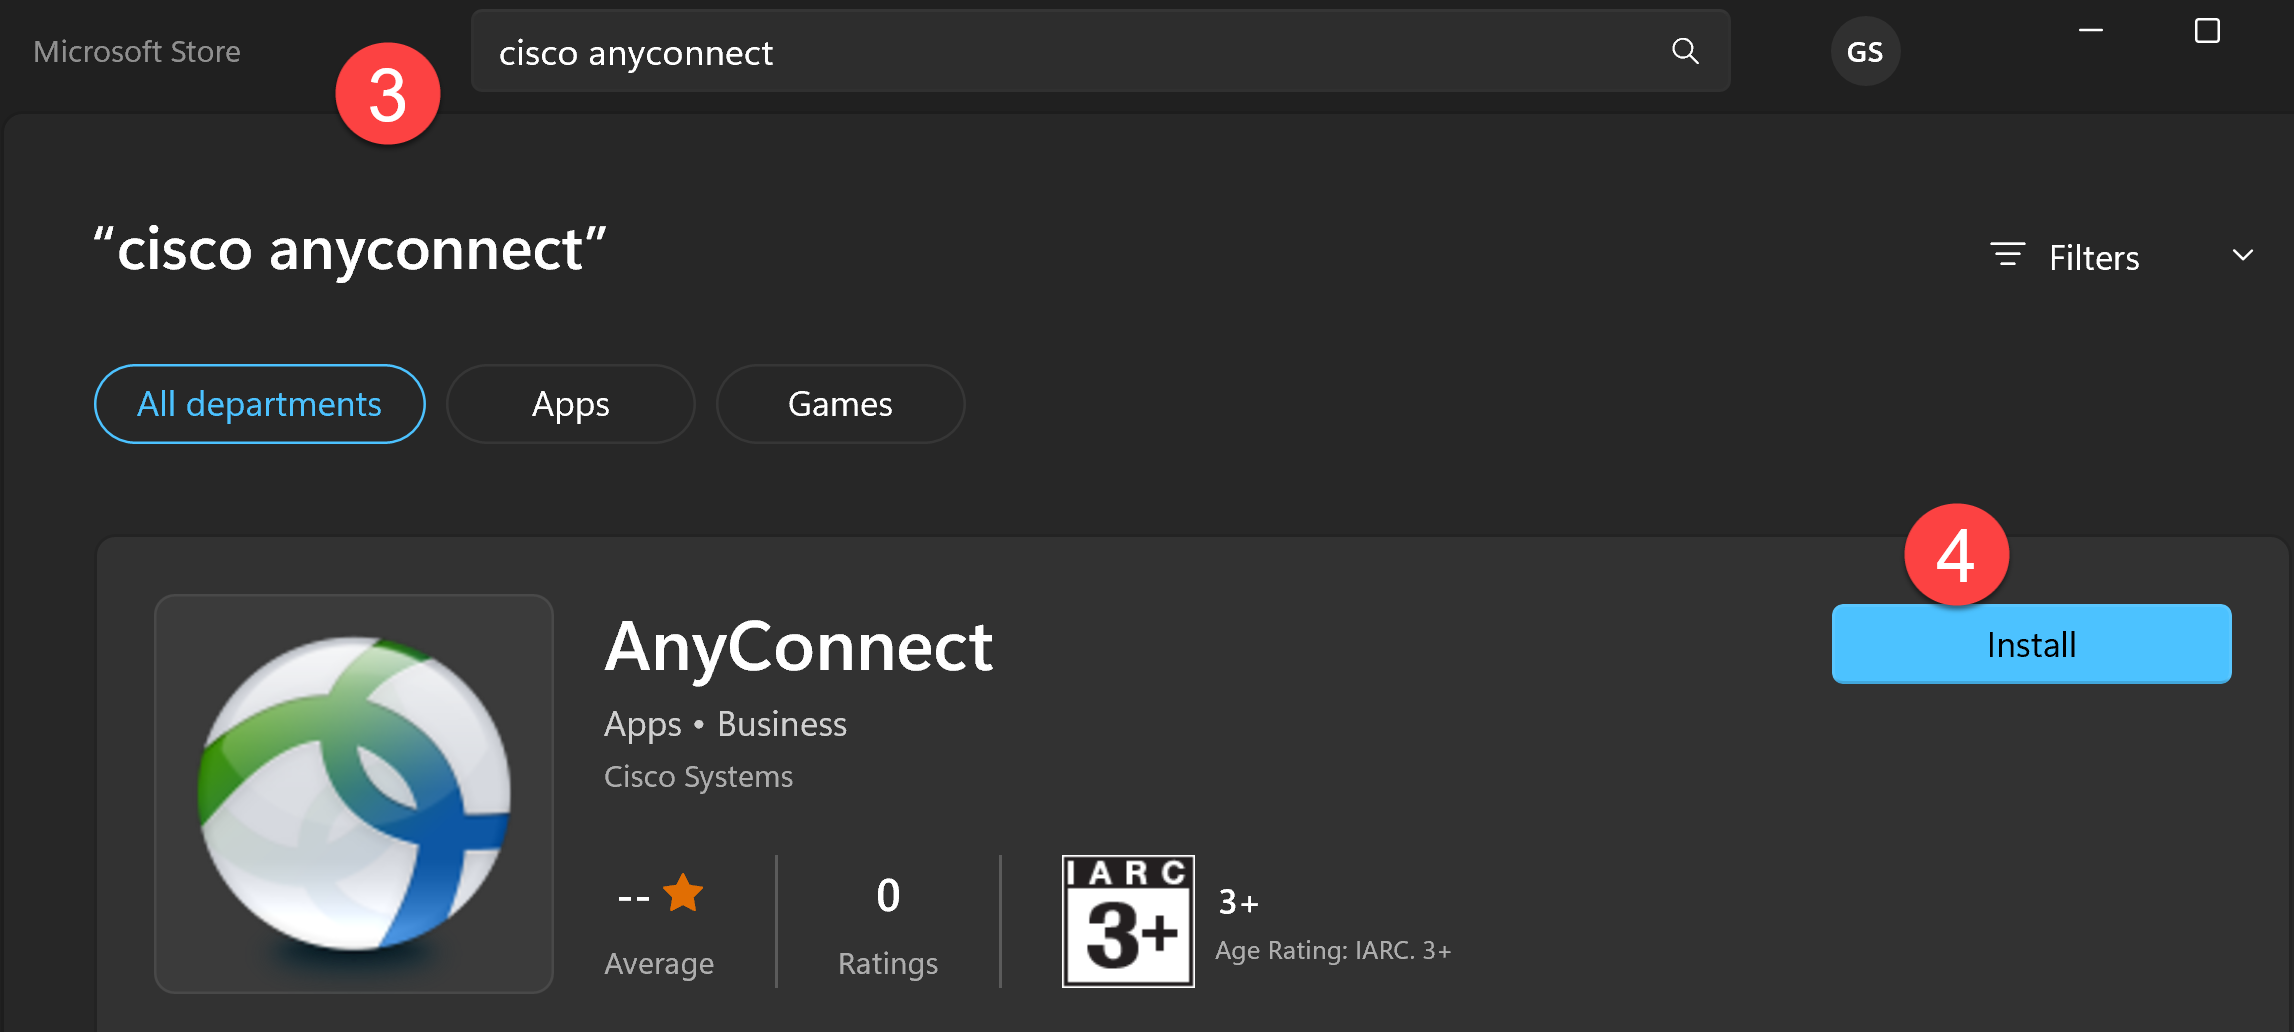
3) In Microsoft Store, search for Cisco AnyConnect, exactly as typed
4) Click Install. The app will be automatically downloaded and installed
5) When the app is installed, click the Open button
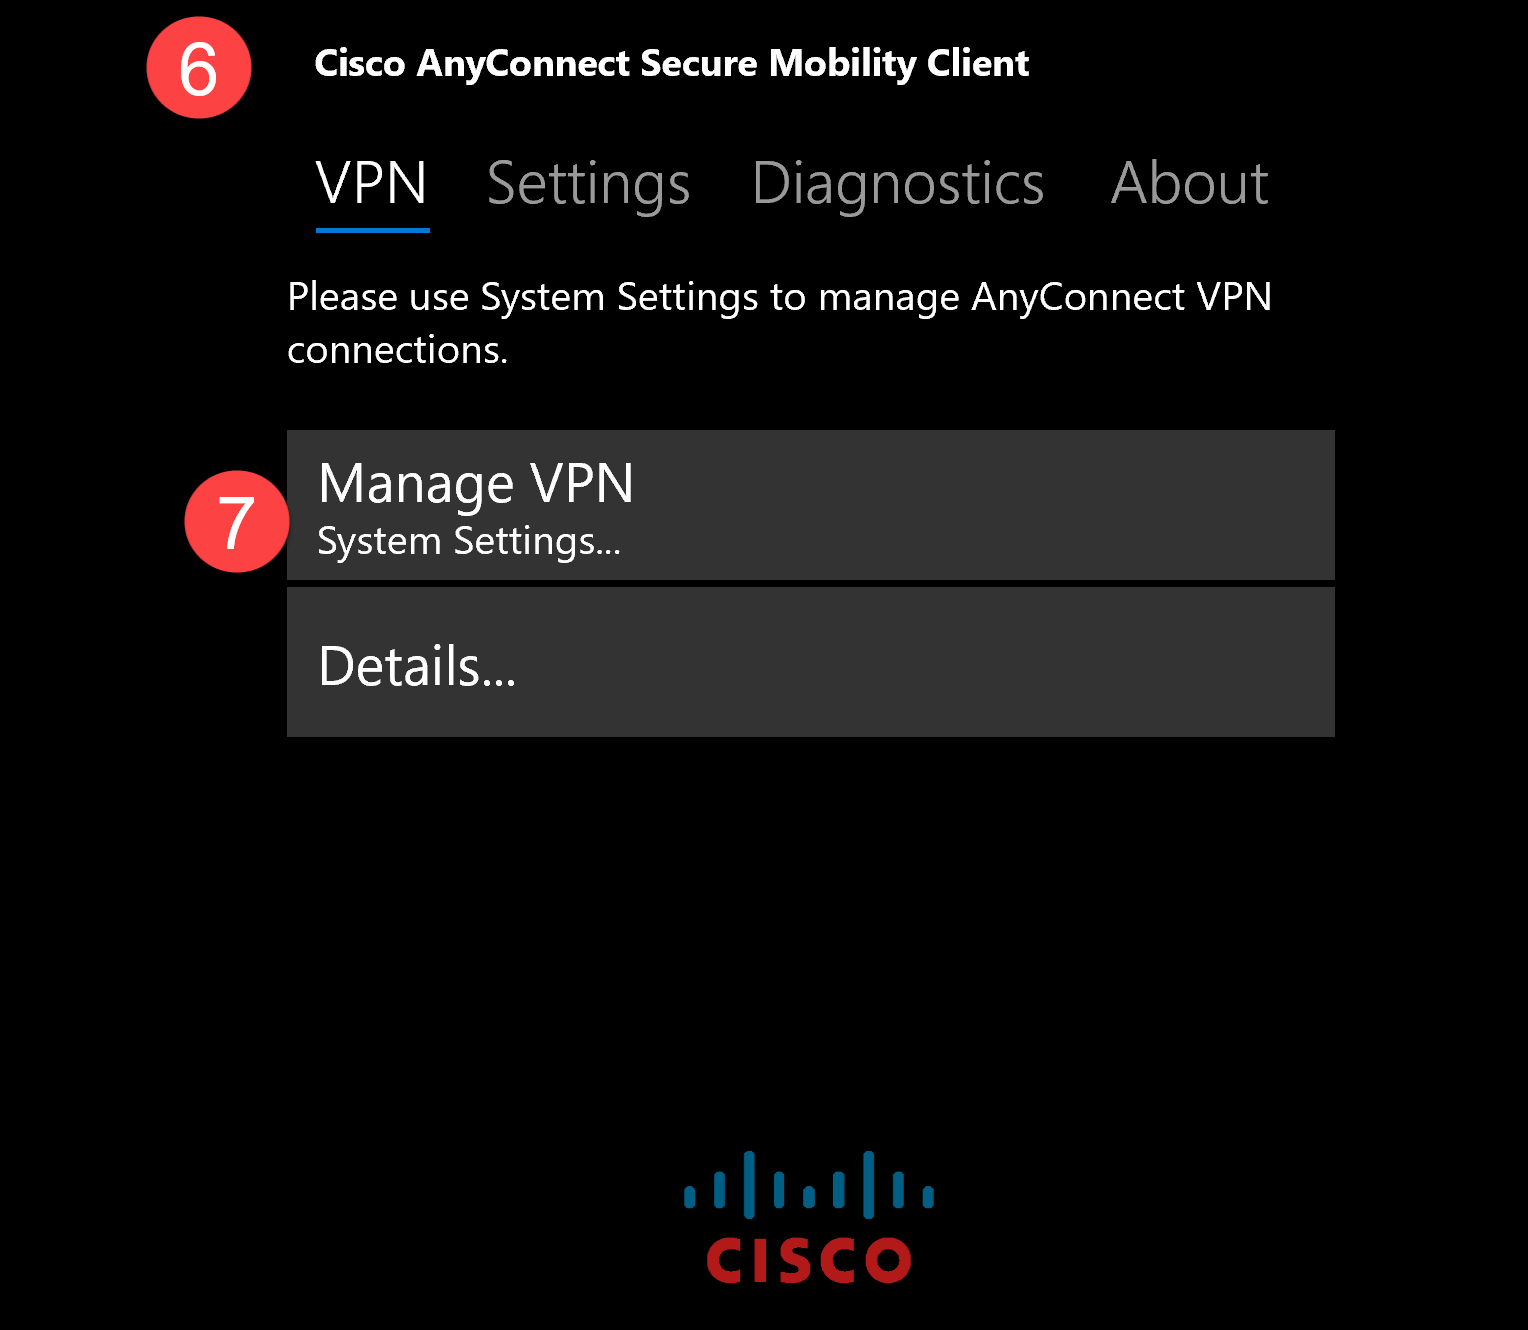
6) The Cisco AnyConnect Secure Mobility Client will start
7) Click on Manage VPN – System Settings
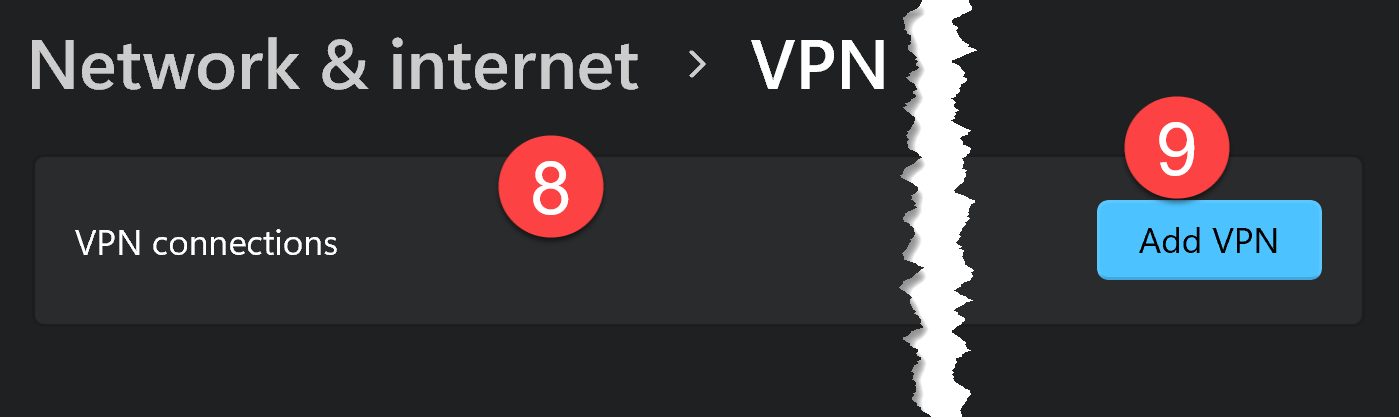
8) The Network & Internet > VPN Setting page will open
9) Click Add VPN
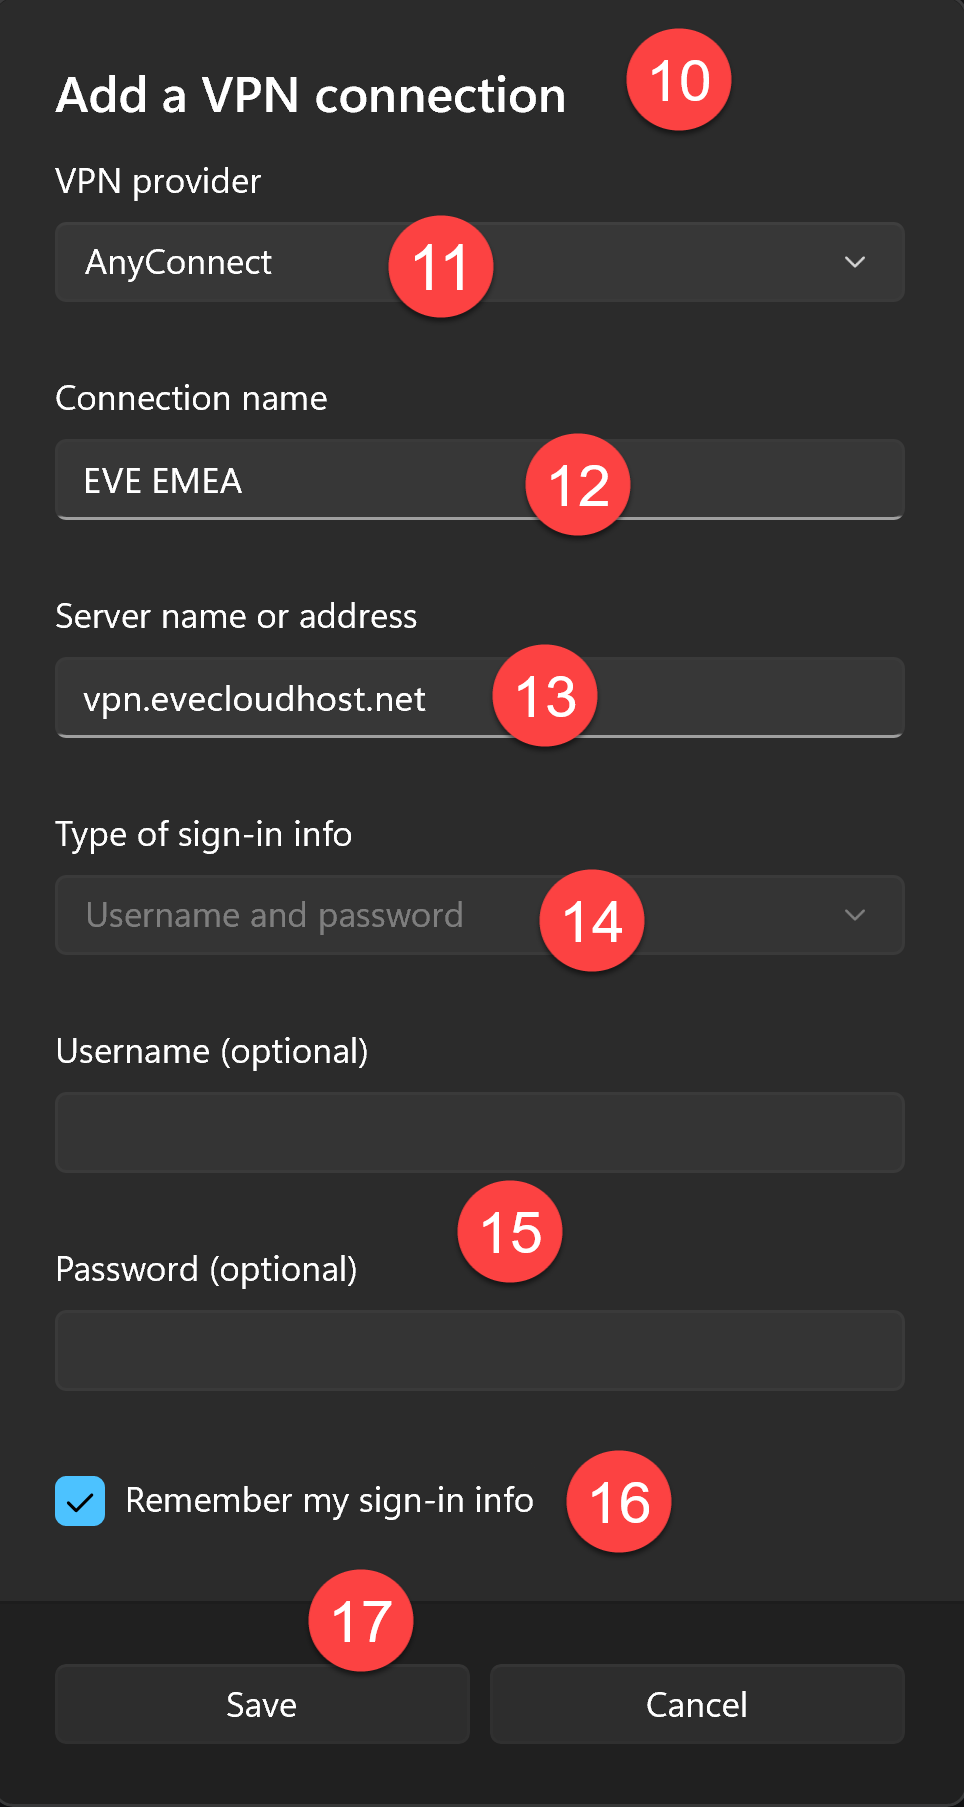
10) The “Add a VPN connection” form will popup
11) In the VPN Provider field, click the drop down arrow and select the newly installed AnyConnect app
12) In the Connection name field, type EVE EMEA
13) In the Server name or address field, type vpn.evecloudhost.net
14) The Type of sign-in info is automatically set to Username and password. Keep it as it is.
15) The Username and Password cannot be entered at this point. They will be entered in the next page
16) Check the Remember my sign-in info option. Please note only the Username will be saved
17) Click Save
18) The Network & Internet > VPN page will open again and list the newly setup EVE EMEA connection
19) Click Connect

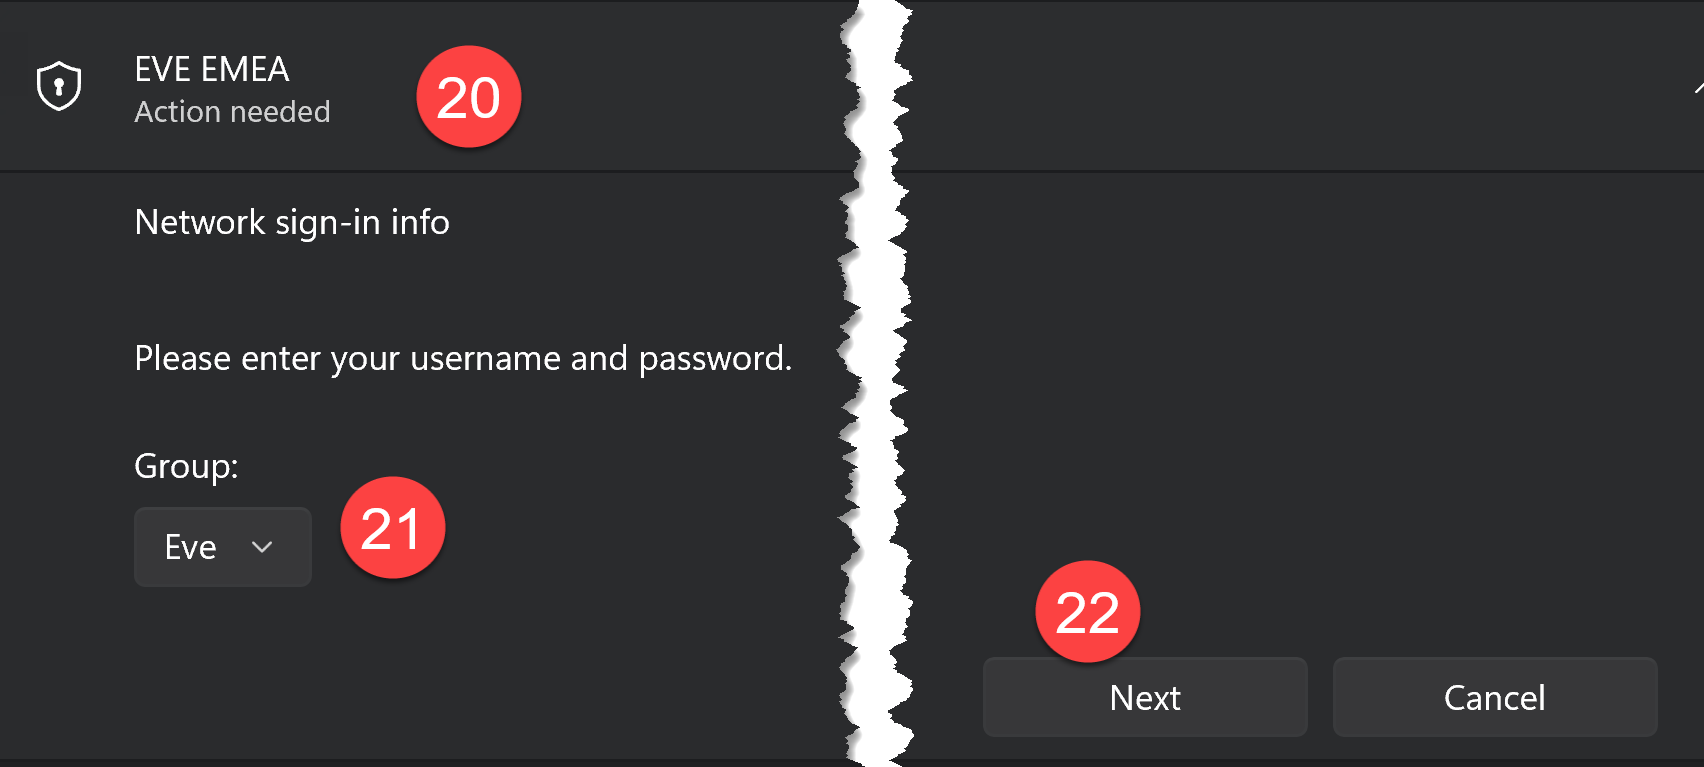
20) Action is needed to connect
21) Make sure the Group is set to EVE
22) Click Next
23) Type your VPN username, as provided by our technicians
24) Type your VPN password, as provided by our technicians
25) Click Next

26) You are now connected.

You can now launch EVE, select your hosted database and connect as usual.
NOTE. Cisco AnyConnect VPN will be disconnected when your PC goes to standby or when the Windows User signs out. The app will not provide any notification. Therefore, we recommend to prevent the PC from going into standby or sleep mode.
Click here to download the Cisco VPN setup program. Save it to your computer, unzip the file and then run it.
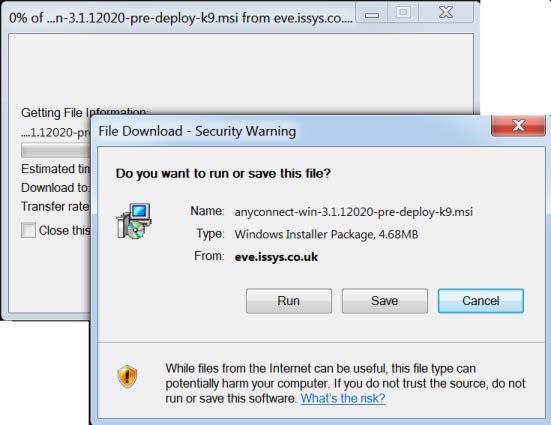
Follow the screen prompts.
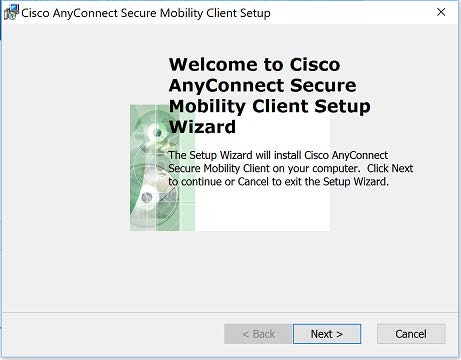
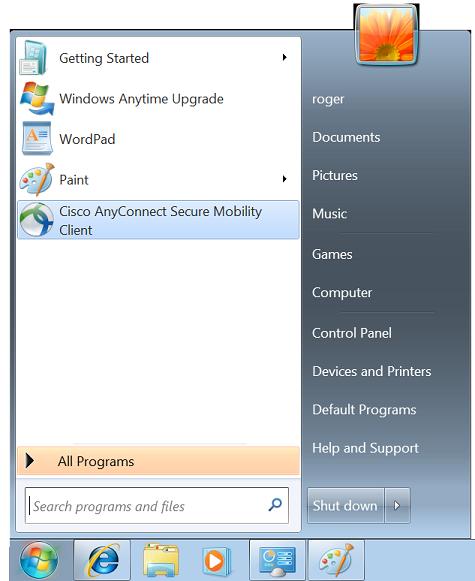
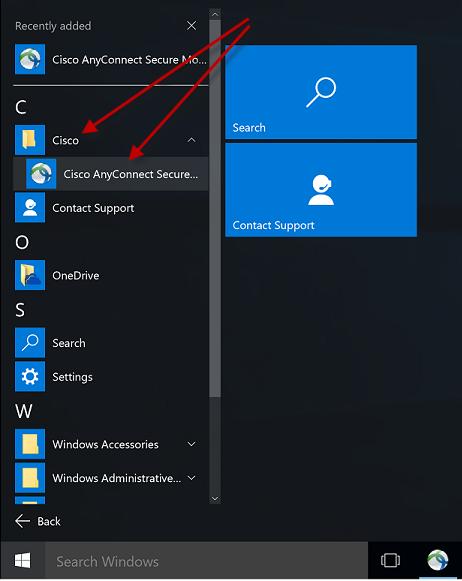
When the setup is complete, start the Cisco AnyConnect Secure Mobility Client program. How you do that depends on
the version of Windows you have. E.g. in Windows 7 click Start and you’ll see the program on your Start menu.
In Windows 10, click Start then All Apps. You’ll see the program in the Recently Added section and also in the Cisco
folder.
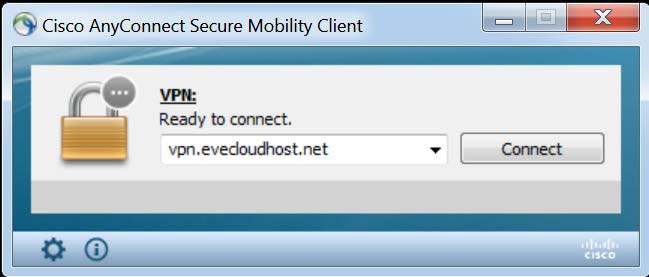
Once the program has started, type vpn.evecloudhost.net into the text box and click Connect.
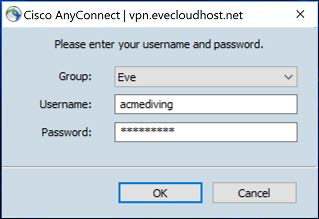
Make sure Eve is selected in the Group box, enter the username and password we sent you by email and click OK. If you were provided with a security certificate, then install your security certificate.
You are now ready to start EVE and connect to your hosted database.
Note: each time you reboot your computer, the Cisco client will start automatically. i.e. after the first time you won’t
need to start it by clicking the Start button as described above. For security reasons, you will be required to enter your
password each time.
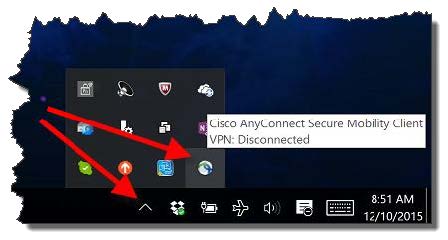
When the VPN is running, you’ll see the Cisco icon in your system tray at the bottom right of your screen. You can click
that if you ever need to Disconnect or Reconnect the VPN.
This tutorial applies to EVE Users who:
1) are running an EVE PRO Cloud licence
2) received EVE PRO Beta version 3.xx or newer
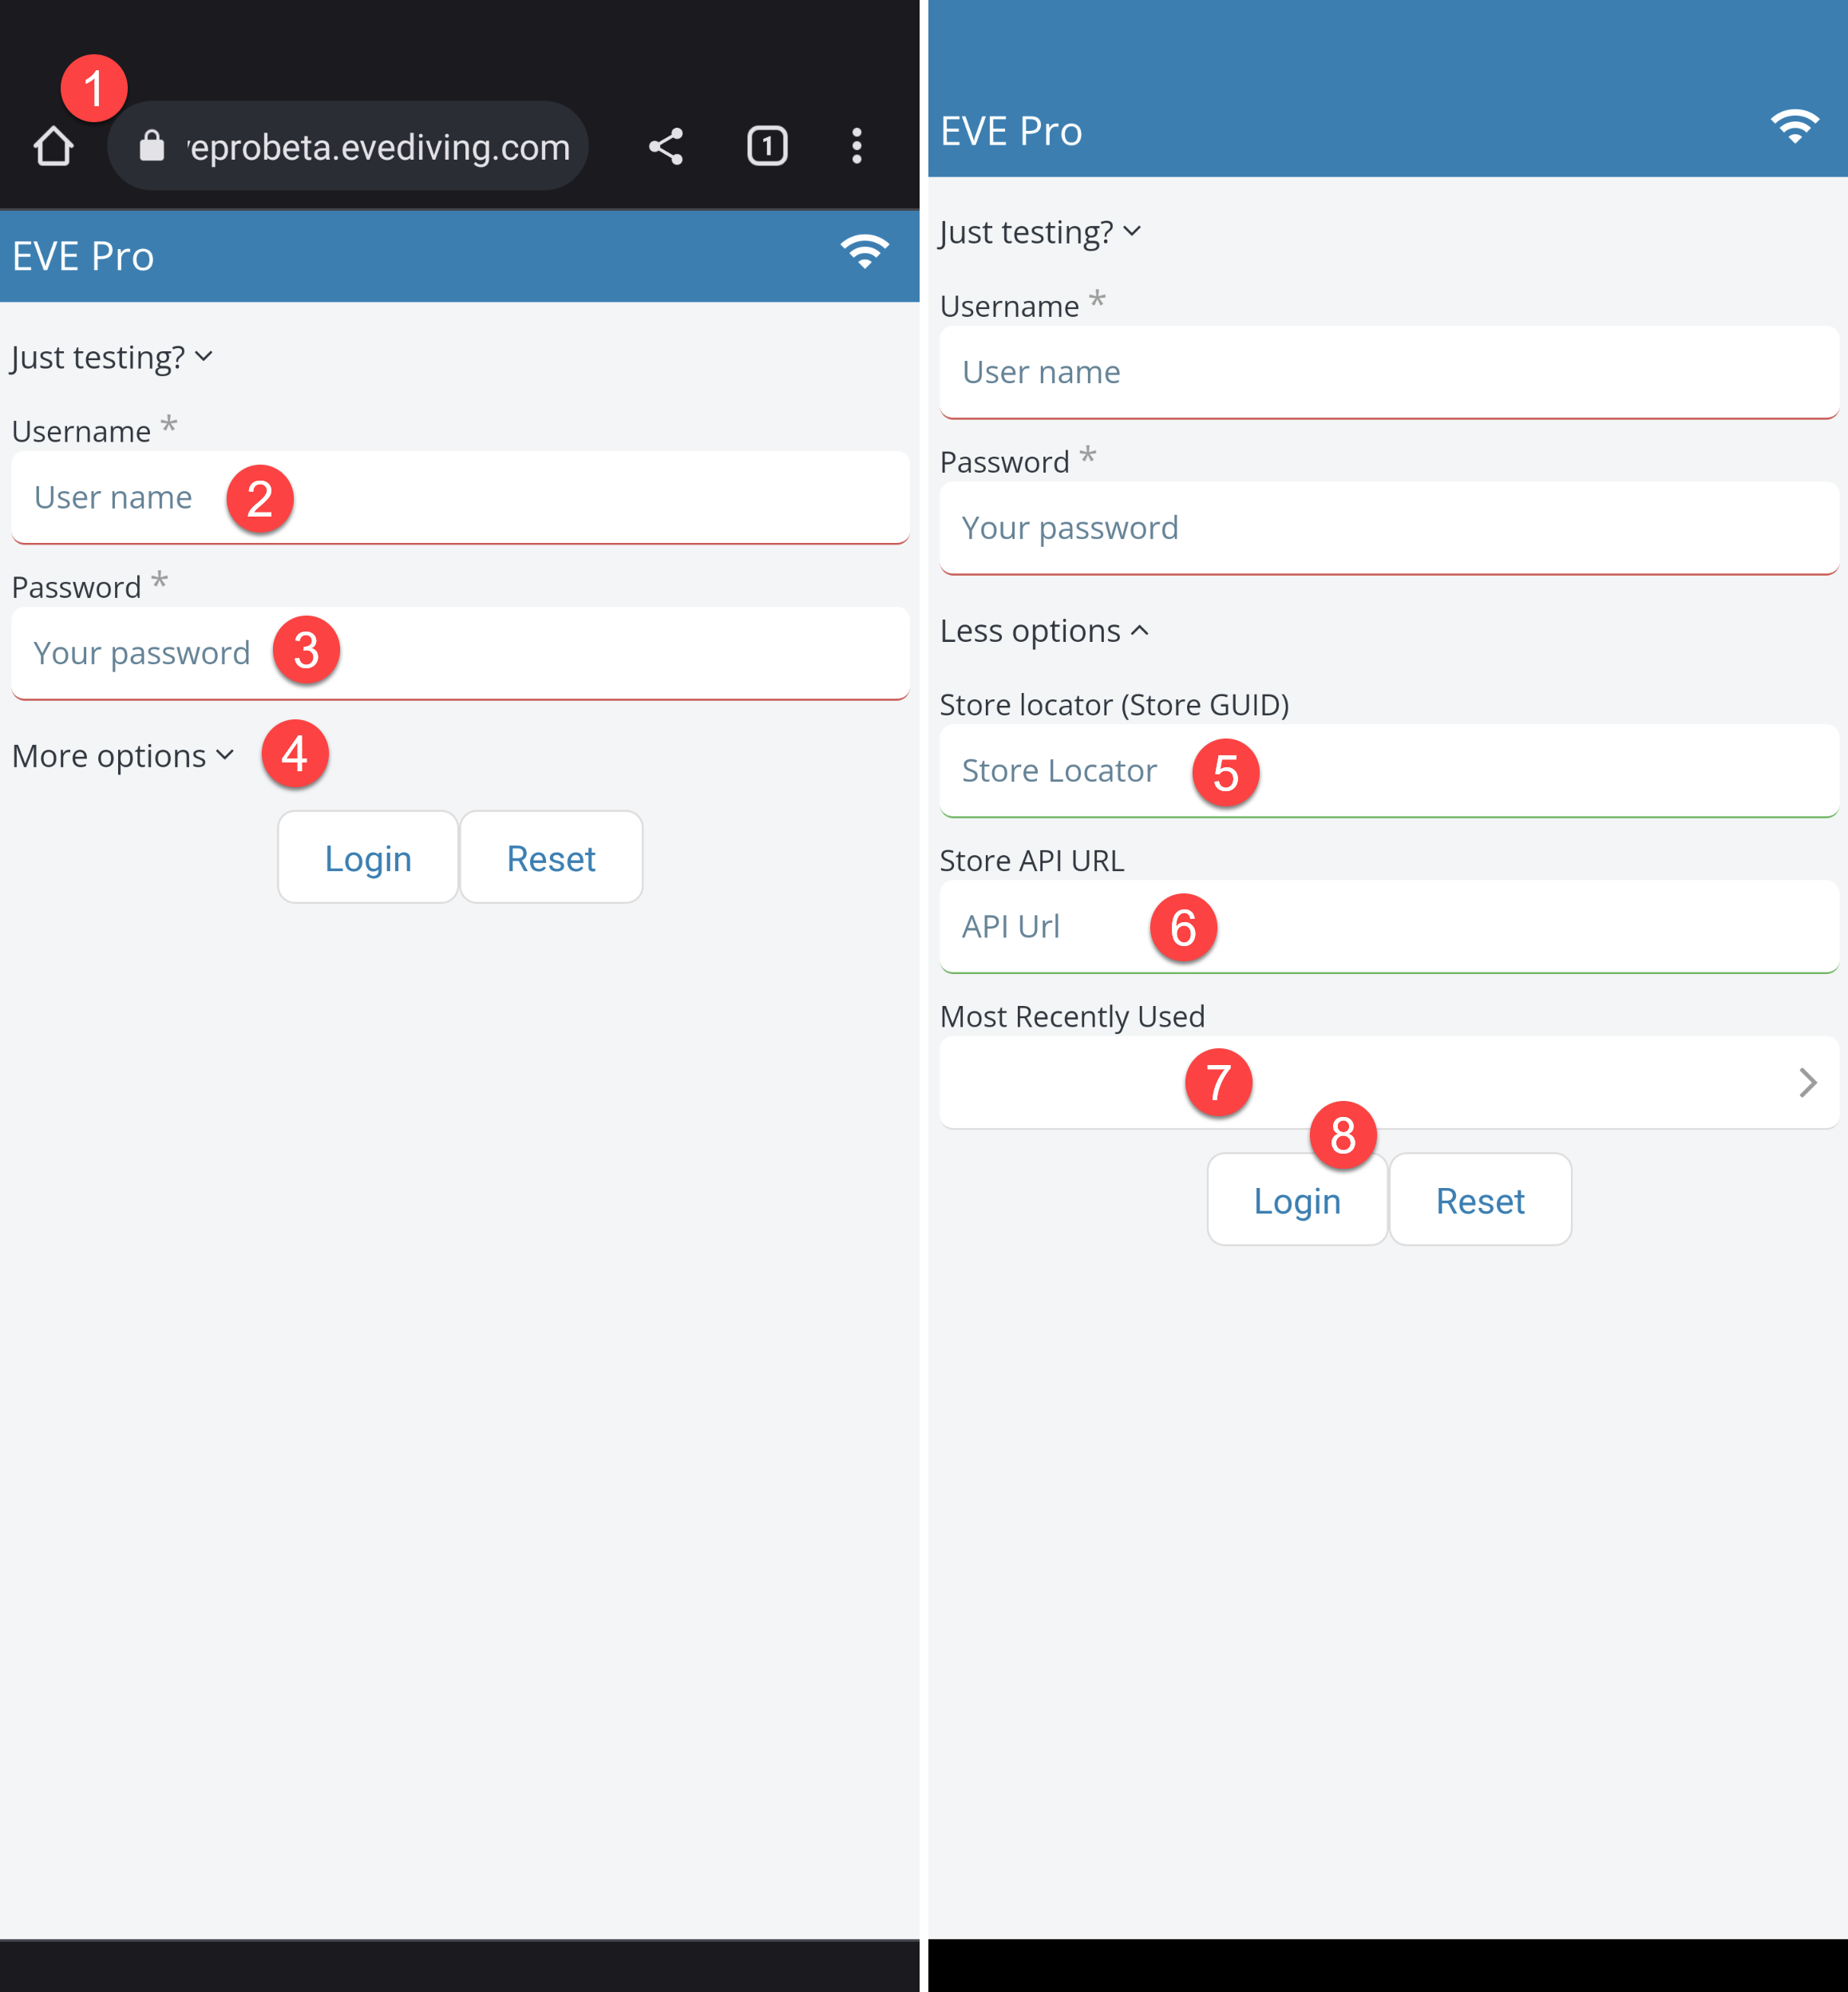
To login to EVE PRO Beta version 3.xx or newer, on a browser, whether mobile or desktop:
1) In your browser, type the following address, exactly as typed: https://eveprobeta.evediving.com/
2) In the Username field, type the same User Name used to login to EVE
3) In the Password field, type the same Password used to login to EVE
The next steps are required only on your 1st login or after you click the RESET button
4) Click More Options
5) In the Store Locator (Store GUID) field, type the string provided by EVE Diving Team
6) In the Store API URL, type the address provided by EVE Diving Team
7) It is not necessary to set the Most Recently Used field. It will populate on the next login attempt
8) Click Login
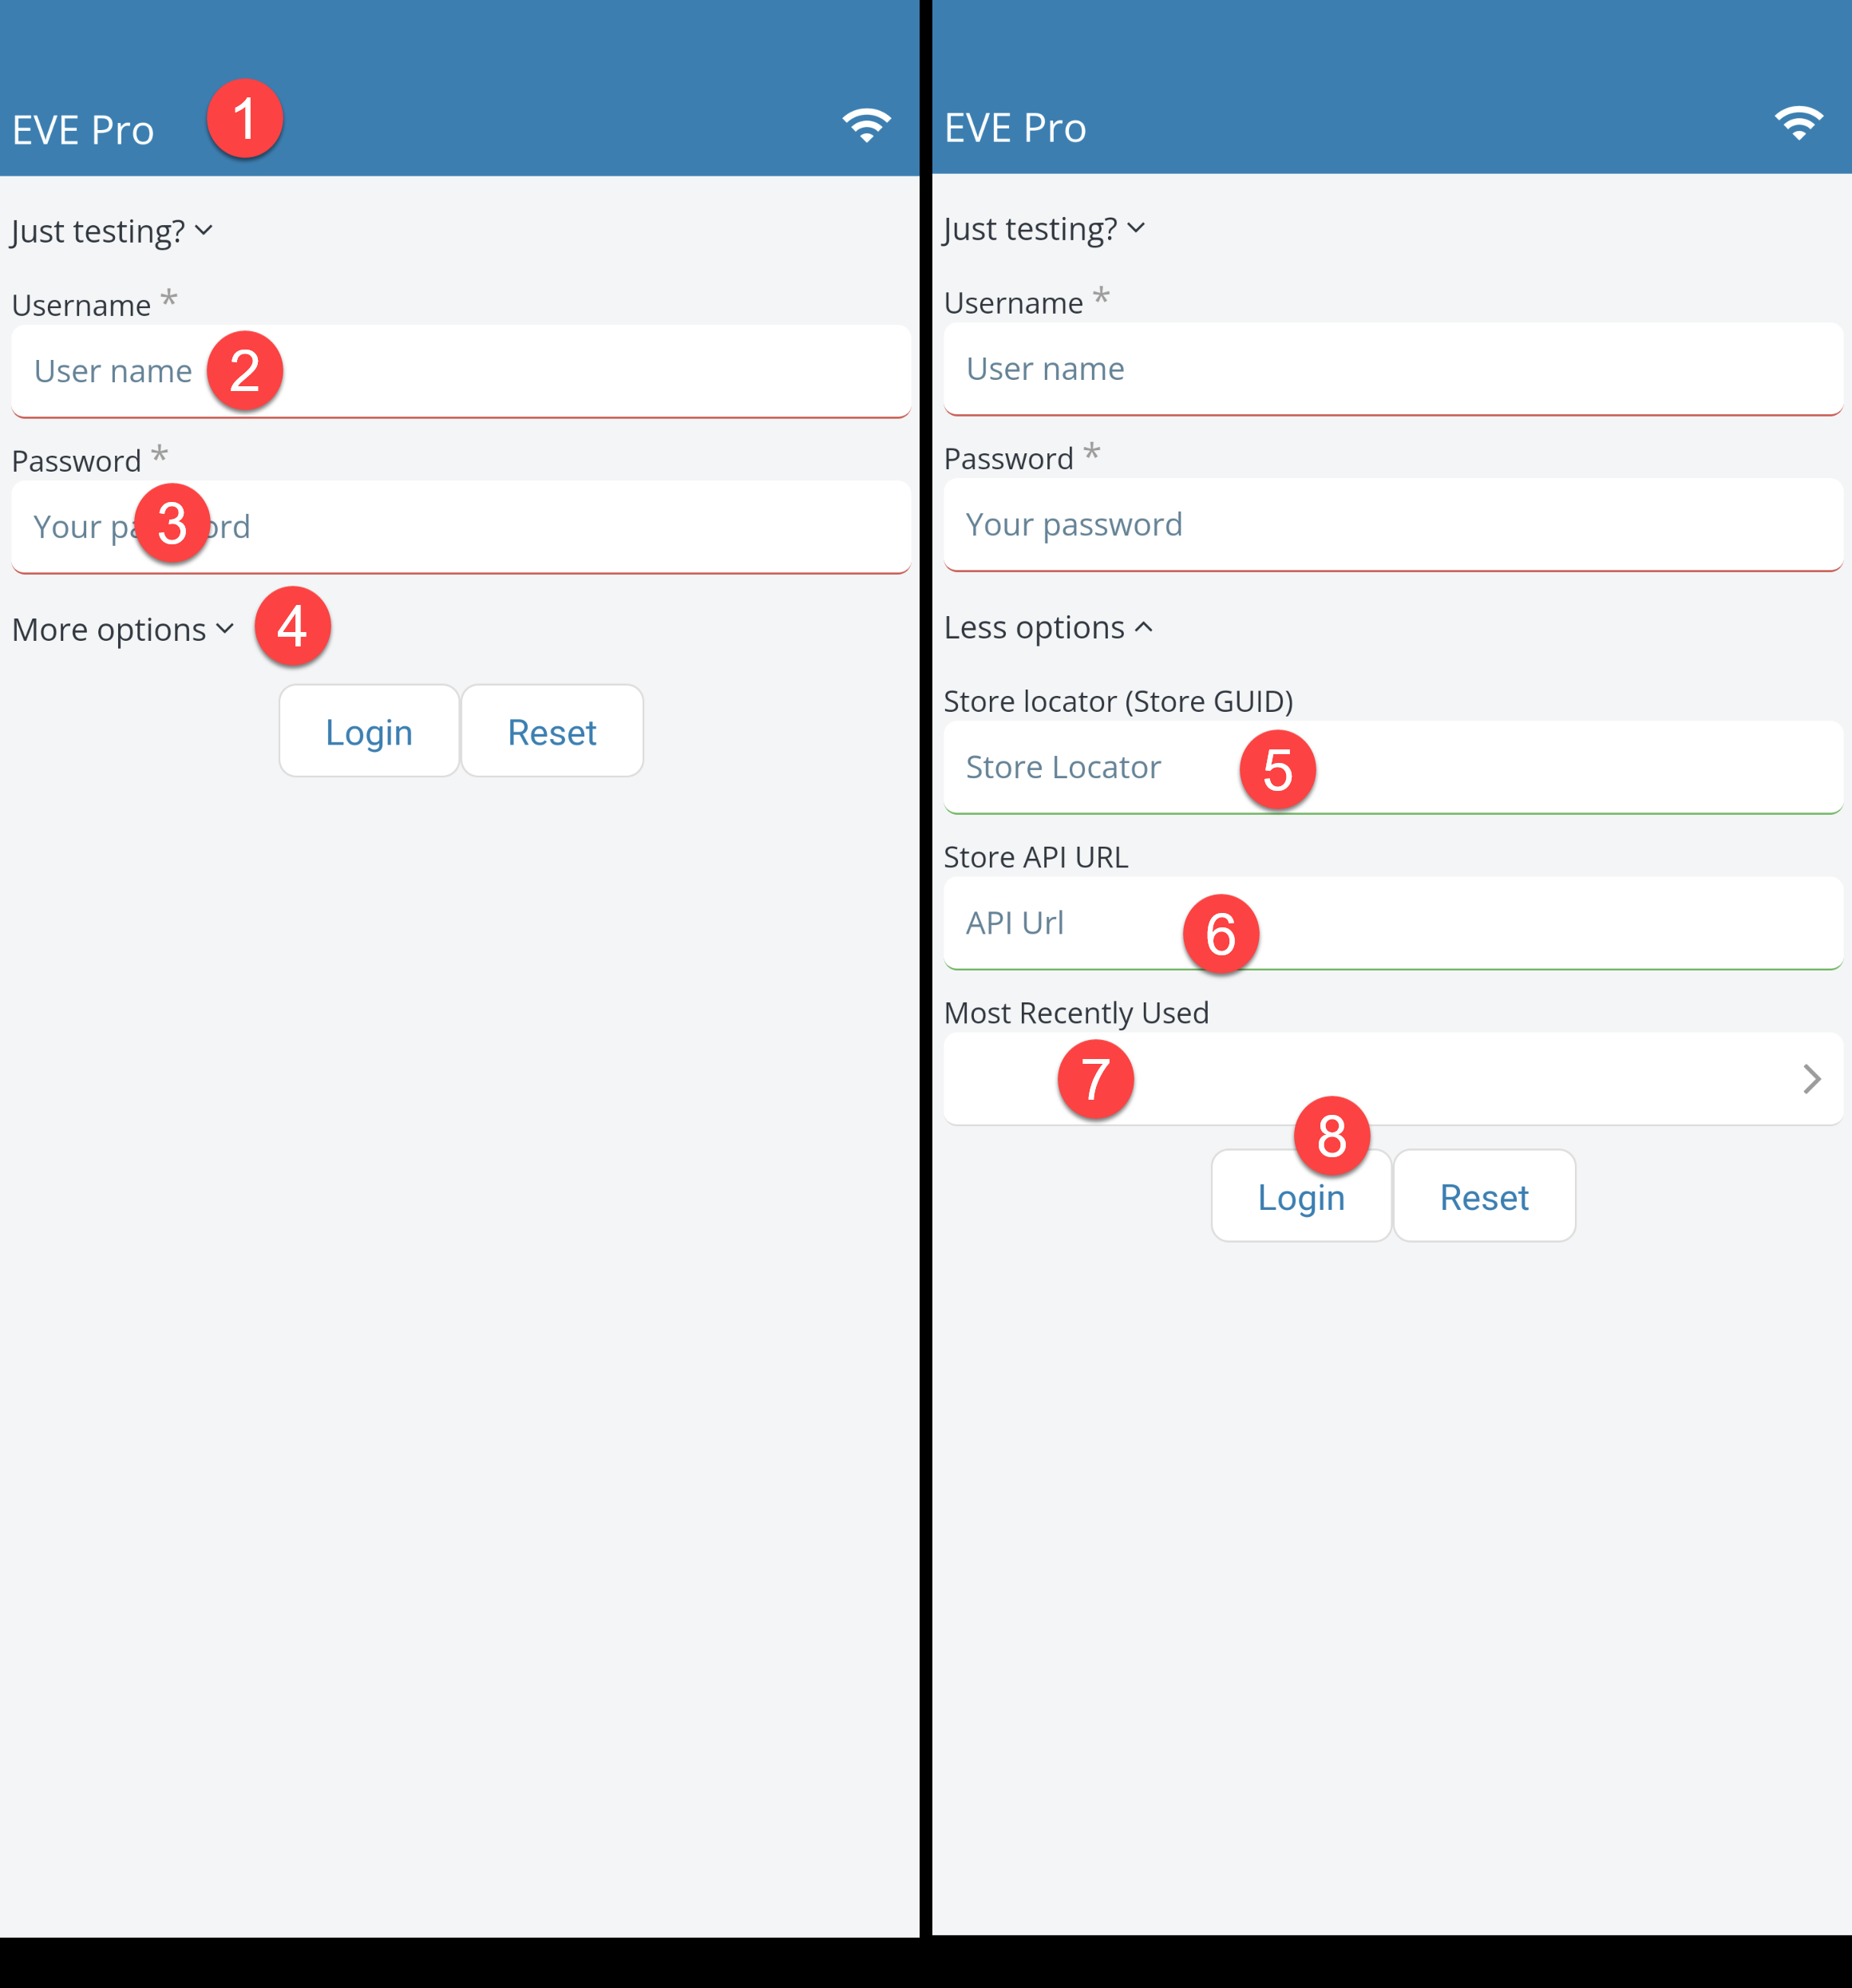
This tutorial applies to EVE Users who:
1) are running an EVE PRO Cloud license
2) received EVE PRO Beta version 3.xx or newer
3) have installed the app version 3.xx or newer on their Android or iOS mobile device
To login to EVE PRO Beta version 3.xx or newer, on a browser, whether mobile or desktop:
1) On your mobile device, launch EVE PRO app*
2) In the Username field, type the same User Name used to login to EVE
3) In the Password field, type the same Password used to login to EVE
The next steps are required only on your 1st login or after you click the RESET button
4) Click More Options
5) In the Store Locator (Store GUID) field, type the string provided by EVE Diving Team
6) In the Store API URL, type the address provided by EVE Diving Team
7) It is not necessary to set the Most Recently Used field. It will populate on the next login attempt
8) Click Login
*email support@evediving.com to receive information on how to download and install the correct app version for your device
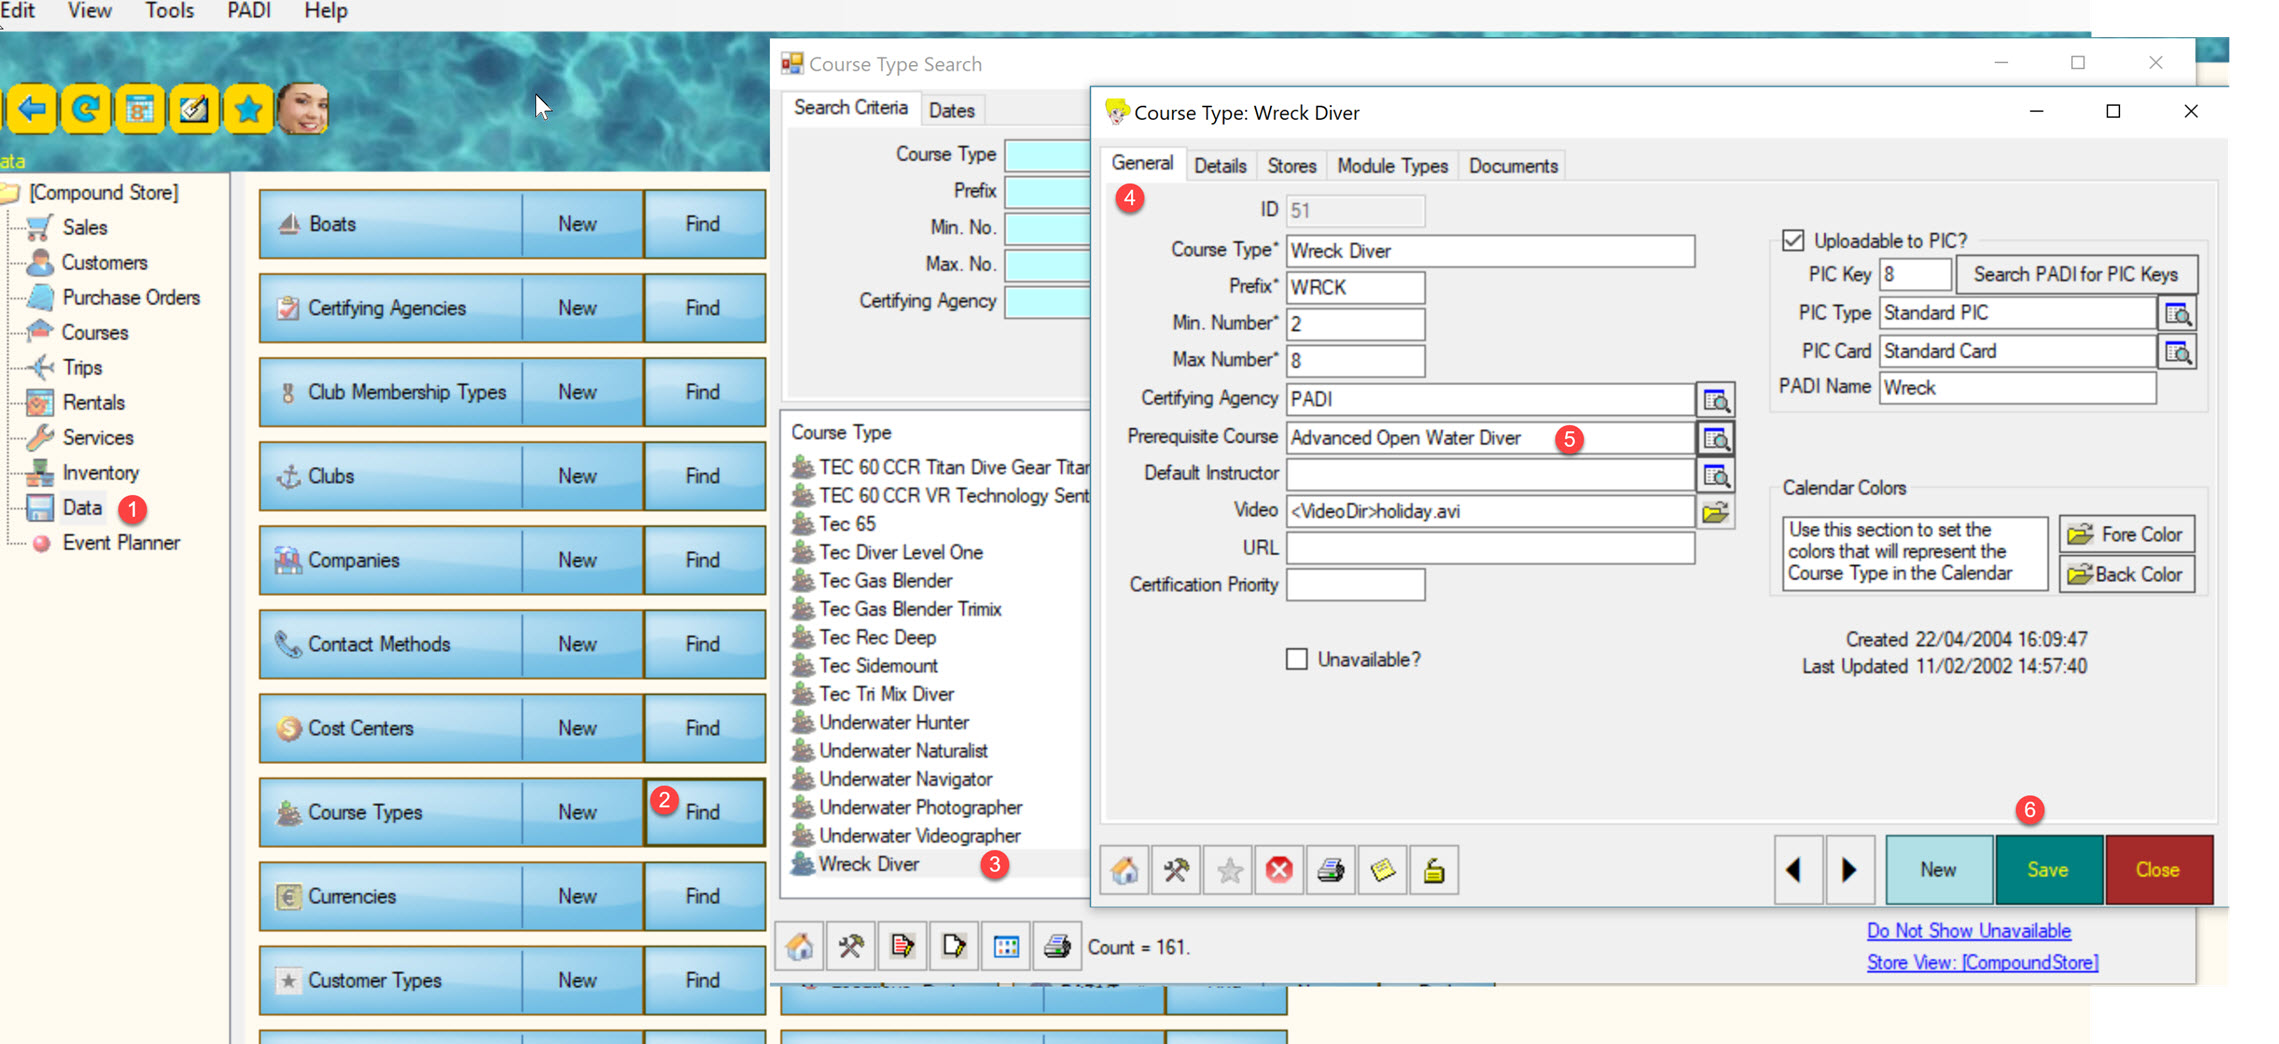
Courses

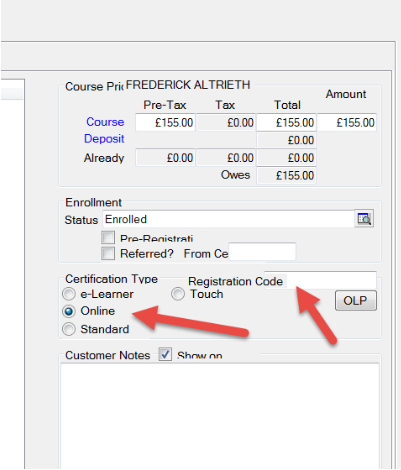
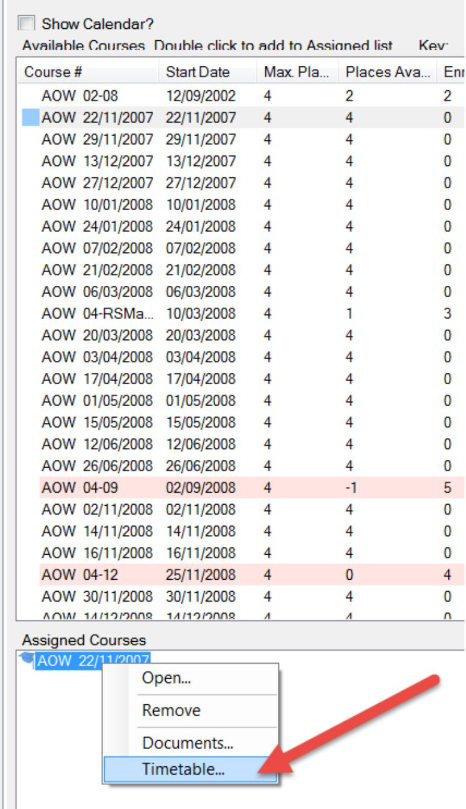
Go to Courses / Find and open the Course


When a course is marked “Completed”, you will be prompted to certify each student. For each student, you can add interest in con-ed courses. By default, EVE will present the list of courses where the course being completed is a prerequisite.
Therefore if, as an example, you wish to add the Wreck Diver Specialty course to that list, please proceed as follows:
- Go to Data
- Go to Course Type and click Find
- Select a course you wish to add as interest and double click to open it
- Select the General Tab
- Set the prerequisite course
- Click Save


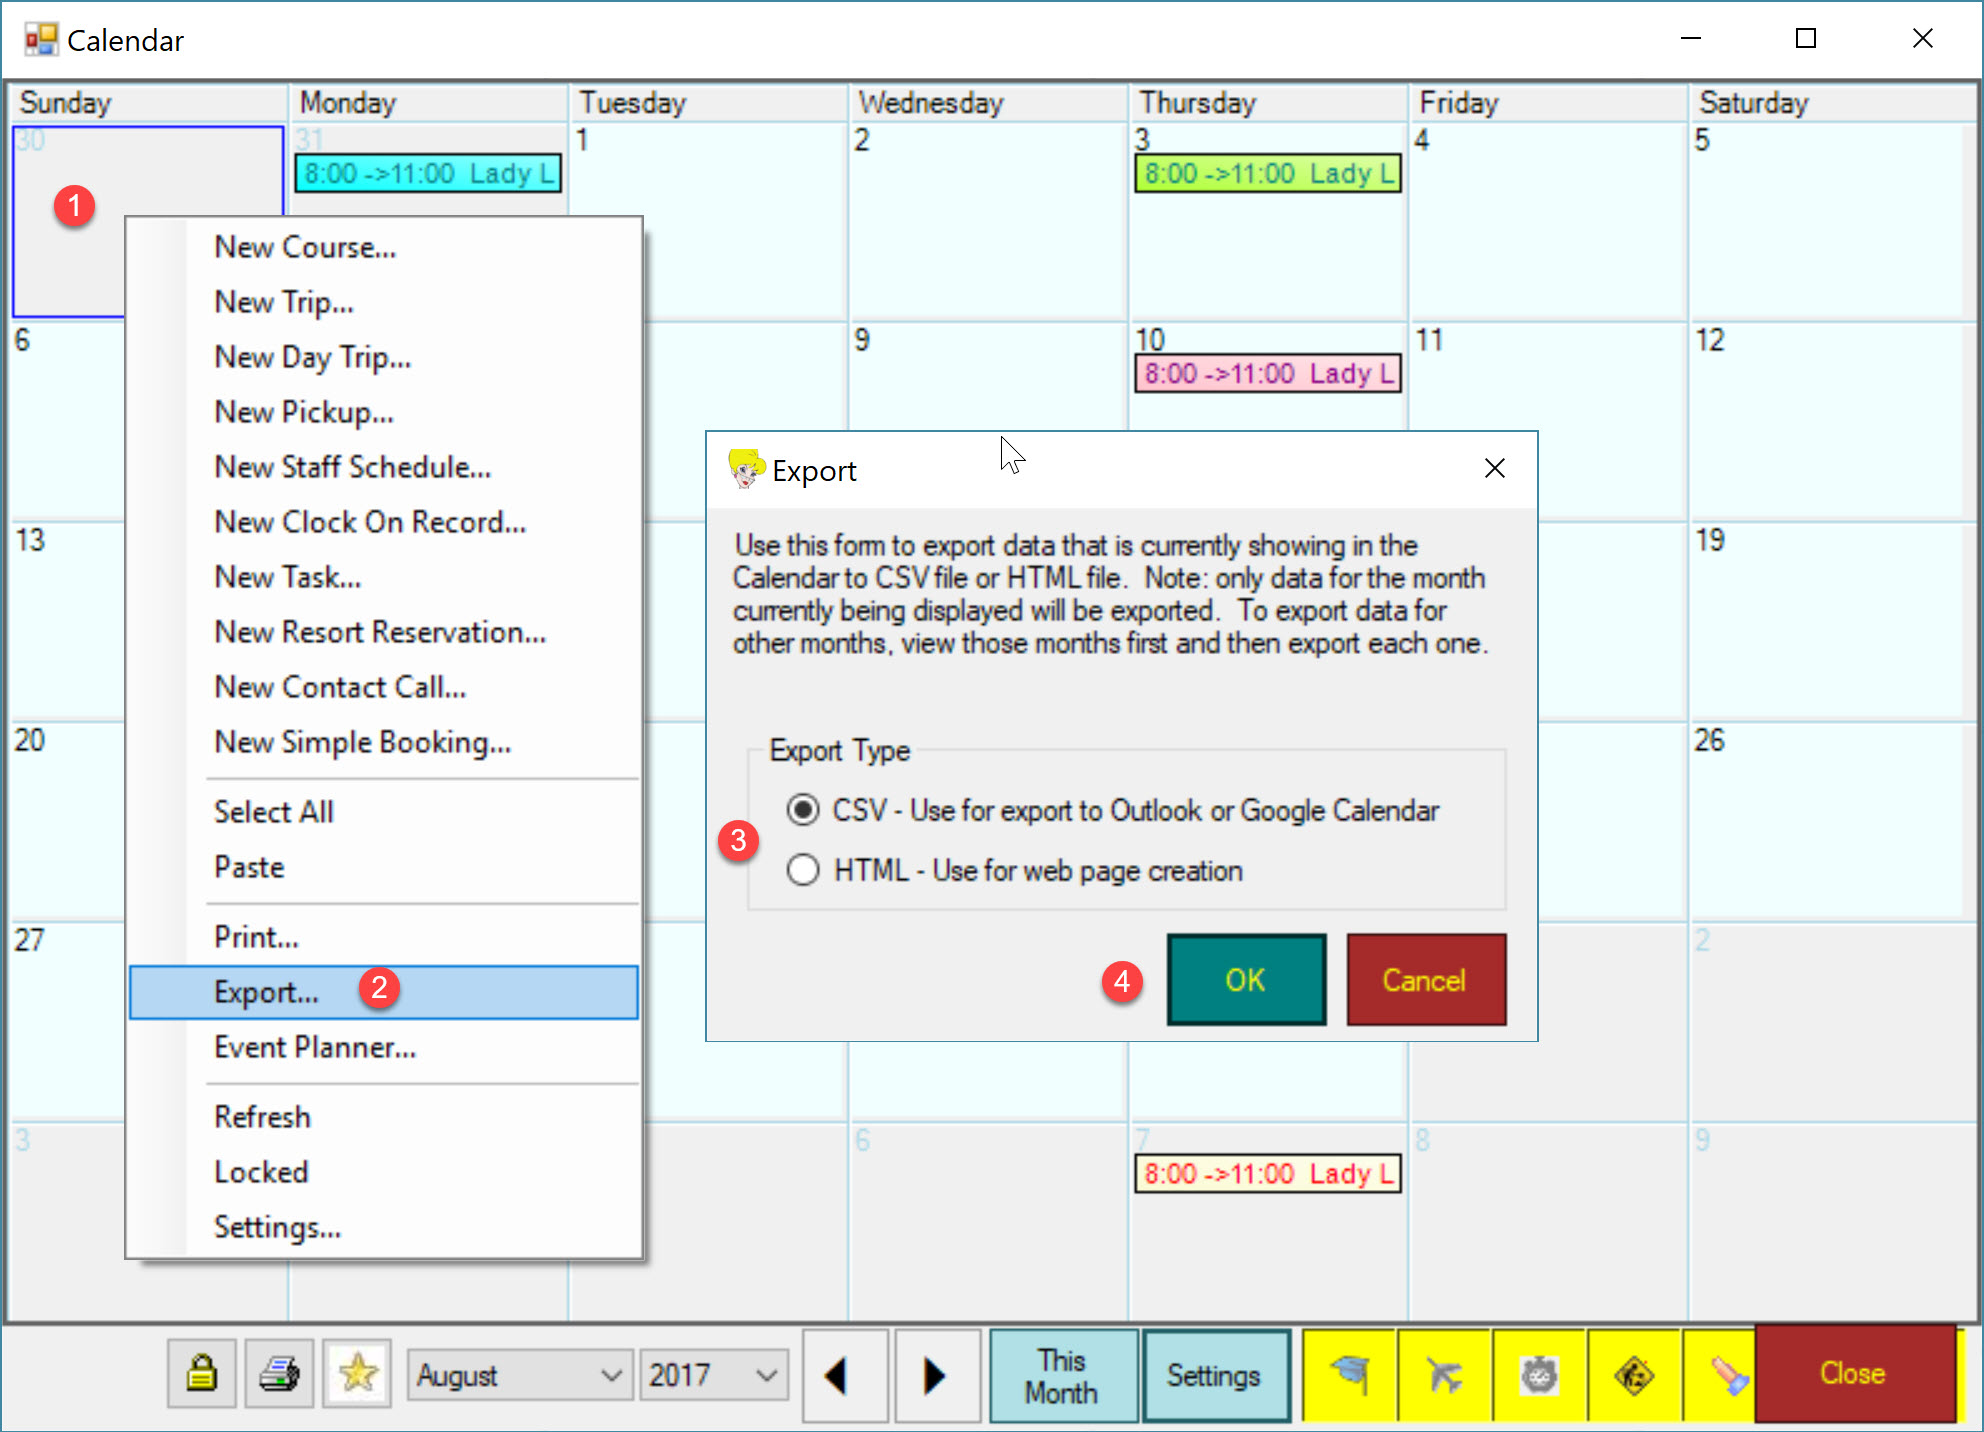
To export your EVE Calendar to Google Calendar, please proceed as follows:
- Right click anywhere on the calendar
- Select Export
- Select the option you see fit for the purpose
- Click OK
This solution offers a static calendar integration and a new file will have to be uploaded each time you create a new course or modify the current calendar. For a dynamic solution, that synchronizes with your EVE database to display courses and trips in real time on an EVE website, then we recommend upgrading to EVE Enterprise.
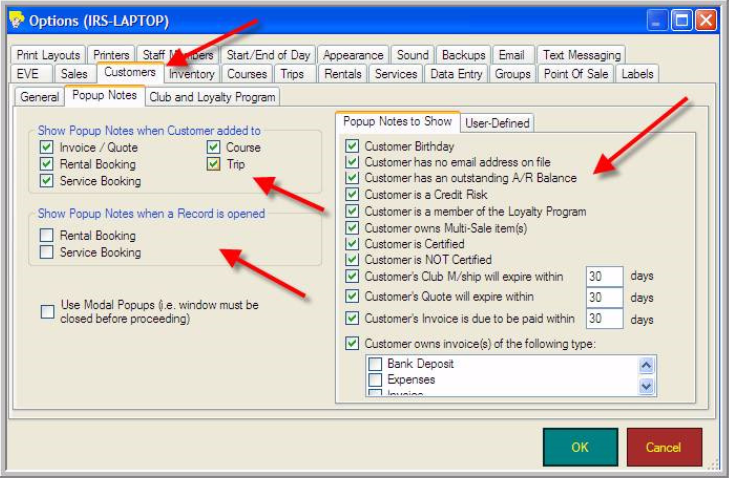
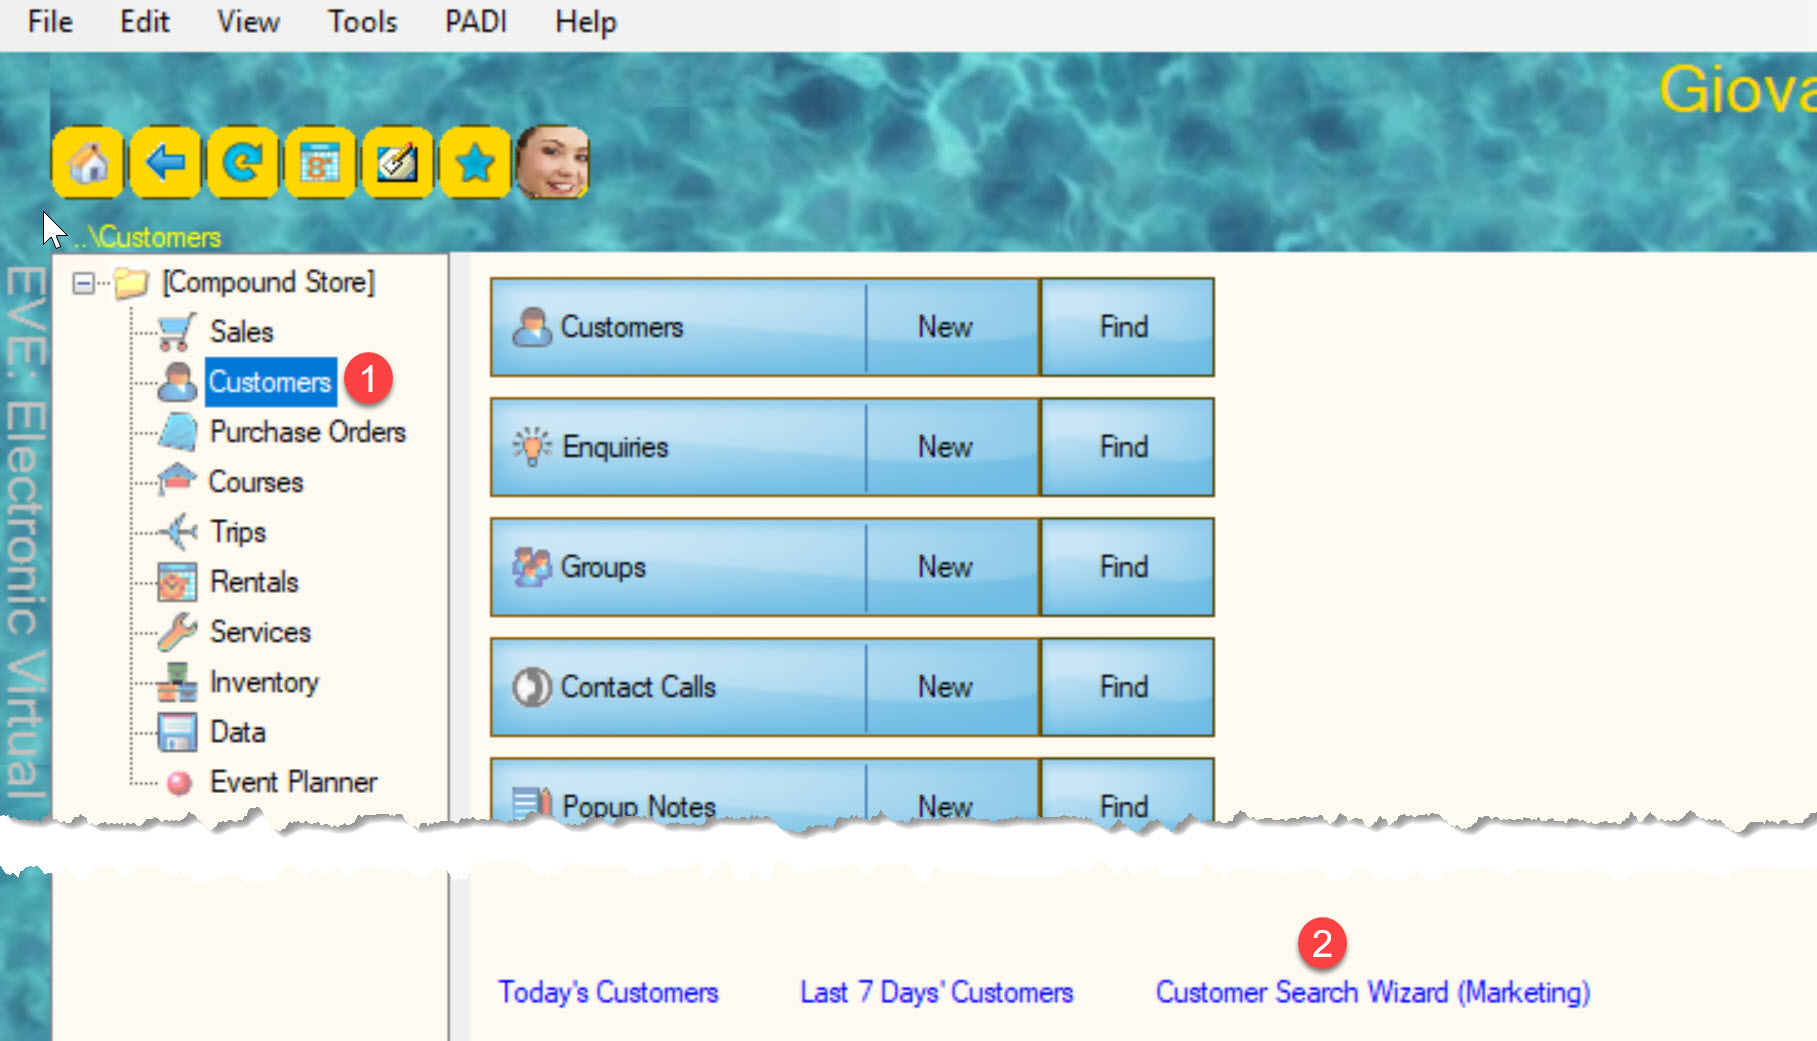
Customers


To mark a customer record (or employee or staff member) as unavailable, please follow this procedure:
- Open the customer record and click on the Details folder
- Check the Unavailable box
- Save the customer record
Customer records marked as unavailable will still display in sales reports as well as any previous transaction, class or trip, however they will no longer be listed when creating a new record like a sales transaction, class, trip, rental booking etc.

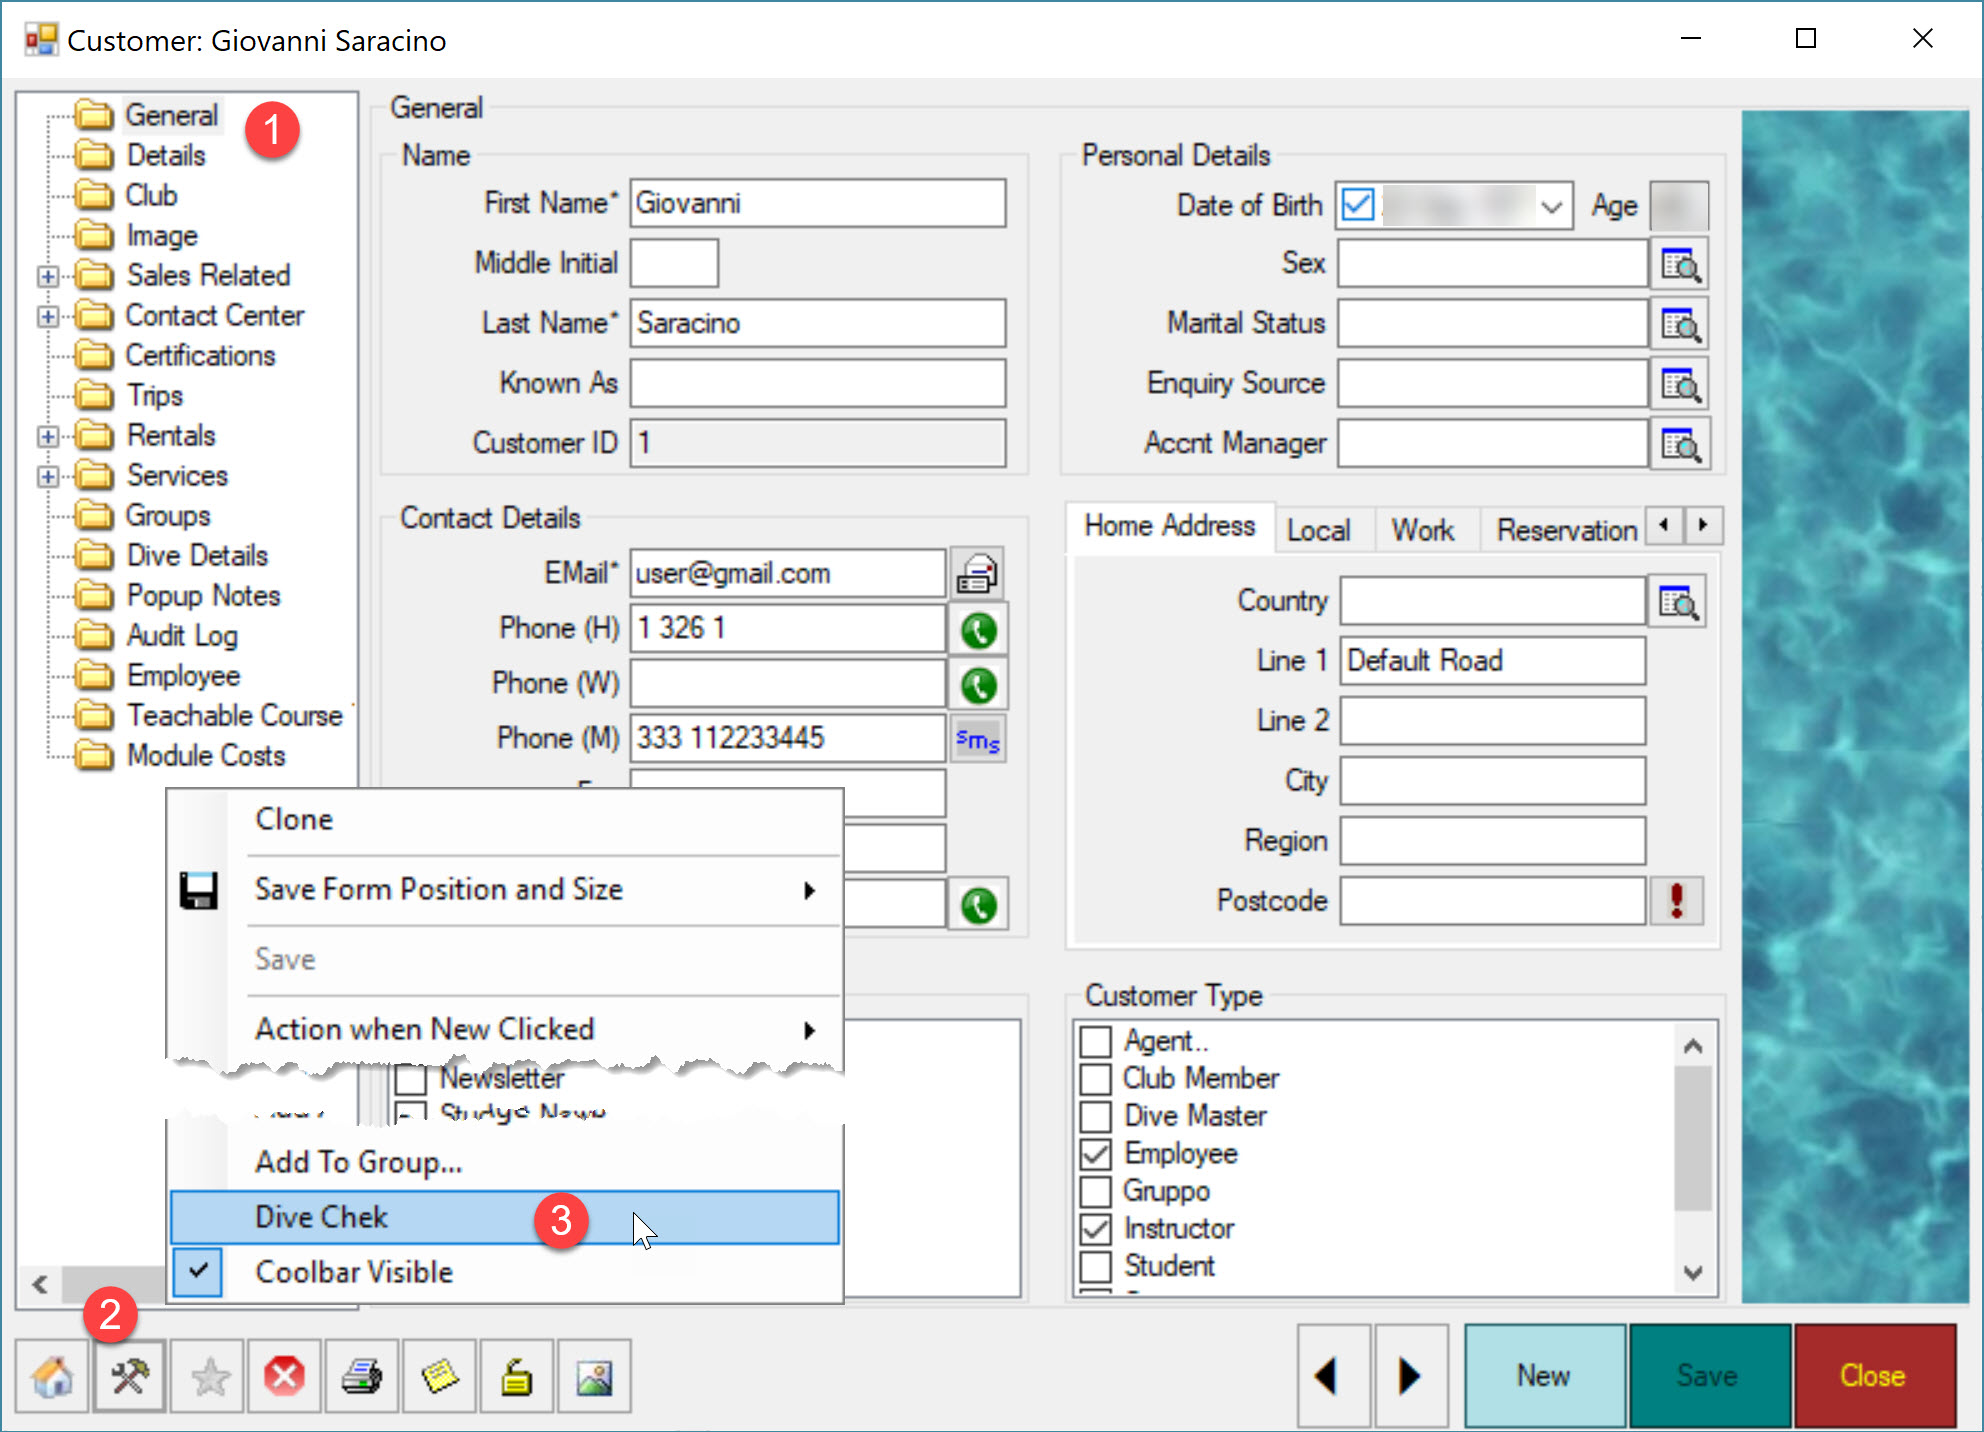
EVE includes a feature to run PADI Dive Check directly from its interface and without logging in to PADI Pro’s site.
If the diver you would like to check is recorded as customer in your EVE database, diver’s details will be retrieved from that record and you will not need to retype them.
To complete a Dive Check for a diver who is recorded in your EVE database, please follow this procedure
1) Open the customer record and click the General folder
2) Click on the Tools icon
3) Click on Dive Check
4) A window will popup with diver’s details. These will be the same as those saved in the customer record. Click Search

5) EVE will contact PADI and return all the diver’s certifications. Click Save to Existing Customer
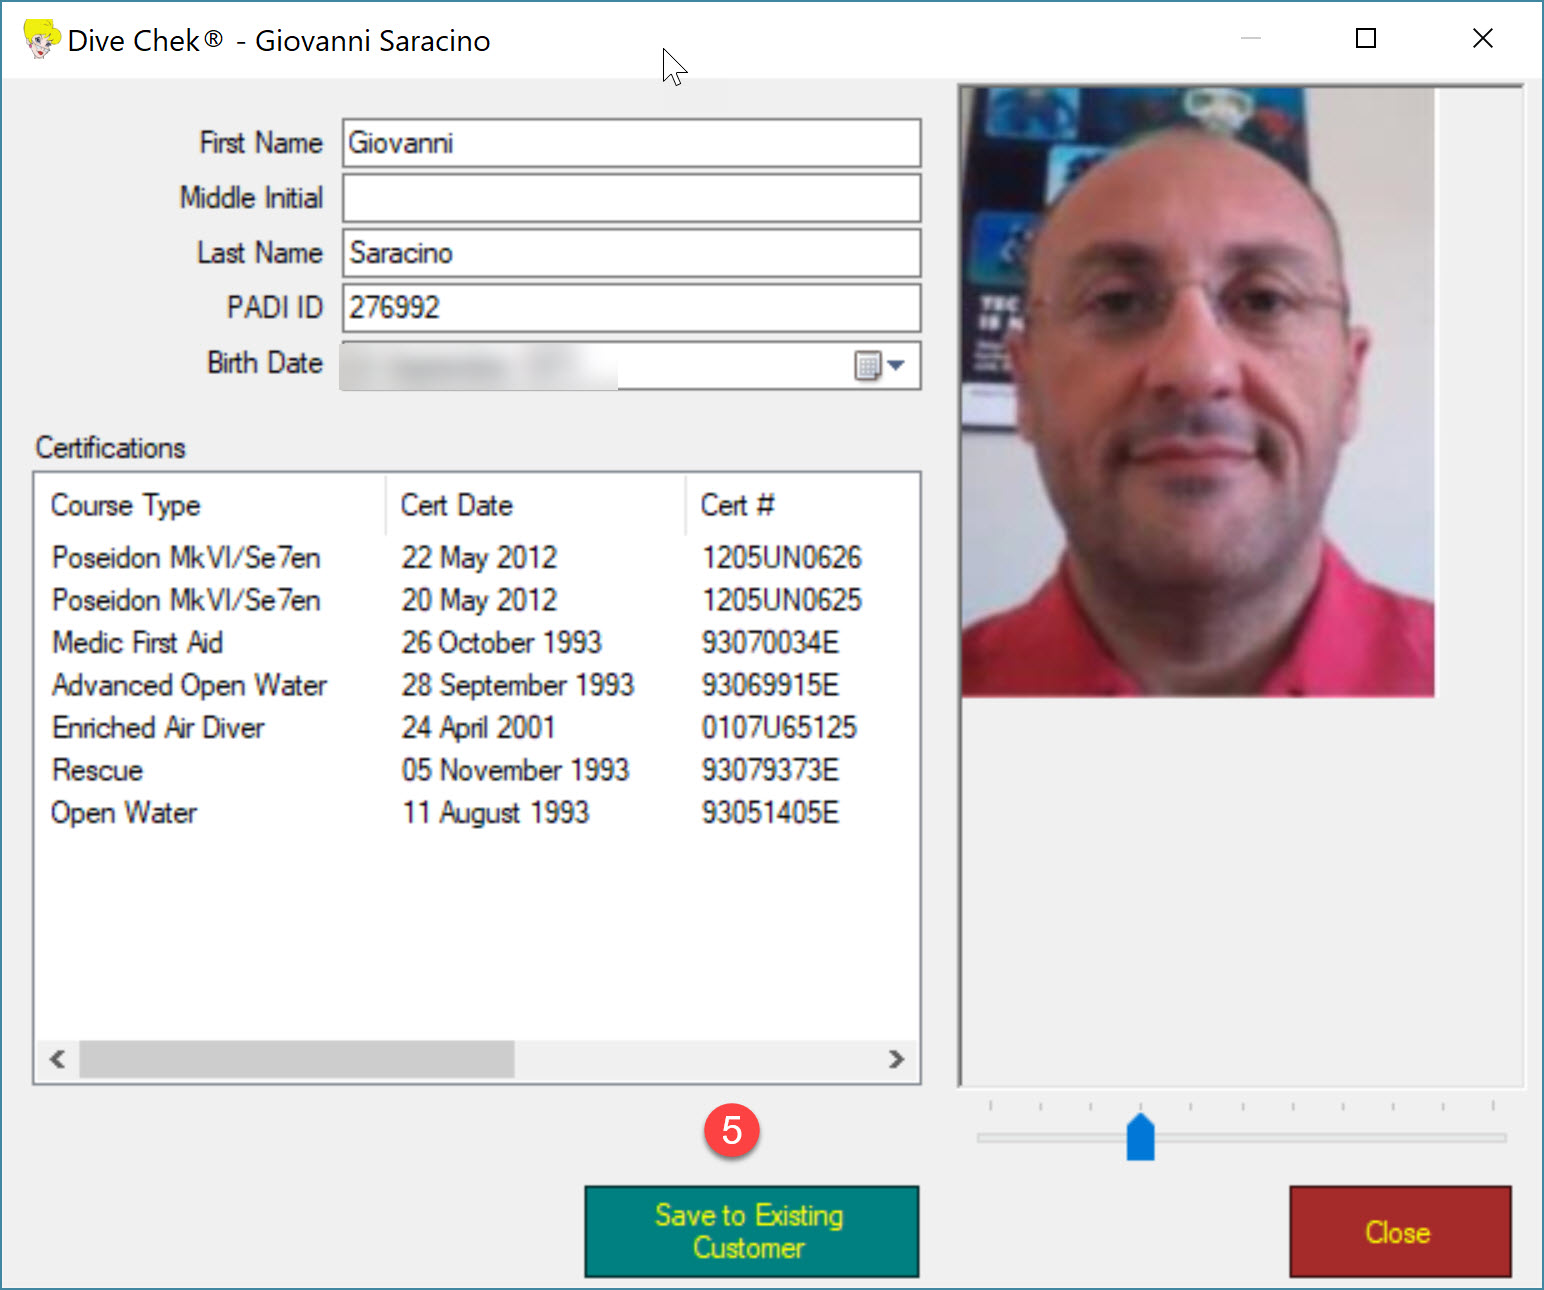
6) EVE will prompt you to select what diver’s details you wish to update. Check those information you need to update
7) Click OK. You may need to close the customer record and reopen it to see the changes.

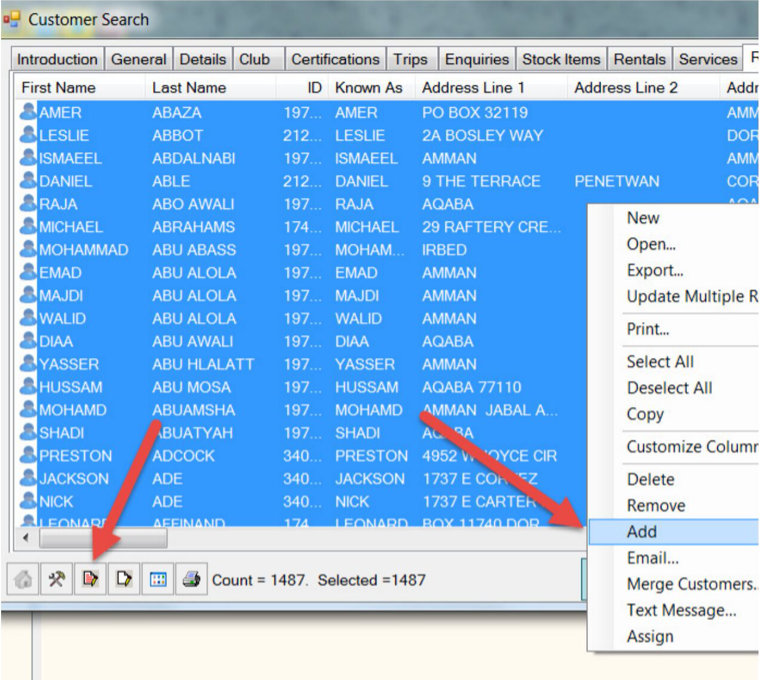
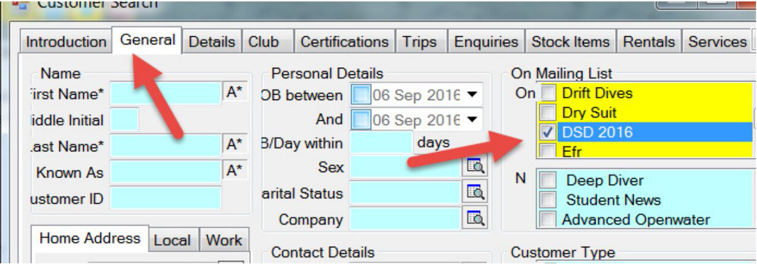
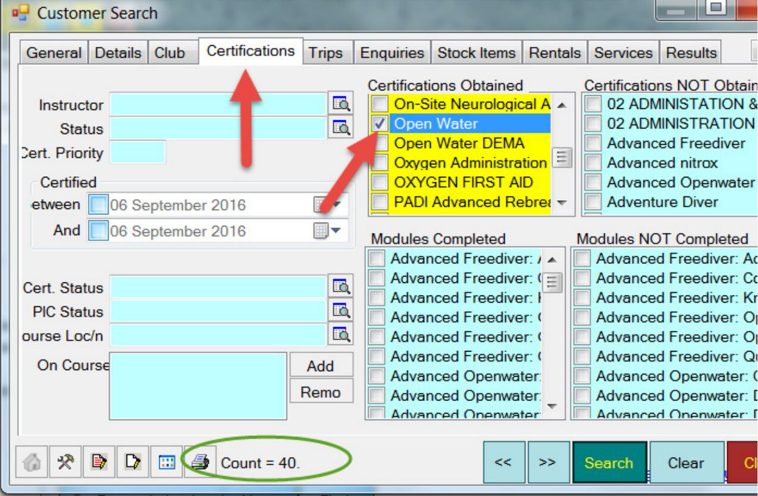
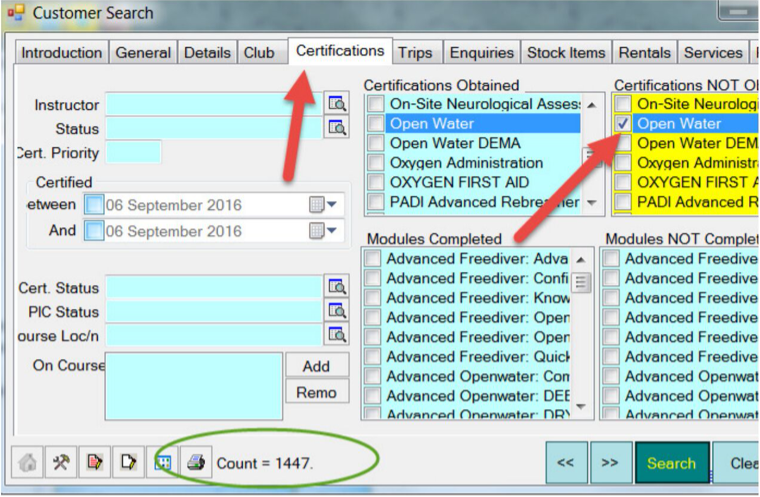
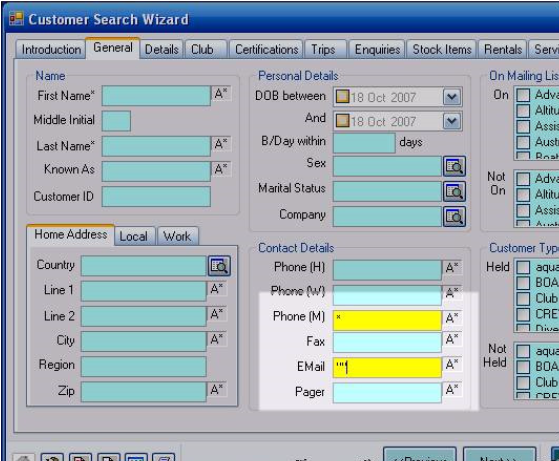
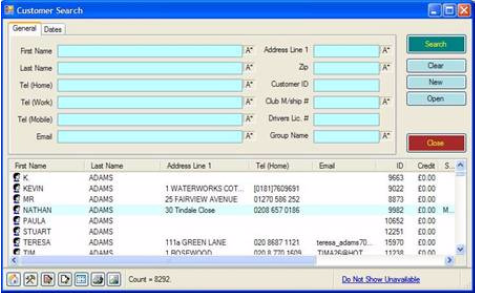
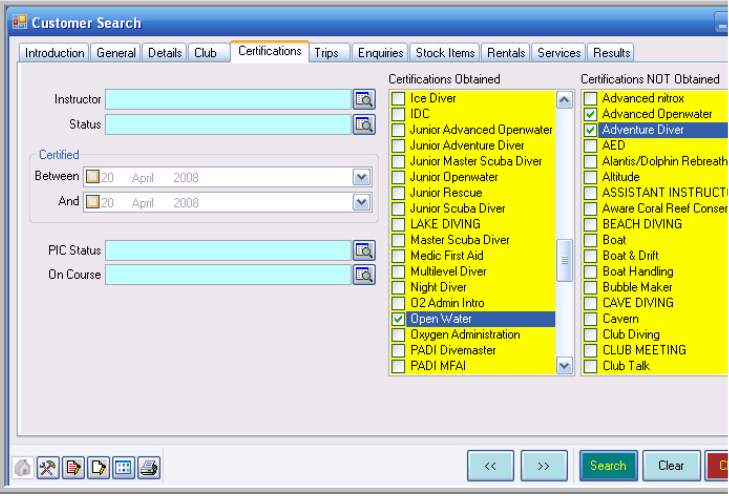
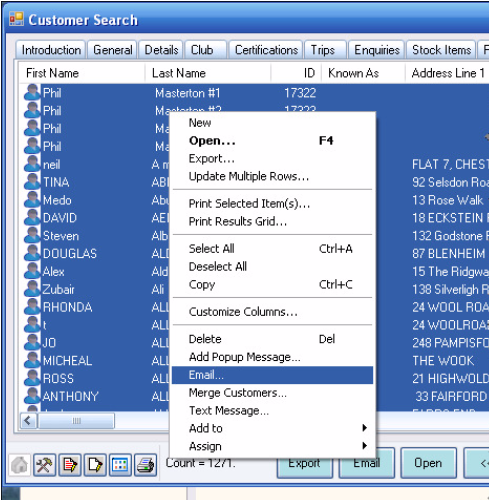
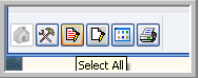
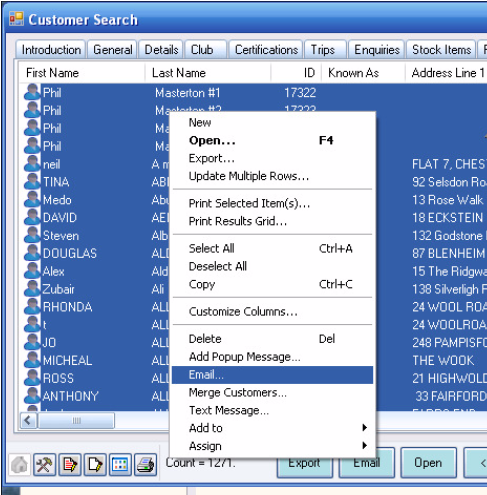
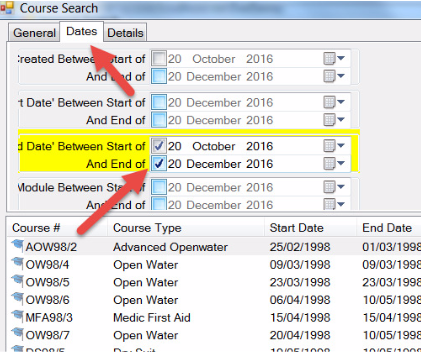
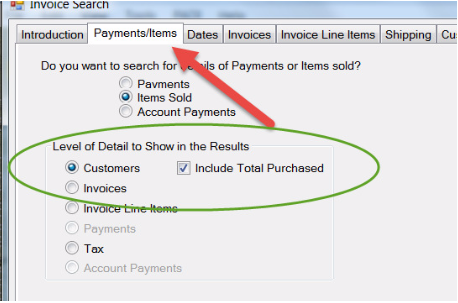
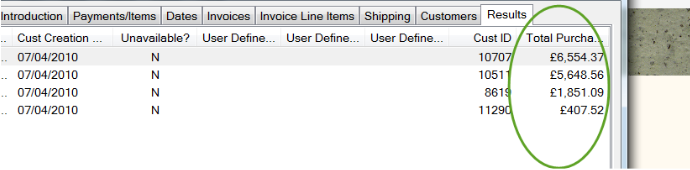
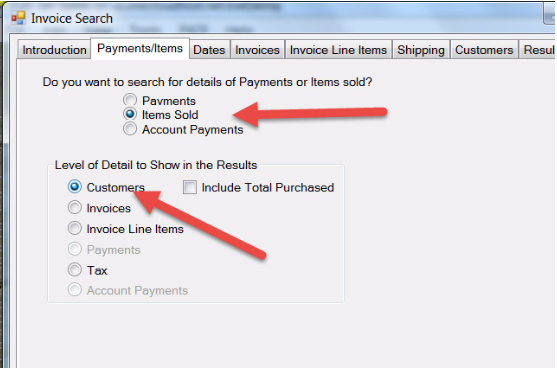
To search for customers who registered to a particular Mailing List, you can use the Customer Search Wizard, as outlined in the following procedure:
- Select the Customers module
- Click on Customer Search Wizard
- Select the General tab and select one or more Mailing List(s)
- Select your Unsubscribers list too, to exclude customers who do no longer wish to be contacted
- Click Search
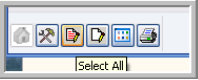
- EVE will return your search results. Select each customer, hold CTRL to select more than on
- A. Use this feature to select all search results
- B. Click on Email if you wish to send them an email using Microsoft Outlook
- C. Click on Export to export to Excel or to Mailchimp for marketing


EVE Agent
First, make sure the EVE Agent is in Windows Startup folder.

Let’s say you wish to create a new agent job, for a new course type or for a distinctive specialty course.
EVE 5.10 allows you to create a new job starting by cloning an existing one and use the filter tab to apply different course type settings.
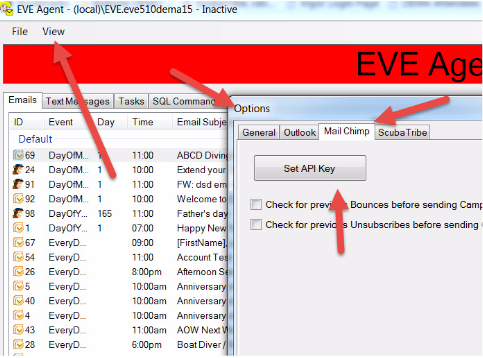
First of all, make sure you have created a new campaign in MailChimp. Follow this guide to learn how to create a new Mailchimp campaign
Then, to clone an existing EVE Agent Job
1) Open EVE Agent and click an existing Agent job to select it
2) Click Clone
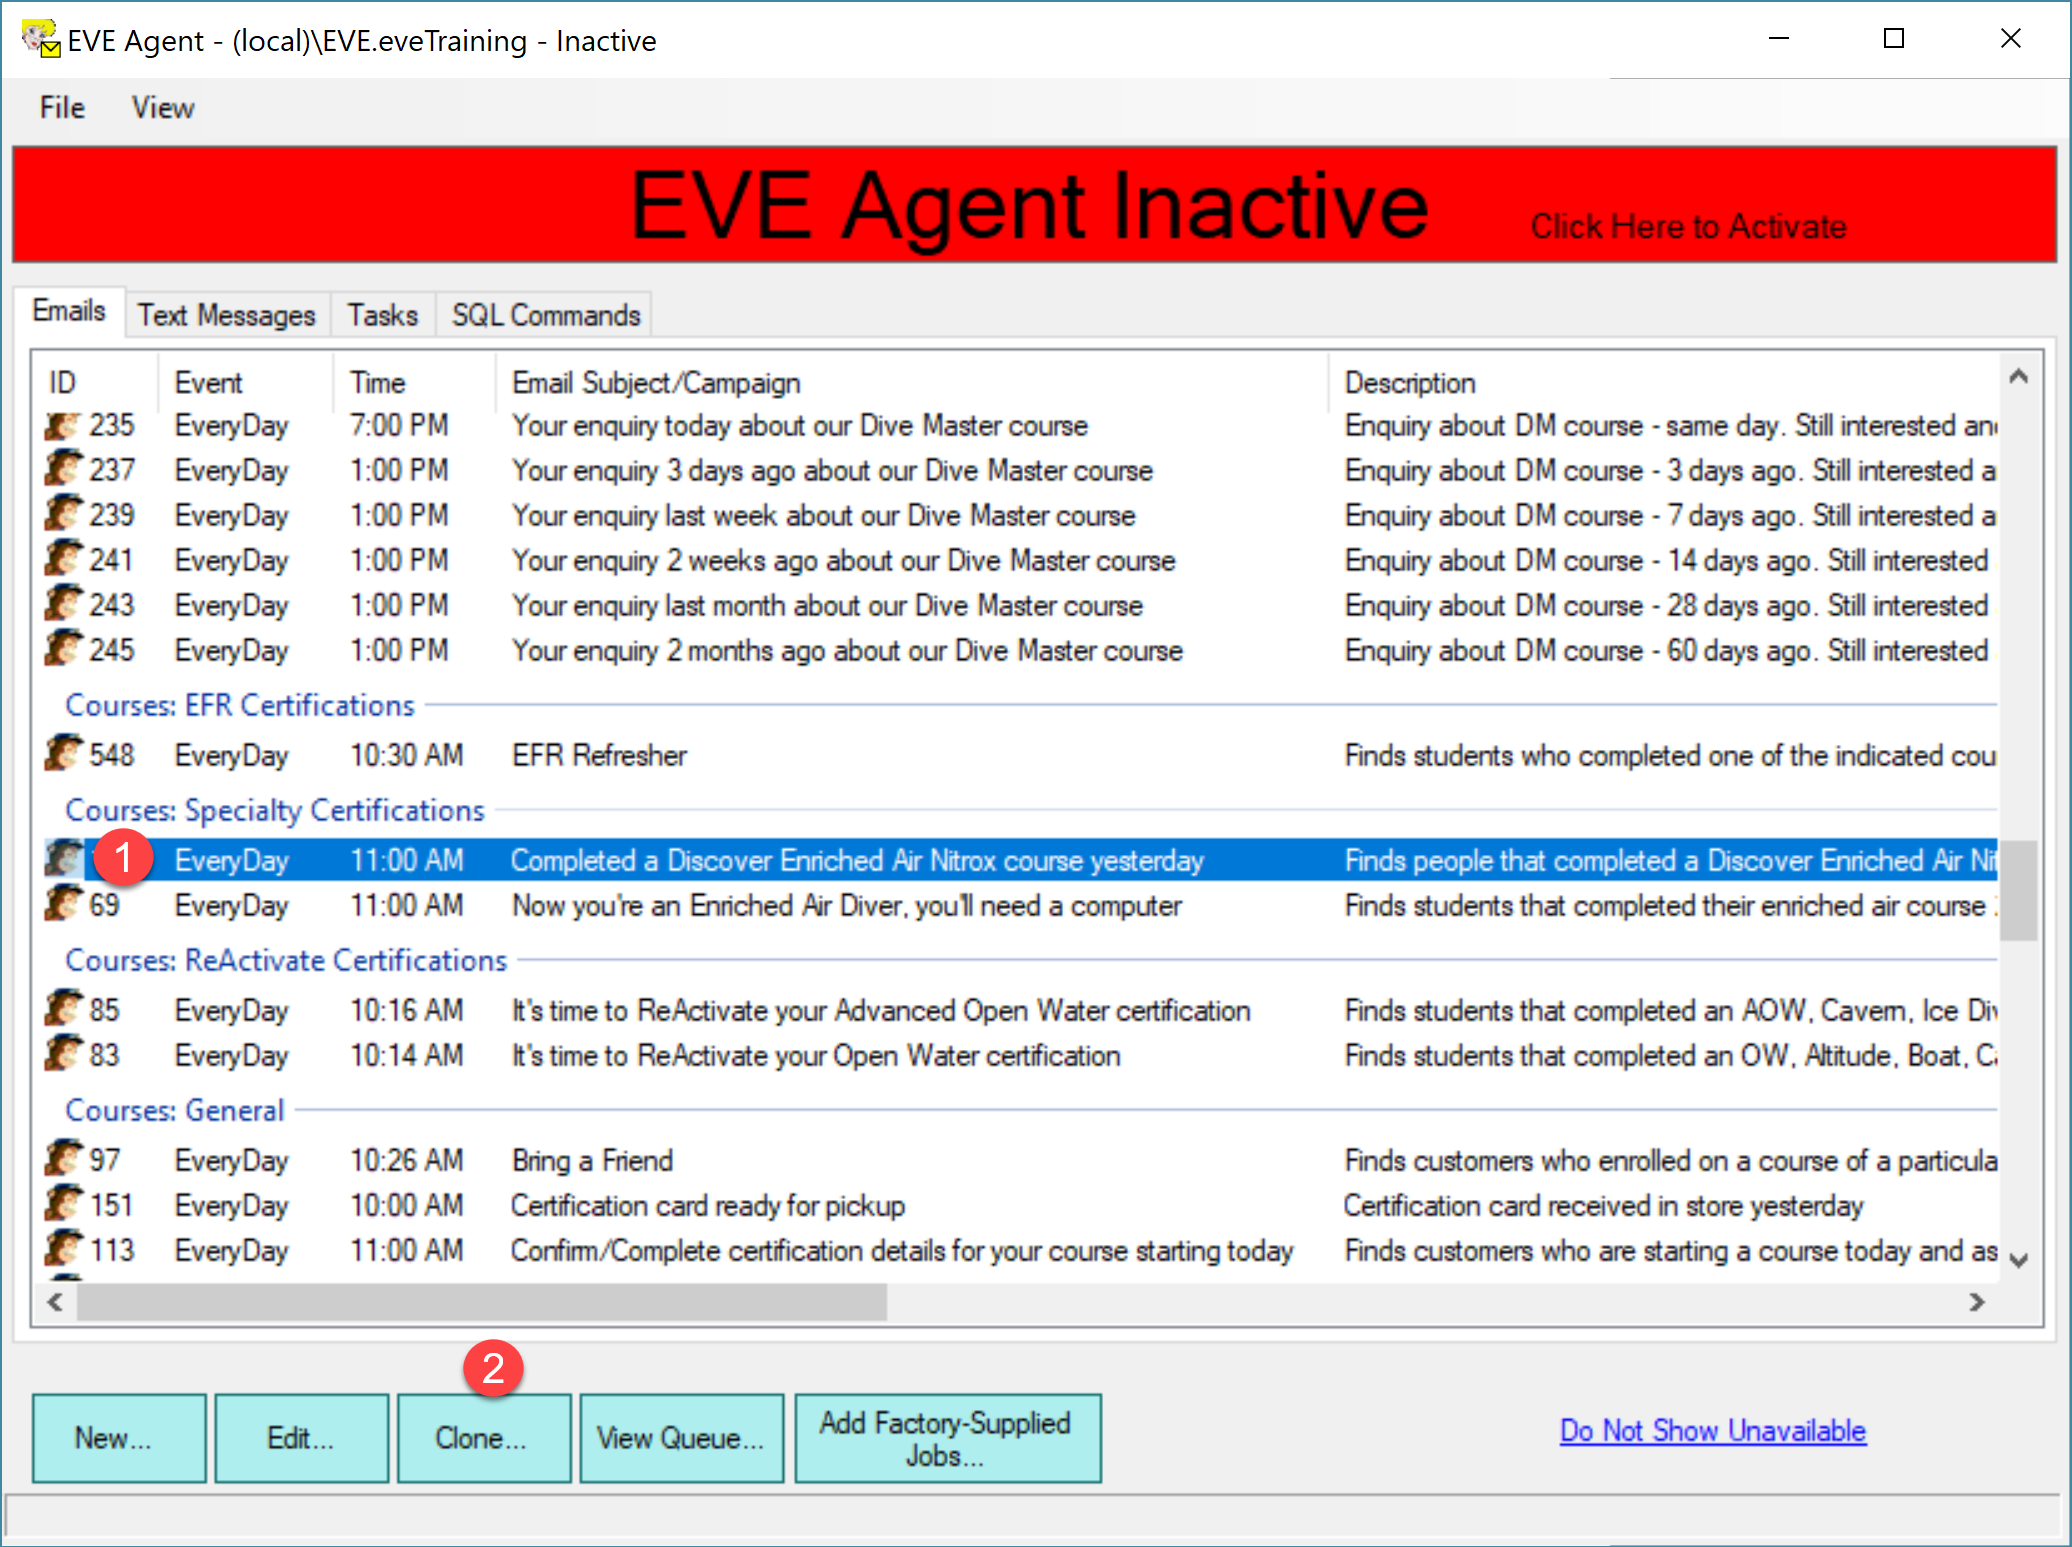
3) Click the General Tab
4) Click to Select Mail Chimp as system to send the email
5) Click the Look Up button to select your new campaign from Mailchimp
6) The List field will be automatically filled in as soon as you select a campaign
7) Enter a description of the job and make sure the Required confirmation box is unchecked
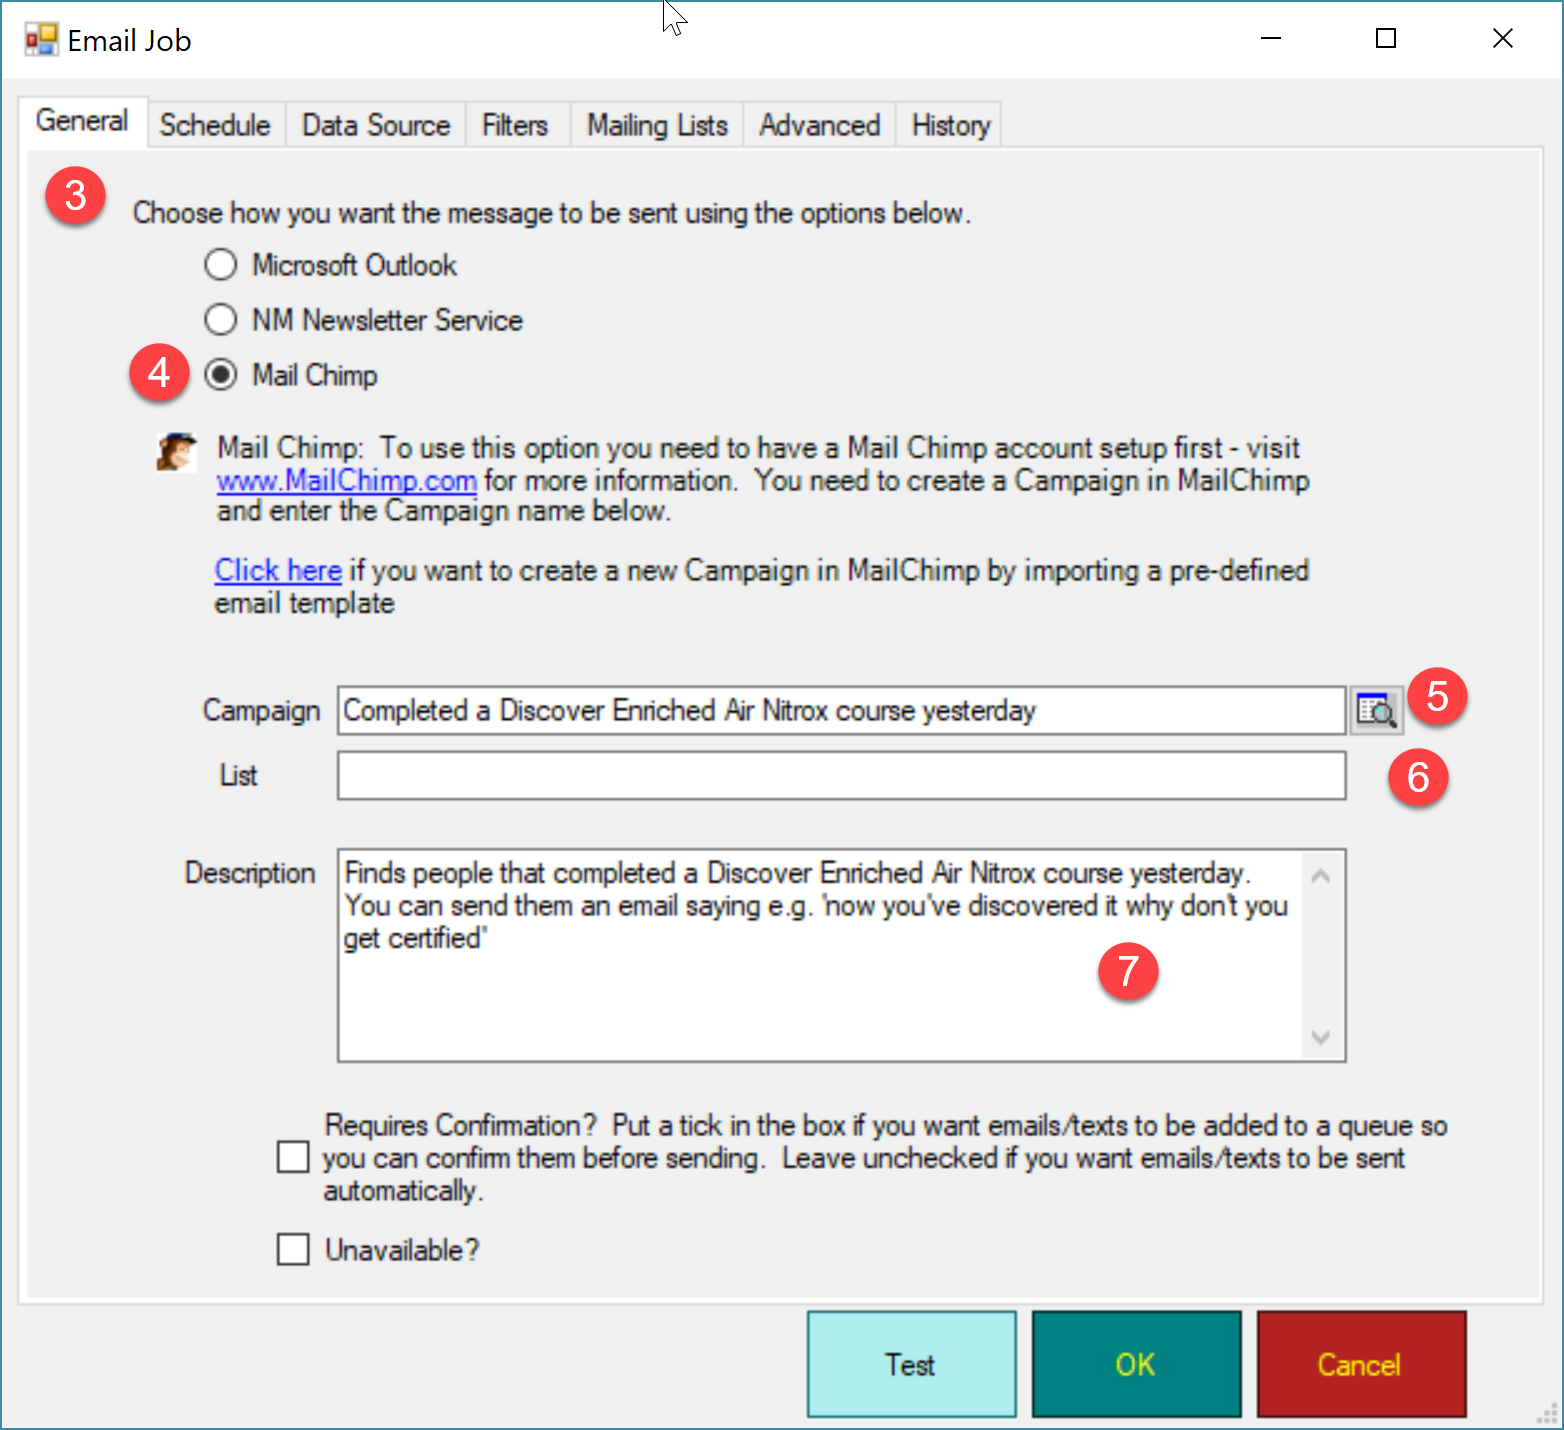
8) Click the Schedule tab
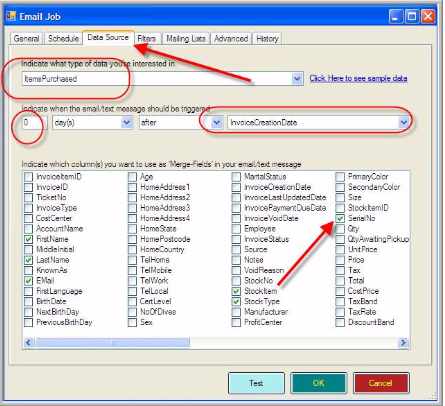
9) Select how often you wish to run the job. If this is a job that sends an email about a new certification, you want to run it every day
10) Select at what time you want the job to run
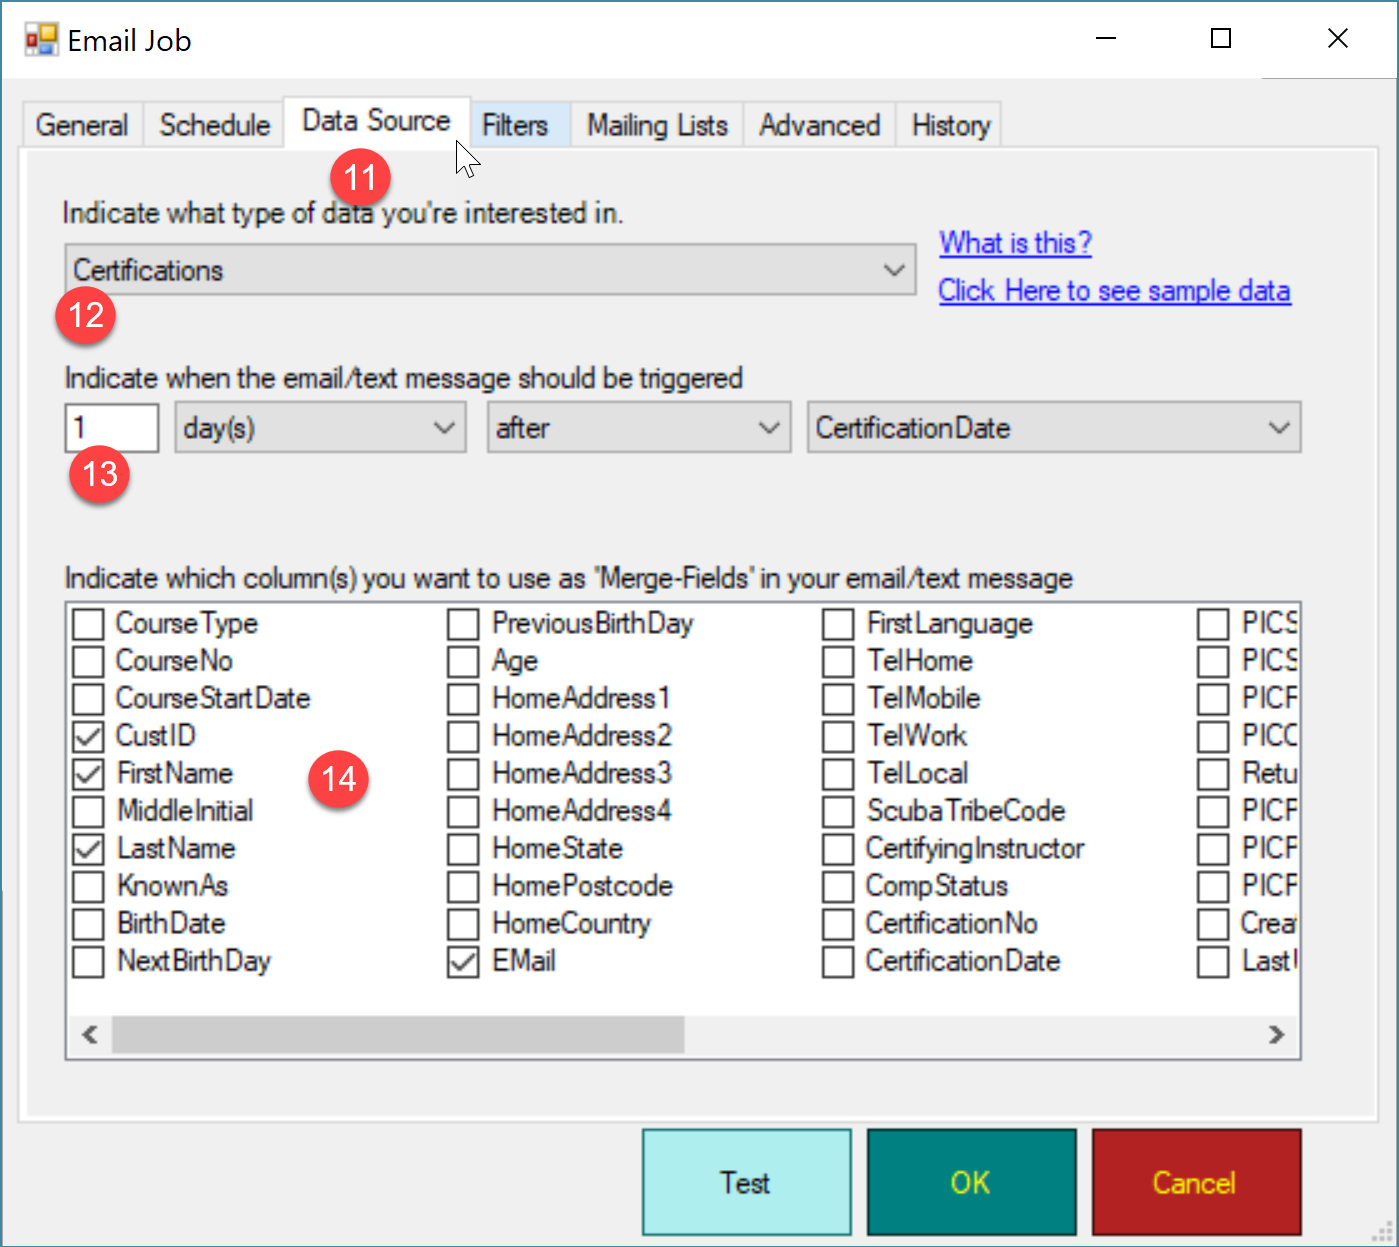
11) Click Data Source.
12) Select your data type. Certifications applies if you want to send an congratulations email to a student who completed a course
13) Select when you wish the job to run. In this case, it is 1 day after certification
14) Verify that CustID, FirstName, LastName and Email are selected. These merge fields are required.
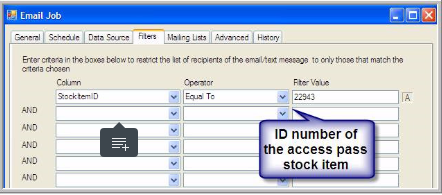
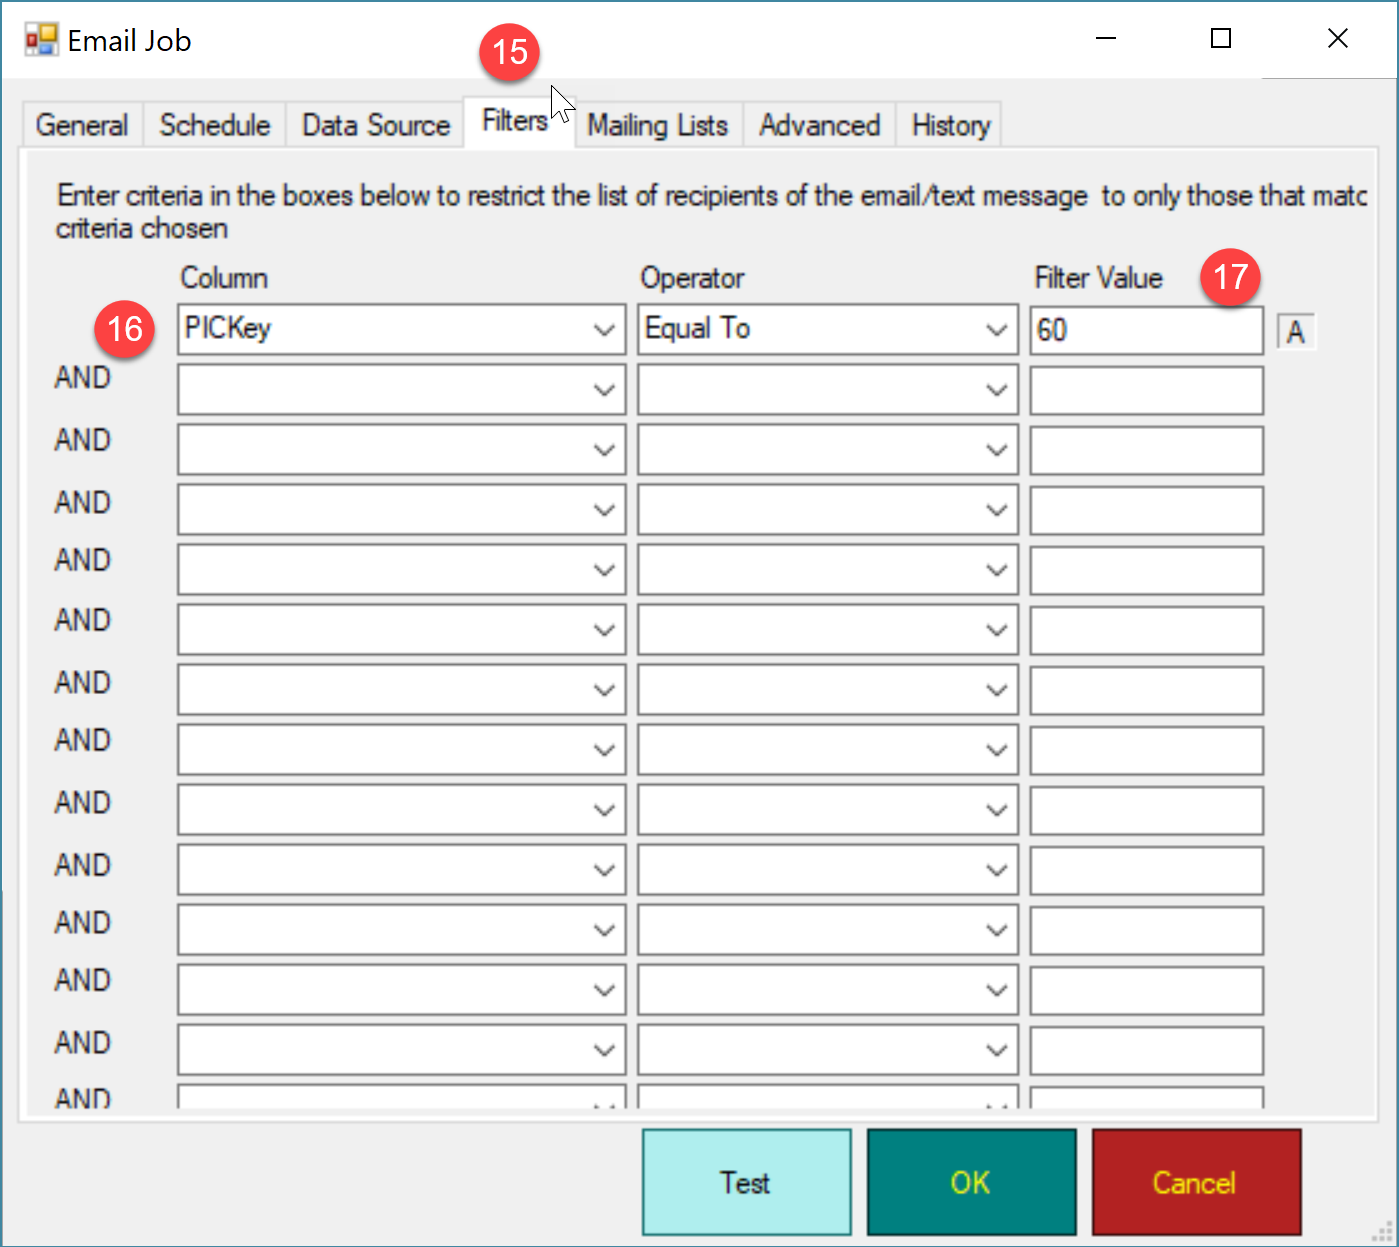
15) Click the Filter tab
16) Verify that PICKey is select in the column
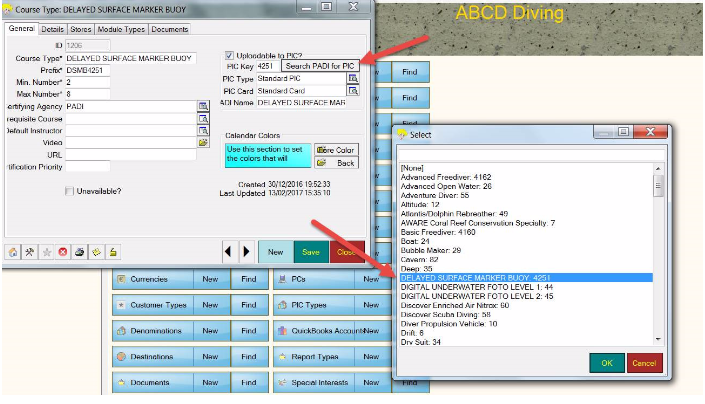
17) Enter the PICkey corresponding to the certification achieved by the student. To find out the PIC key for each course type, please follow this guide.
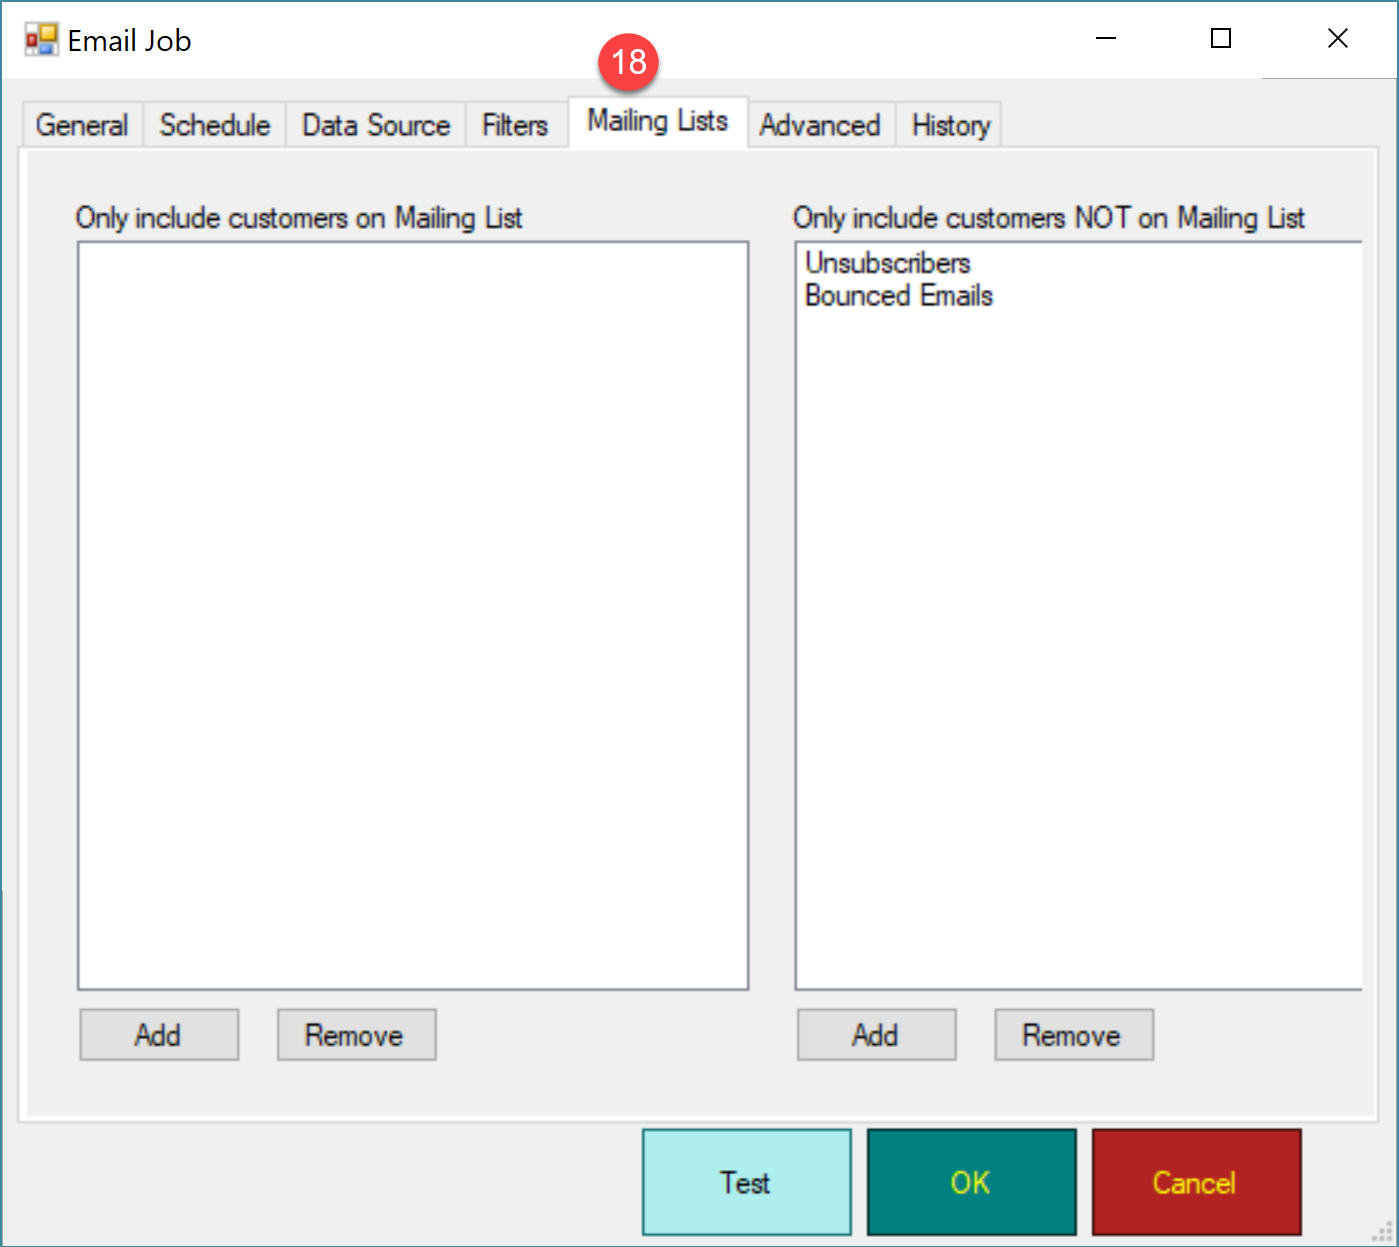
18) Click the Mailing Lists tab. You can use it to limit the group of people who will receive the email. You will also use it to make sure unsubscribers or bounced emails do not receive this email
19) Click on the Group Look Up button to assign this new job to a group
20) Select a group from the list
21) Click OK
22) Click OK to save the new job

Please watch this video that outlines the process:
This video shows how to create a campaign in MailChimp:
This video will guide you through the process:
EVE OnLine Shop
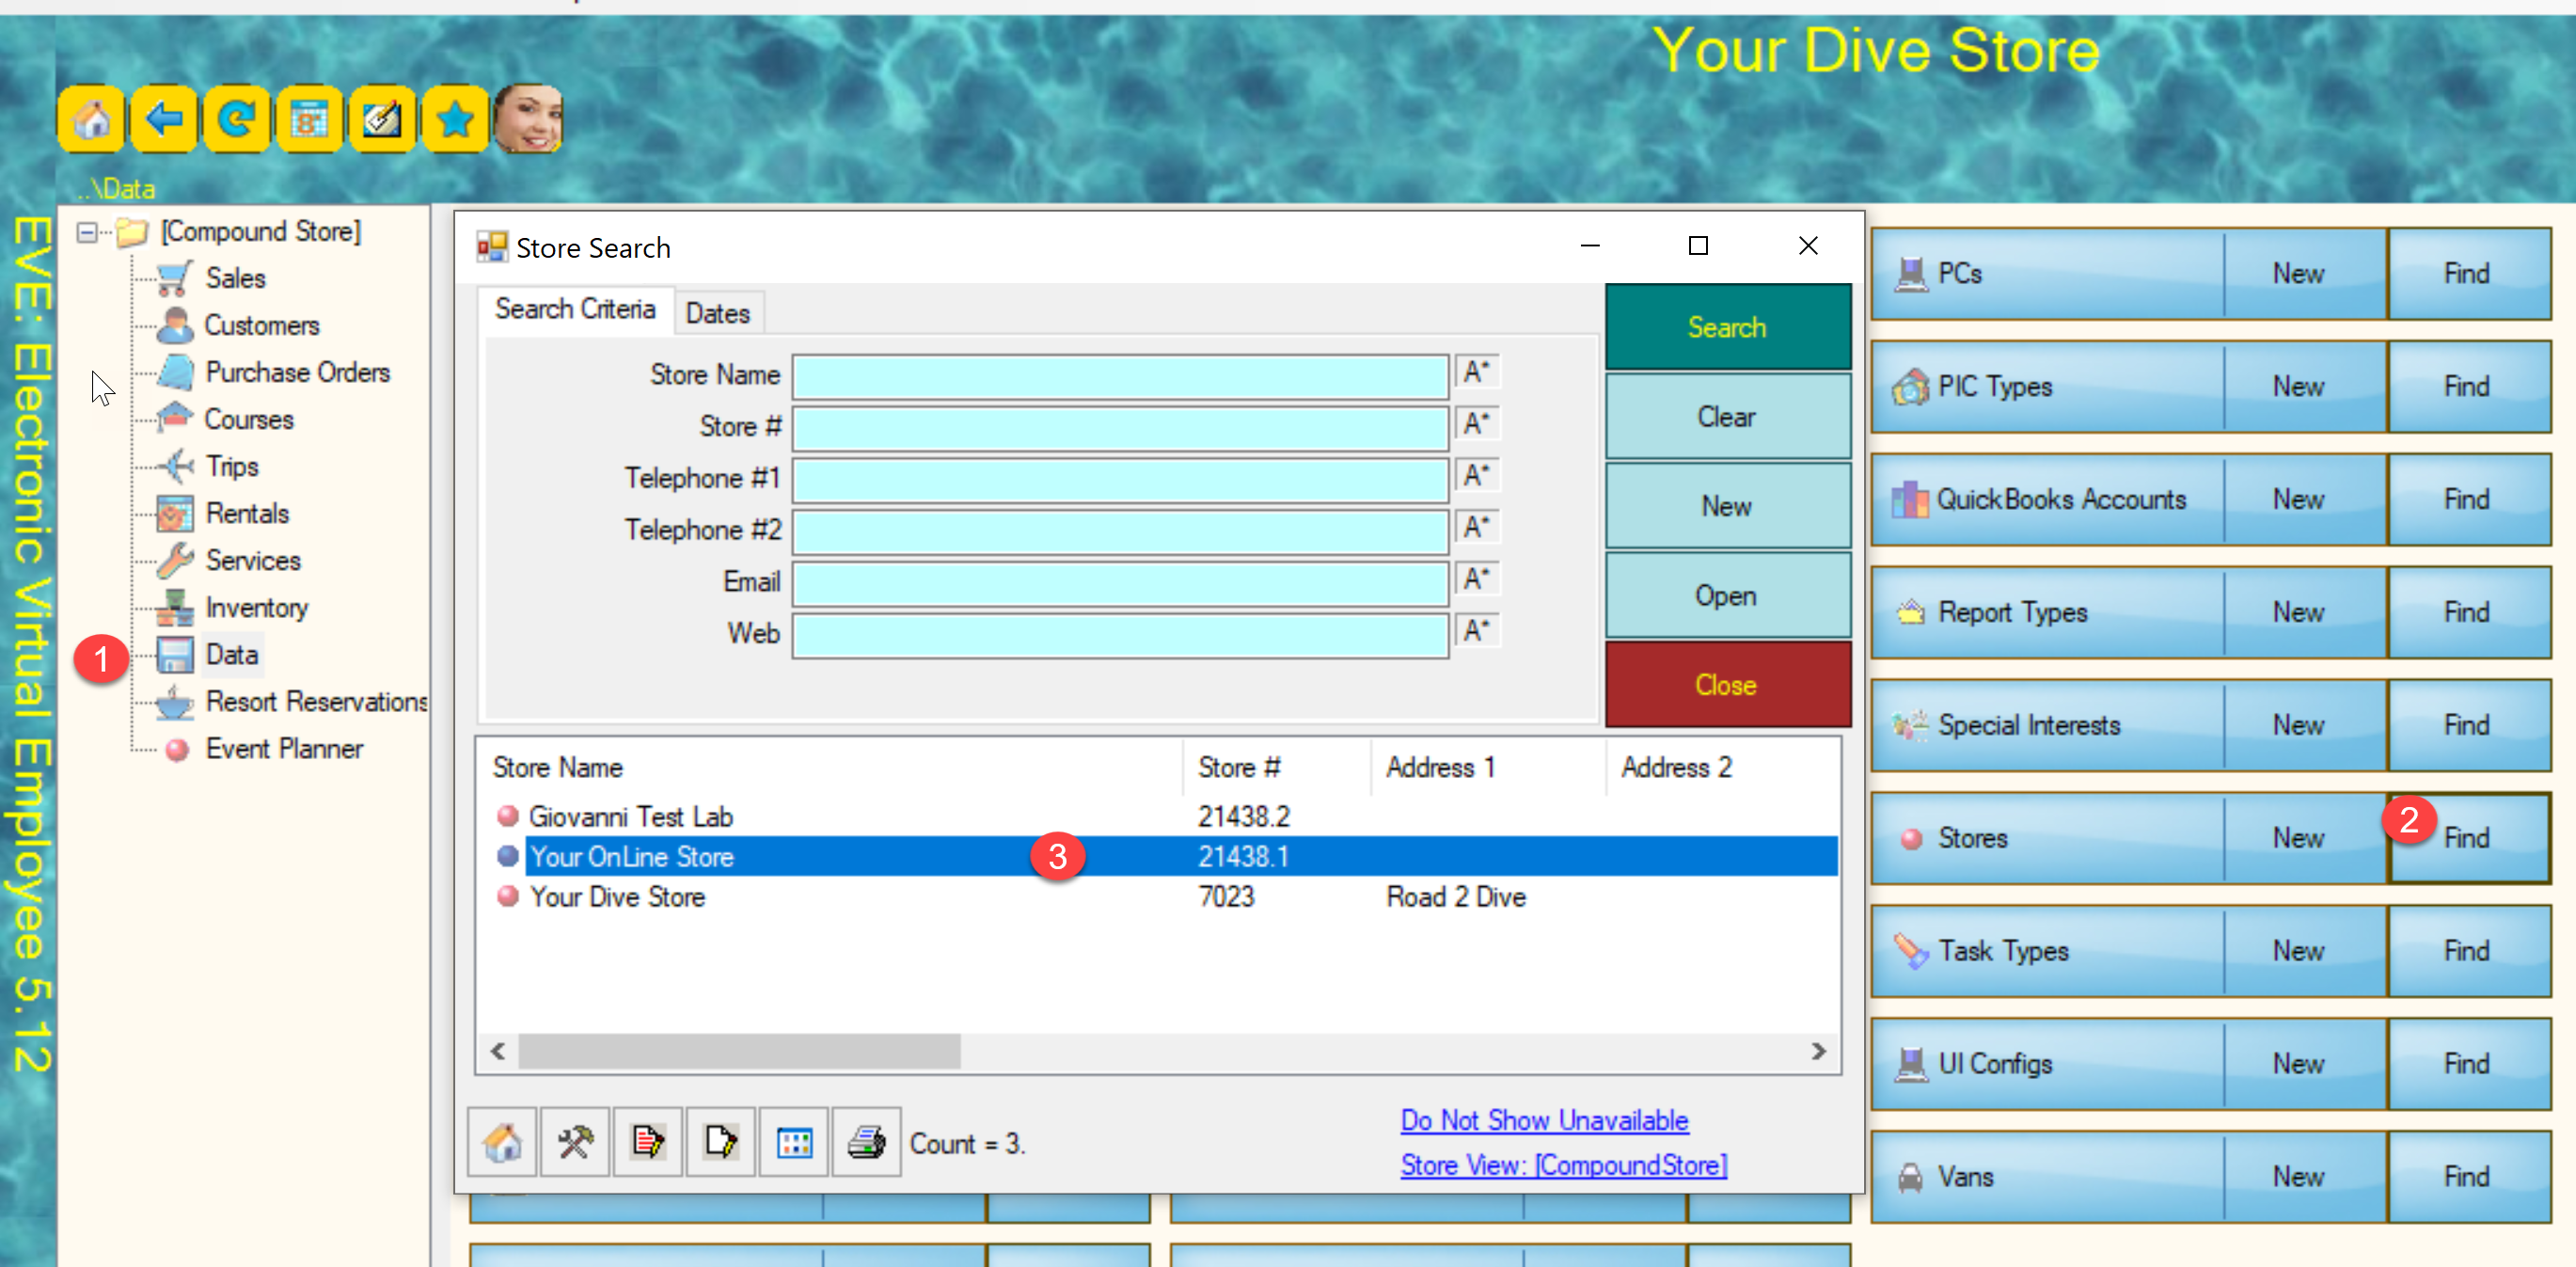
In the new online shop, to add a stock item to a category, follow this procedure:
(screens may vary depending on your preferred User Interface)
1) Launch EVE and click Data
2) Go to Stores and click Find
3) Click Search
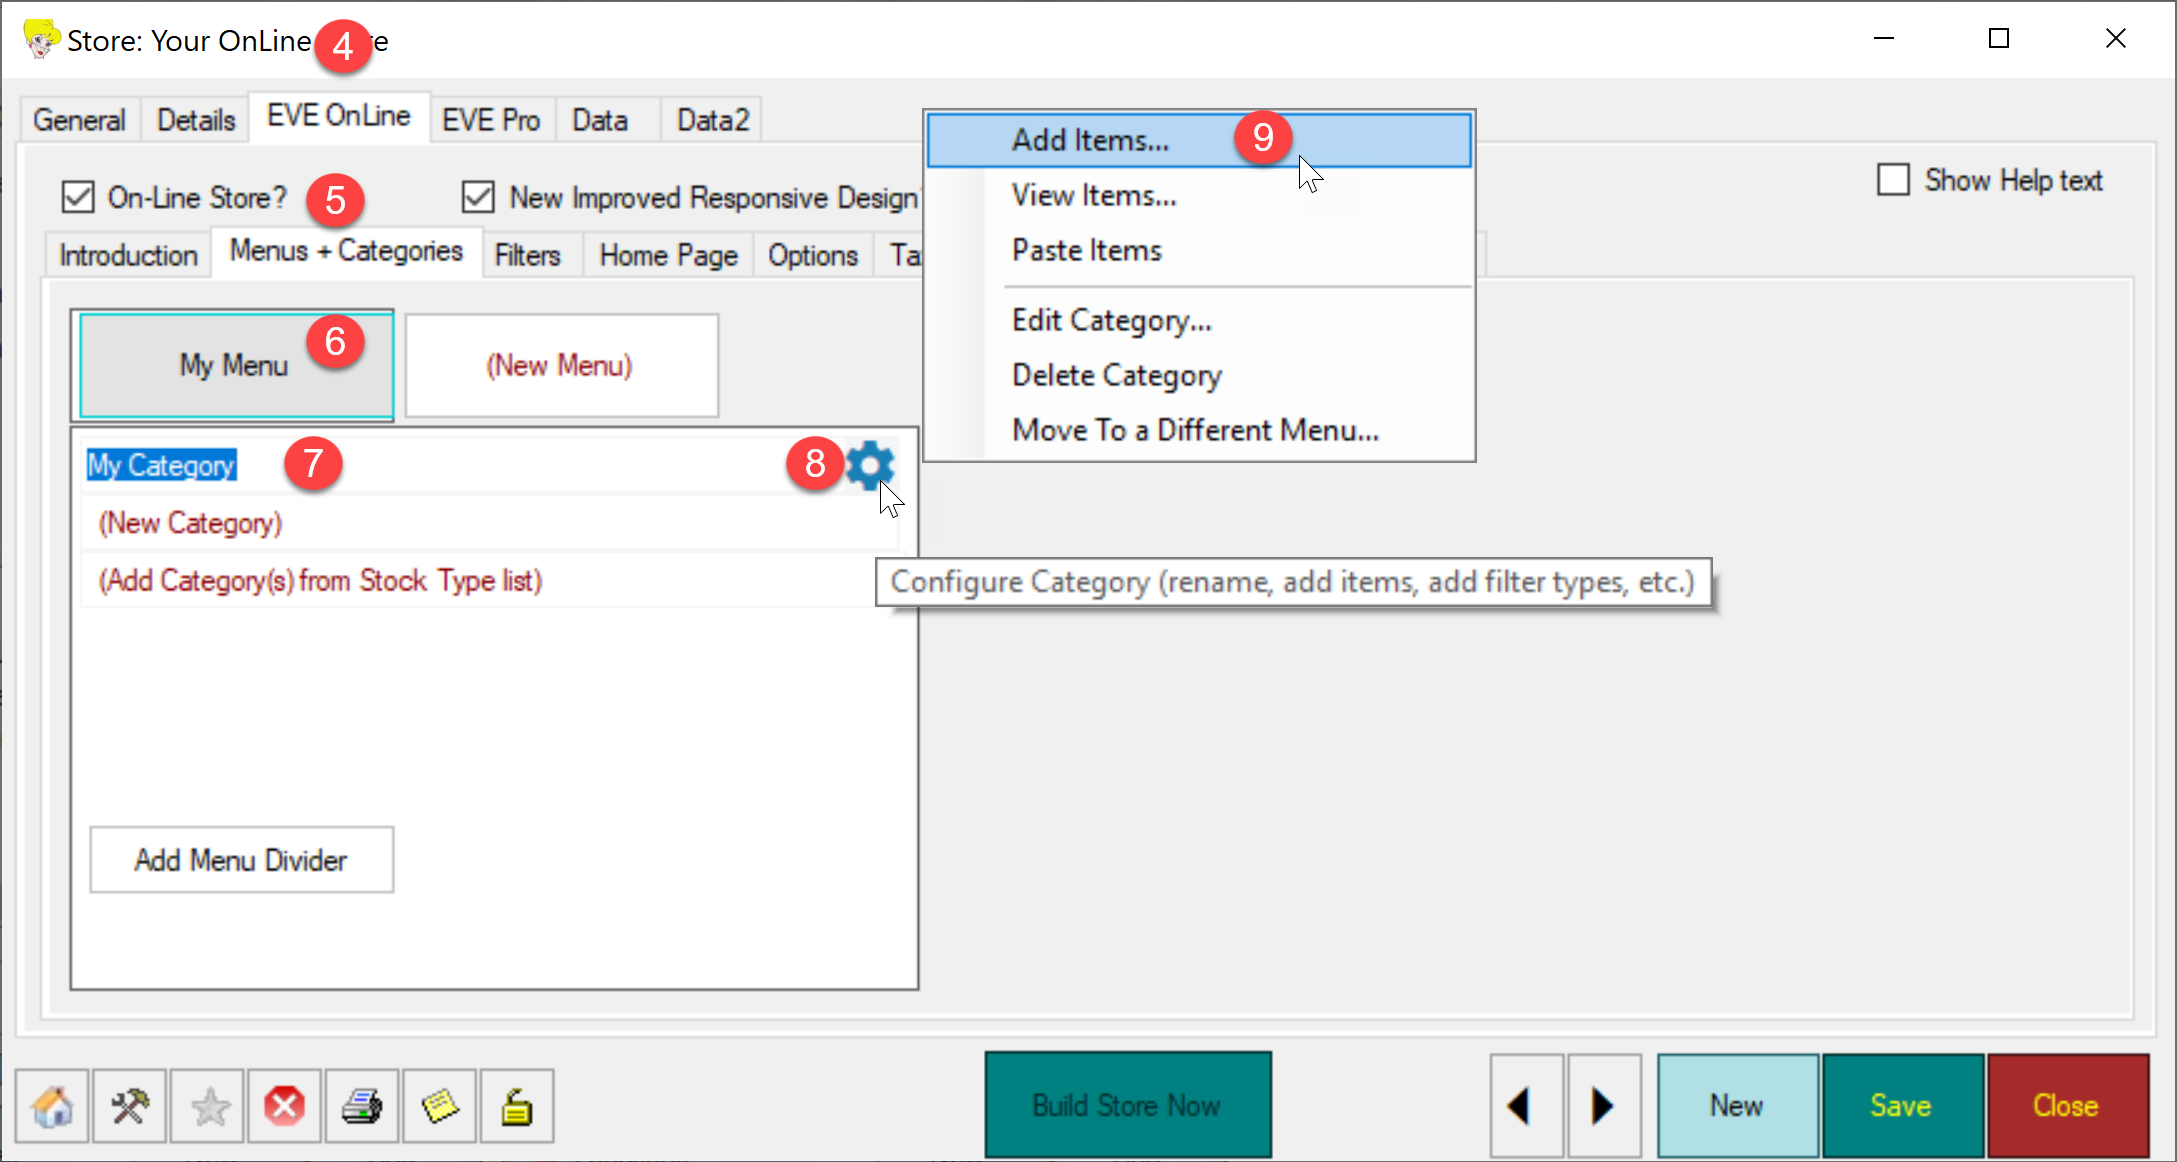
4) Double click on your online store record
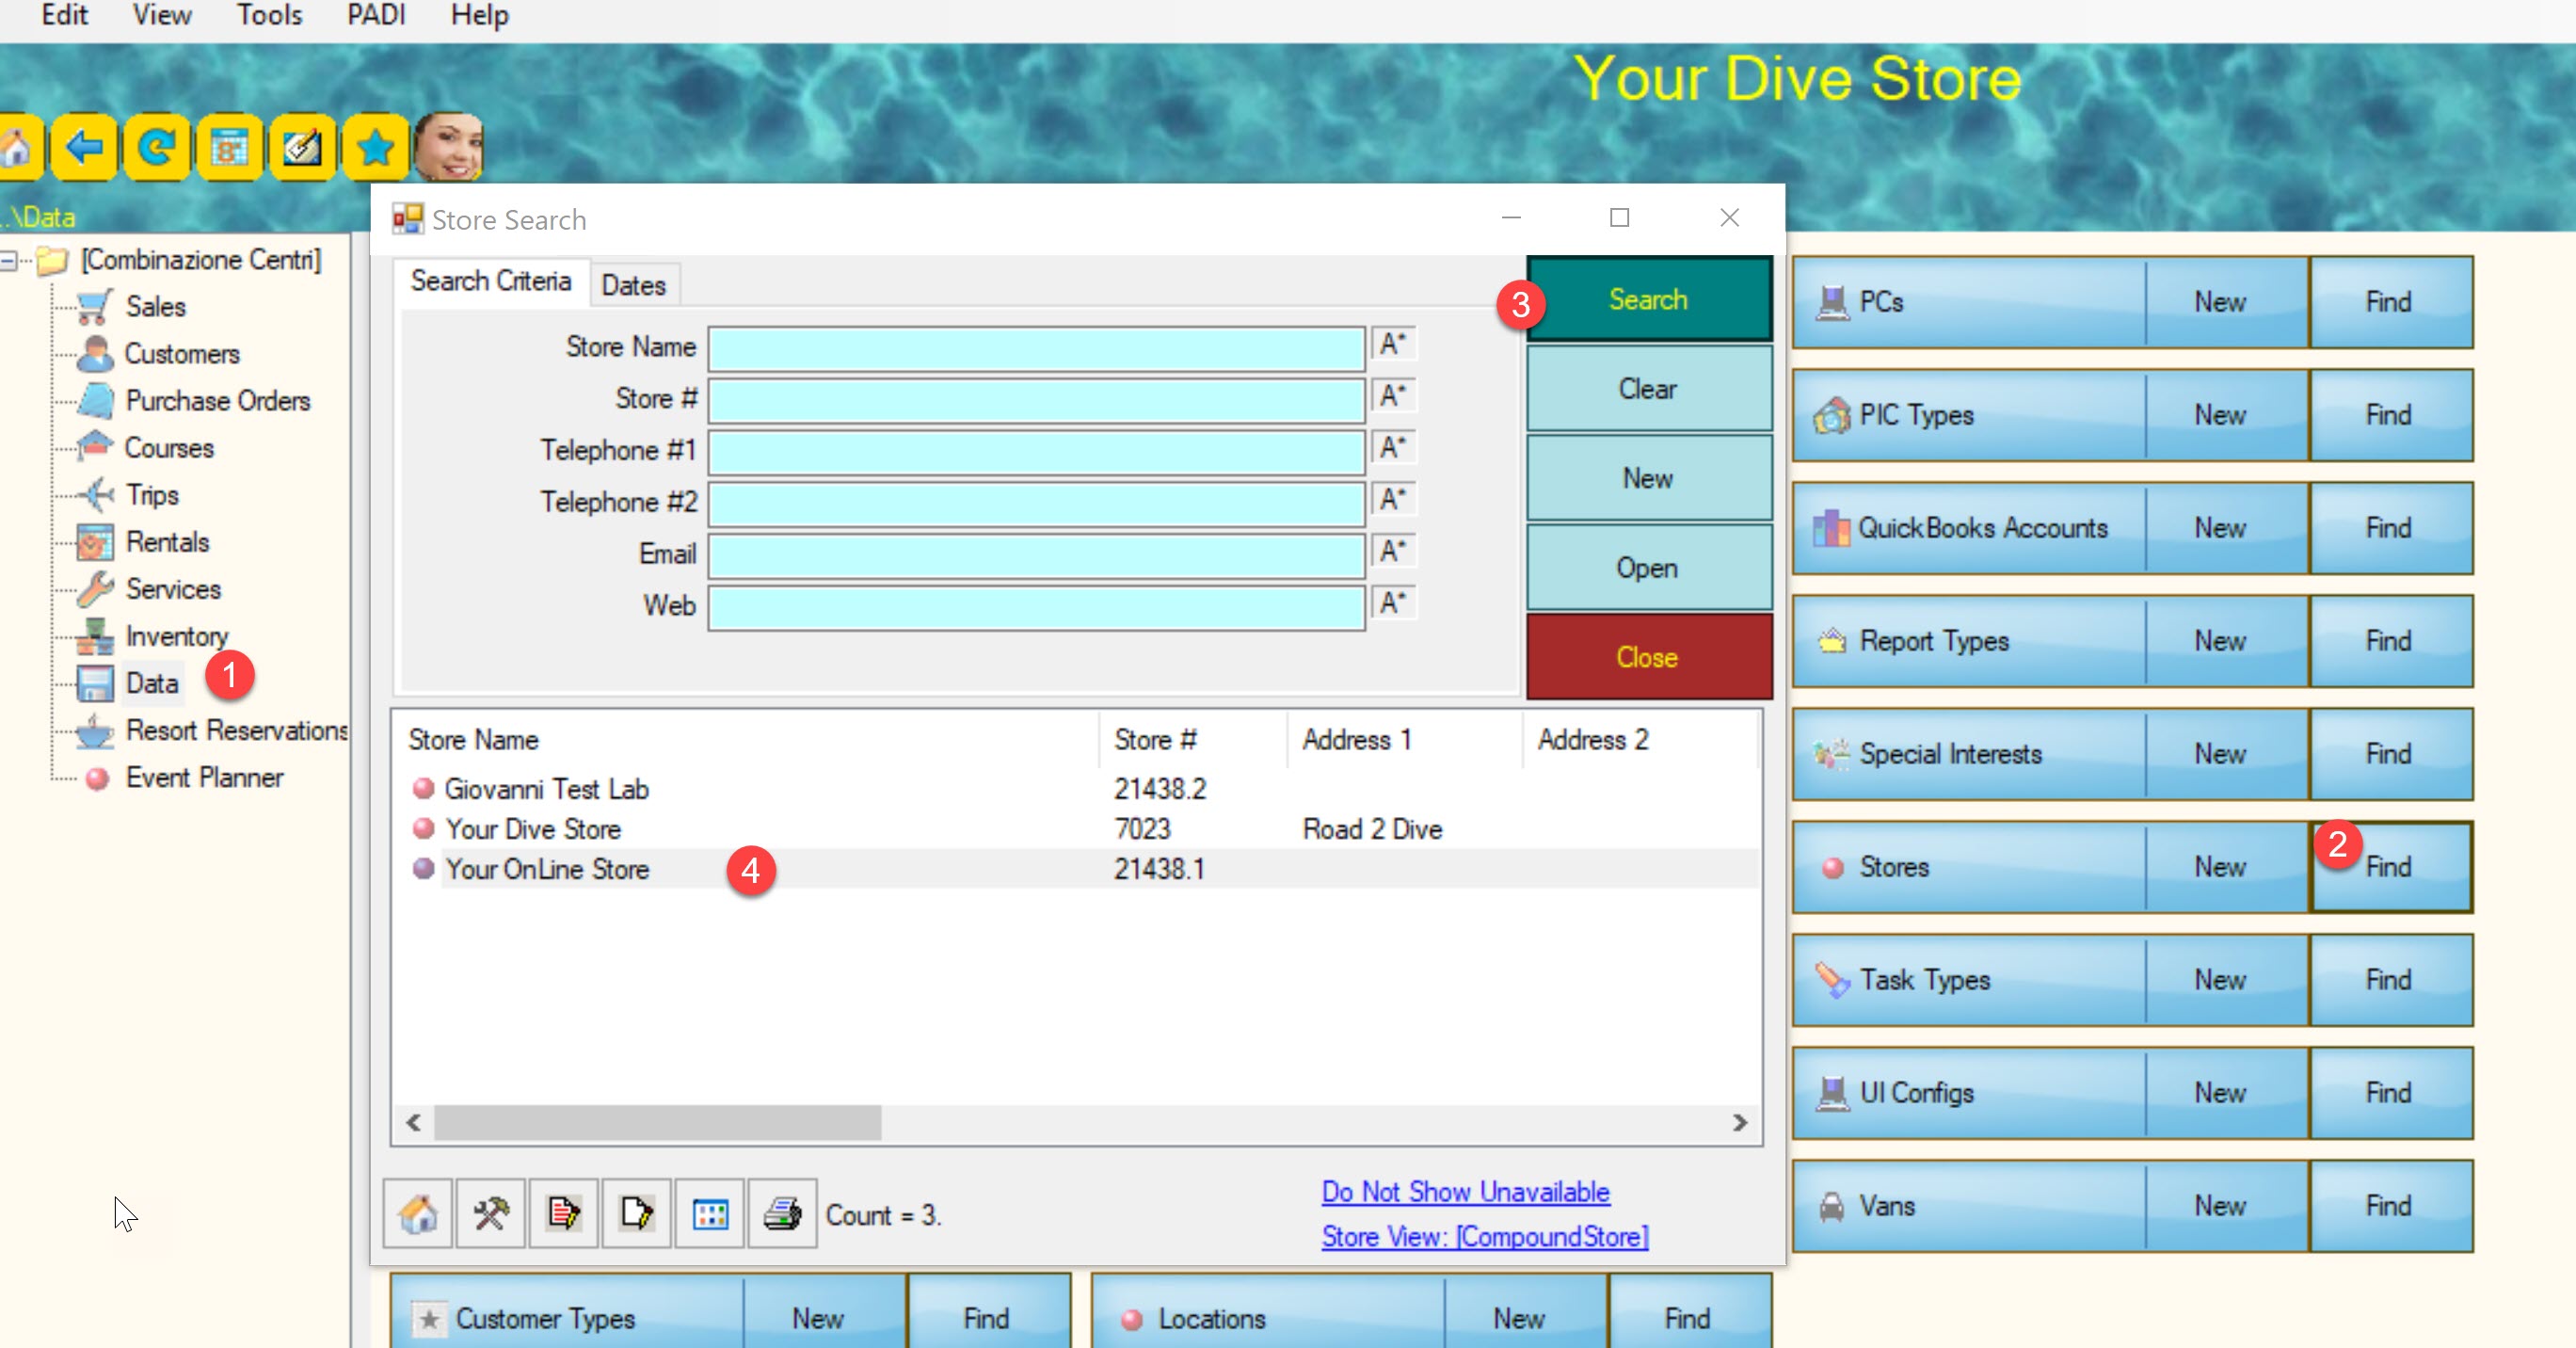
5) Click EVE OnLine tab
6) Click Menus + Categories
7) Click the Menu with the category where you wish to add item(s)
8) Click the category where you wish to add item(s)
9) Click the Tools icon
10) Click Add items…

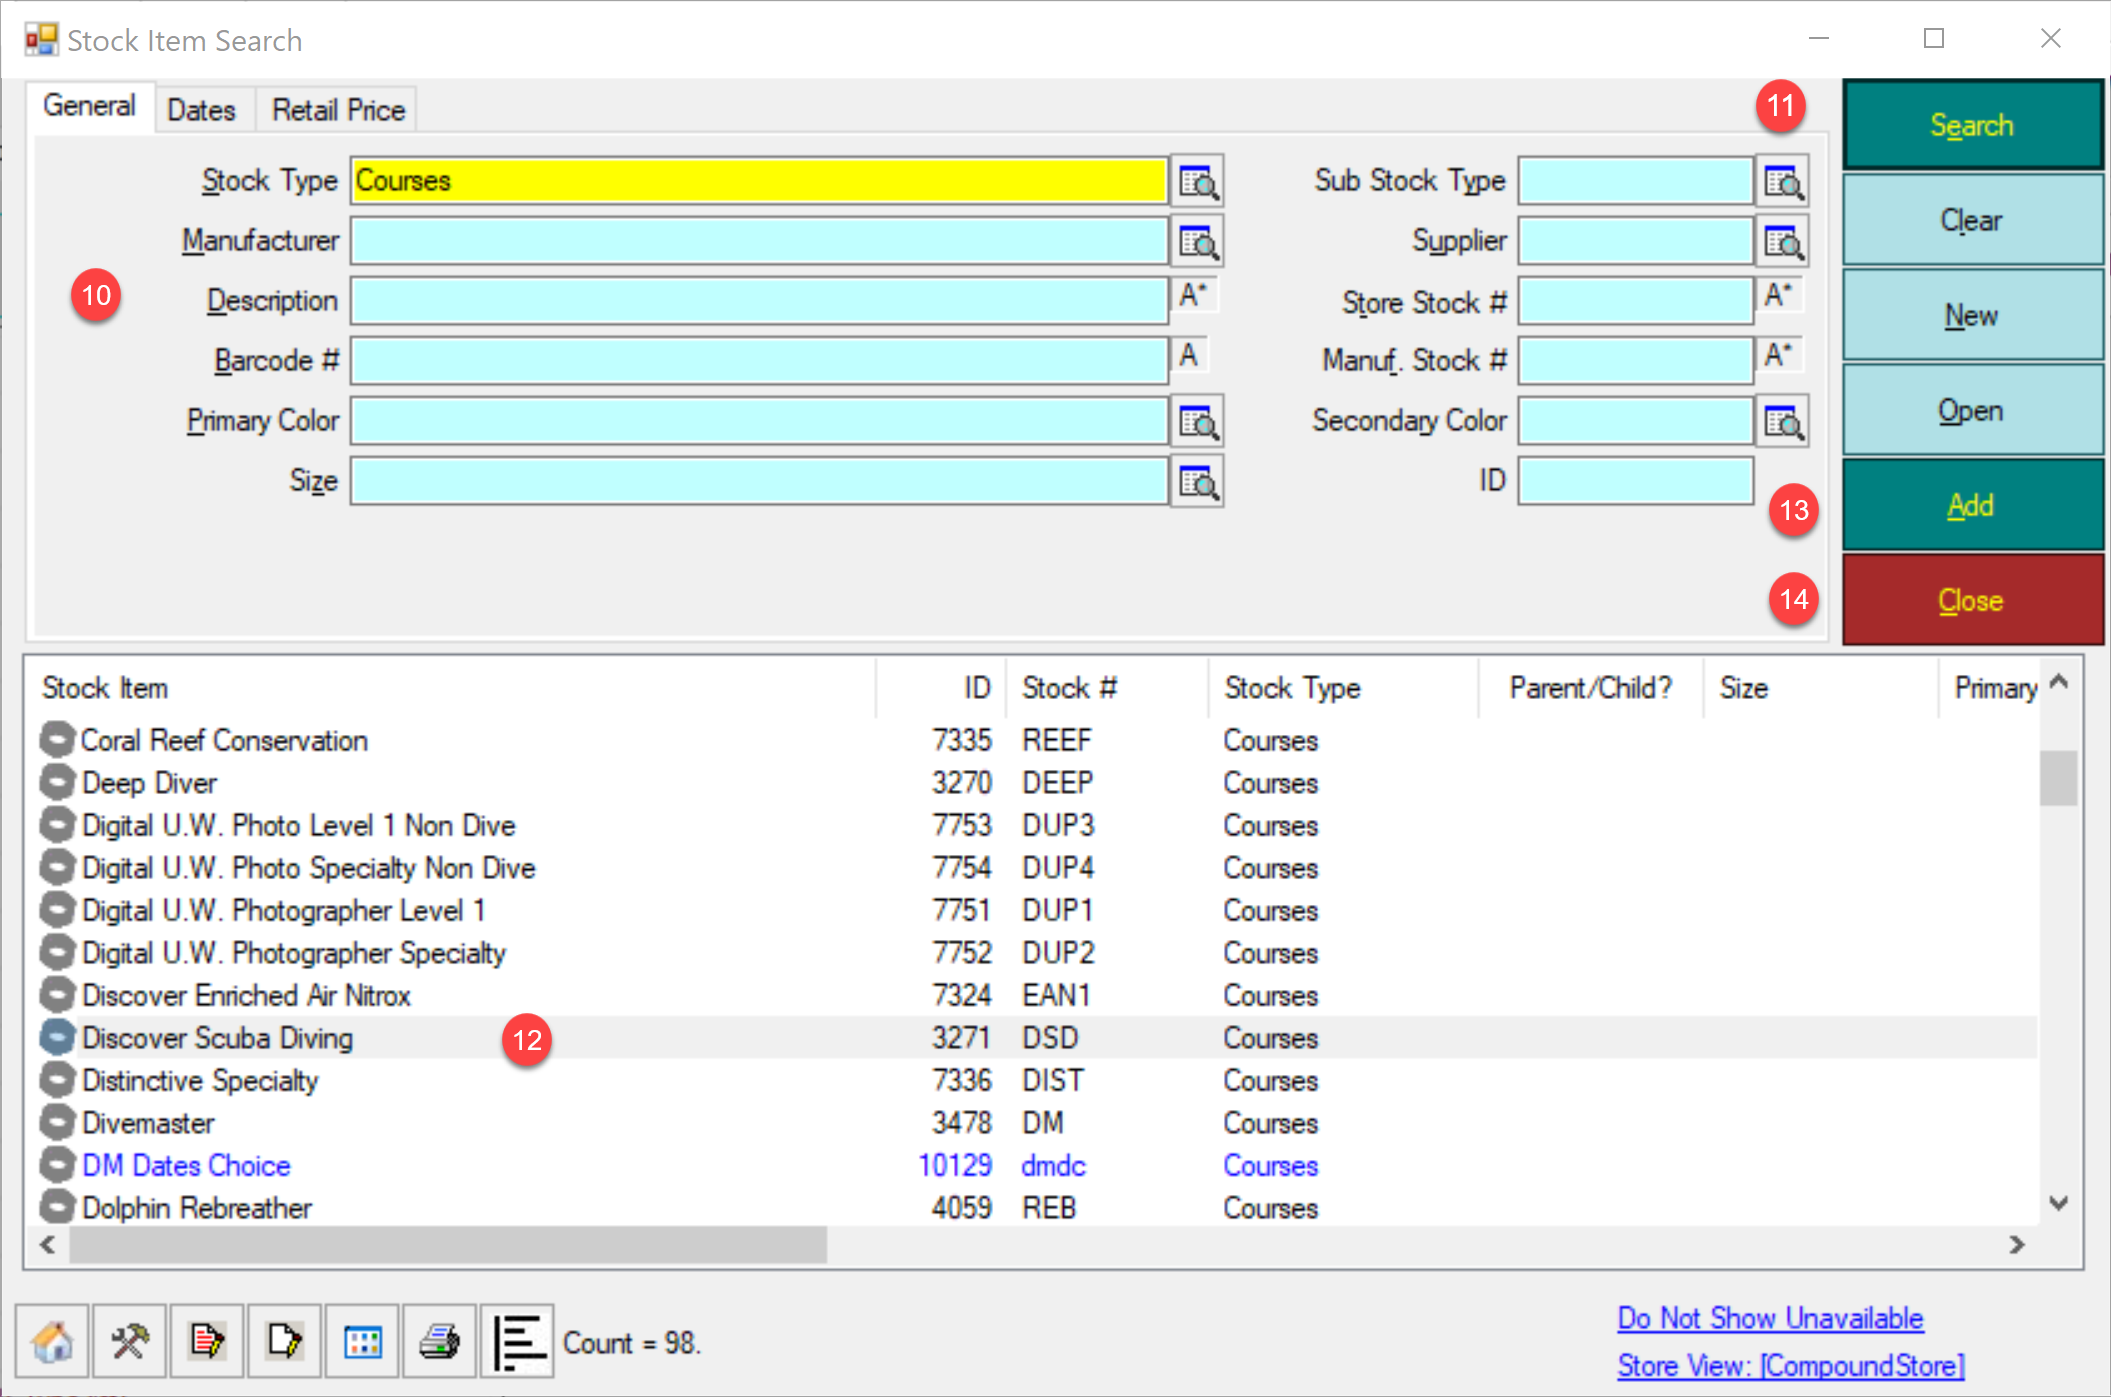
11) The Stock Item search will open
12) Enter search criteria as you see fit
13) Click Search
14) Select the item(s) you wish to add. Hold CTRL pressed to select multiple items
15) Click Add. Your item(s) will be added to the corresponding category

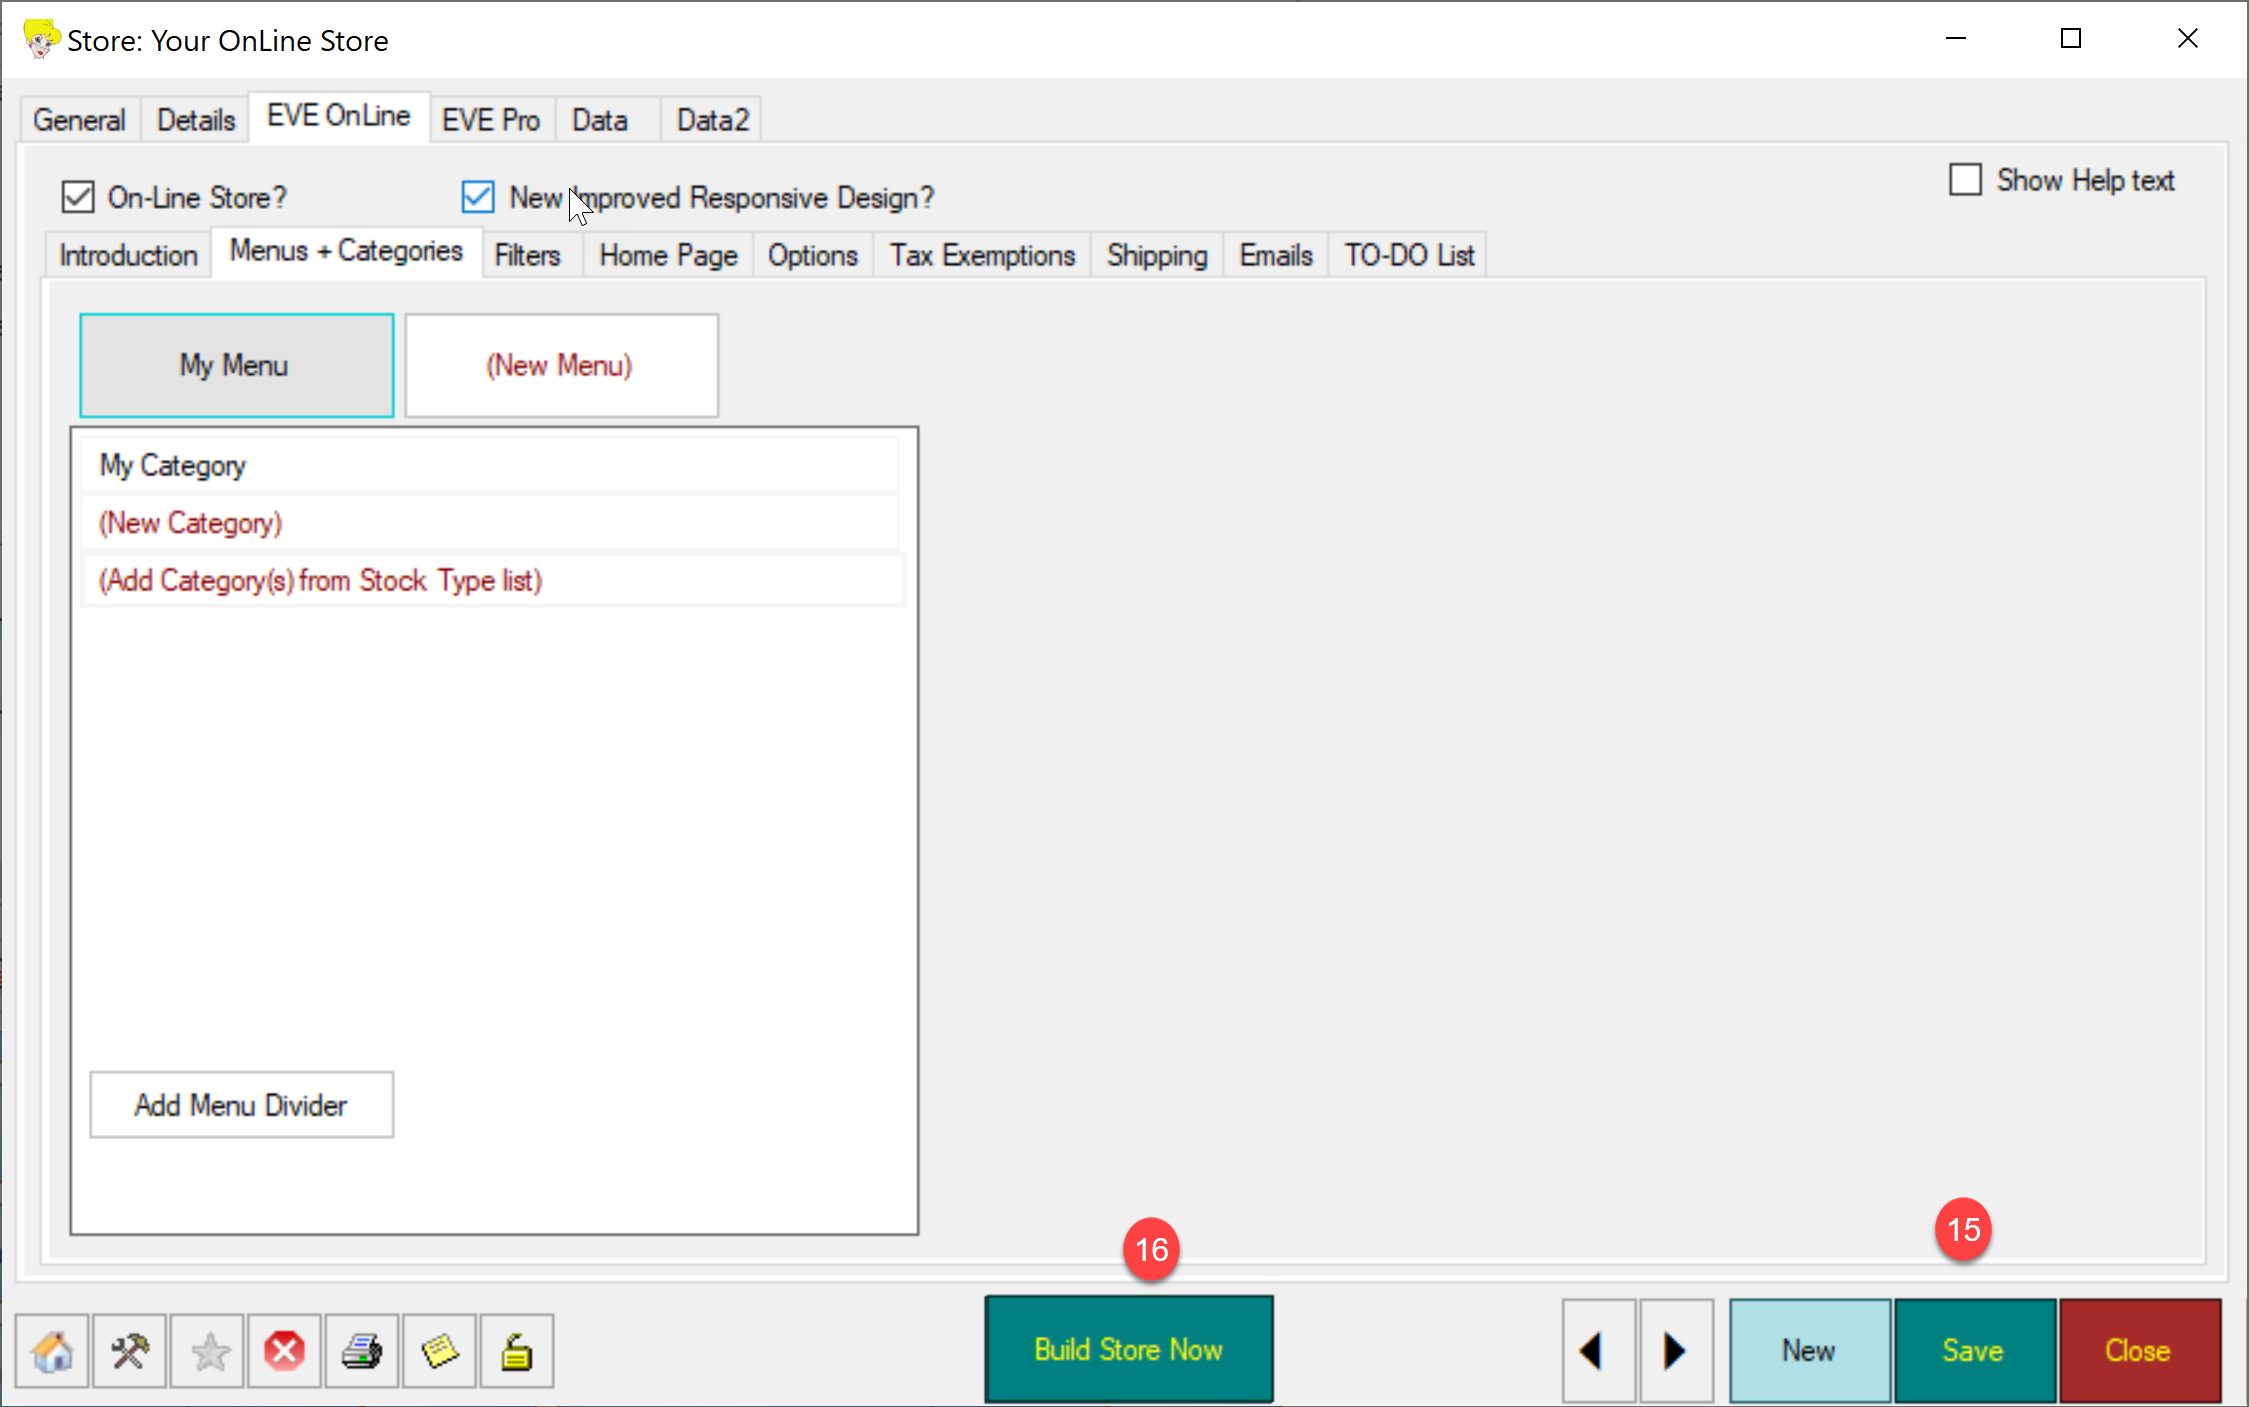
16) Save the newly applied settings

EVE now offers a new drag&drop feature. The feature is available if:
- Your EVE client is updated to version 5.12 Build 195 or newer
- Your EVE database is hosted on our cloud (see cloud packages)
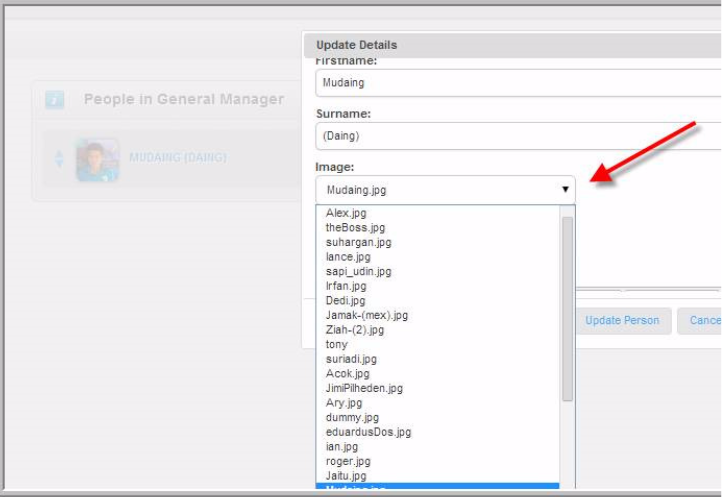
The feature allows you to add an image to customers and/or stock items. As result of that, is no longer necessary to add images to the mapped network drive first.
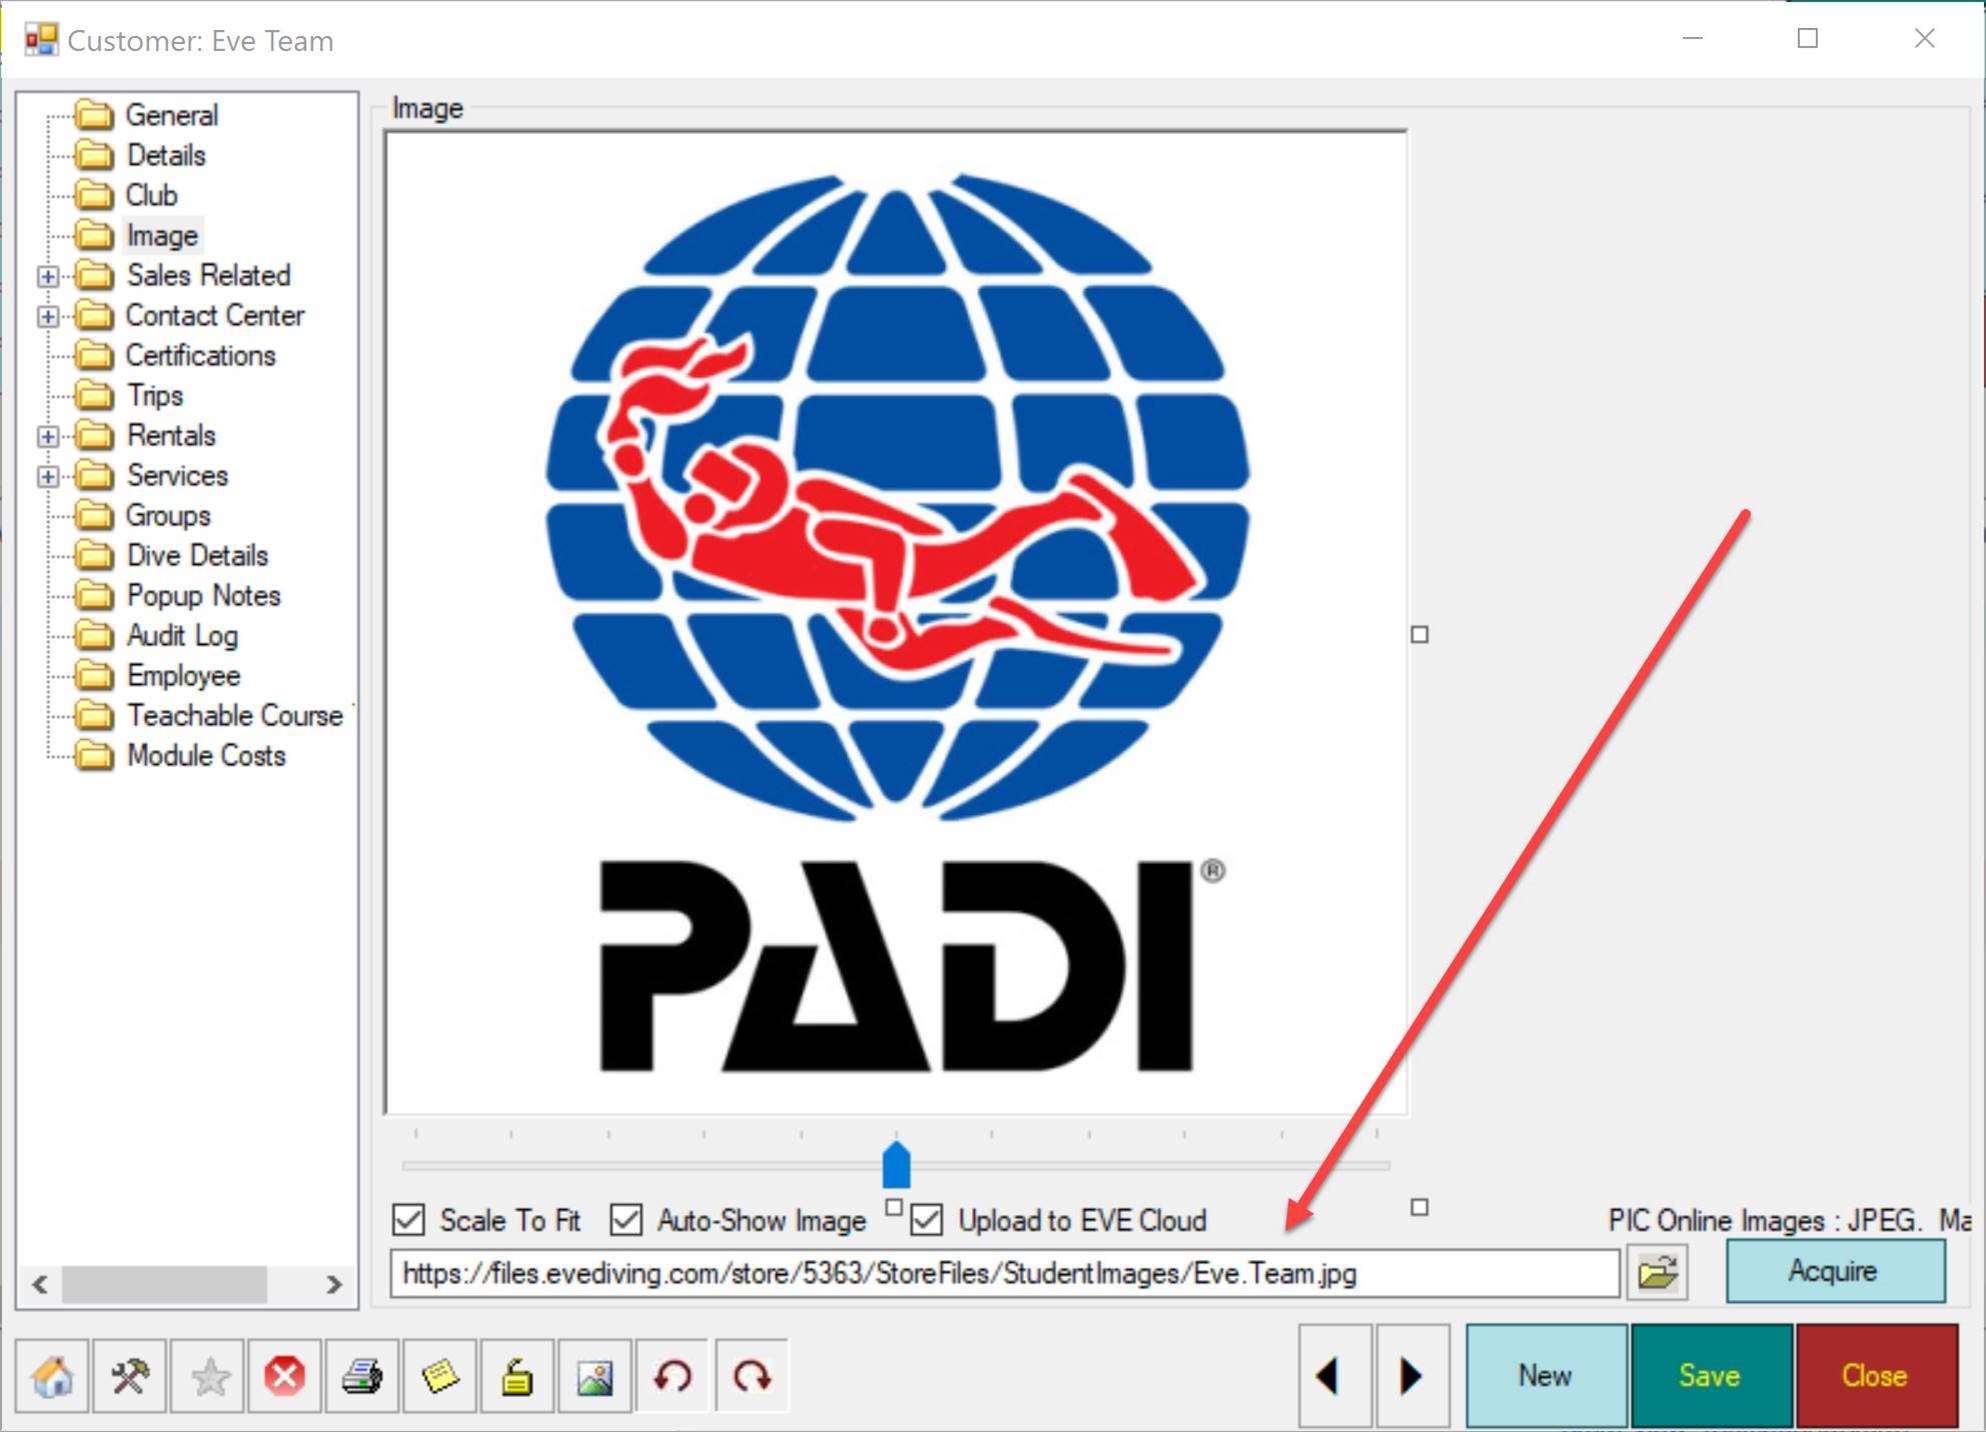
To add an image to a customer record:
- select an image from a folder on your local PC
- click on the image file and hold the mouse button pressed
- drag the image file to file path field, as shown in the image below (click to enlarge)
- release the mouse button to drop the image to the customer record
The image will be automatically uploaded to our server.
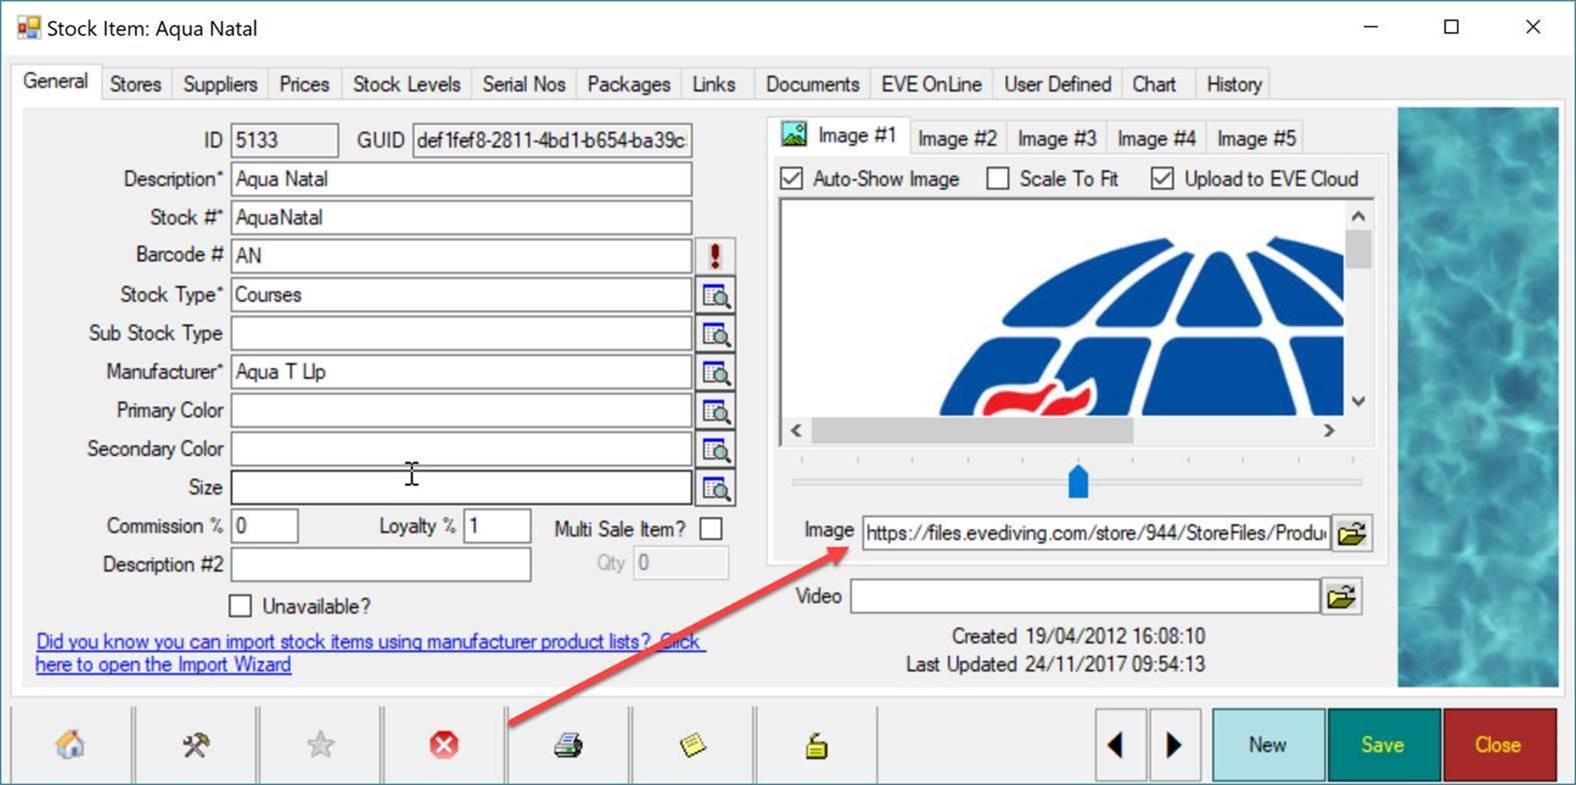
To add an image to a stock item record:
- select an image from a folder on your local PC
- click on the image file and hold the mouse button pressed
- drag the image file to file path field, as shown in the image below (click to enlarge)
- release the mouse button to drop the image to the customer record
The image will be automatically uploaded to our server.
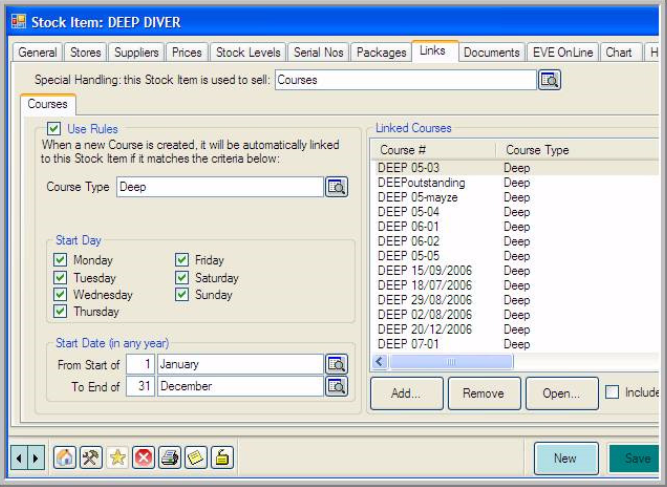
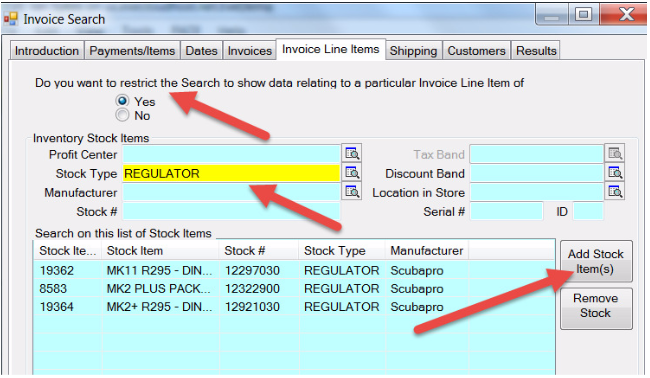
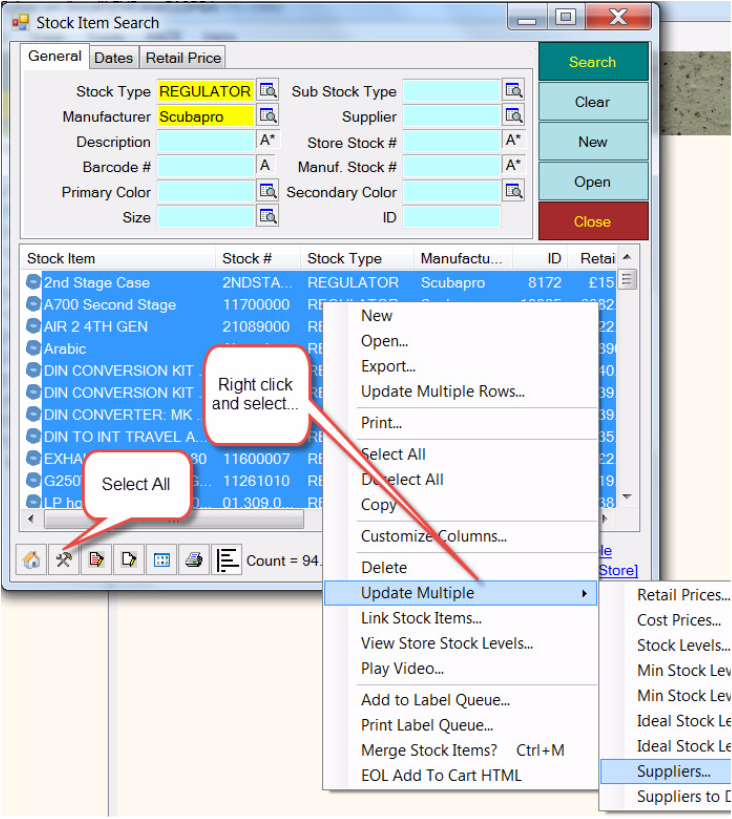
Stock item(s) must be added to a Category before they can be available for sale on the shop. This procedure is also required for those stock items used to sell Courses and Trips.
To add stock item(s) to a category, follow this procedure
1) Click Data
2) Go to the Stores module and click Find
3) Double click on the record corresponding to your online store
4) Click EVE OnLine tab
5) Click Menus + Categories tab
6) Click the Menu with the Category where you wish to add your stock item(s)
7) Click the Category Name
8) Click the Tools icon
9) Click Add Items and the Stock Item Search form will pop up
10) Run a stock item Search, add search criteria as you see fit
11) Click Search
12) Select the item(s) you wish to add. Hold the CTRL button to select multiple items
13) Click Add
14) Close the search form
15) Click Save
16) Click Build Store Now
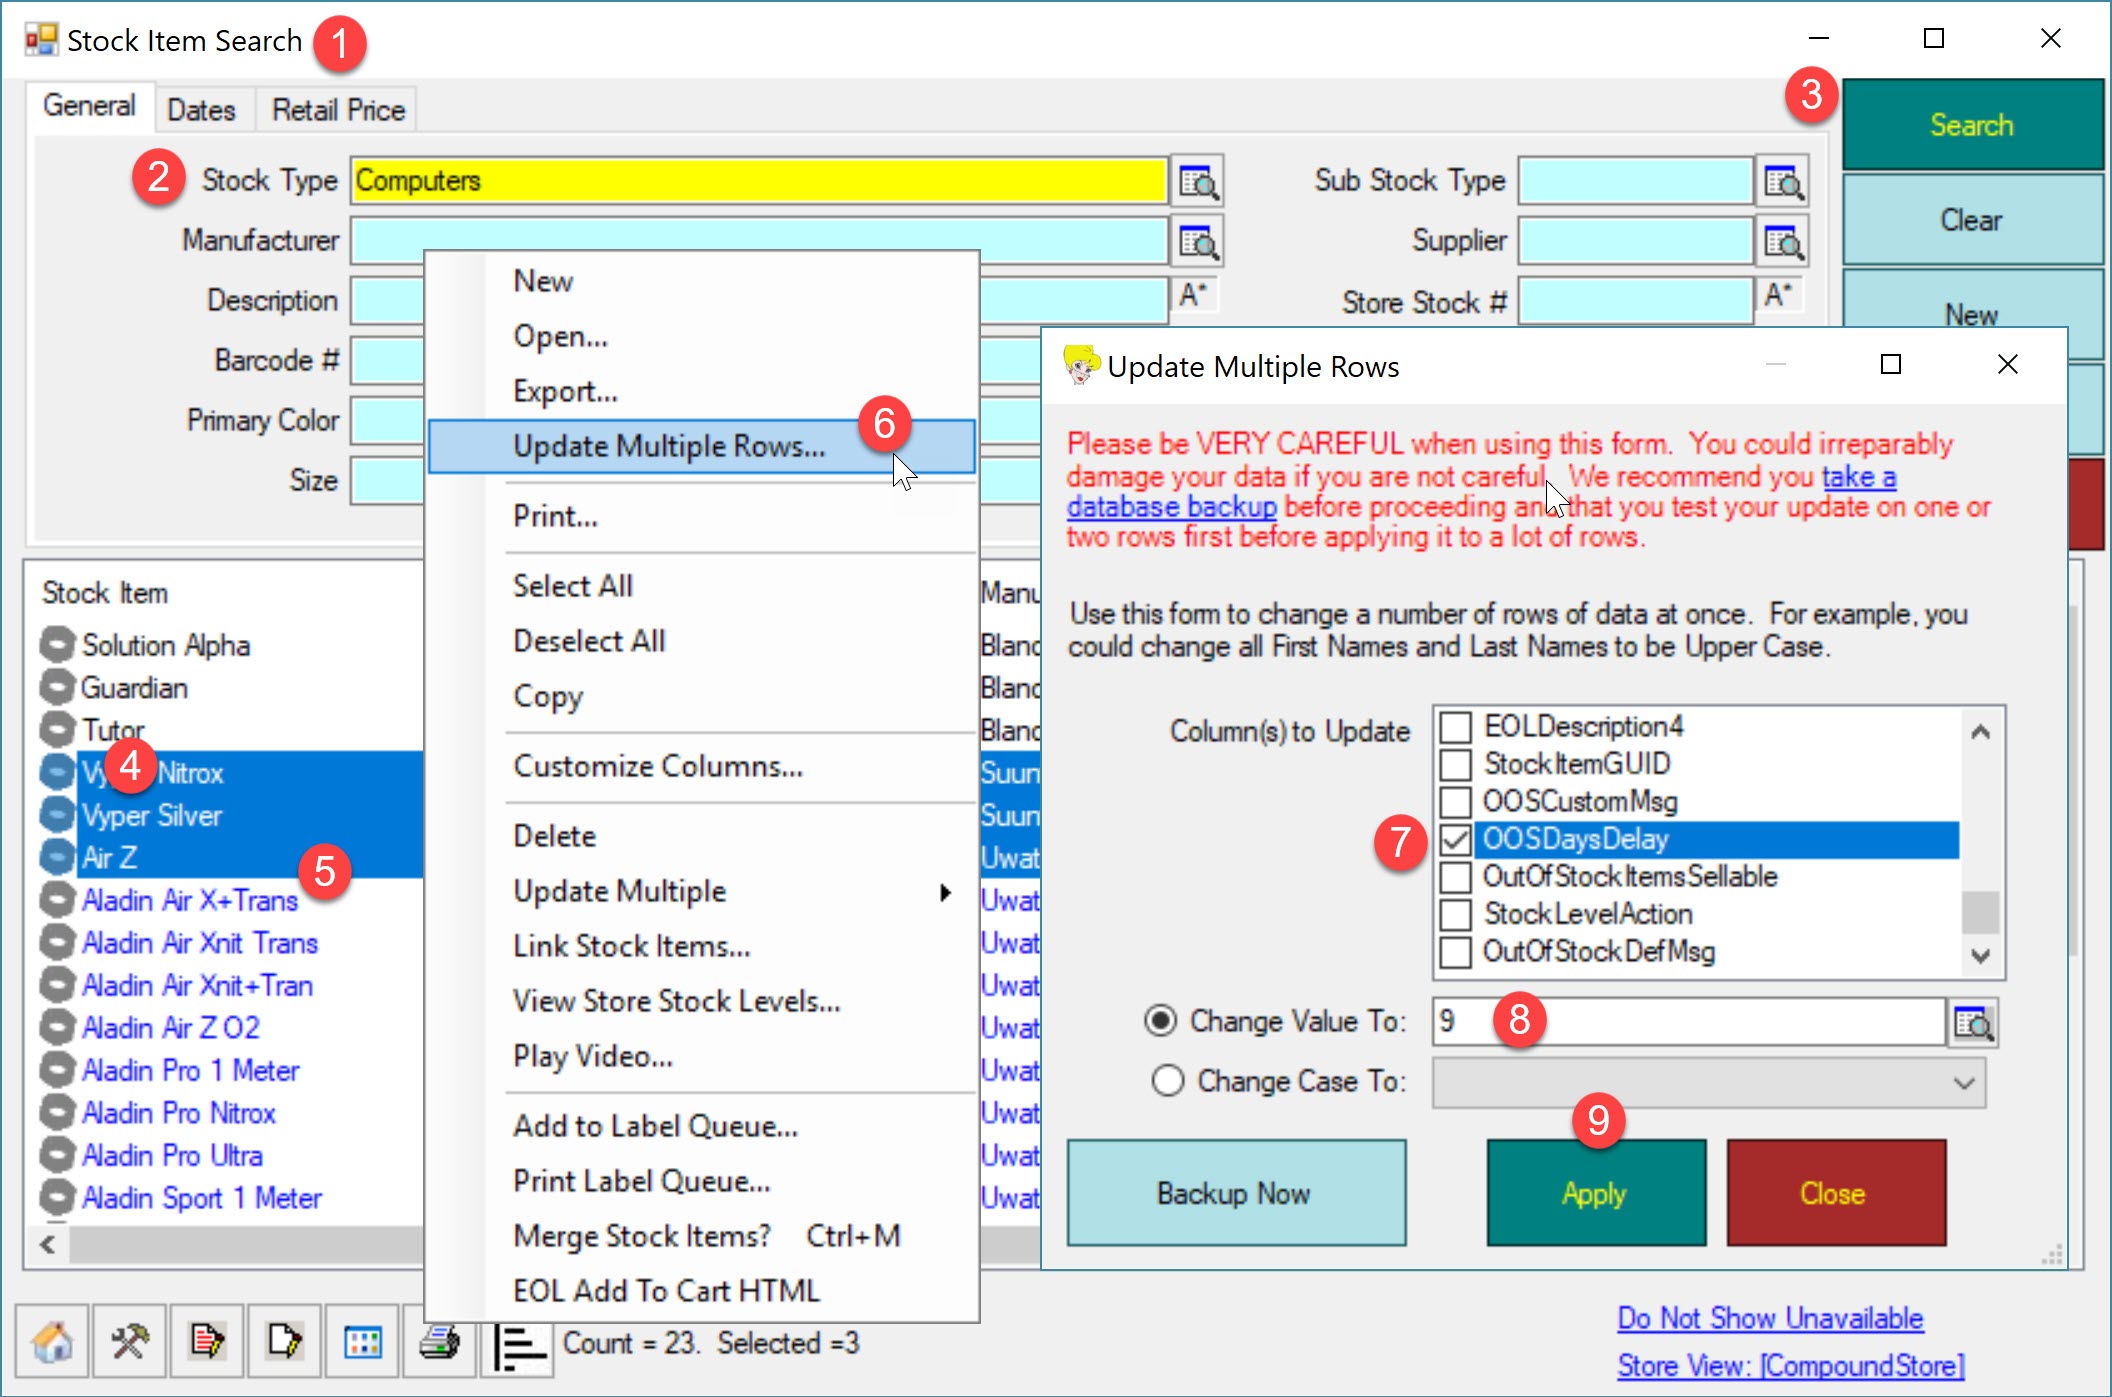
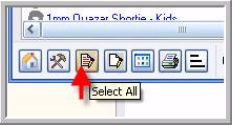
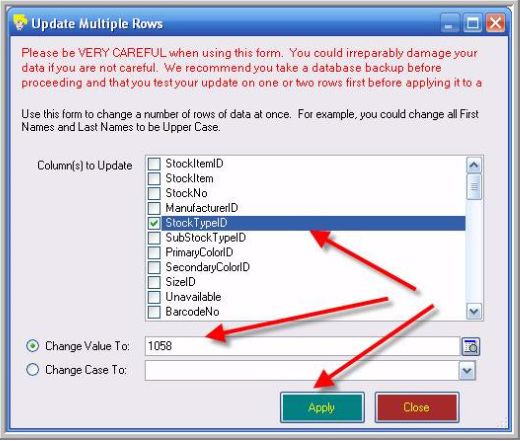
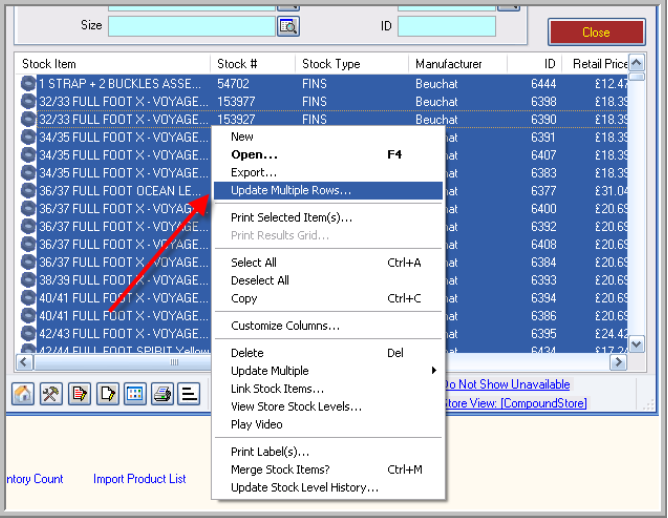
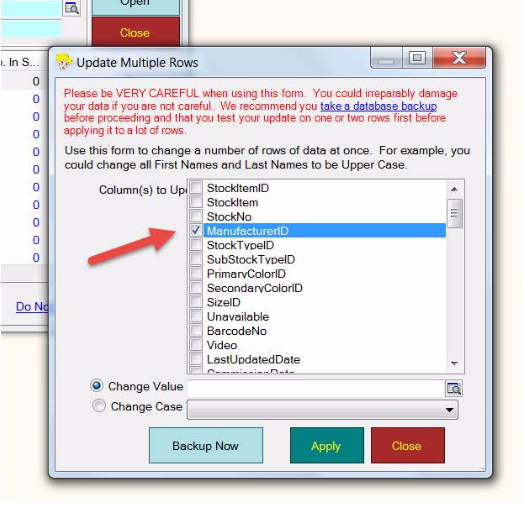
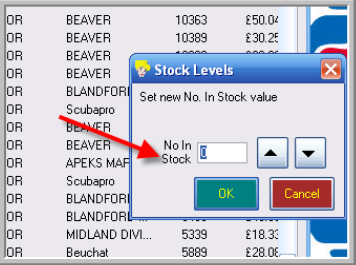
The new EVE OnLine shop allows to set the number of days required to ship an item, when it is out of stock. To apply the same setting to multiple stock items, follow this procedure:
1) Complete a stock item search
2) Use Search criteria, where necessary
3) Click Search
4) Select the stock item(s) you wish to update. Hold the CTRL button pressed to update multiple items
5) Right click on any selected item
6) Click on Update Multiple Rows
7) Scroll the list and check one of the following options:
- check OOSDaysDelay if you wish to set the default number of shipping days
- check the OutOfStockItemsSellable to define whether the item can still be sold when it is out of stock
- OutOfStockDefMsg if you wish to set the default message to display when an item is out of stock
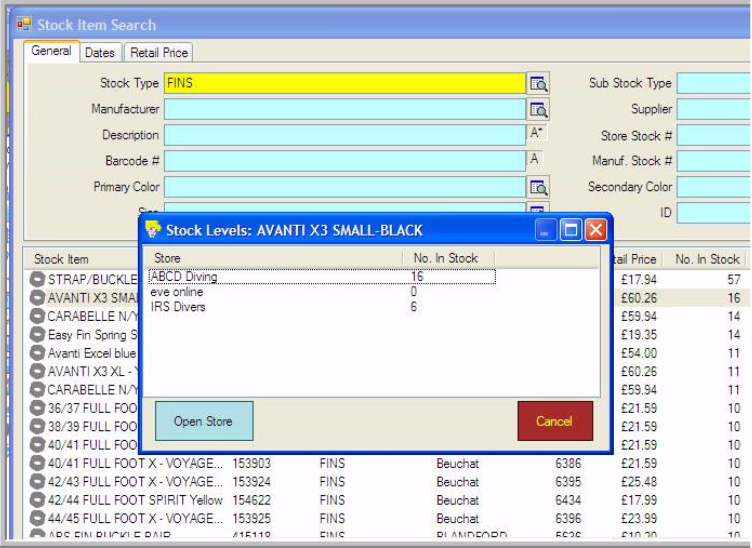
- StockLevelAction if you wish to display/hide current stock levels
8) Based on the option select at point 7:
- If you checked OOSDaysDelay, enter the number of days
- If you checked OutOfStockItemsSellable, then enter 1 if you wish the item to sellable, enter 0 (zero) if you do not wish to item to be sellable when it is out of stock
- If you check the OutOfStockDefMsg, enter the text you wish to display when the item is out of stock
- If you ckec the StockLevelAction, enter 0 if you wish to hide the current stock level, enter 1 if you wish to display the current stock level, enter 2 if you wish to display a label on whether the item is on stock or not
9) Click Apply
When you update price(s) for shop item(s) in your EVE database, it is possible that the web shop has cached old prices. In this situation, the web page will display old prices. Clearing EVE OnLine Cache will fix this issue. To clear EVE OnLine cache, proceed as described below:
-
- Click on the EVE Globe located in the top right corner of EVE Interface
- Click Clear EOL Cache
EVE will not return any confirmation message. However, next time the web shop is loaded, prices will be recalculated
![]()
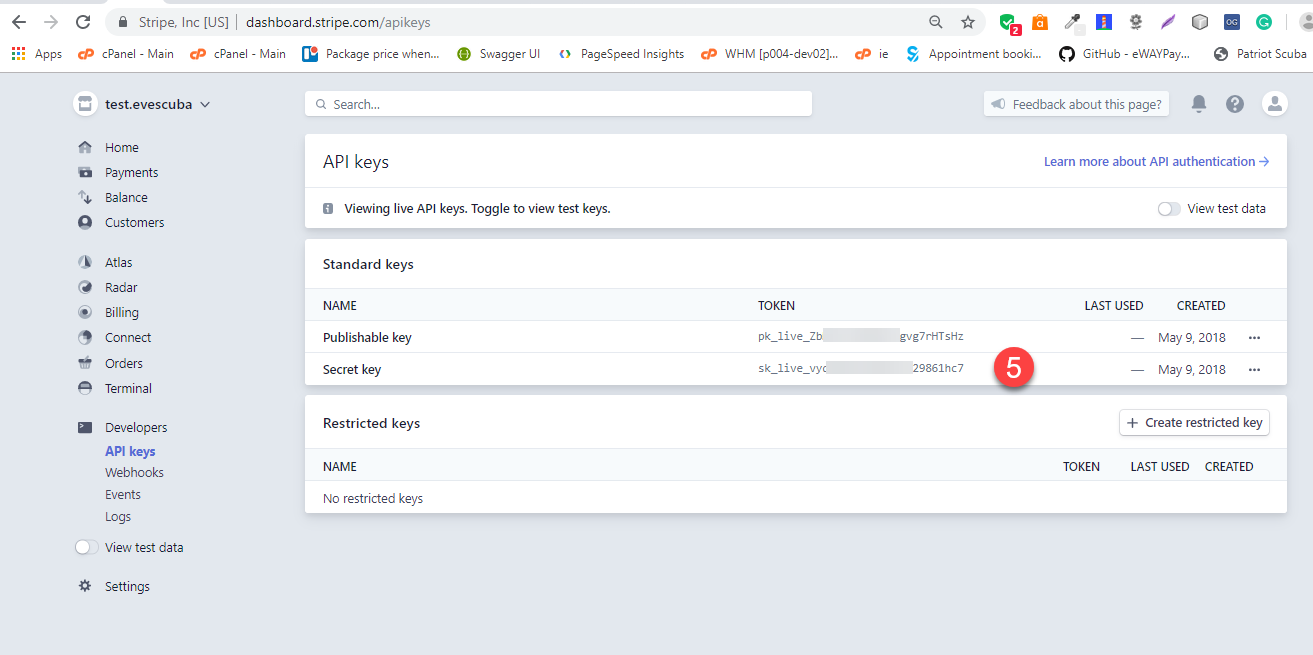
The setup of Stripe as a Payment Method requires:
- the Secret Key
- the Publishable Key
Both keys are generated in your Stripe account. To generate those 2 keys, follow this procedure:
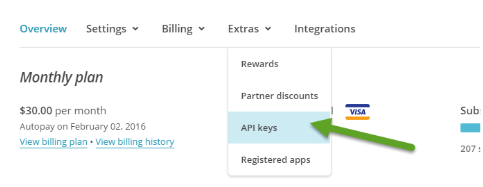
1) Open your browser, login to your Stripe account and open this link https://dashboard.stripe.com
2) In the list on the left side, click on Developers
3) Click API keys
4) Click Reveal live key token
5) Copy each value and apply it to EVE as explained in this video tutorial

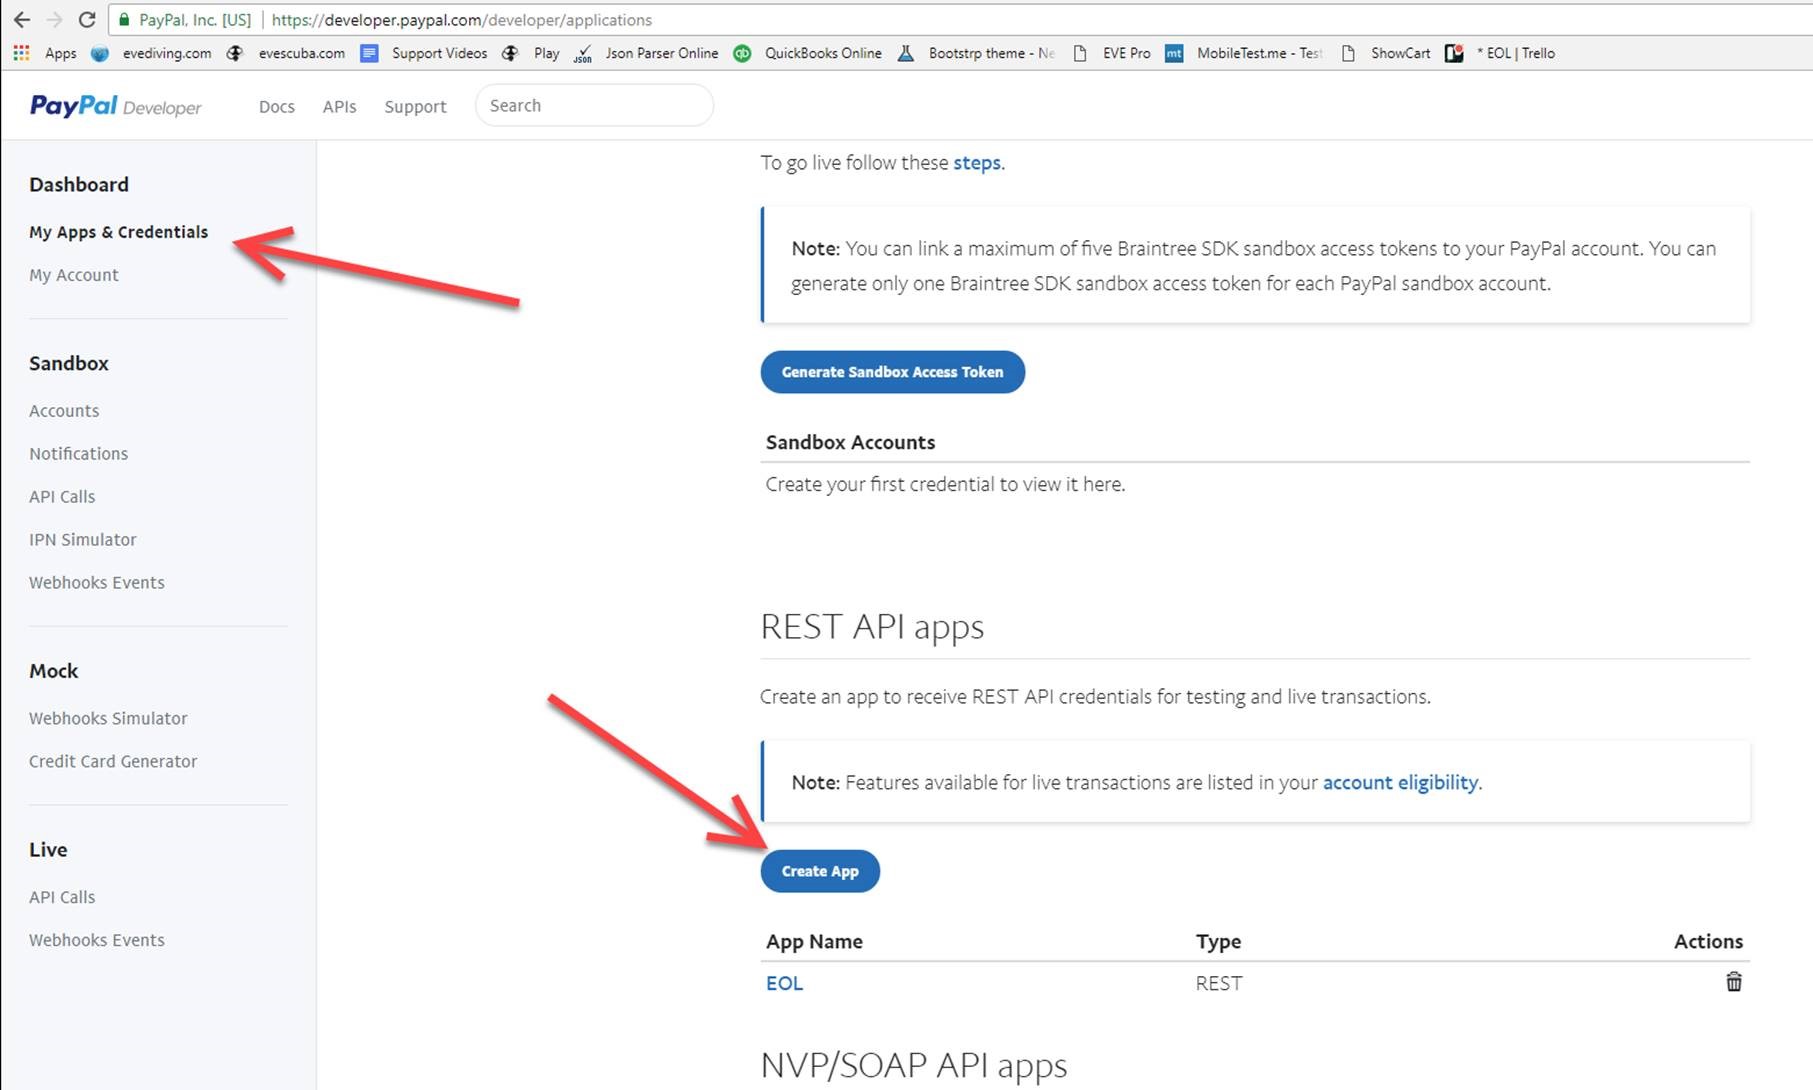
To setup PayPal as payment provider on the new EVE OnLine shop, please watch this video tutorial first.
To complete the setup, you will need your LiveClientID and your LiveSecret. Please follow this procedure to generate these 2 elements:
1. Login at https://developer.paypal.com
2. On the My Apps & Credentials page, scroll down until you see the “Create App” button and click it.
3. Enter “EVE Online” in the App Name box and click Create App.
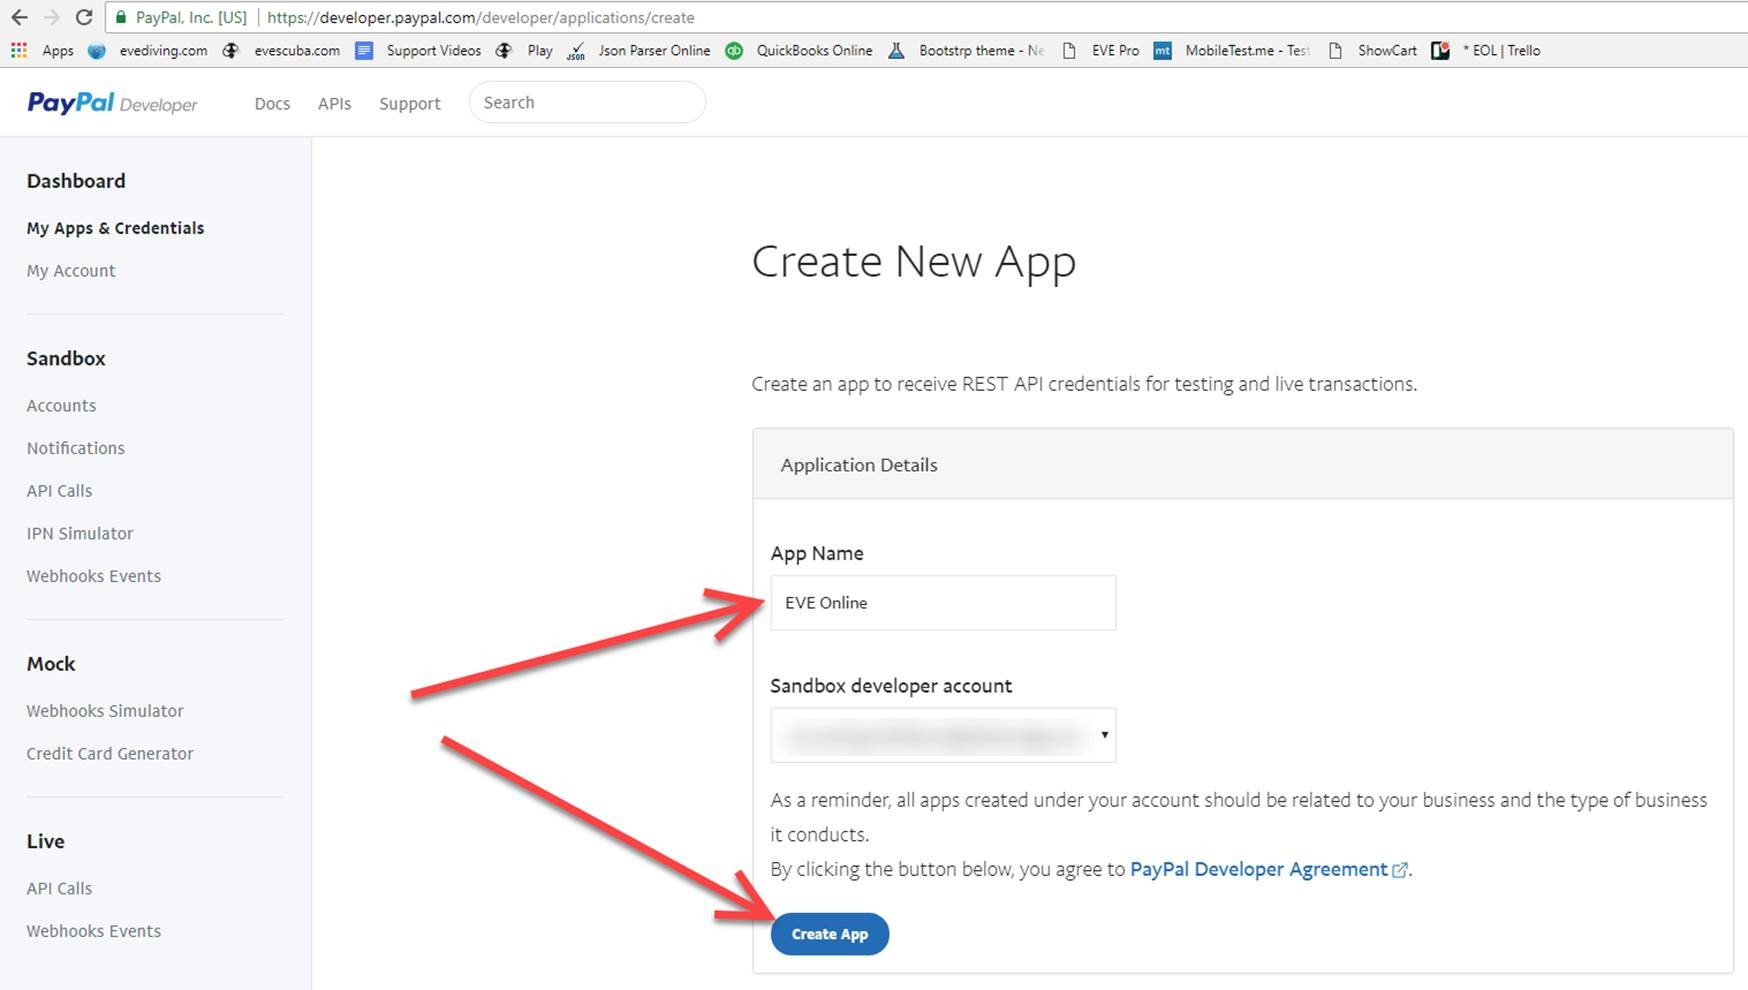
4. You’ll see a page like below. Click on the Live button at the top right.
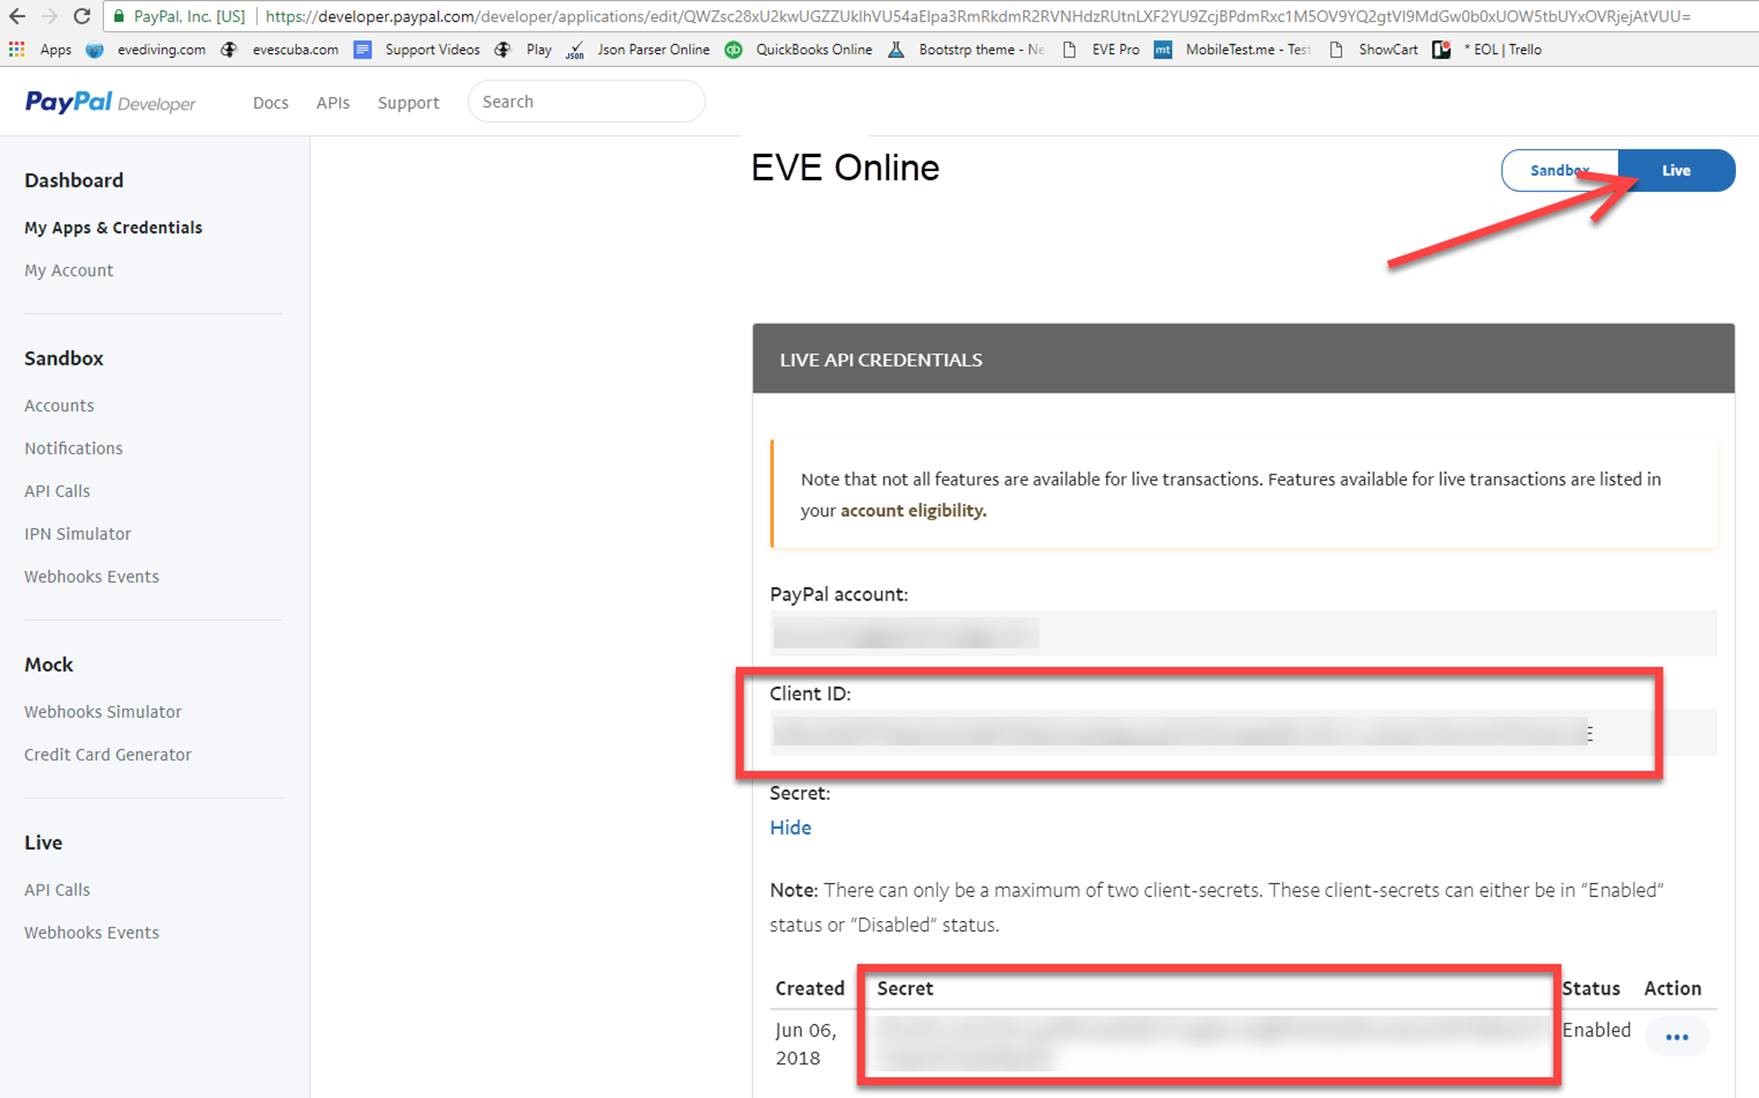
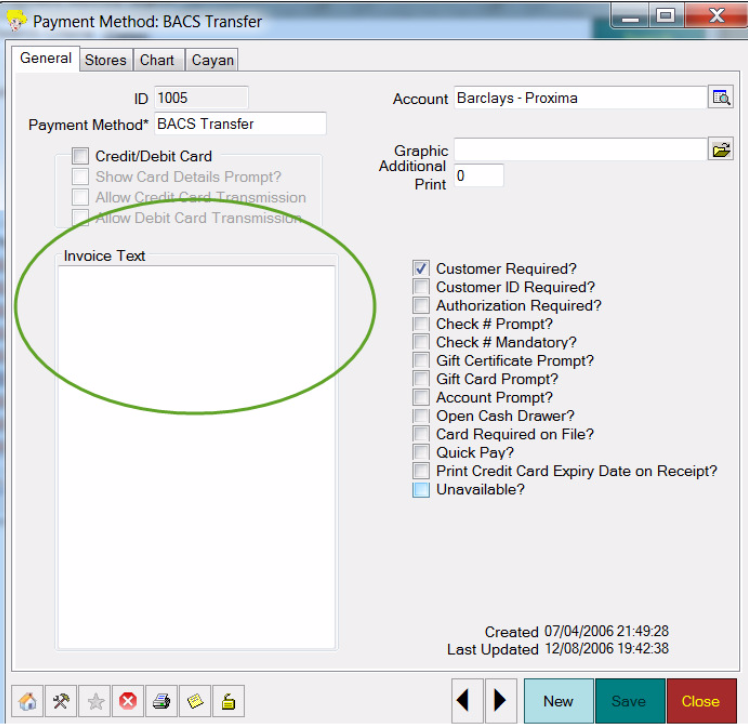
5. Copy and paste the Client ID and Secret into the LiveClientID and LiveSecret boxes respectively on the PayPal payment method in EVE (see below), in the tab corresponding to your OnLine shop.
6. Also, in EVE enter something in the Notes on the PayPal page such as “Checkout with PayPal”
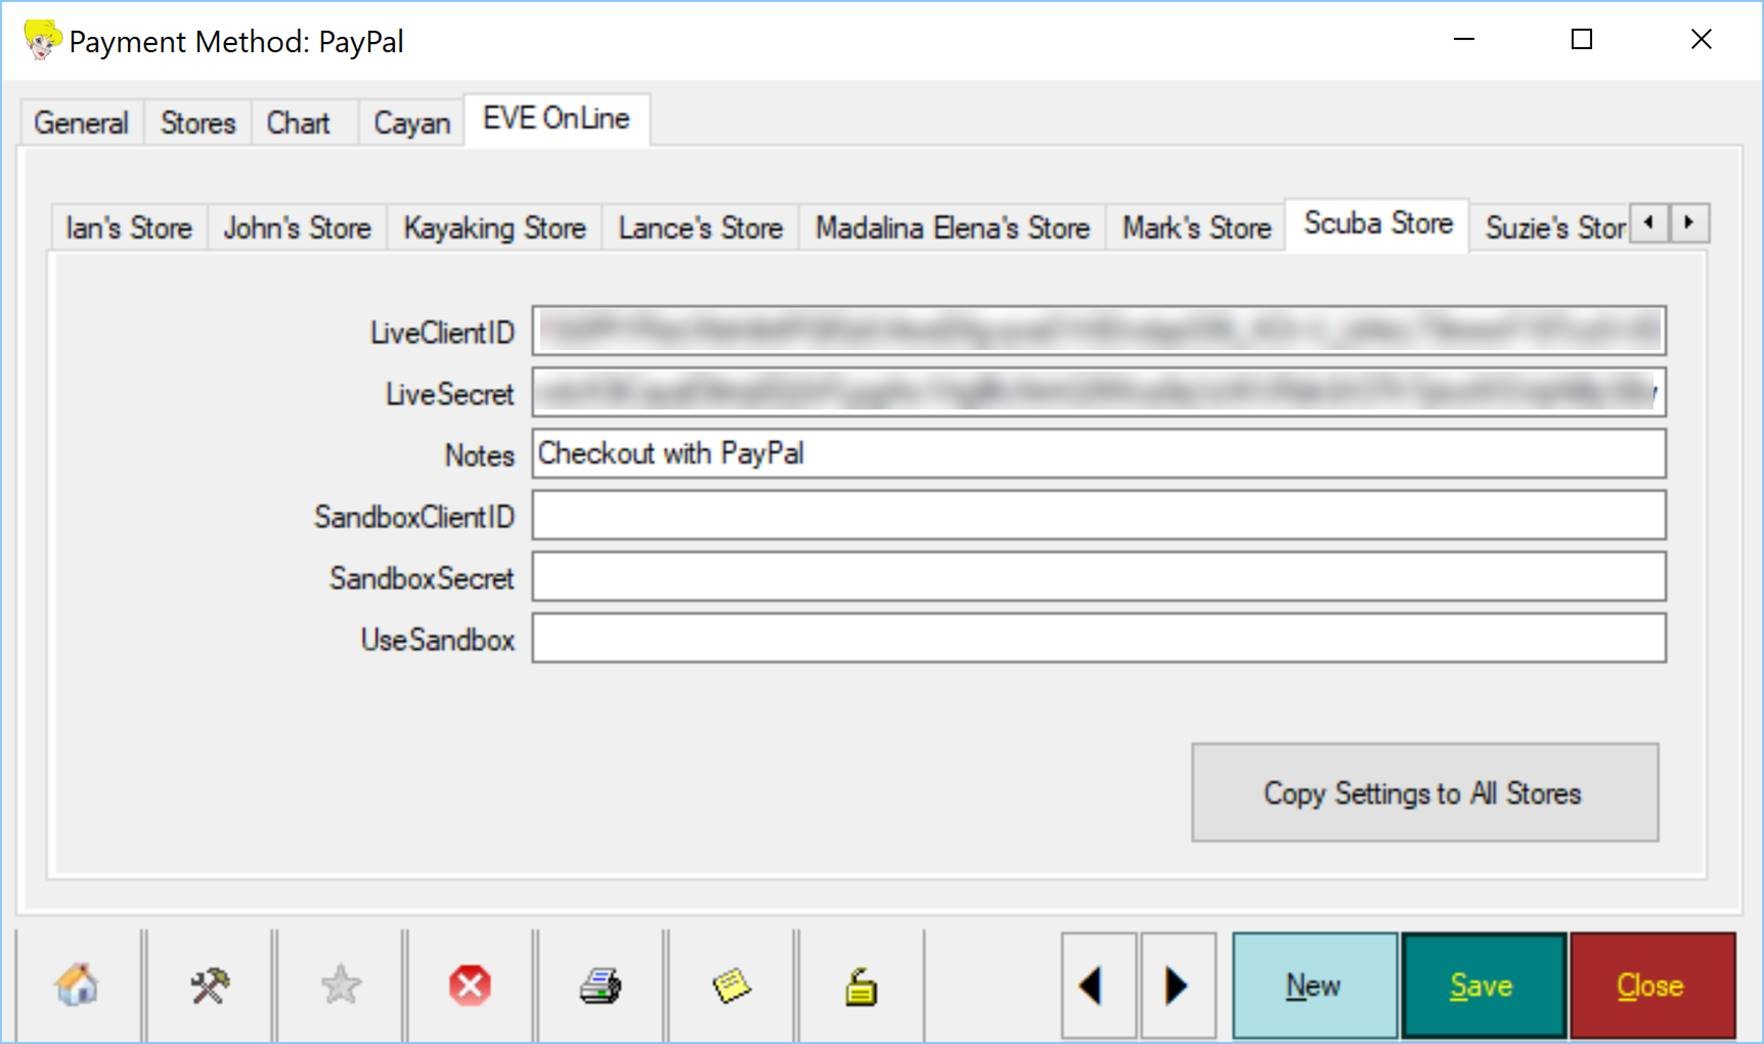
7. Just enter info in LiveClientID and LiveSecret and Notes boxes.
8. Leave the other boxes blank.
NOTE. If you put anything in UseSandbox it tells EOL to use the Sandbox details!!
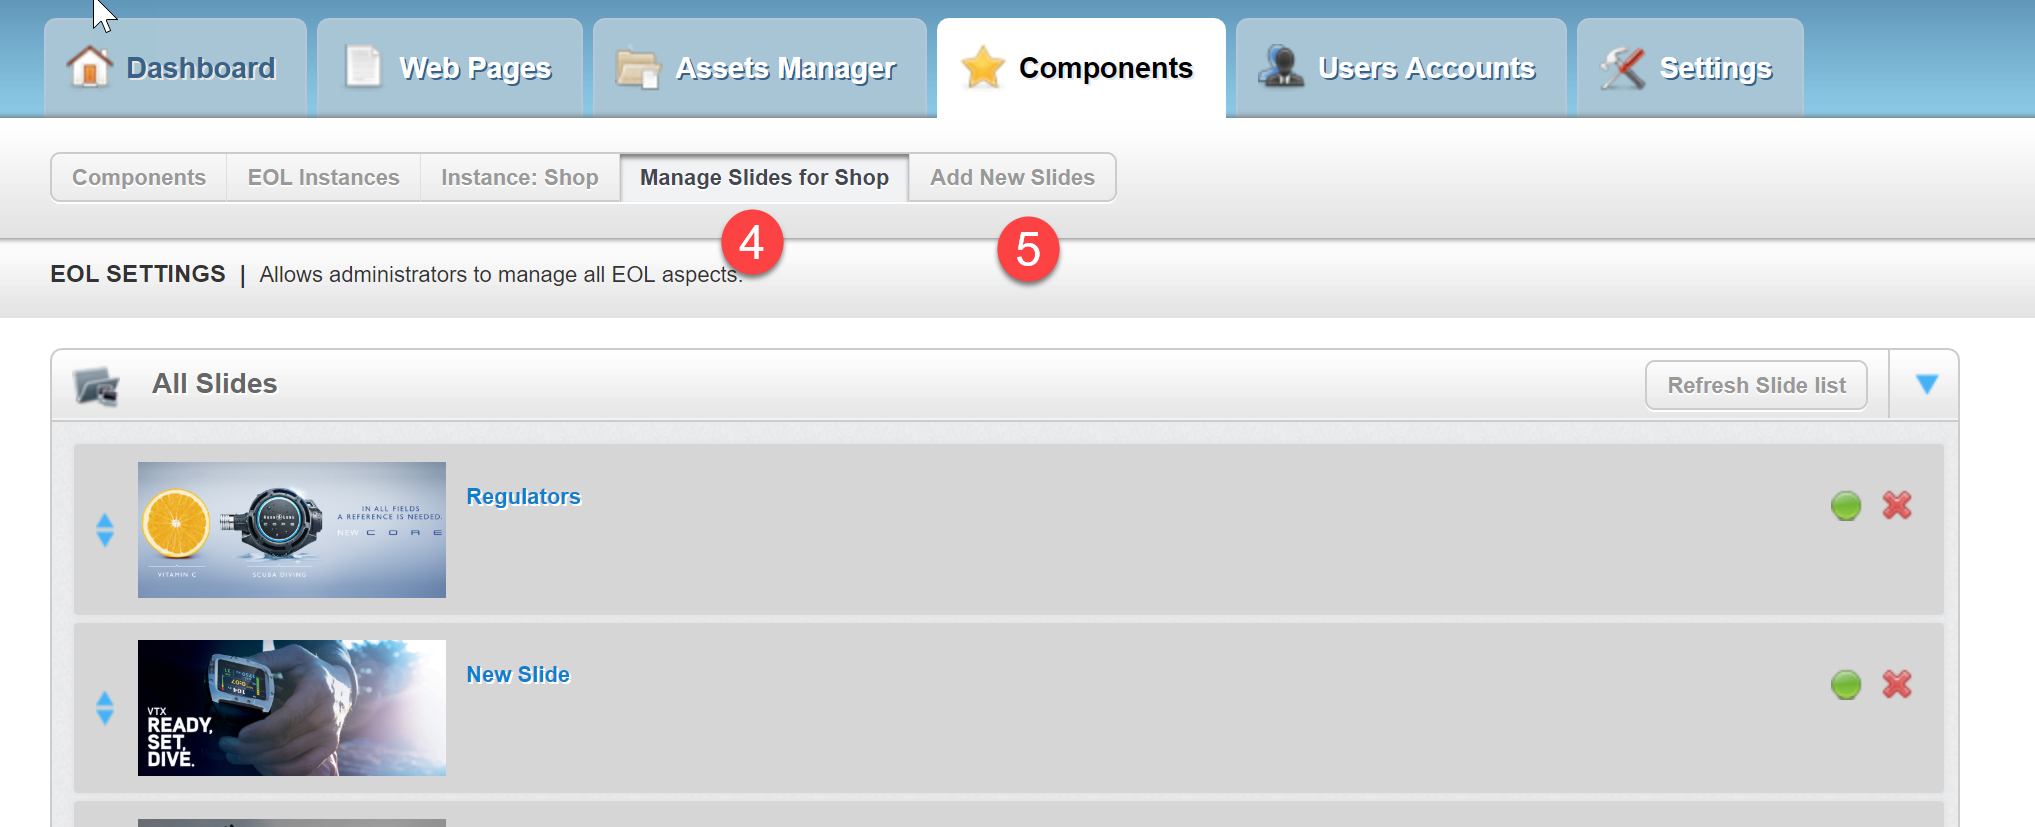
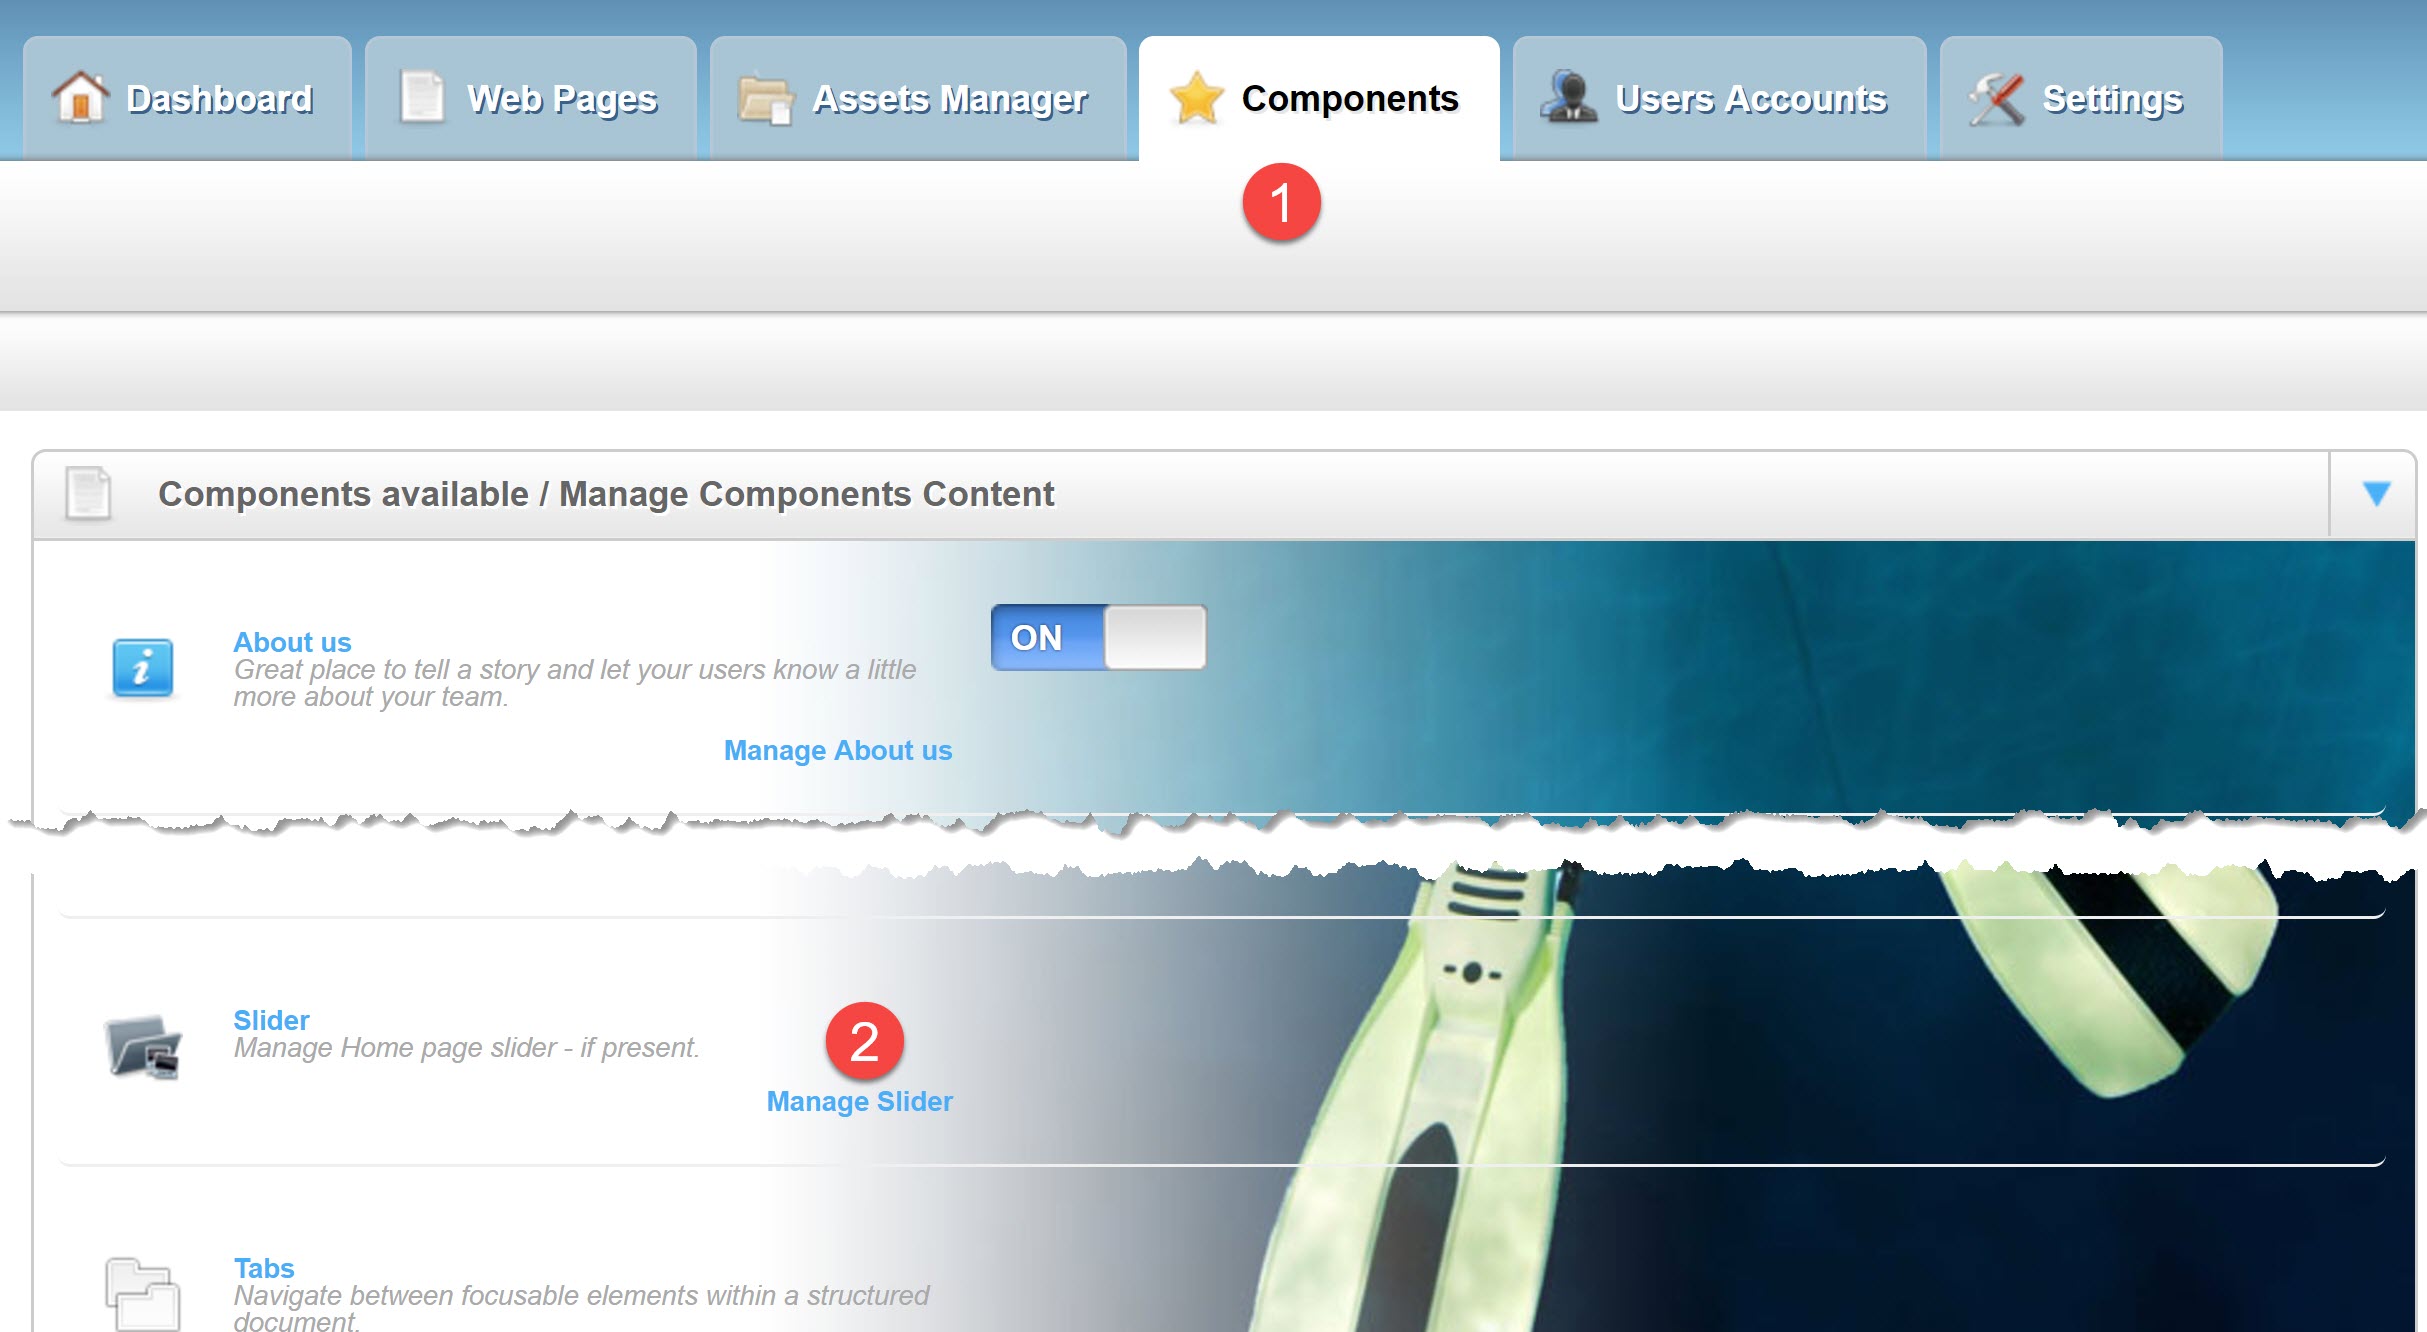
To edit or add slides to your EVE OnLine shop home page, please follow this procedure
1) Login to the CMS and click on the Components tab
2) Scroll down and click on Manage EOL
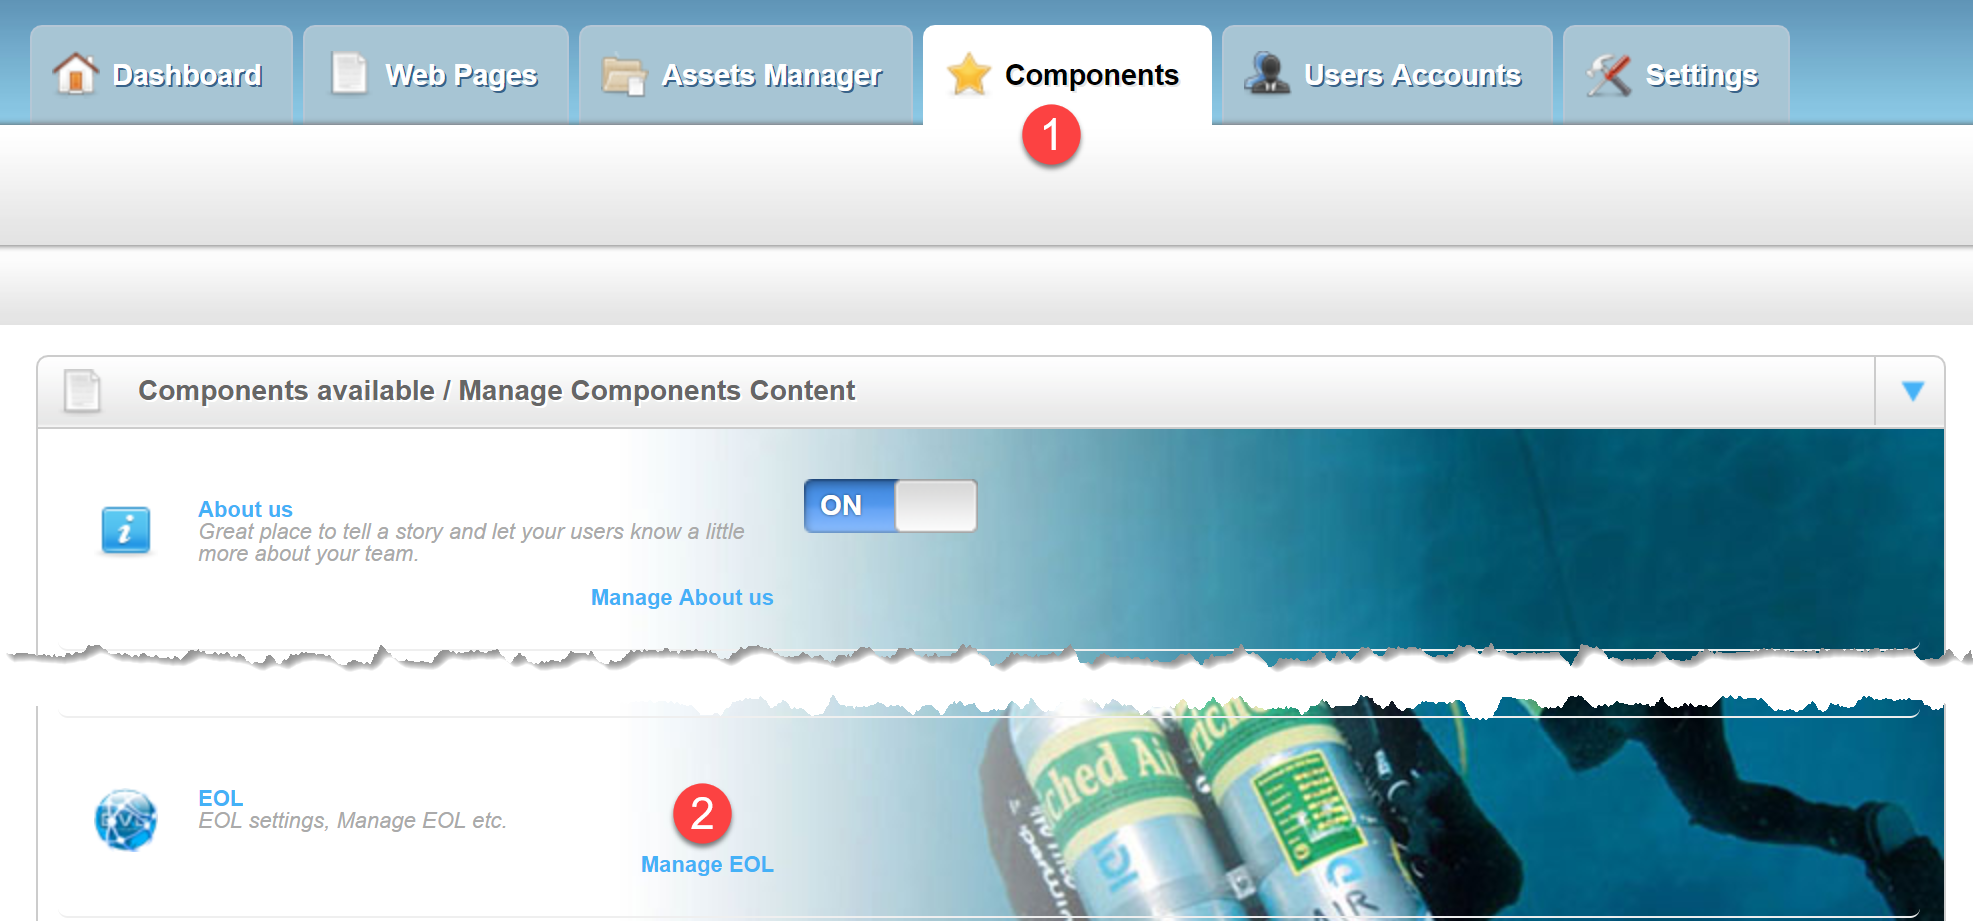
3) Click the Edit button
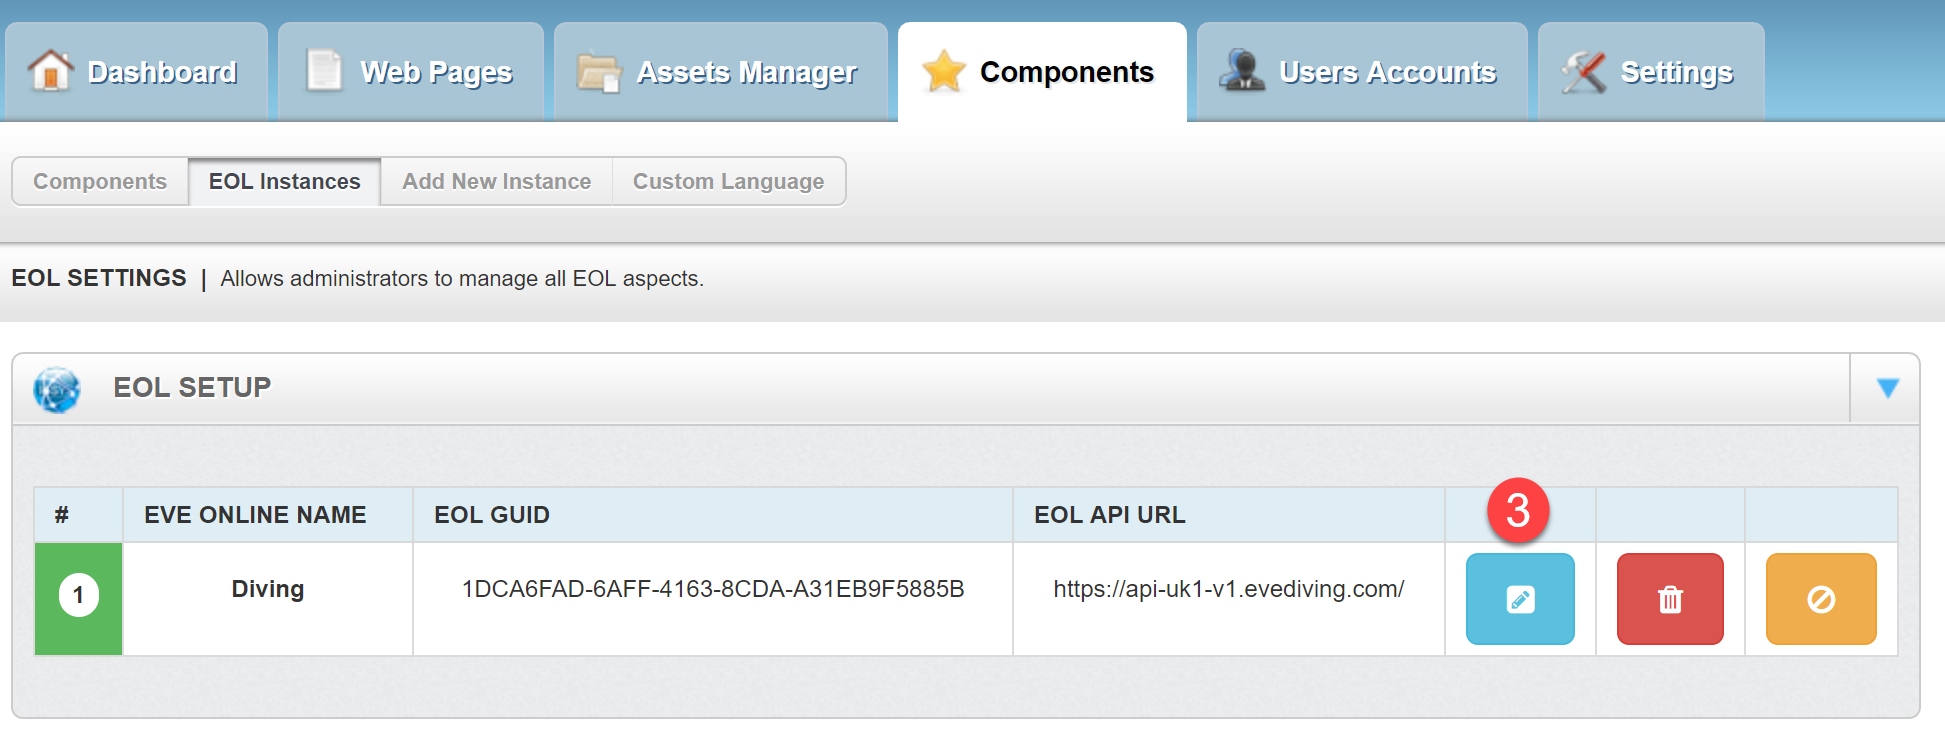
4) Click Manage Slides for shop, if you wish to edit existing slides
5) Click Add New Slides, if you wish to add new slides
To remove stock item(s) from a category and therefore from the online shop, please open your online shop record and follow the procedure outlined below:
- Click EVE OnLine tab
- Click Filters tab
- Click a menu tab tab
- Select the category containing the item(s) you wish to remove
- Right Click on the item you wish to remove
- Click Remove
- Click Save
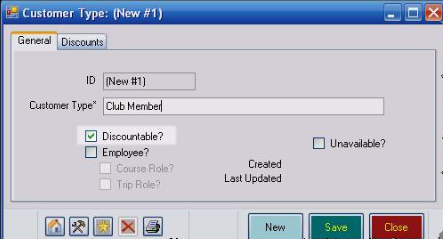
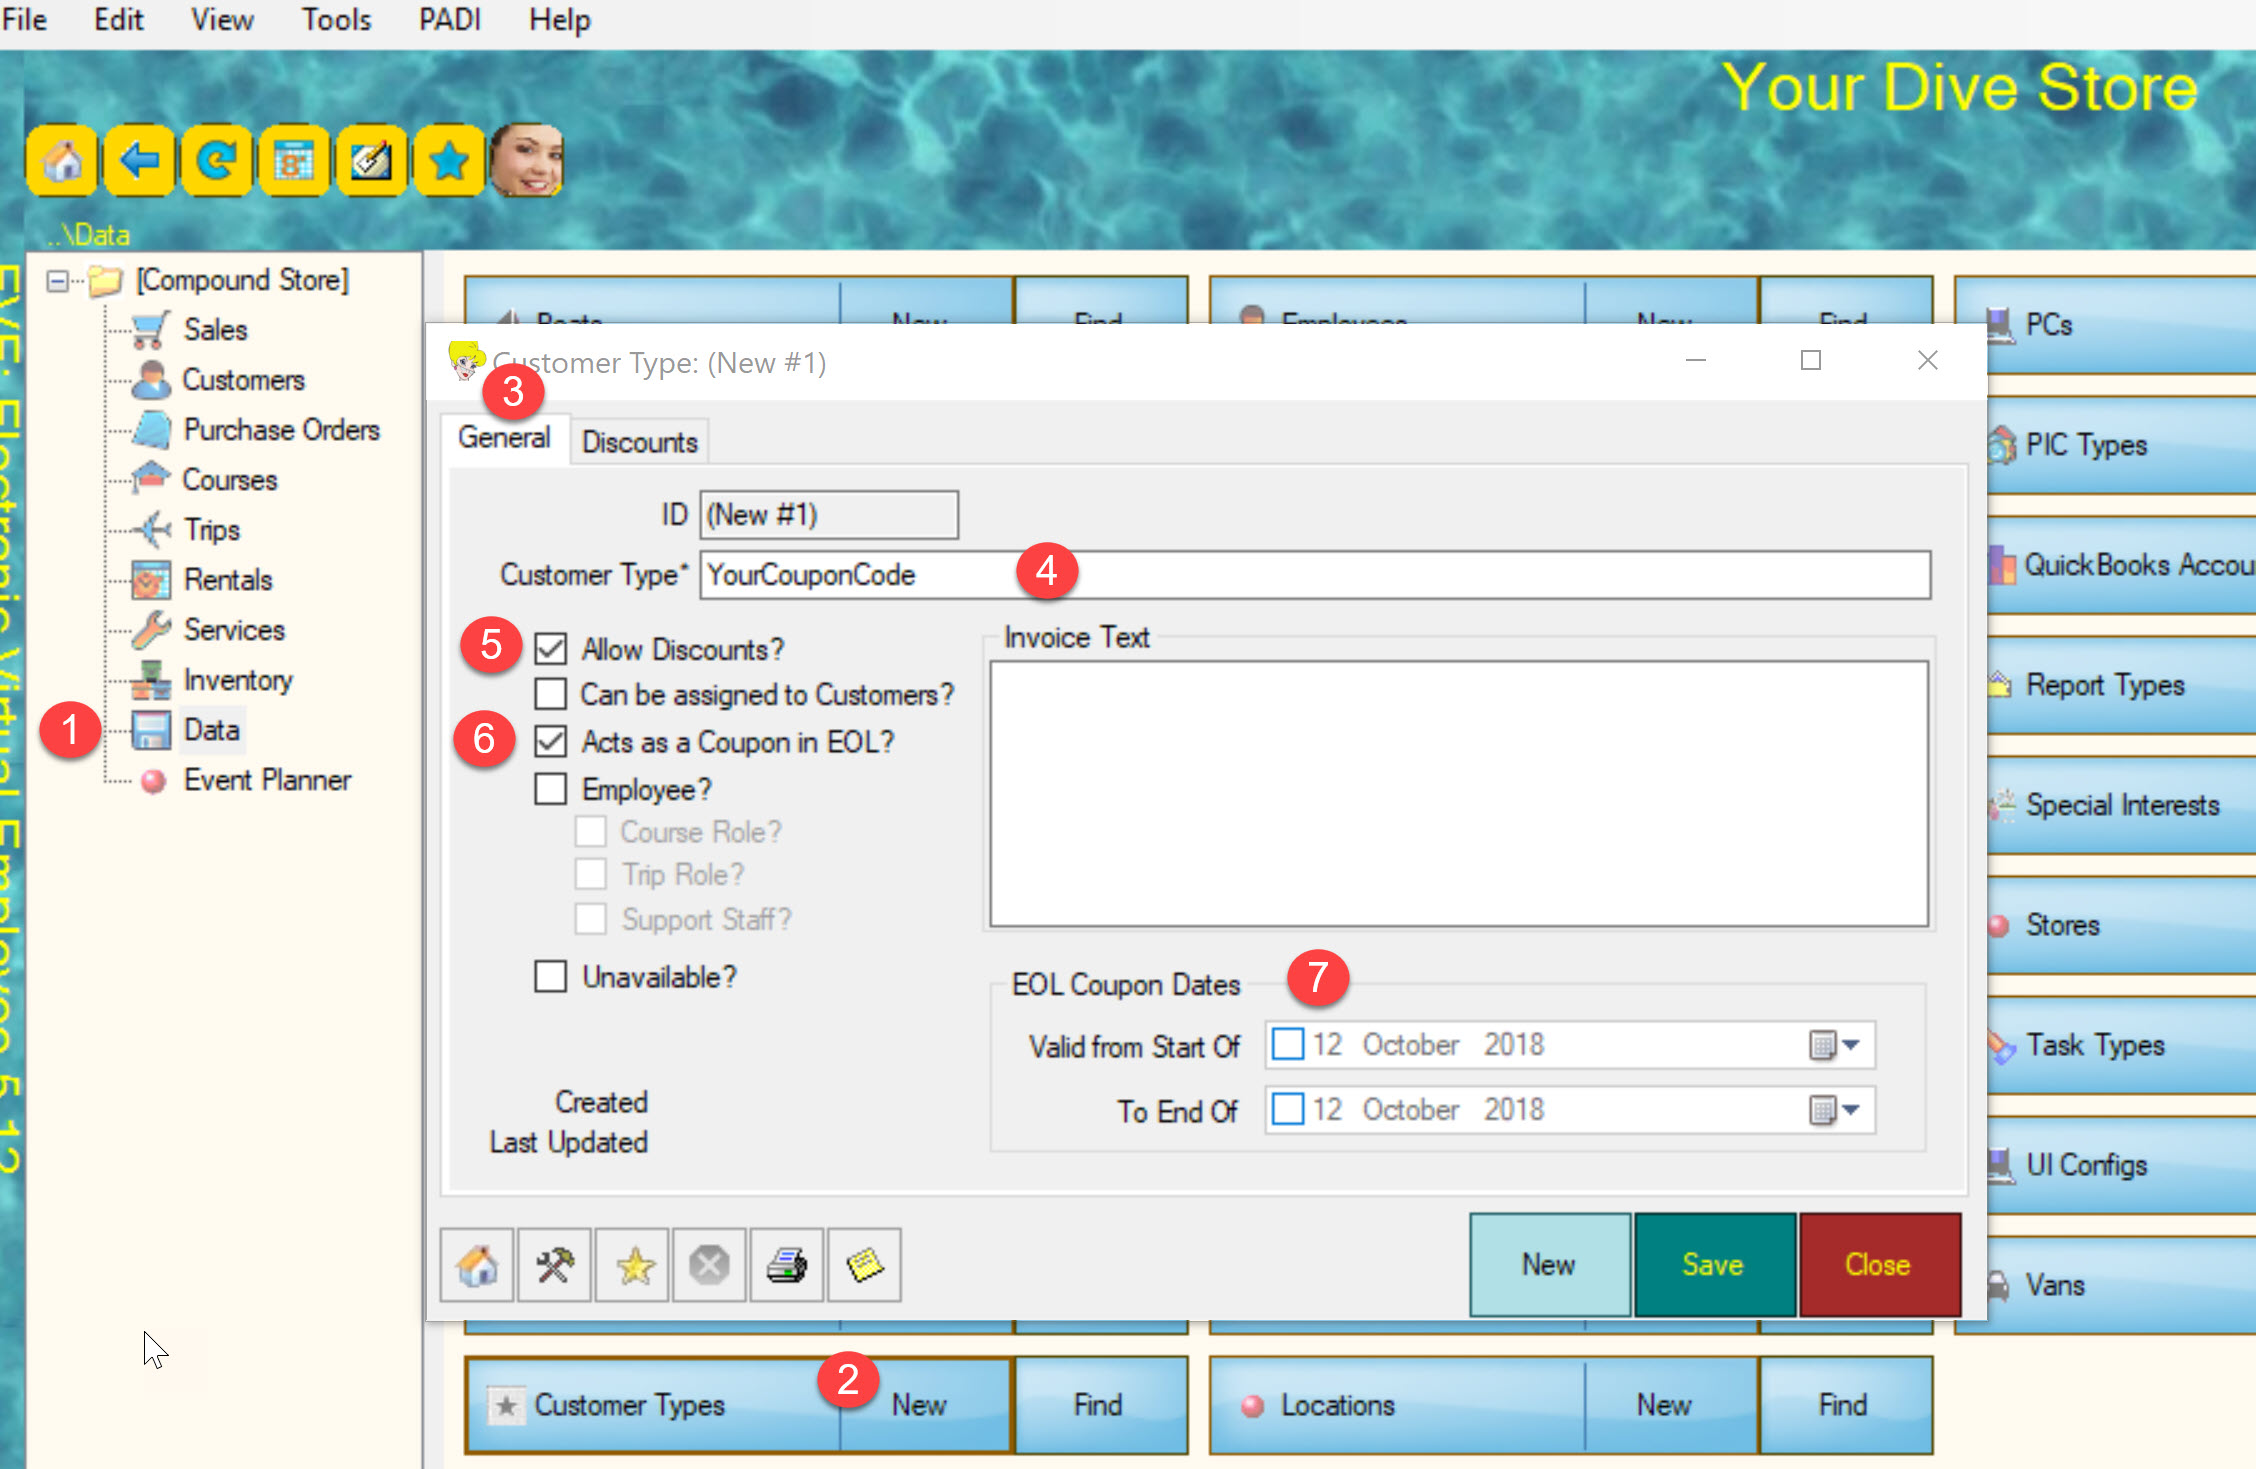
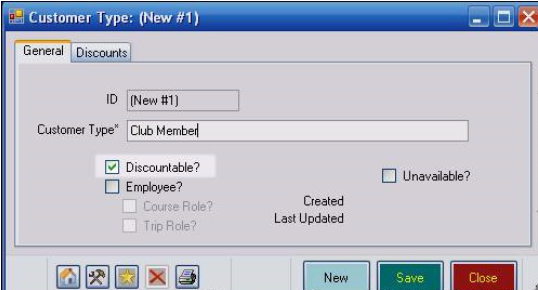
The new, mobile friendly version of our online shop allows you to provide customers with a coupon code. Customers can use the coupon code to receive a discount in the online shop.
To create a coupon code, open EVE and follow this procedure:
- Click Data
- Go to the Customer Types module and click New
- Click the General tab
- Enter the name of your coupon code. This is the code you will share on your website or through EVE Agent with your customers. The same code can be used by any customer.
- Check the Allow Discounts option
- Check the Acts as a Coupon in EOL option
- Optional. If you wish the coupon to be valid only for a set period, enter start and end date
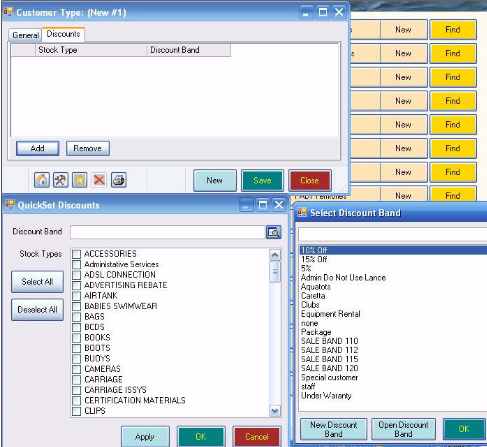
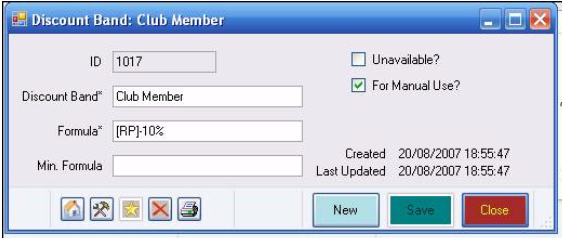
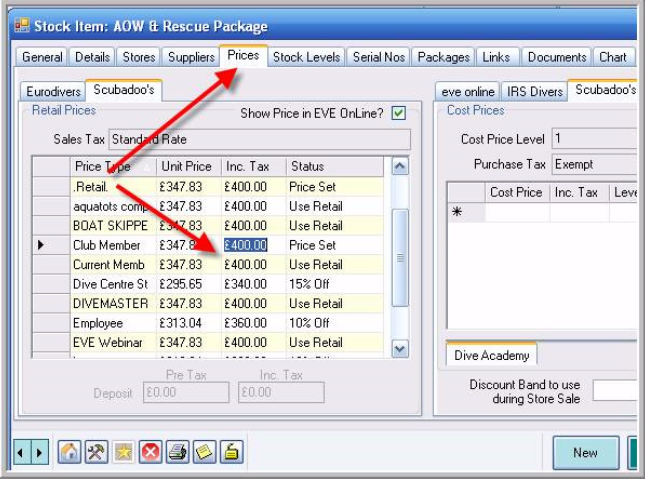
- Discount* can be offered on all stock items that belong to a stock type or to a single stock item. In this example, click Stock Item Discounts.
- Click Add
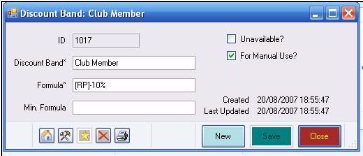
- Select the discount you wish to offer or create a new one
- Click OK
- The stock item search form will display. Select an item
- Click Add
- Click Save
*Note. EVE will always apply the best price. If a customer, who uses a coupon, belongs to a customer type who receives an higher discount on the selected stock type / stock item, then EVE will calculate the discount based on the customer type, rather than use the coupon code.

EVE Training Academy
As a new student to the EVE Academy, the following process will:
- Enrol you into the Academy
- Enrol you into your selected Course
If you have purchased a ‘discounted study coupon’, the following instructions will allow you to
pay for your course with the training token / coupon.
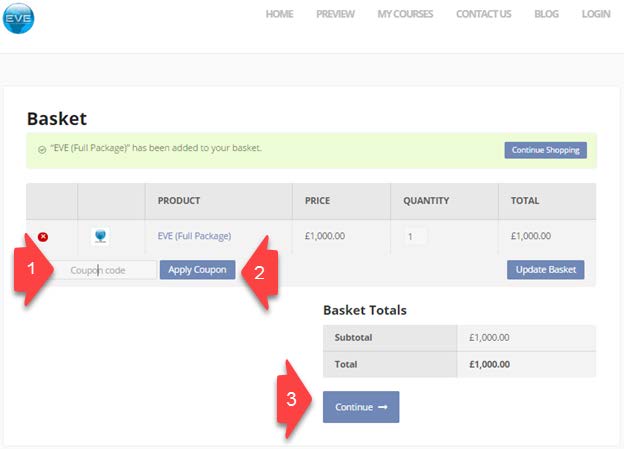
The next page shows you how. On the ‘Basket’ page instead of paying the full price of the
course:
1. Enter your Coupon code into the ‘Coupon code’ box.
2. Click the ‘Apply Coupon’ button.
3. Click the ‘Continue’ button.

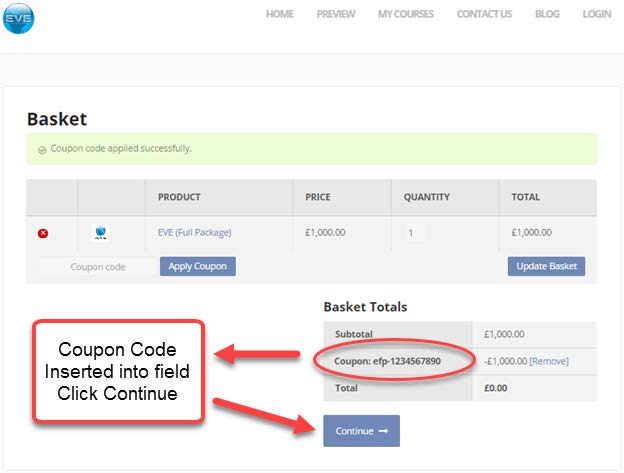
Clicking the Continue button will place the coupon code into the payment section.
When you see your coupon code in place .
Click continue

Now you have paid your Academy fees.
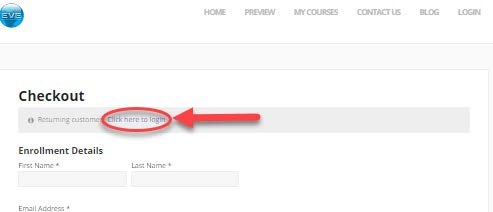
Your next step as a new student, is to enrol into the Academy:
On the ‘Checkout’ page you need to create a login profile. You will need to enter your details in the ‘Enrolment Details’ section:
1. Enter your first name into the ‘First Name’ box.
2. Enter your last name into the ‘Last Name’ box.
3. Enter your email address (the email address associated with your ISSYS account’ into the ‘Email Address’ box.
4. Enter a password into the ‘Account password’ box.
Note: The details you enter will be used along with the email address entered above to login into your EVE Training account and access your EVE Training courses.
5. Click the ‘Continue’ button.

Letting you know – Your Enrolment is complete and you are booked into your course
You are now automatically logged into your EVE Training account.
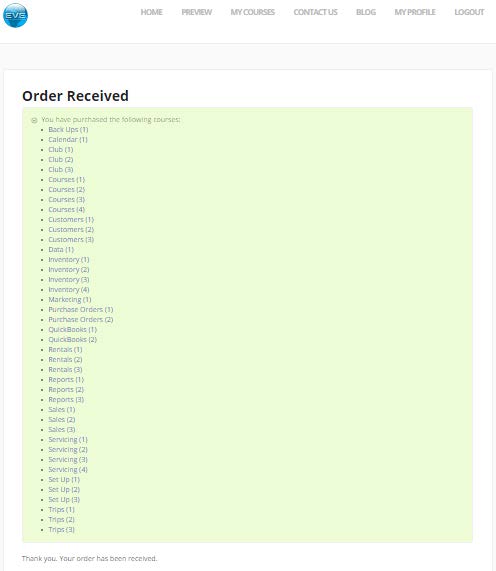
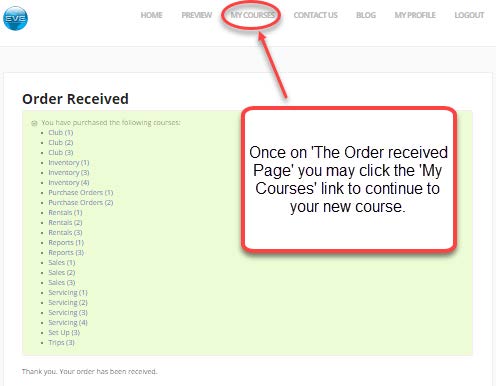
On the ‘Order Received’ page you will see the course list that is included as part your EVE Course package.
On the ‘Order Received’ page you will see the course list that is included as part your EVE Course package. You are now automatically logged into your EVE Training account. To begin your training you need to click ‘My Courses’ in the menu bar at the top of this page
To begin your training you need to click ‘My Courses’ in the menu bar at the top of this page.
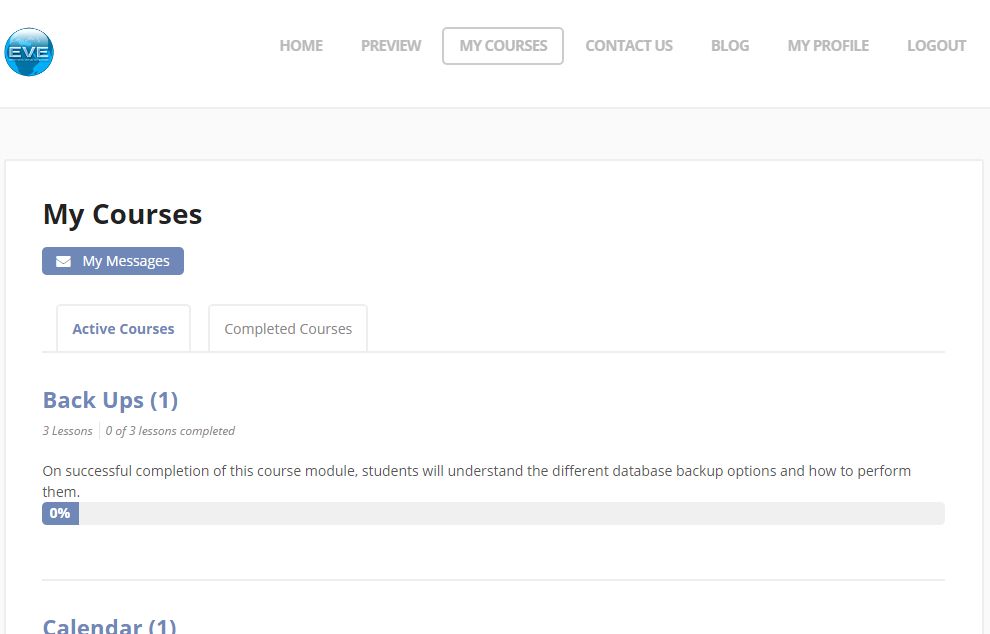
Doing so will bring you to the ‘My Courses’ Screen
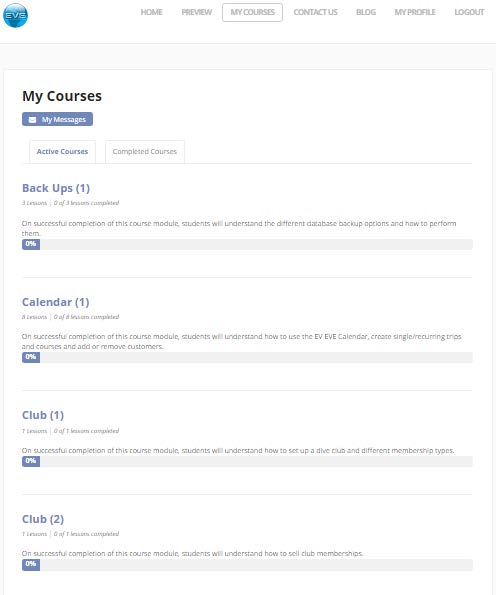
On the ‘My Courses’ page you will see the course list that is included as part your EVE Course package.
Congratulations, you are ready to begin your EVE Learning.
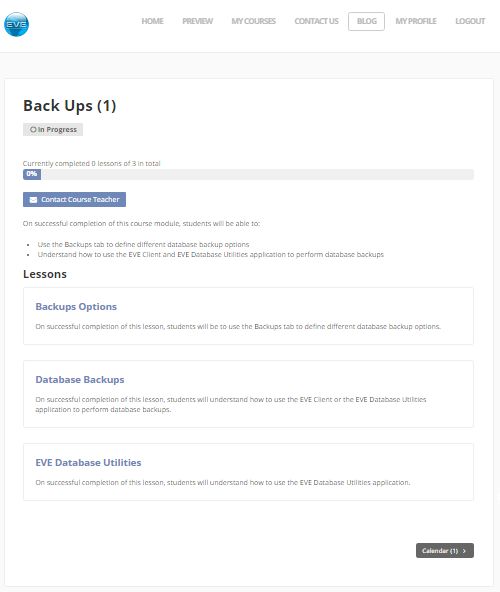
Click on the first course title to start a course.
The following screen will list the Learning Outcomes (Objectives) of your first lesson

On the course page you will see a list of lessons contained within your course.
Click on the title of the first lesson to start your EVE Training.
Should you log out and need to log back into complete your training, will need to:
1. Click on the ‘My Courses’ URL – https://www.evesupport.com/my-courses/
2. Enter your Email address you used to create the EVE Training account (the same email address associated to your EVE Diving account)
3. Enter your EVE Training password
Good luck with your EVE Training and if you have any questions please contact support@evediving.com
These instructions apply to stores who already created an account on our Online Training Academy and need to redeem a new code
To redeem your coupon code, click on the shopping basket link in your email and
1) Enter the Coupon code into the “Coupon Code” box
2) Click the “Apply Coupon” button
3) Click the “Continue” button
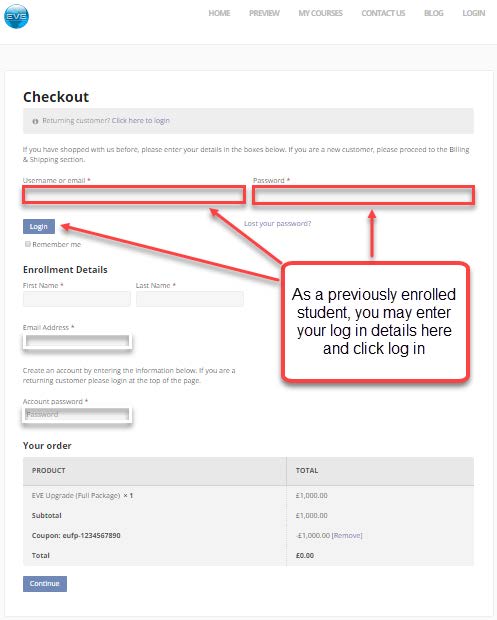
On the ‘Checkout’ page, as a returning customer to EVE Training, you need to login by clicking on the ‘Returning customer?’ link underneath the ‘Checkout’ title.
This will then reveal boxes which you can use to login into your EVE Training account:
1. Enter your email address (the email address associated with your EVE Training and ISSYS account’ into the ‘Email Address’ box.
2. Enter your EVE Training password into the ‘Account password’ box.
3. Click the ‘Login’ button.
The ‘Checkout’ page now has your details completed for the ‘Enrollment Details’ section. Click the ‘Continue’ button.

On the ‘Order Received’ page you will see the course list that is included as part your ‘[[EVECourseID]]’ package.
You are now automatically logged into your EVE Training account.
To begin your training you need to click ‘My Courses’ in the menu bar at the top of this page.
On the ‘Order Received’ page you will see the course contents list that is included as part your new ‘[[EVECourseID]]’ package.
You are now automatically logged into your EVE Training account.
To begin your training you need to click ‘My Courses’ in the menu bar at the top of this page and then select the appropriate course(s) and lessons.
Good luck with your EVE Training and if you have any questions please contact support@evediving.com
The Team at EVE Diving
If you are not already logged in you will need to visit the EVE eLearning homepage to login
before you can access and use your EVE eLearning course.
On the EVE eLearning homepage (www.evewebnet.com/Evetraining):
1. Click the ‘LOGIN’ option in the main menu.
On the ‘My Courses’ login page you will need to enter your login details:
1. Enter your email address (the email address associated with your EVE Training and
ISSYS account’ into the ‘Email Address’ box.
2. Enter your EVE Training password into the ‘Account password’ box.
3. Click the ‘Login’ button.

You are now logged into the ‘My Courses’ page where you will be able to see all your ‘Active
Courses’ (these are courses you have purchased but not yet completed.
On the ‘Active Courses’ tab on the ‘My Courses’ page you will see a list of courses. To begin a
course (or to return to a course you have started but not yet completed) click on the course title.
On the course page you have chosen to start/complete you will see:
● A progress bar (showing how much of the course you have completed).
● A description of the course.
● The list of lessons within that course.
To begin/complete a lesson you will need to click on a lesson title.
Each lesson begins with a learning outcome which outlines the information you will be learning
and what skills you will have acquired by the end of the lesson.
The lesson is made up of text, screenshots and/or tutorial videos. To watch a tutorial video click
the play button (arrow icon).

Once you are confident with the information delivered in the lesson you will be able to complete
the lesson. At the bottom of the page you will see the ‘Complete Lesson’ button.
A grey message bar will appear and inform you that you have passed this lesson. On right
hand side you see a ‘Next Lesson’ link. Click this to be taken to the next lesson and repeat
these steps until you get to the last lesson of the course.
Once you have completed the last lesson a course, click the course title link at the bottom of the
lesson page to be taken back to the course overview page.

Back on the course page you will see that the course is complete and there is an option view
your course completion certificate. Click the ‘View Certificate’ button to view/print the course
completion certificate.

The course completion certificate can be printed or downloaded/saved.

At the bottom of the course overview page you have the option to click a button to go back to a
the previous course or click a button to go the next course.

If you wish to see an overview of all your active courses click the ‘My Courses’ option in the
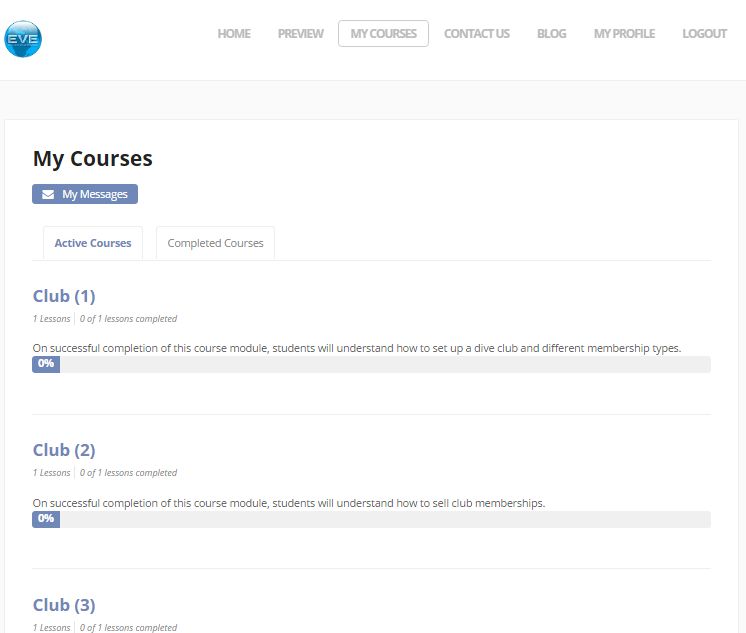
main menu. You will see all the courses you have yet to complete on the ‘Active Courses’ tab.
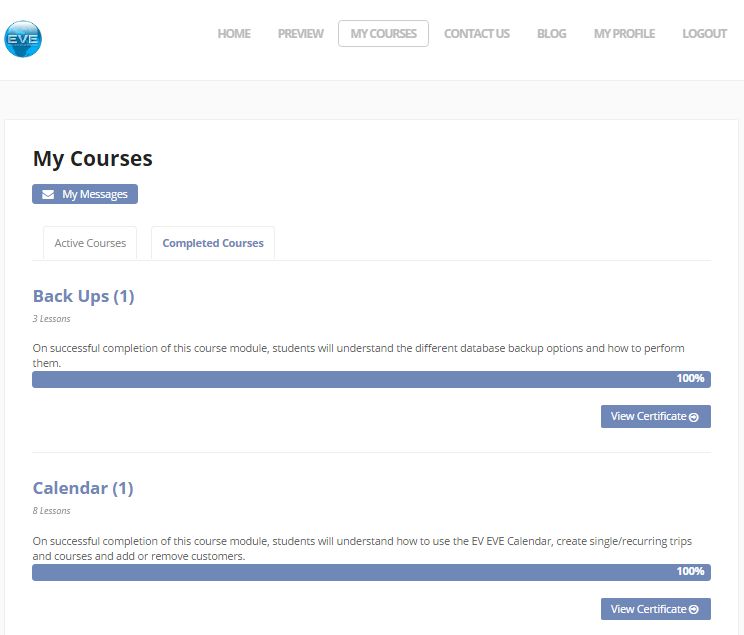
To view you completed courses, click the ‘Completed Courses tab on the ‘My Courses’ page.
On the ‘Completed Courses’ tab you will see all the courses you have completed and you have
an option to view, download/save or print course completion certificates by clicking the
appropriate ‘View Certificate’ button.
Once you have finished a lesson or course and wish to logout for the session you will need to
click the ‘LOGOUT’ option in the main menu.
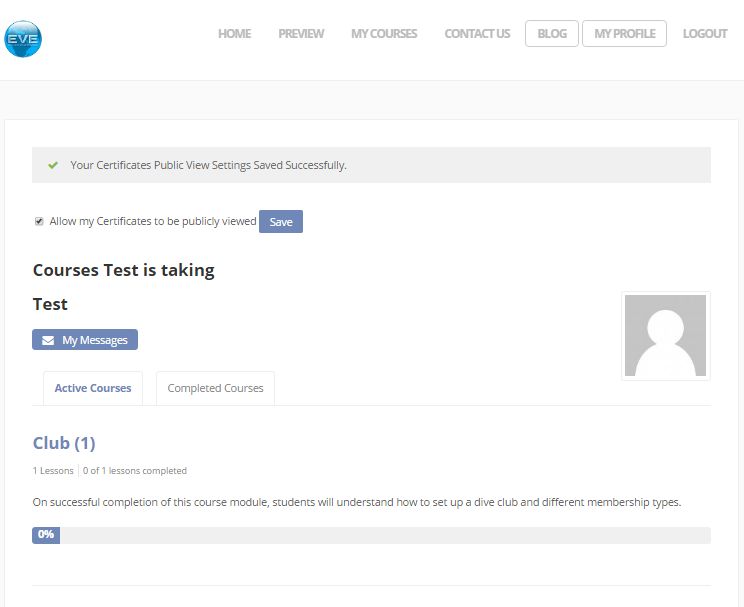
If you wish for your course completion certificates to be publicly viewed online by your
current/potential employer(s) you must login to the EVE eLearning website. Once you are
logged in you must click the ‘MY PROFILE’ option in the main menu.

On the my ‘My Profile’ page, you will need to check the ‘Allow my Certificates to be publicly
viewed’ box and then click the ‘Save’ button.

Your profile has been updated and you can now share your online completed course certificates
with your current/potential employer(s).
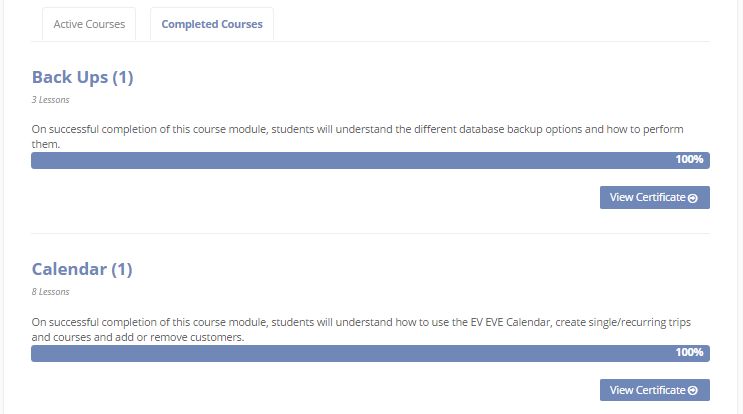
To send the links to your online course completion certificates click on the ‘Completed Courses’
tab (which can also be found on the ‘My Courses’ page).
On the ‘Completed Courses’ tab you will see your list of completed courses. To share an online
course completion certificate click on the appropriate ‘View Certificate’ button.
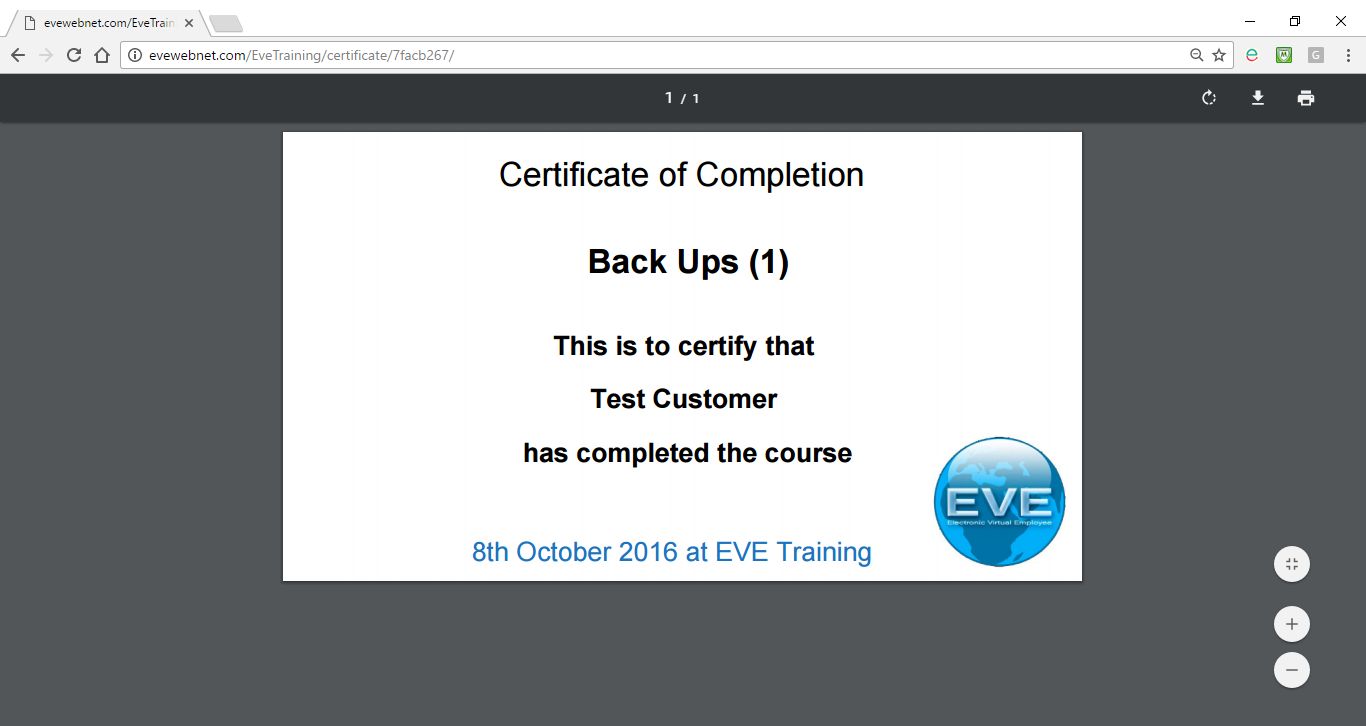
On the course completion certificate page you have the option to print or download/save the
certificate. To share the certificate online with your current/potential employer(s) you must copy
the URL in the address bar which can then be saved to a Curriculum Vitae (CV) document or
emailed.
EVE Websites
This tutorial will provide you with the instructions to create a popup form on your EVE website.
The feature is available exclusively with an EVE Website.
The popup form will run the following automatic tasks:
1) Collect the Student data details, required to assign the free eLearning code
2) Create a customer record in EVE, for the student
3) Add the student to a generic course date, in EVE
4) Send the OW eLearning Section 1 free code to the student
To create the popup form:
1) Launch your EVE website, login to the CMS and click the Components tab

2) Scroll down and click on Manage popups

3) Click the Create a New Popup button

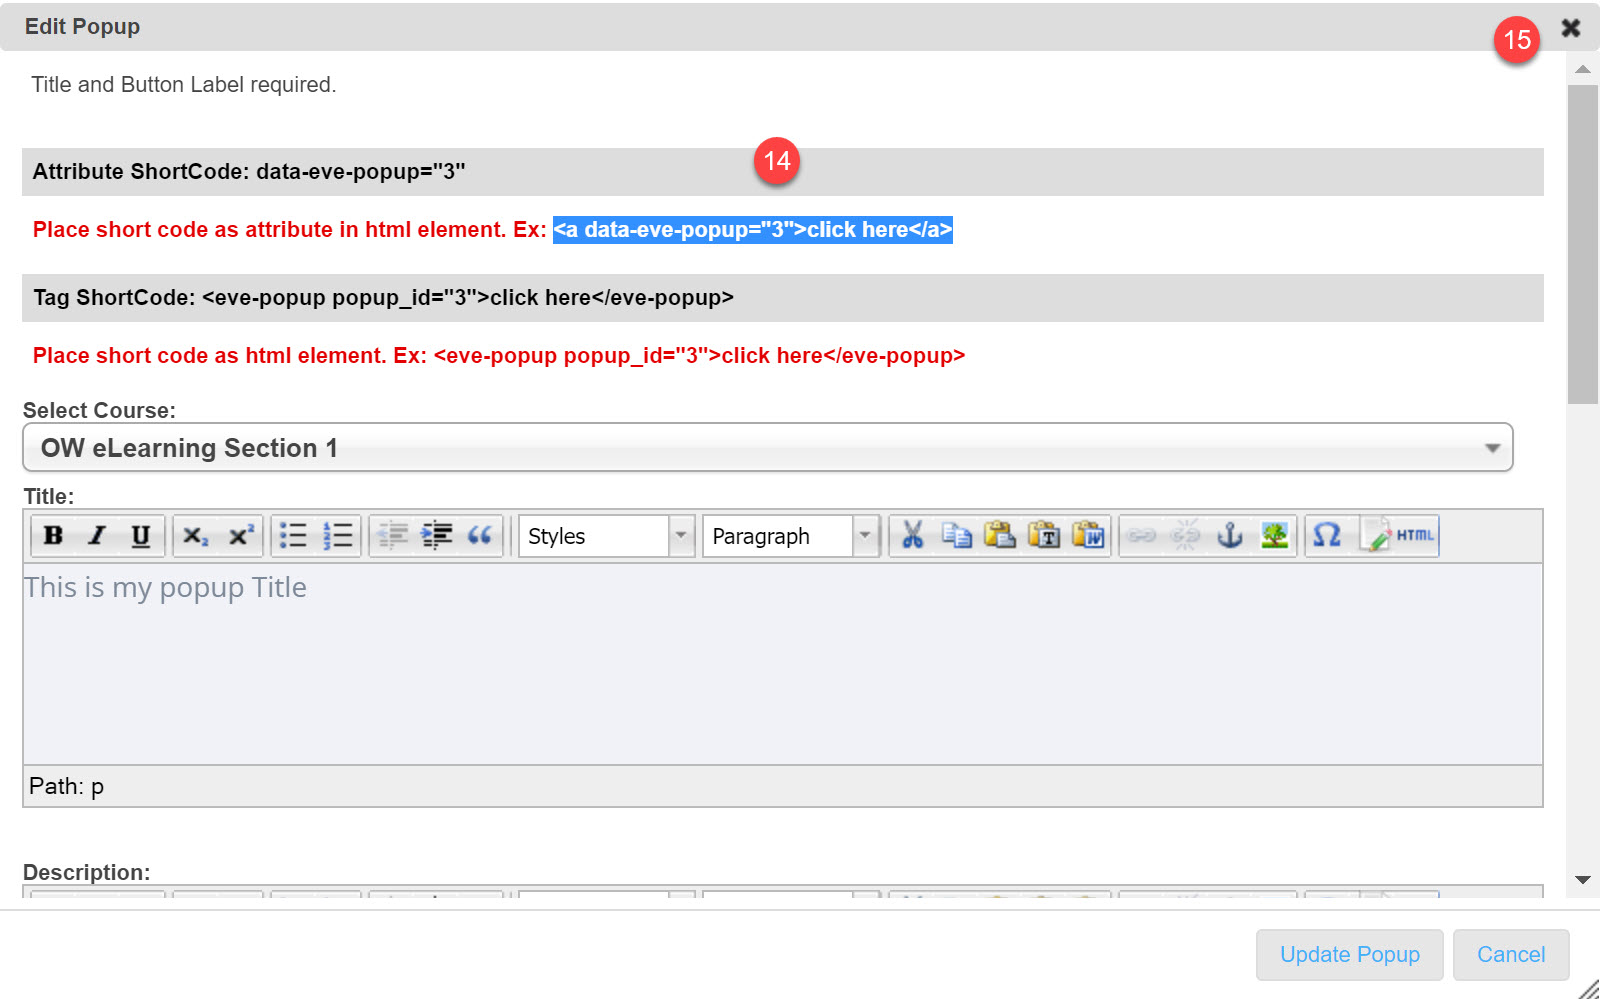
4) Set the Course type to OW eLearning Section 1 or any available free section
5) Set the popup Title
6) Set the popup description
7) Scroll down for further fields

8) Type the message to display on successfully submitting the popup
9) Type the button label. It can be set, for example, to Send or Submit
10) Type your Footer text
11) Click Update Popup

12) Return to the popup list
13) Click on your newly created popup record
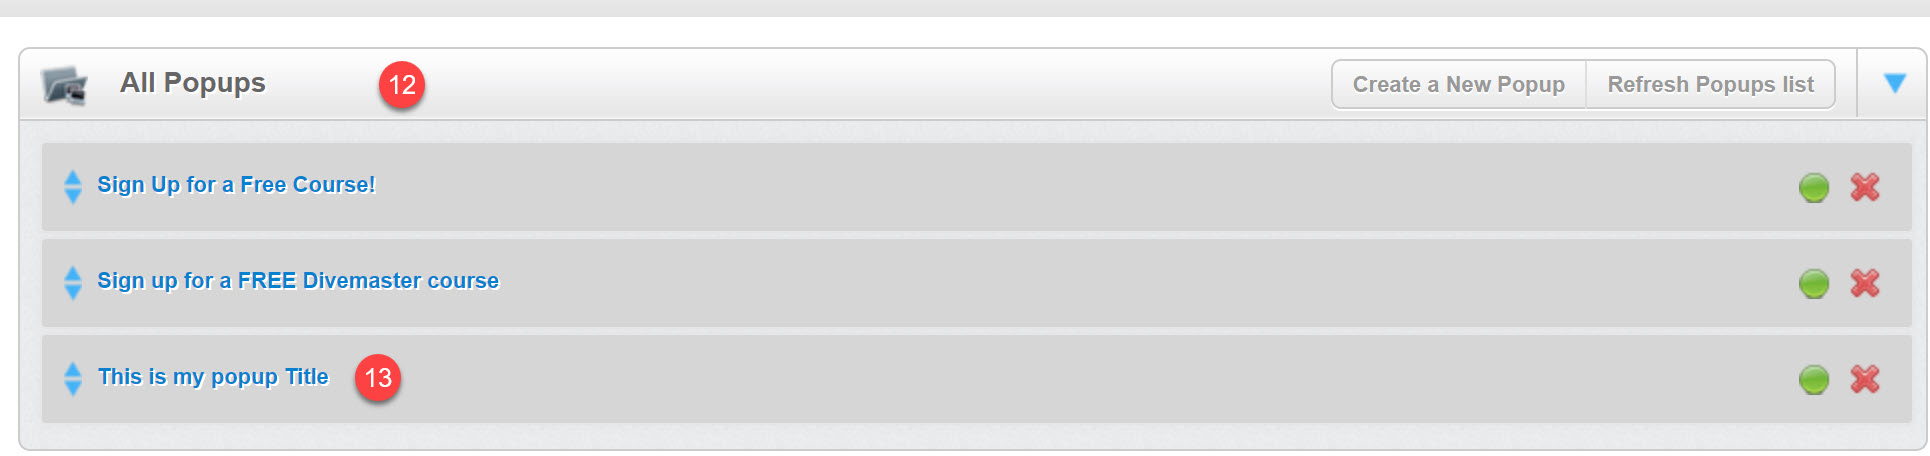
14) Select and copy the text highlighted in blue
15) Close the window
16) Go to Web Pages, open the page where you wish to add the popup and click the HTML button
17) Paste the copied text to the HTML Source Editor window
18) Click Update
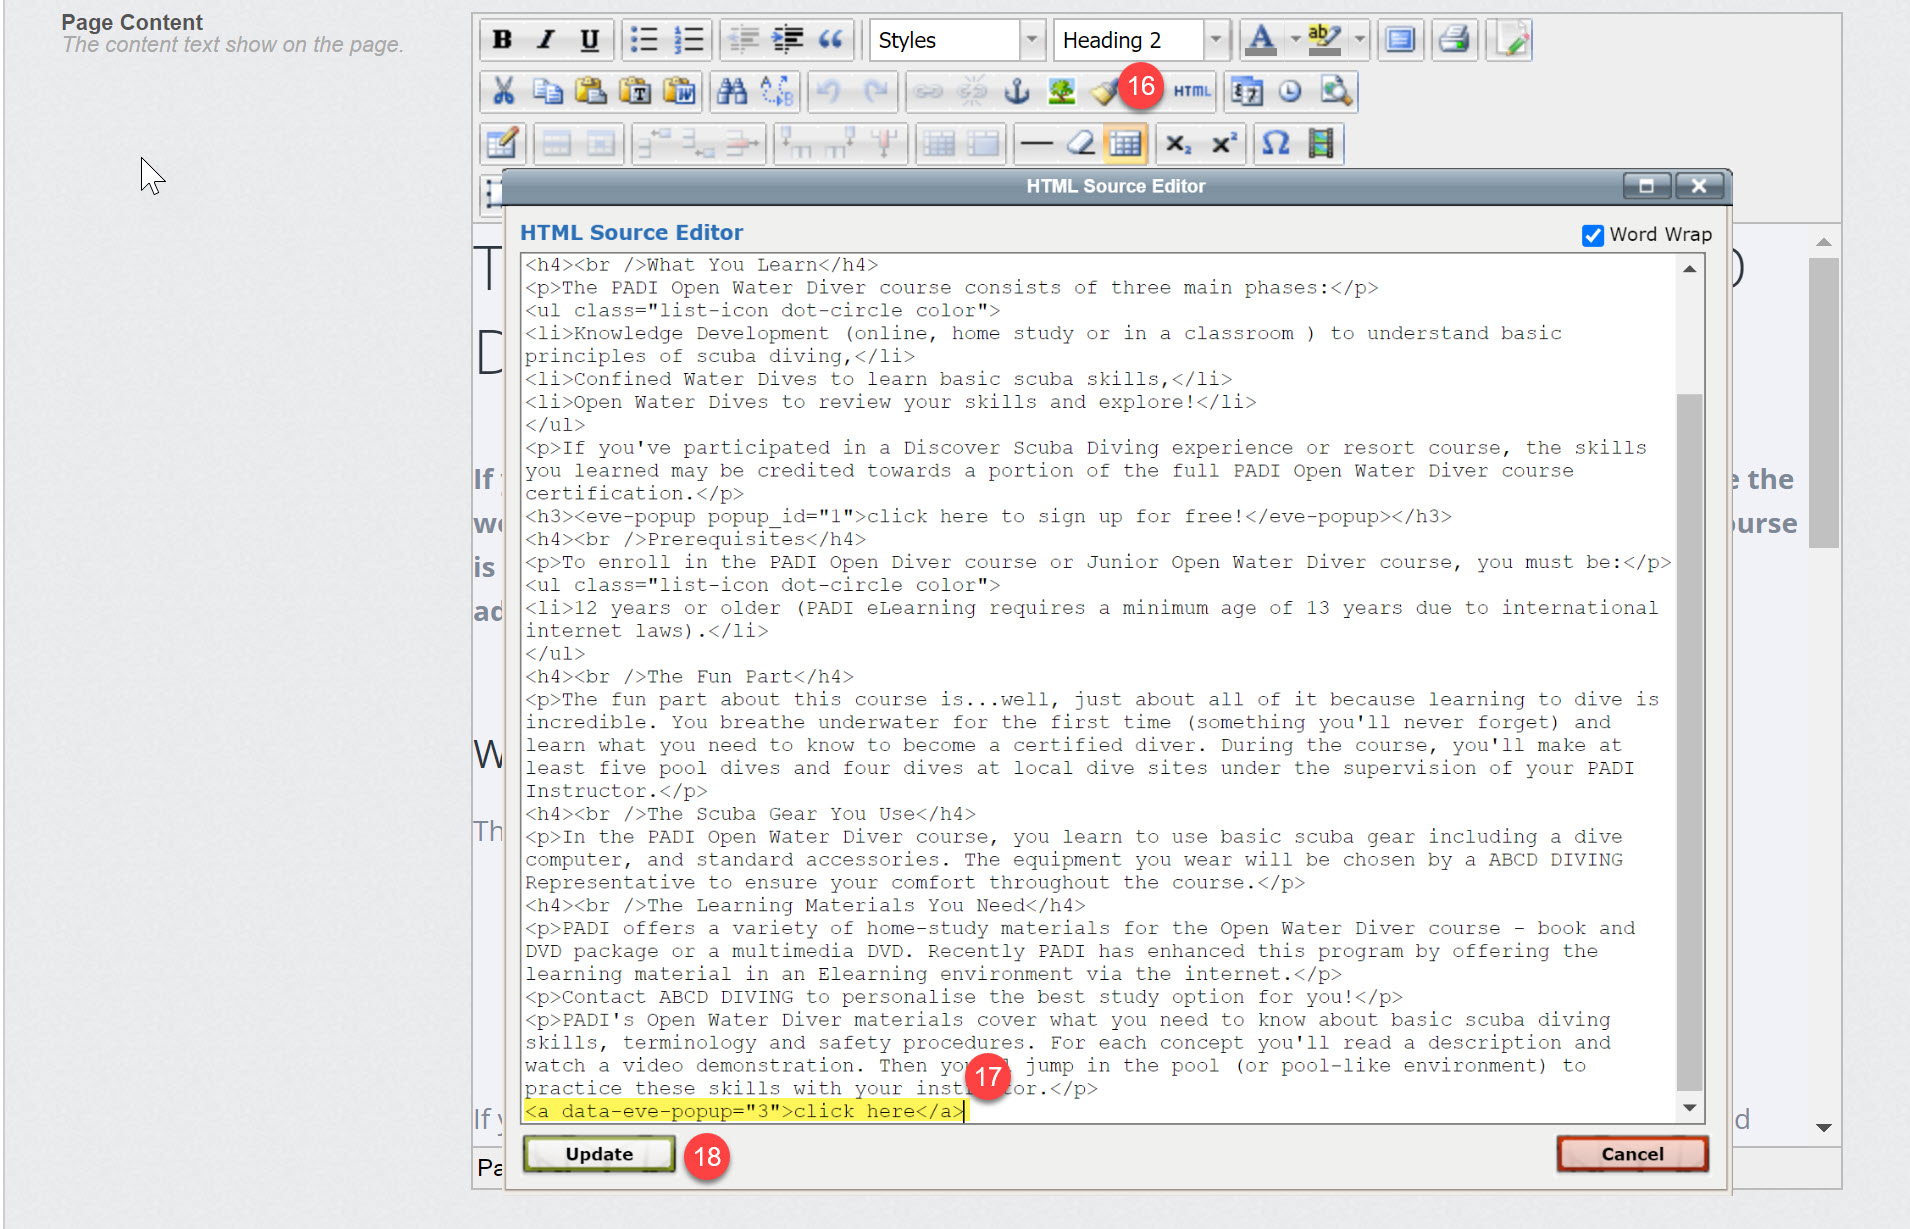
19) Save the page changes

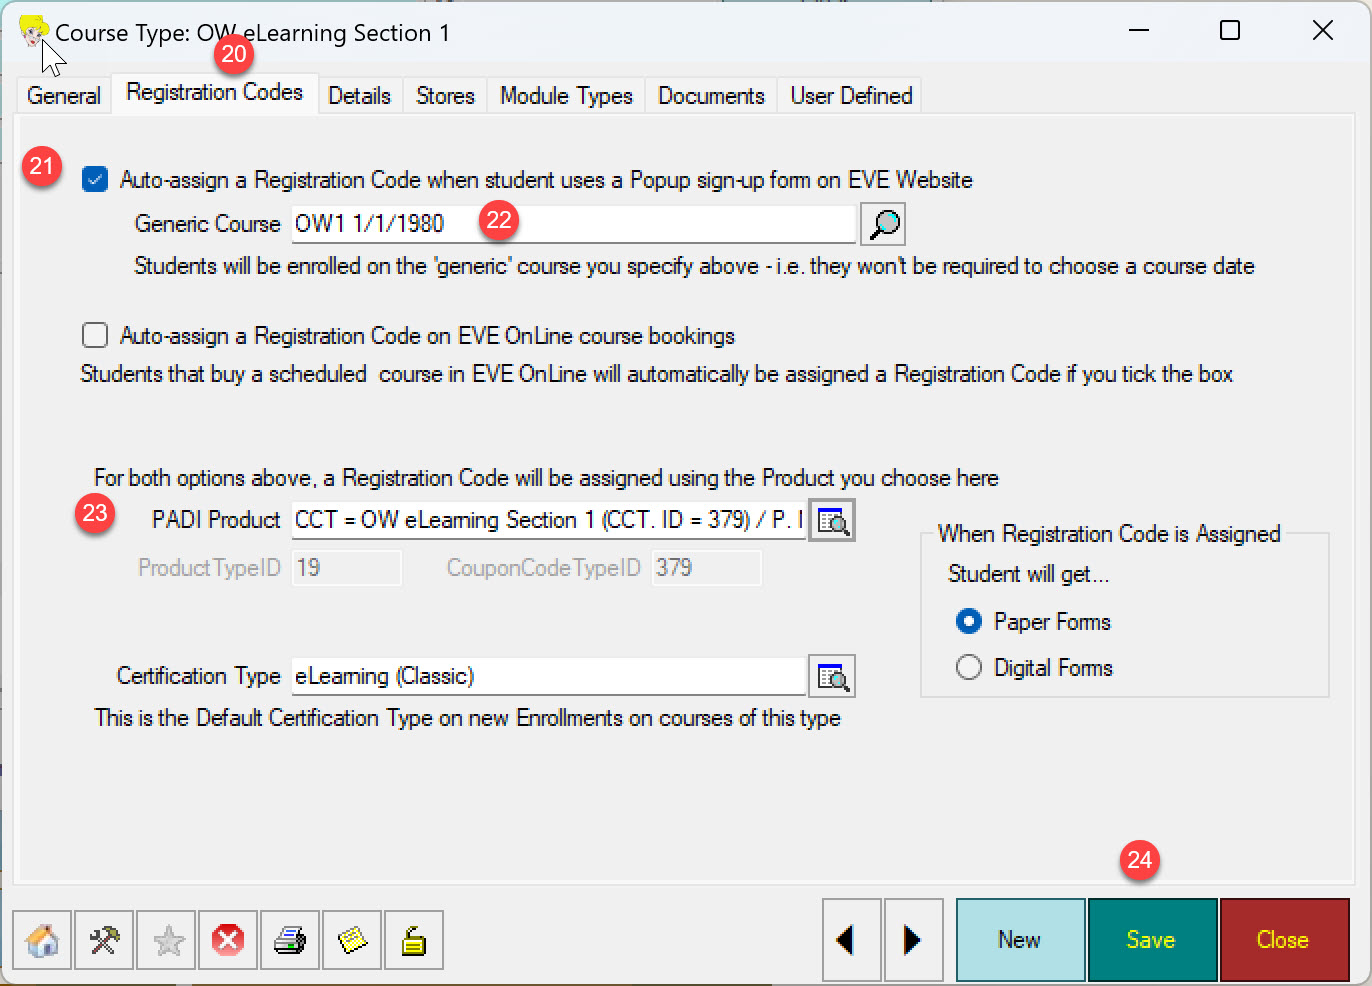
20) in EVE > Data > Course Types open the corresponding course type: OW eLearning Section 1
21) Check the Auto-assign a Registration Code when student uses a Popup sign-up form on EVE Website
22) Select the Generic Course Date
23) Select the Product Type by clicking the look up button
24) Save the newly applied settings
24) Return to your EVE website and open the page where you added the popup. It will display the corresponding link
25) When you click the link, the popup form will open

Click here to see it in action, on the EVE website of a successful PADI store.
To embed a map of dive sites in your region, follow this simple procedure:
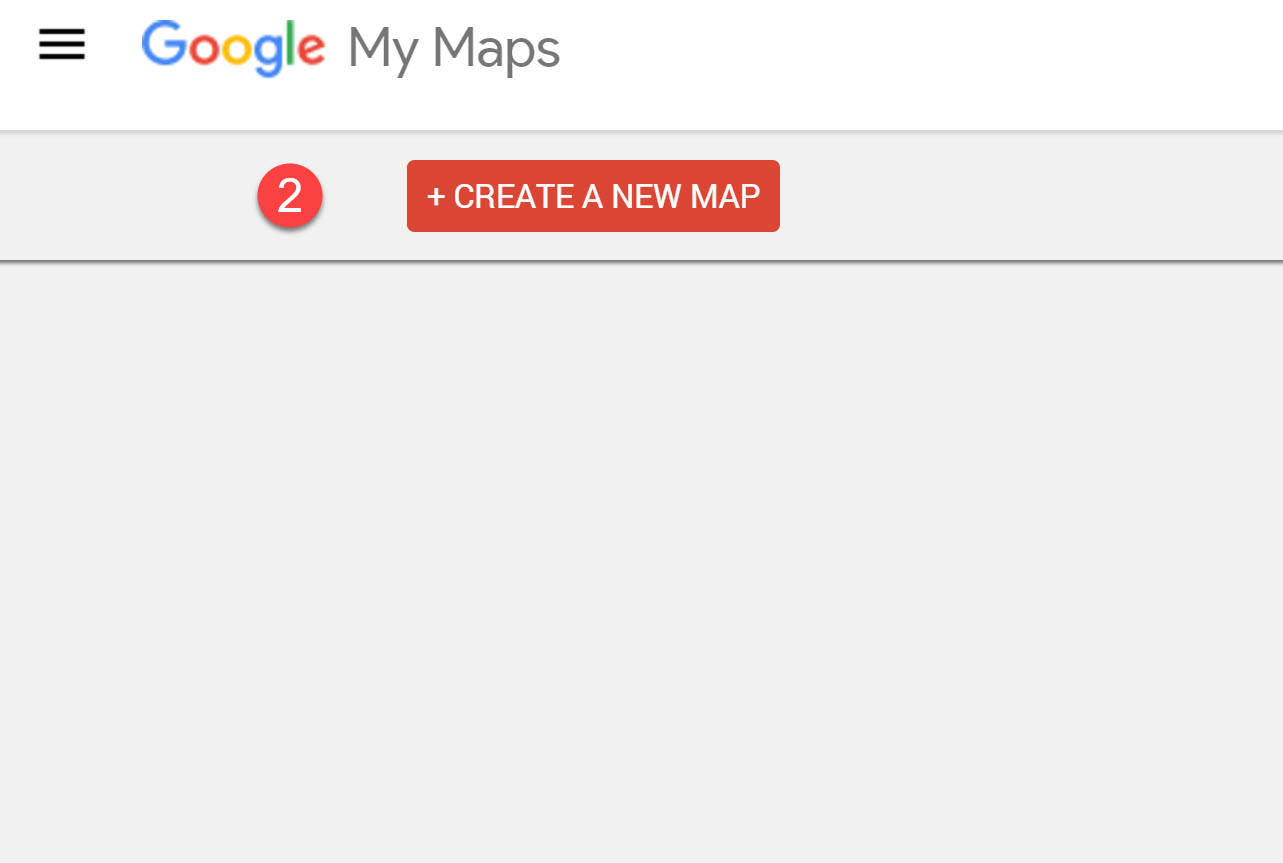
1) Open this link to Google Maps. The link requires login to your Google account. We recommend using the same account used for your website.
2) Click on Create New Map
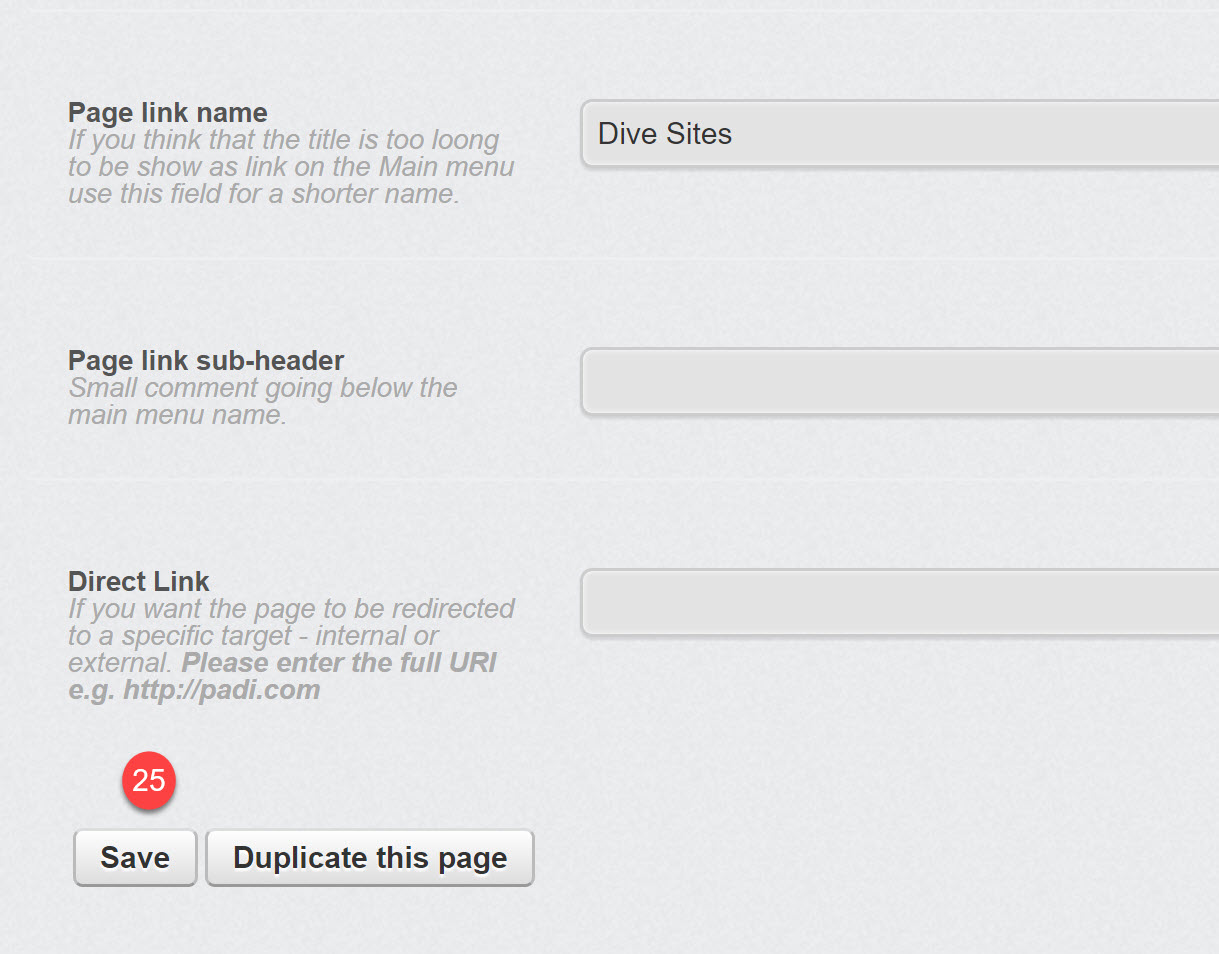
3) Click on Untitled Map to assign a name to the map
4) Assign a name to the map. A description is optional
5) Click the Save button

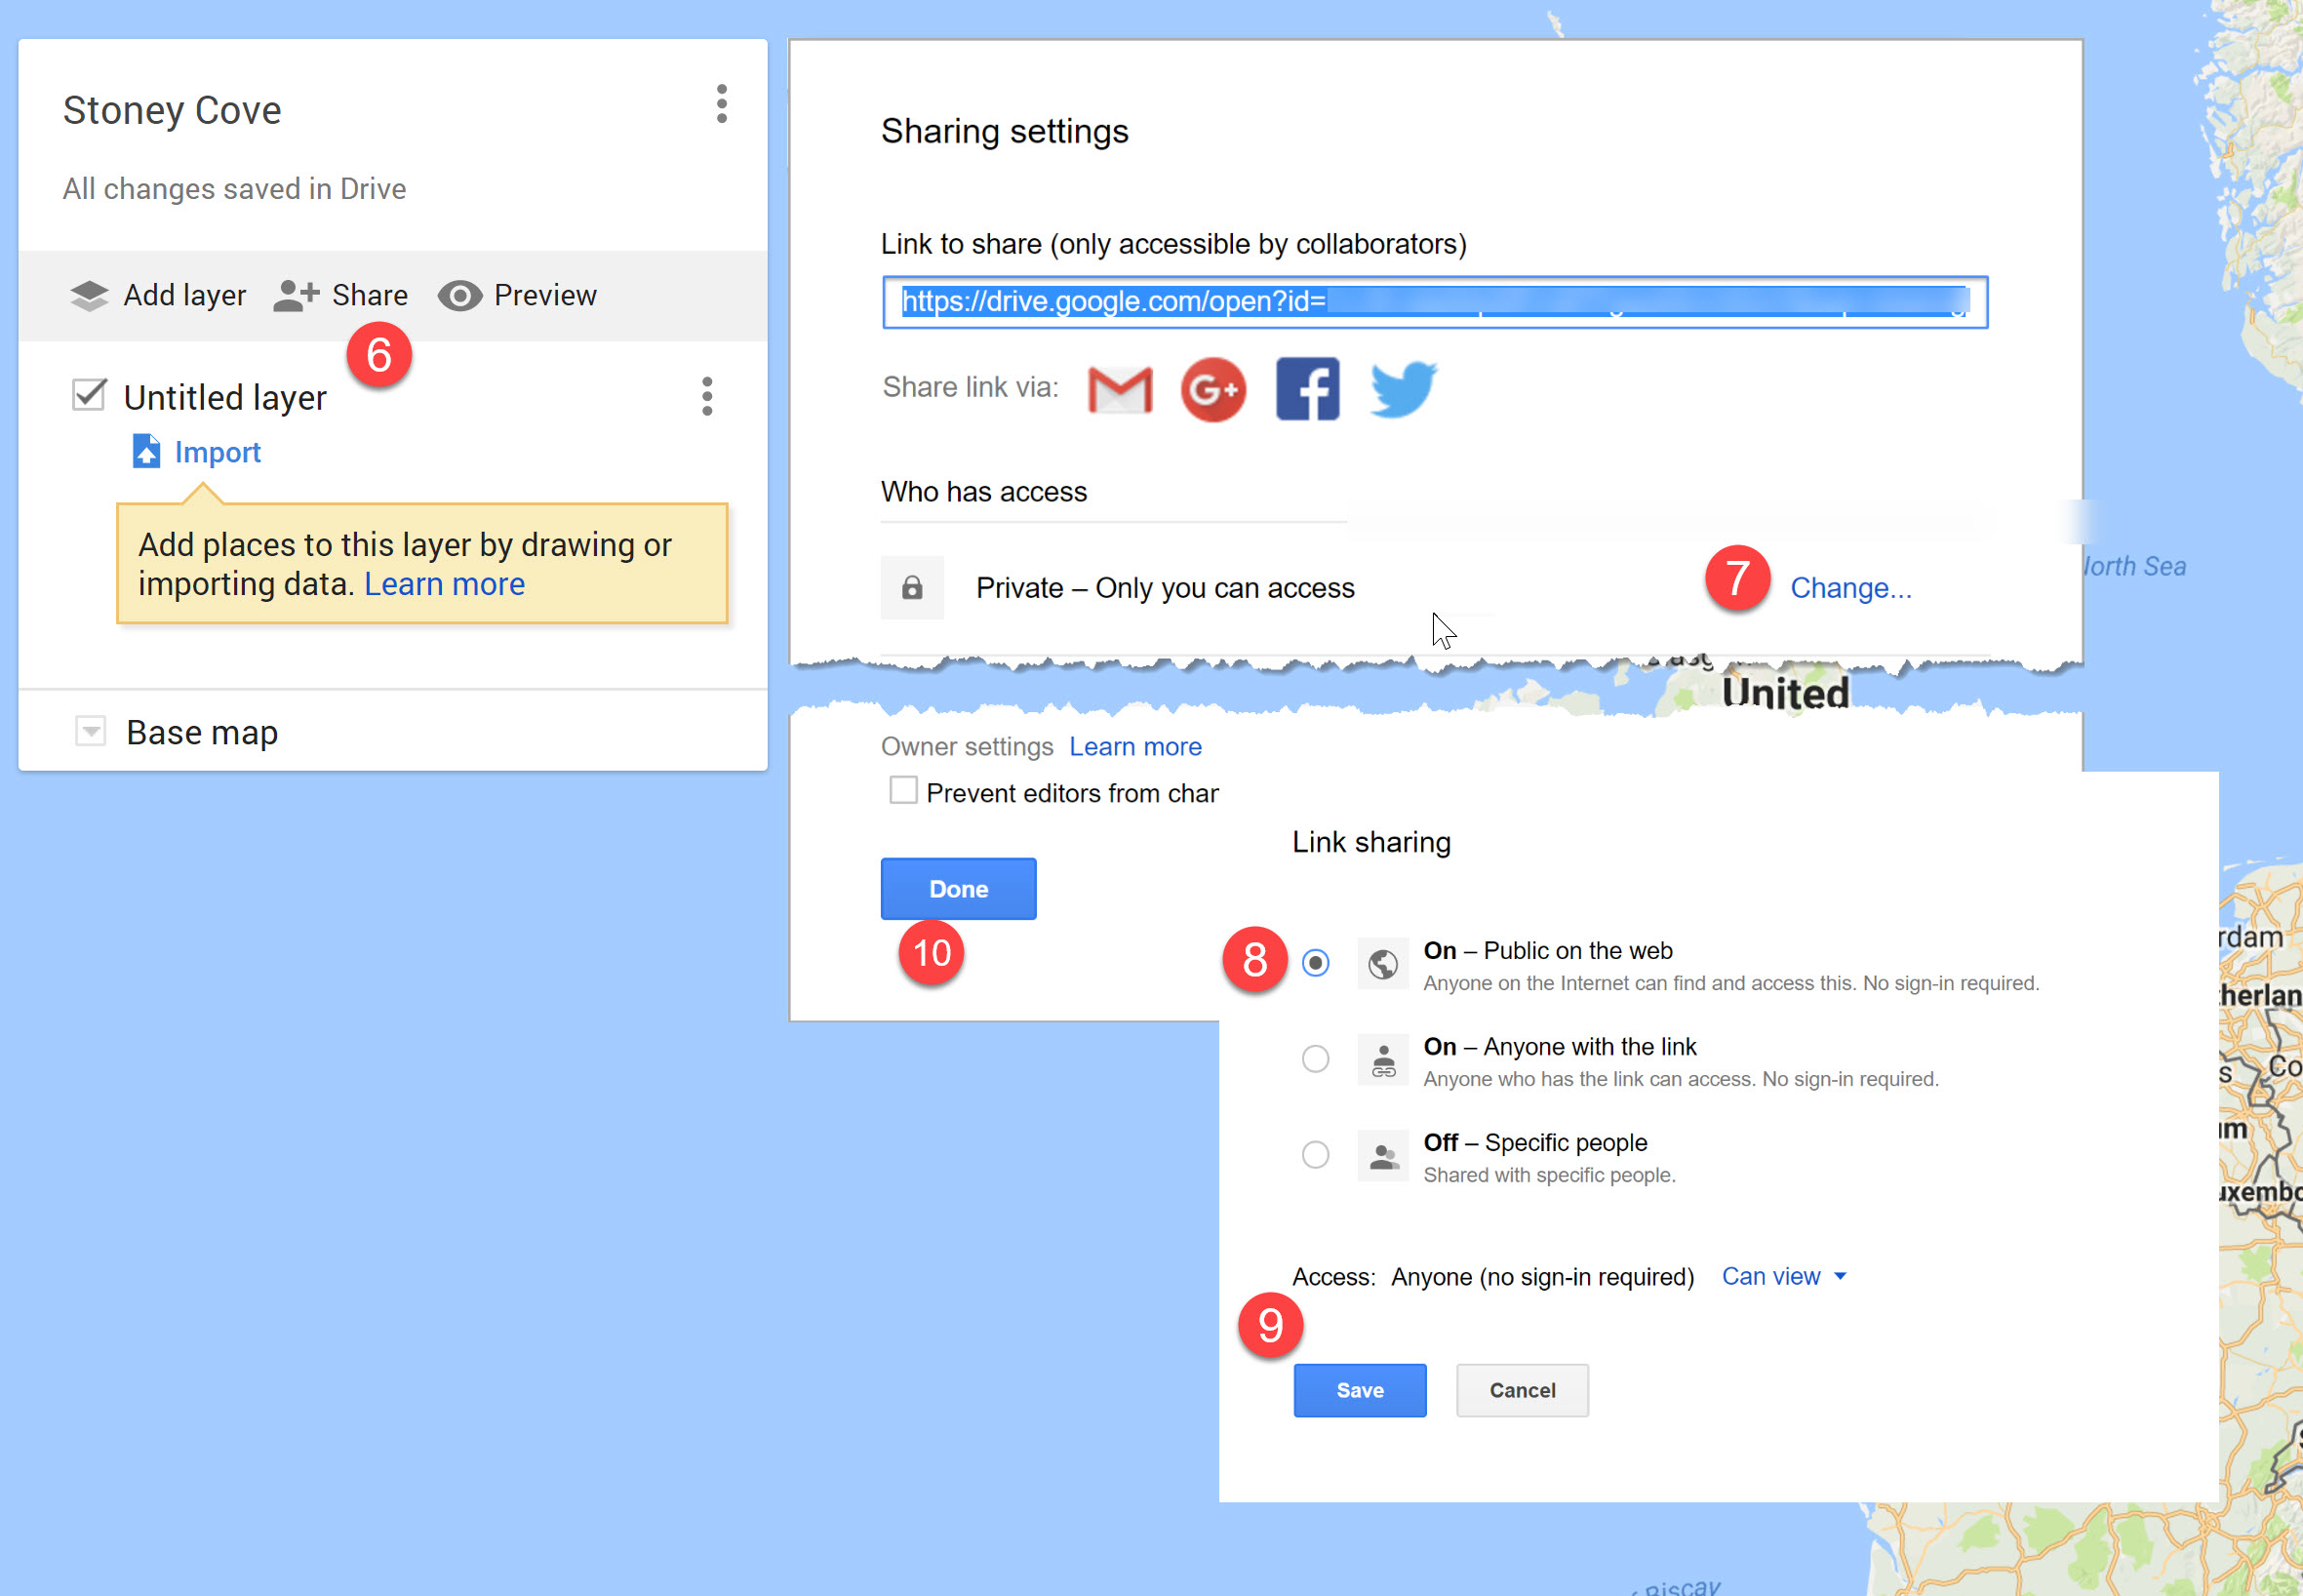
6) The map must be public to be embedded on your website. To set the map public, click on +Share
7) Click on Change
8) Select On – Public on the web
9) Click Save
10) Click DONE
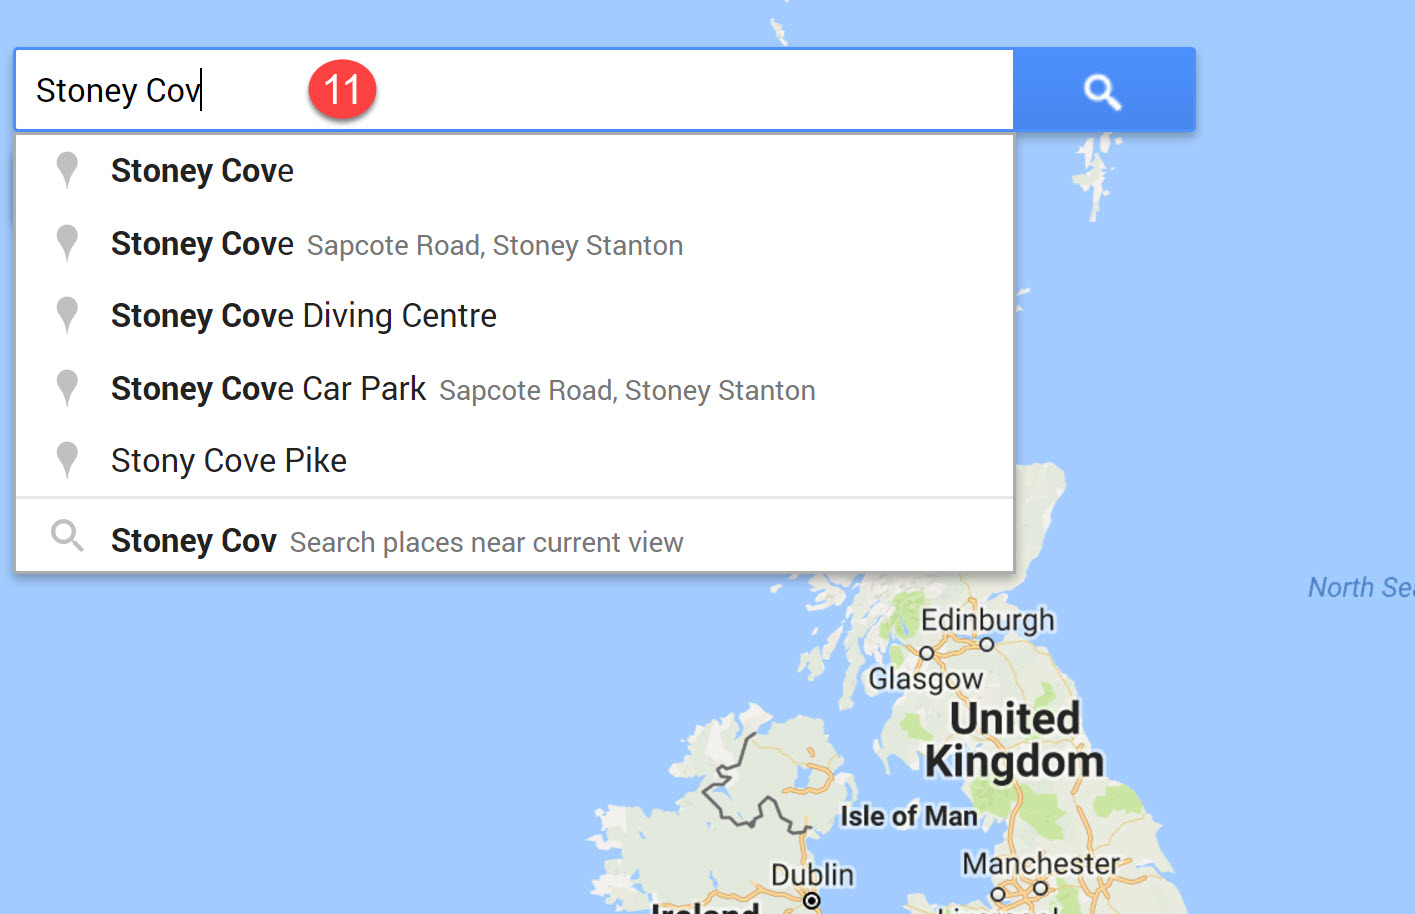
11) Use the Search box and zoom buttons to limit the map to your local area
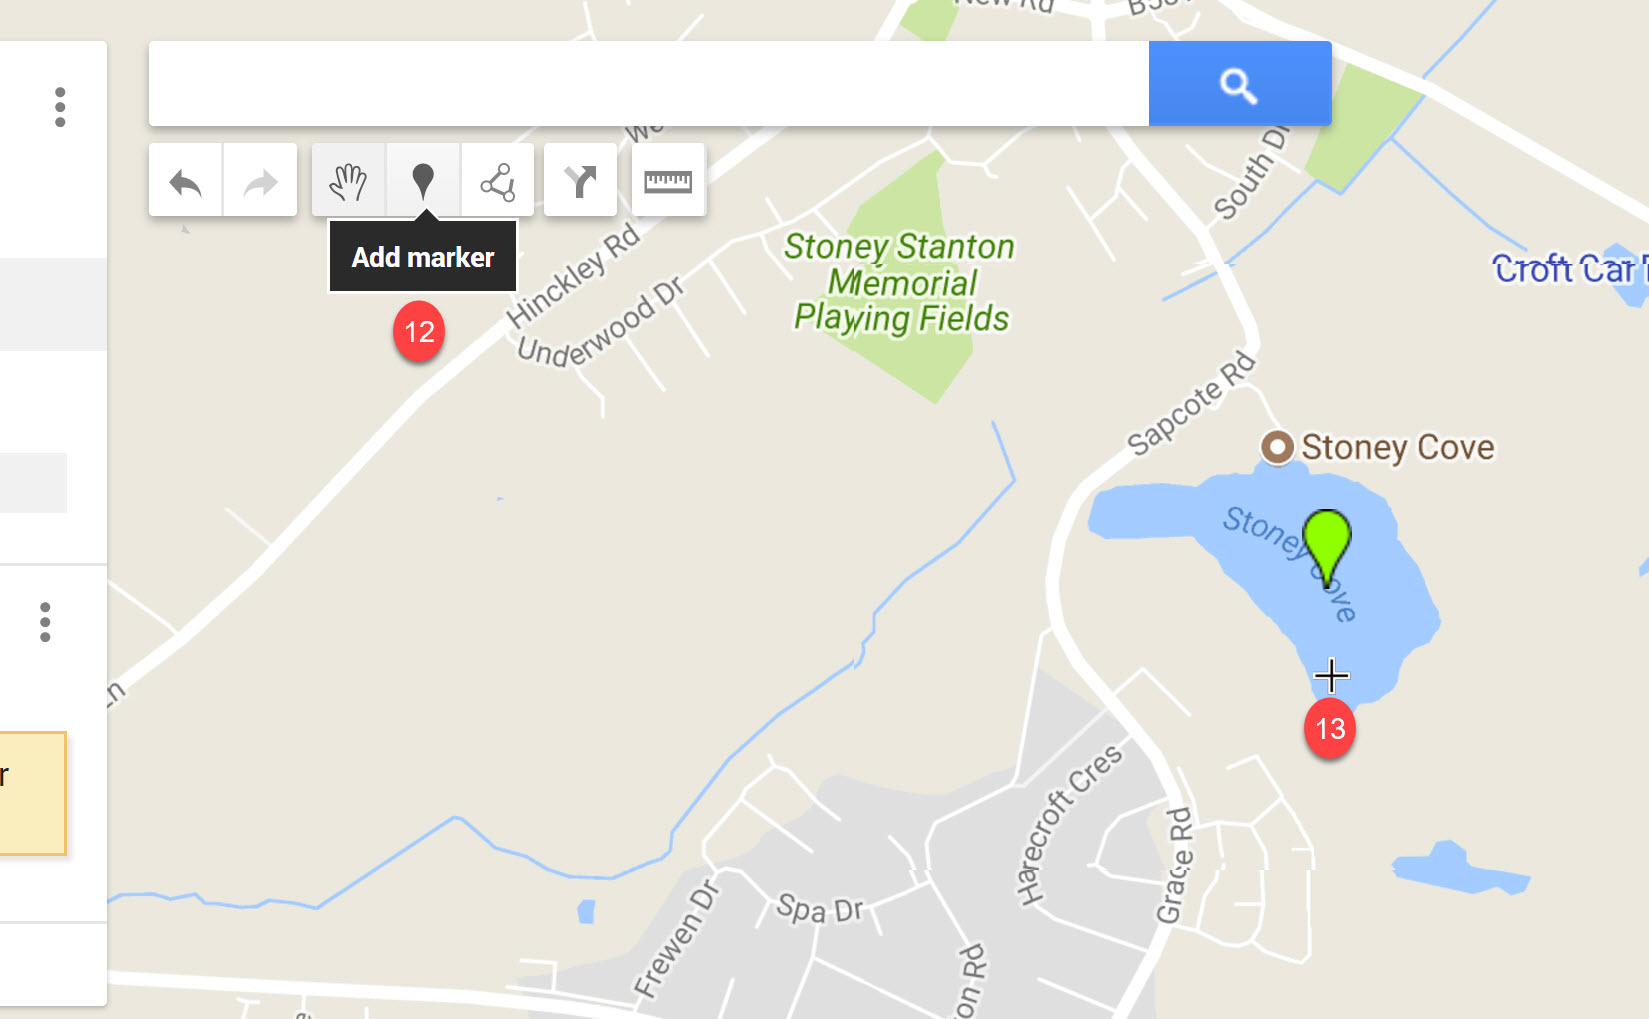
12) Click on Add Marker
13) Drag the cursor to the position of your dive site
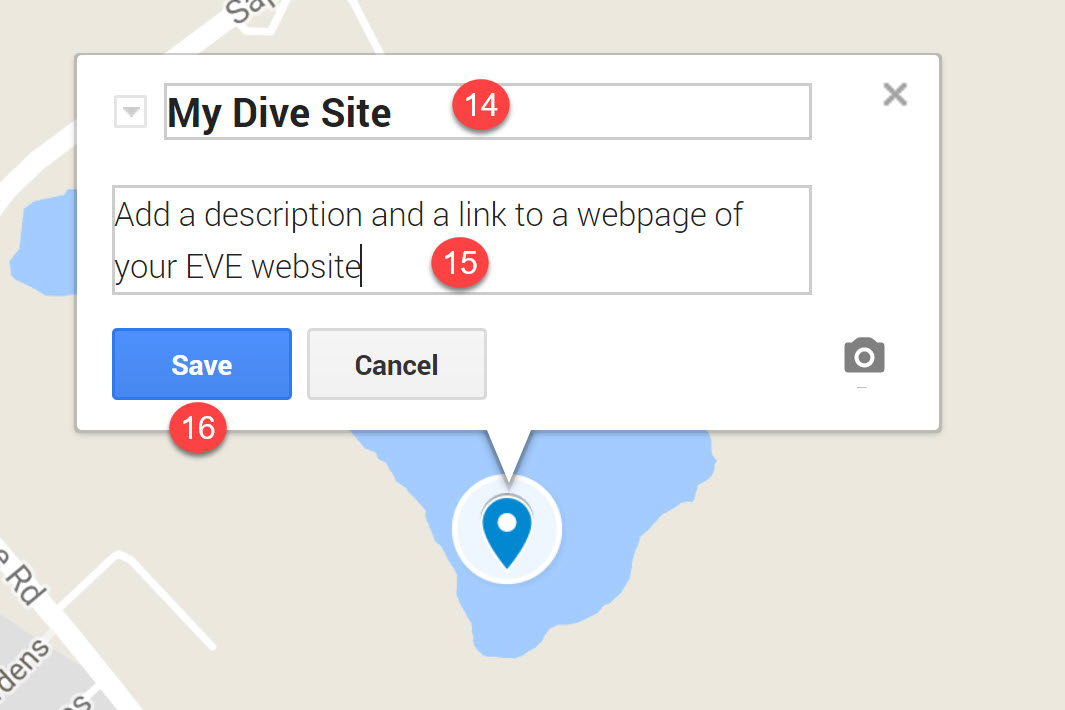
14) Assign a name to your dive site
15) Add a brief description of your dive site. You can also add a link to a web page on your EVE website
16) Click Save.
17) Repeat steps from 12 to 16 for each dive site in your map
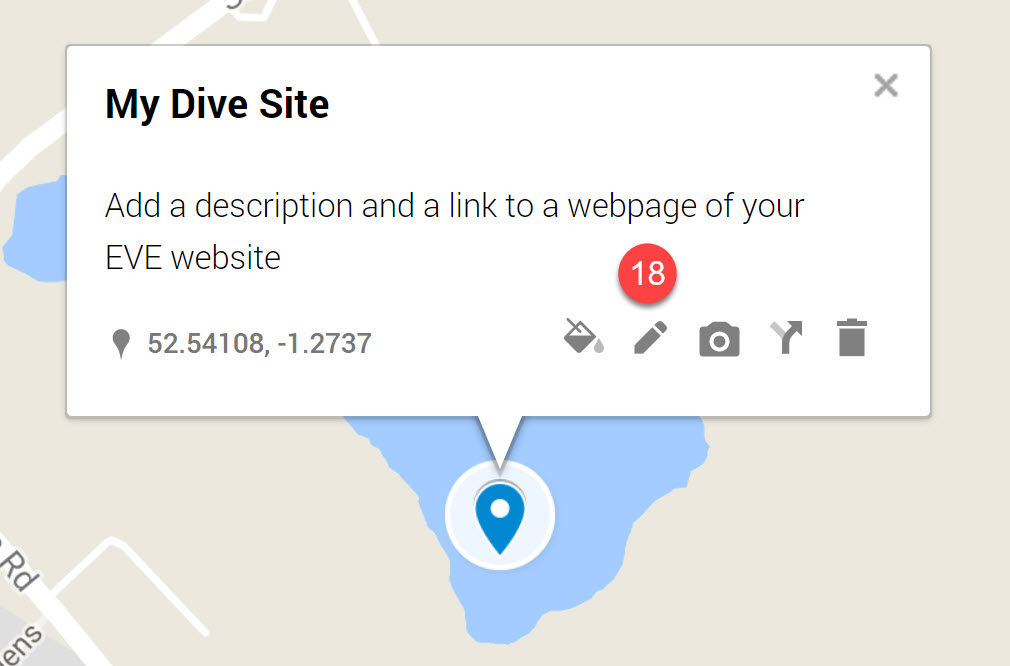
18) Use the Edit button if you wish to edit the description of each dive site
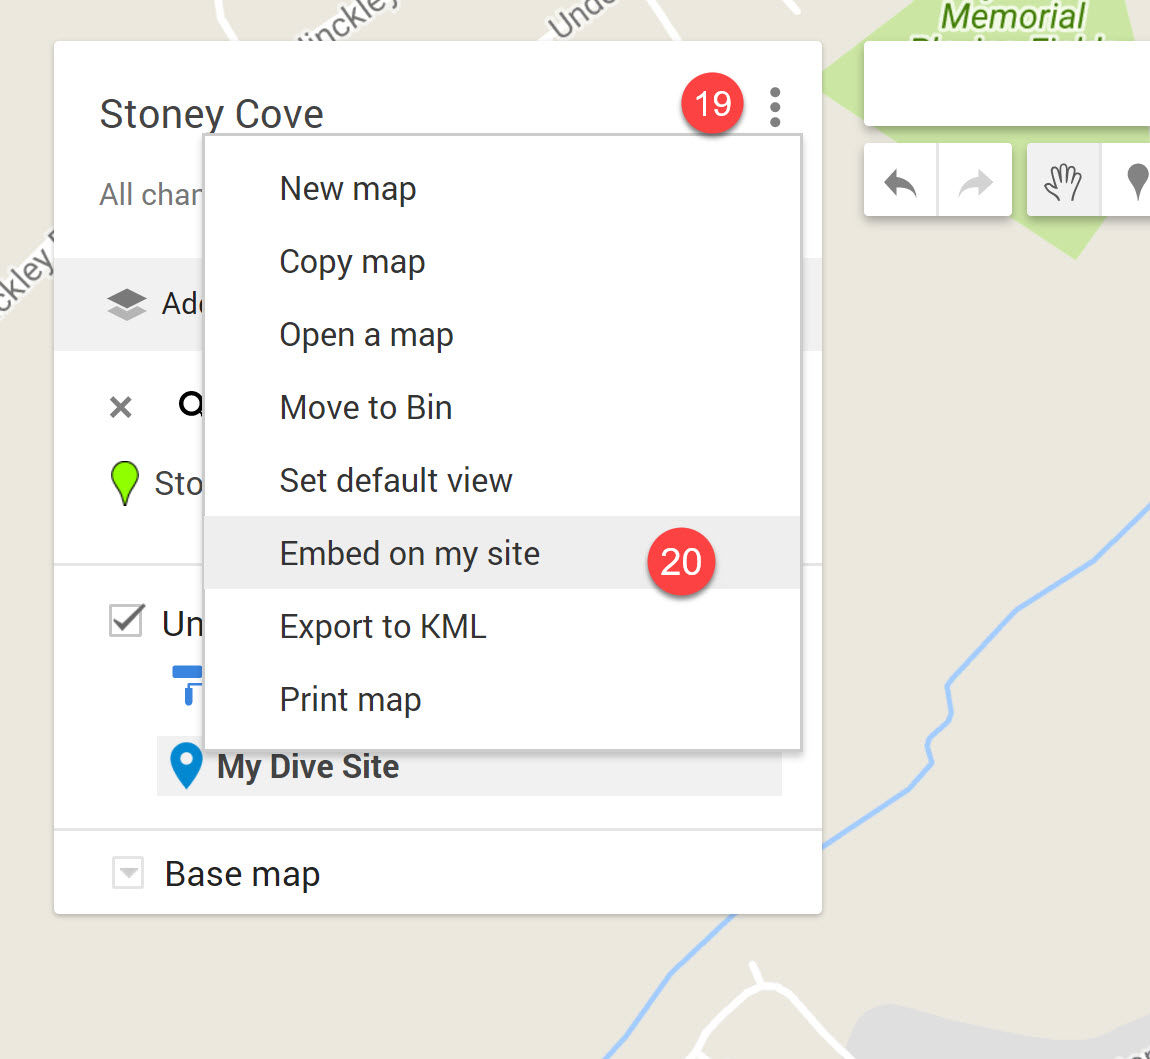
19) Click on the Options button
20) Select Embed on my site
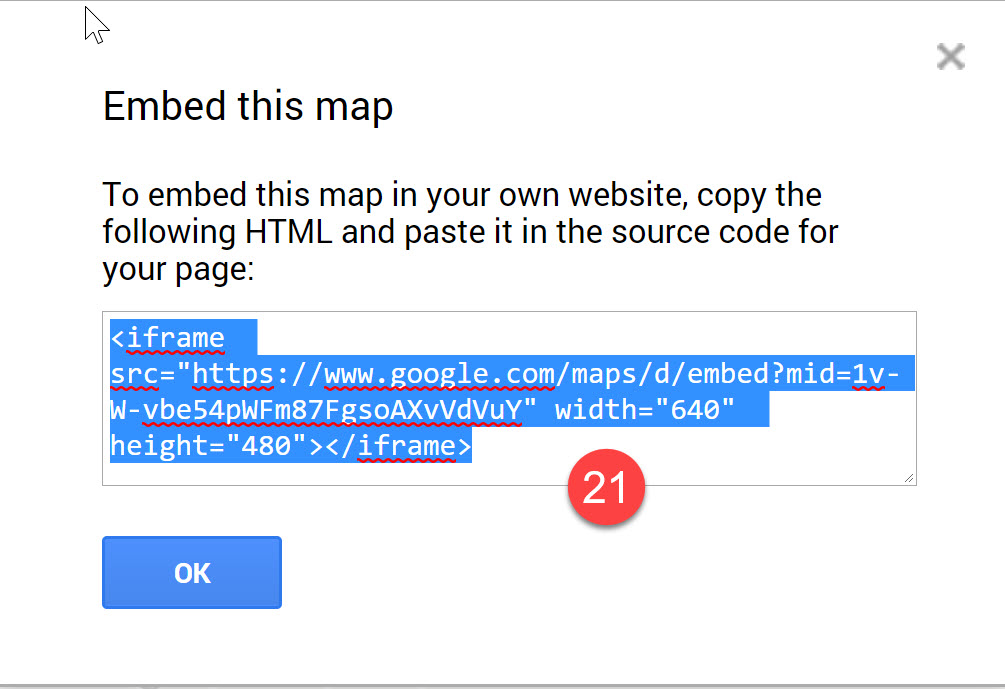
21) Copy the HTML code highlighted in blue
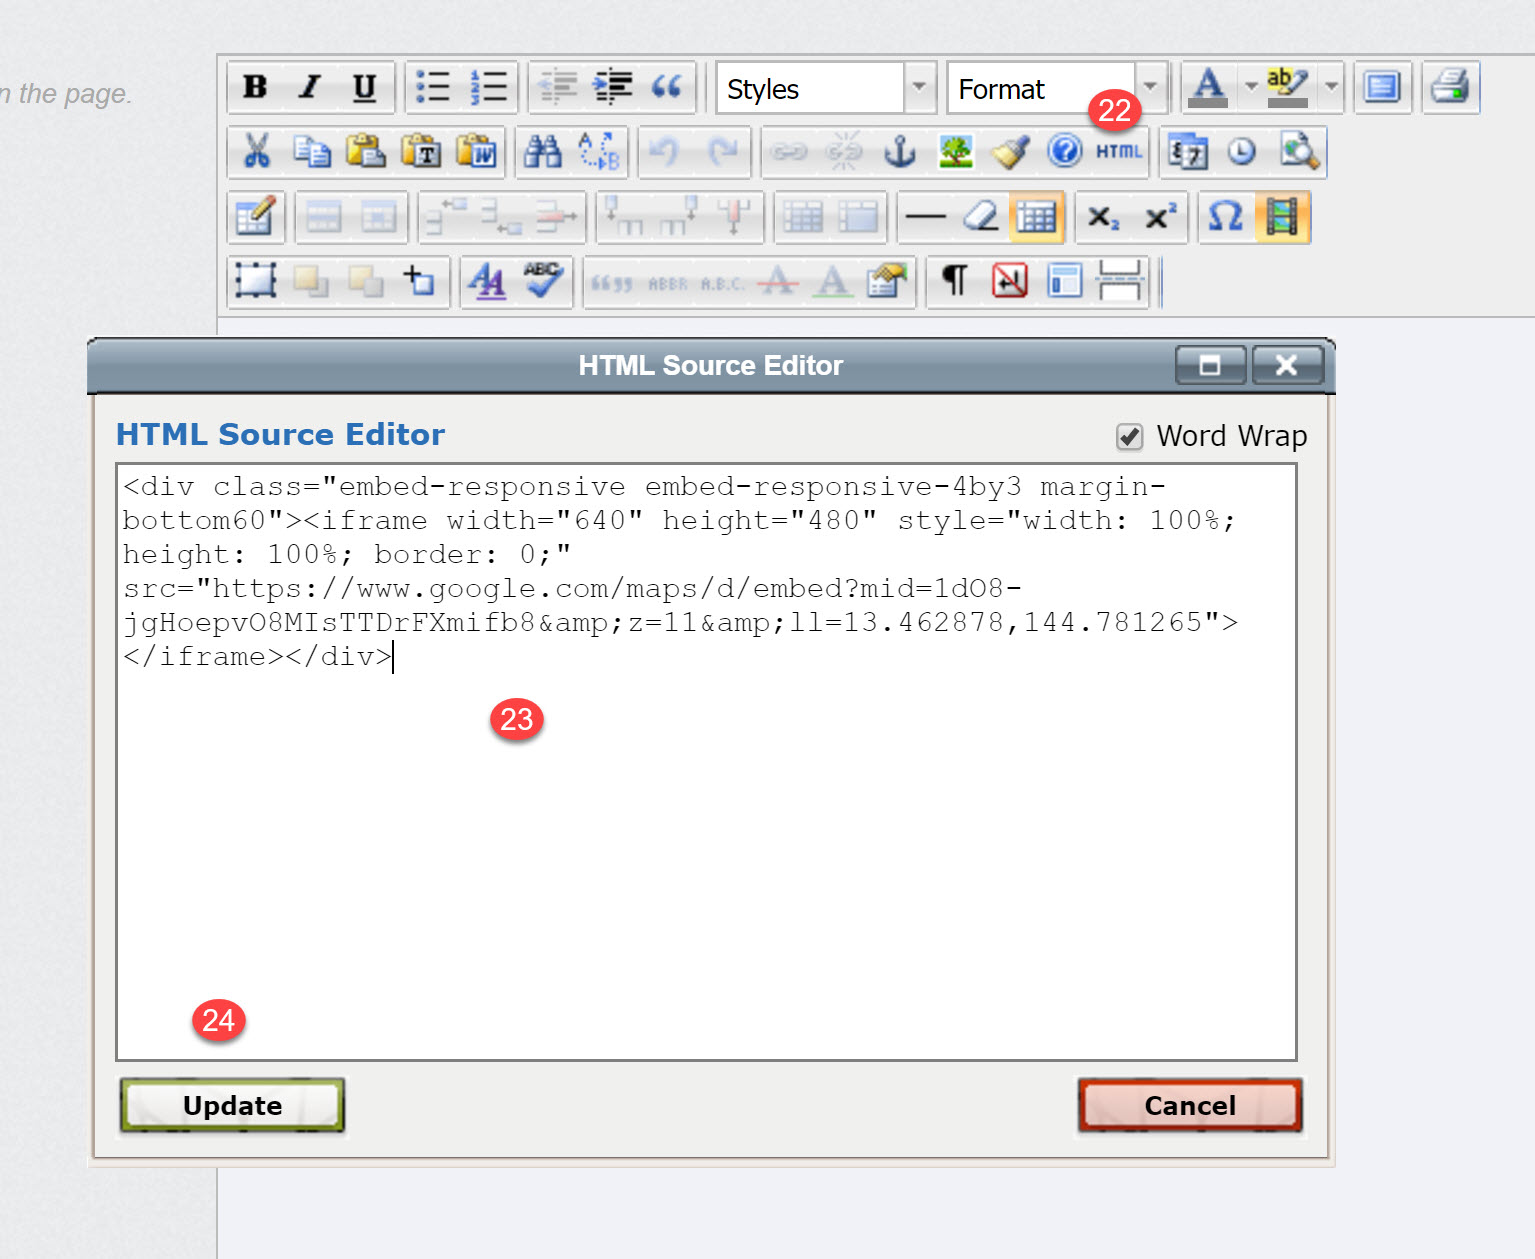
22) Open your EVE website, login to the CMS and open the webpage where you wish to add the map. Click on the HTML editor button
23) Paste the embed code in the HTML editor
24) Click Update
25) Save the webpage
Browse your website to the corresponding web page. Your map is now embedded to your website.
Follow this link to read instructions on how to flush DNS on various operating systems

To edit the text displayed on a slide or add a mobile image or a video, please follow this procedure:
1) Login to your website CMS and go to the Components Tab
2) Scroll down and click on Manage Slider
3) Click on the title of the slide you wish to modify

4) Enter a title for the slide
5) Select a colour scheme, compatible with your website template
6) Enter a caption title
7) Enter a caption title 2
8) Use the editor tools to apply formats
9) Type your text
10) Select a mobile image. Mobile images must be uploaded to Assets Manager > MobileSliderImg folder first
11) Enter the ID of a YouTube video
12) Enter a link target
13) Enter a link label
14) Update your slide

Your EVE website template stores your PADI store number. The information is used to generate your unique link to PADI eLearning.
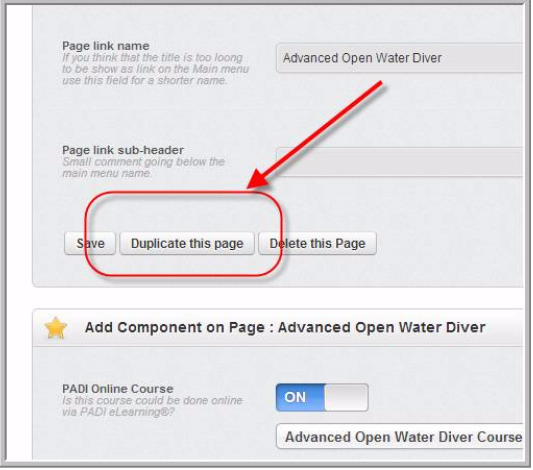
To add the corresponding link to a course web page, please follow this procedure:
1) Login to your CMS, go to Web Pages
2) Open the web page where you wish to add the elearning link
3) Scroll down to Add Component on Page section
4) Switch the PADI OnLine course ON
5) Save new settings
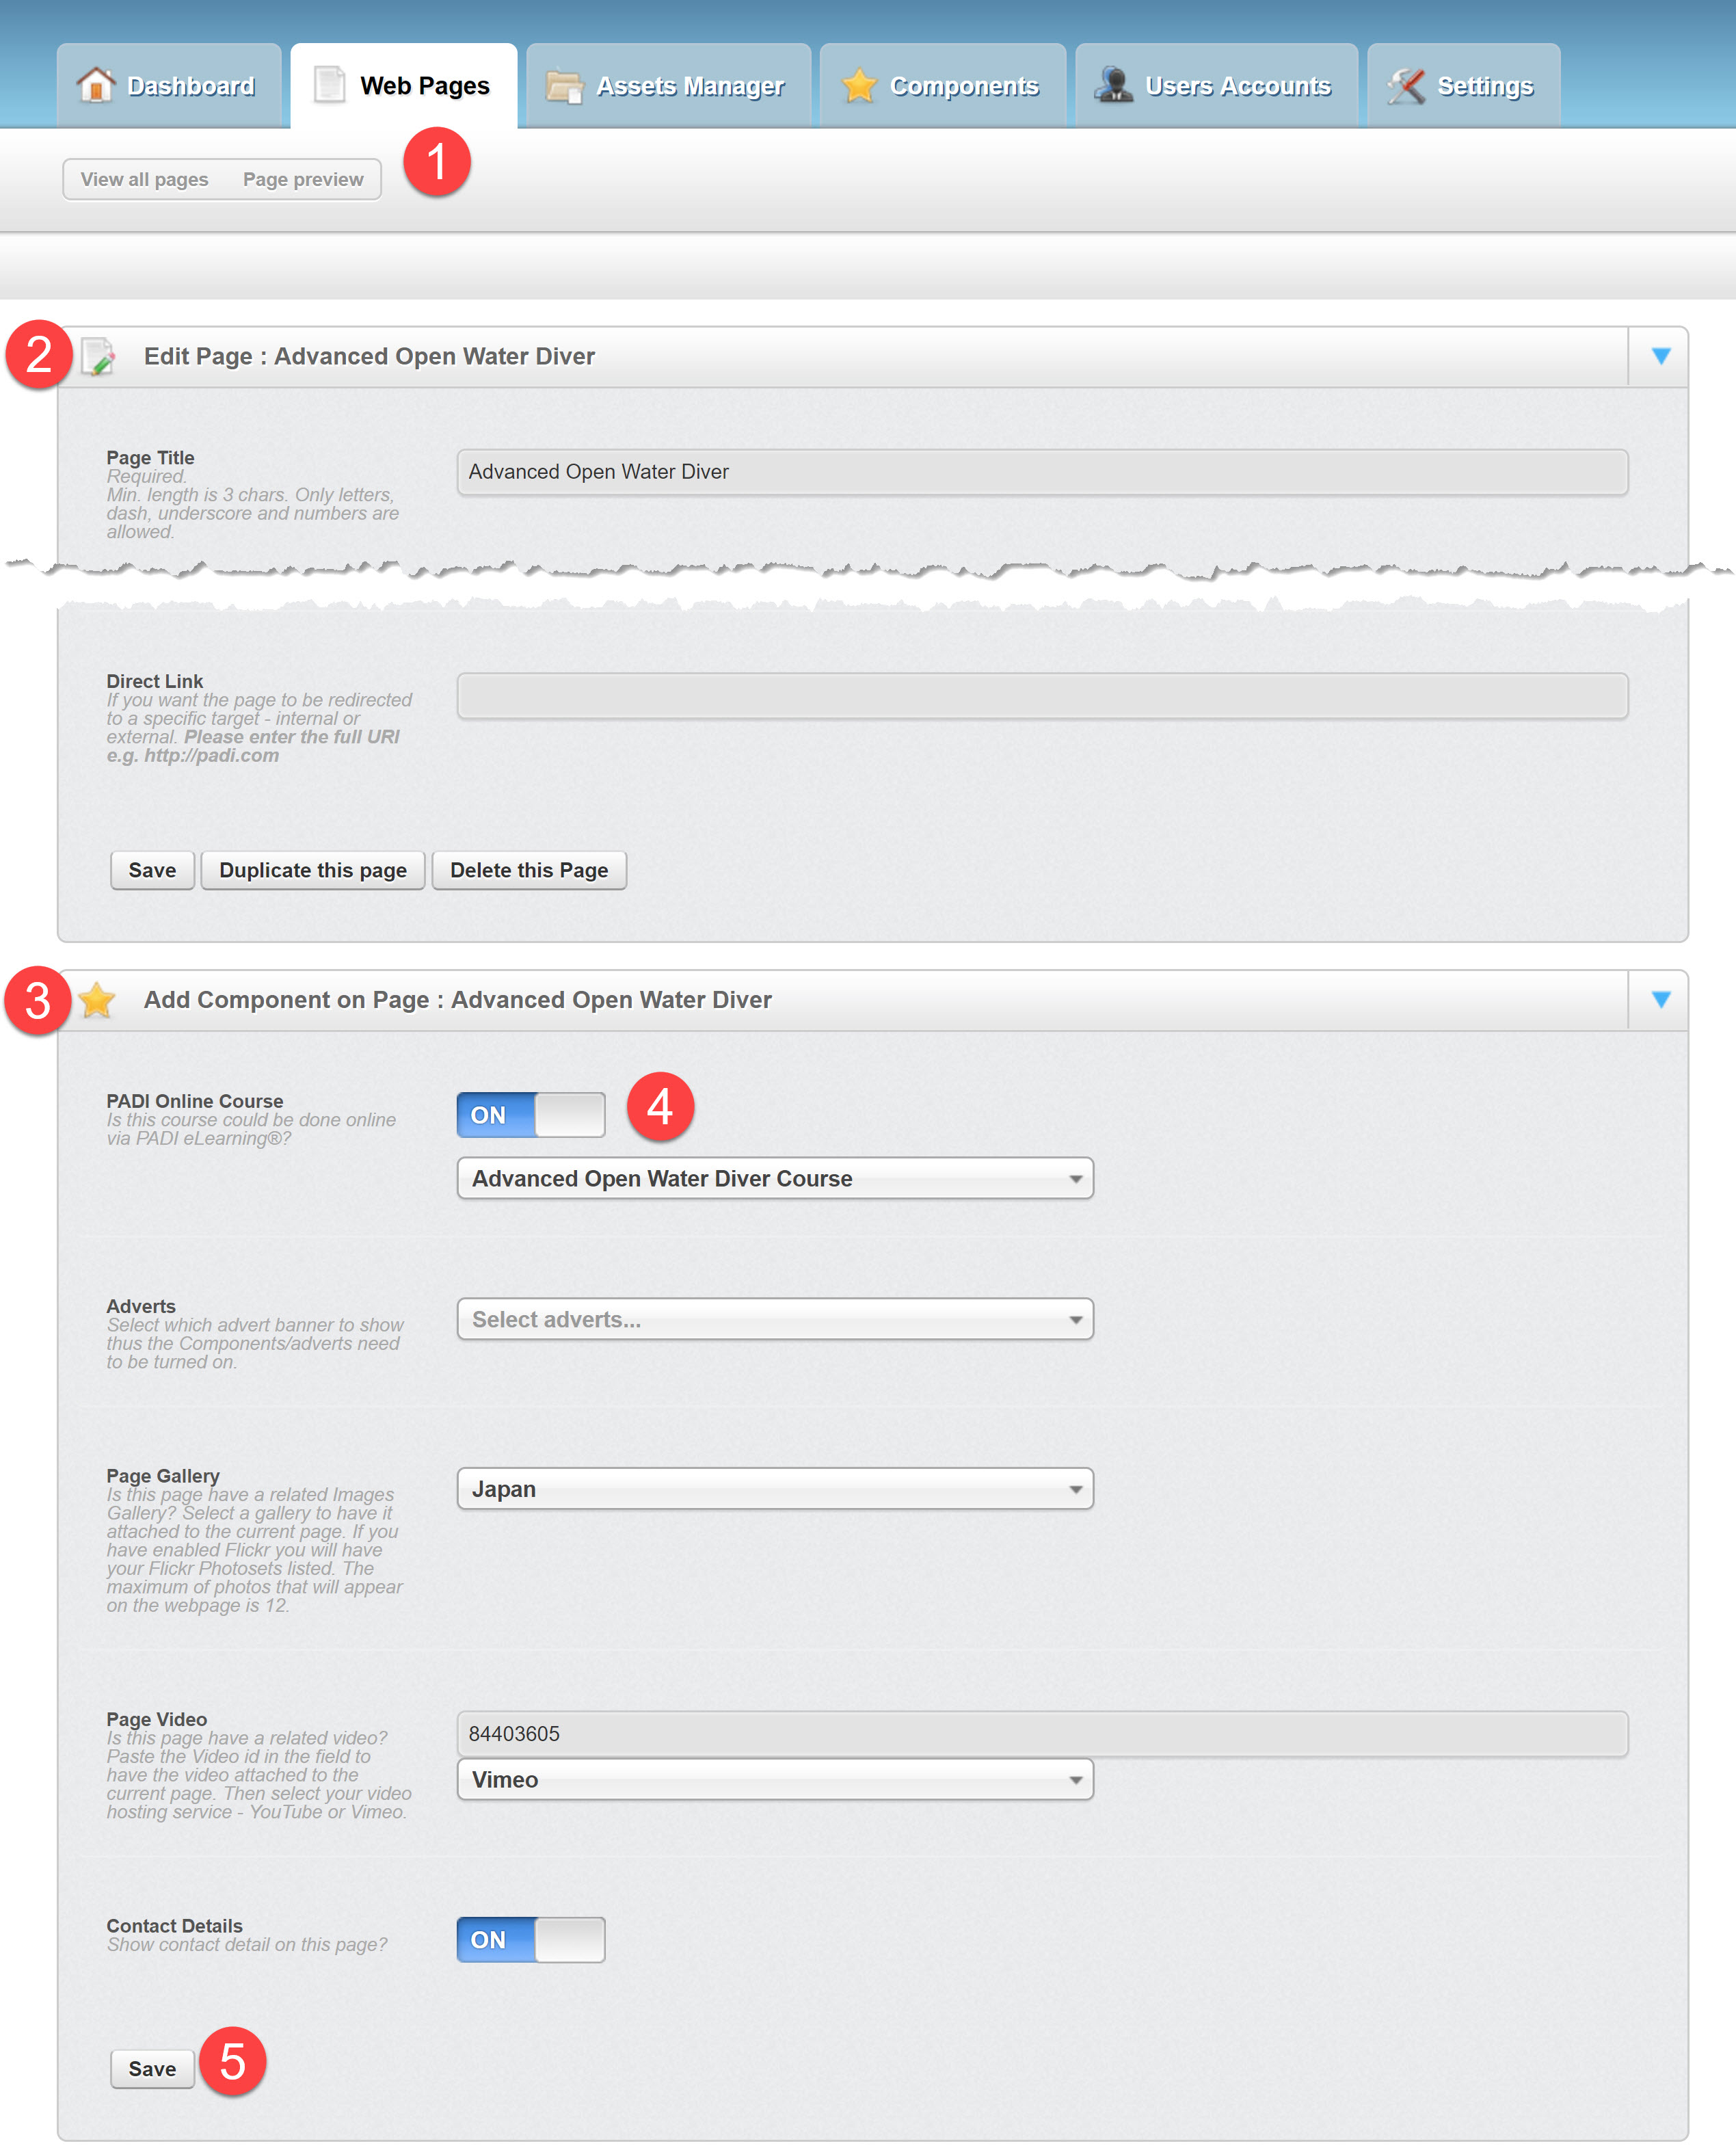
6) Browse your website to the page you edited. A PADI eLearning component will be displayed

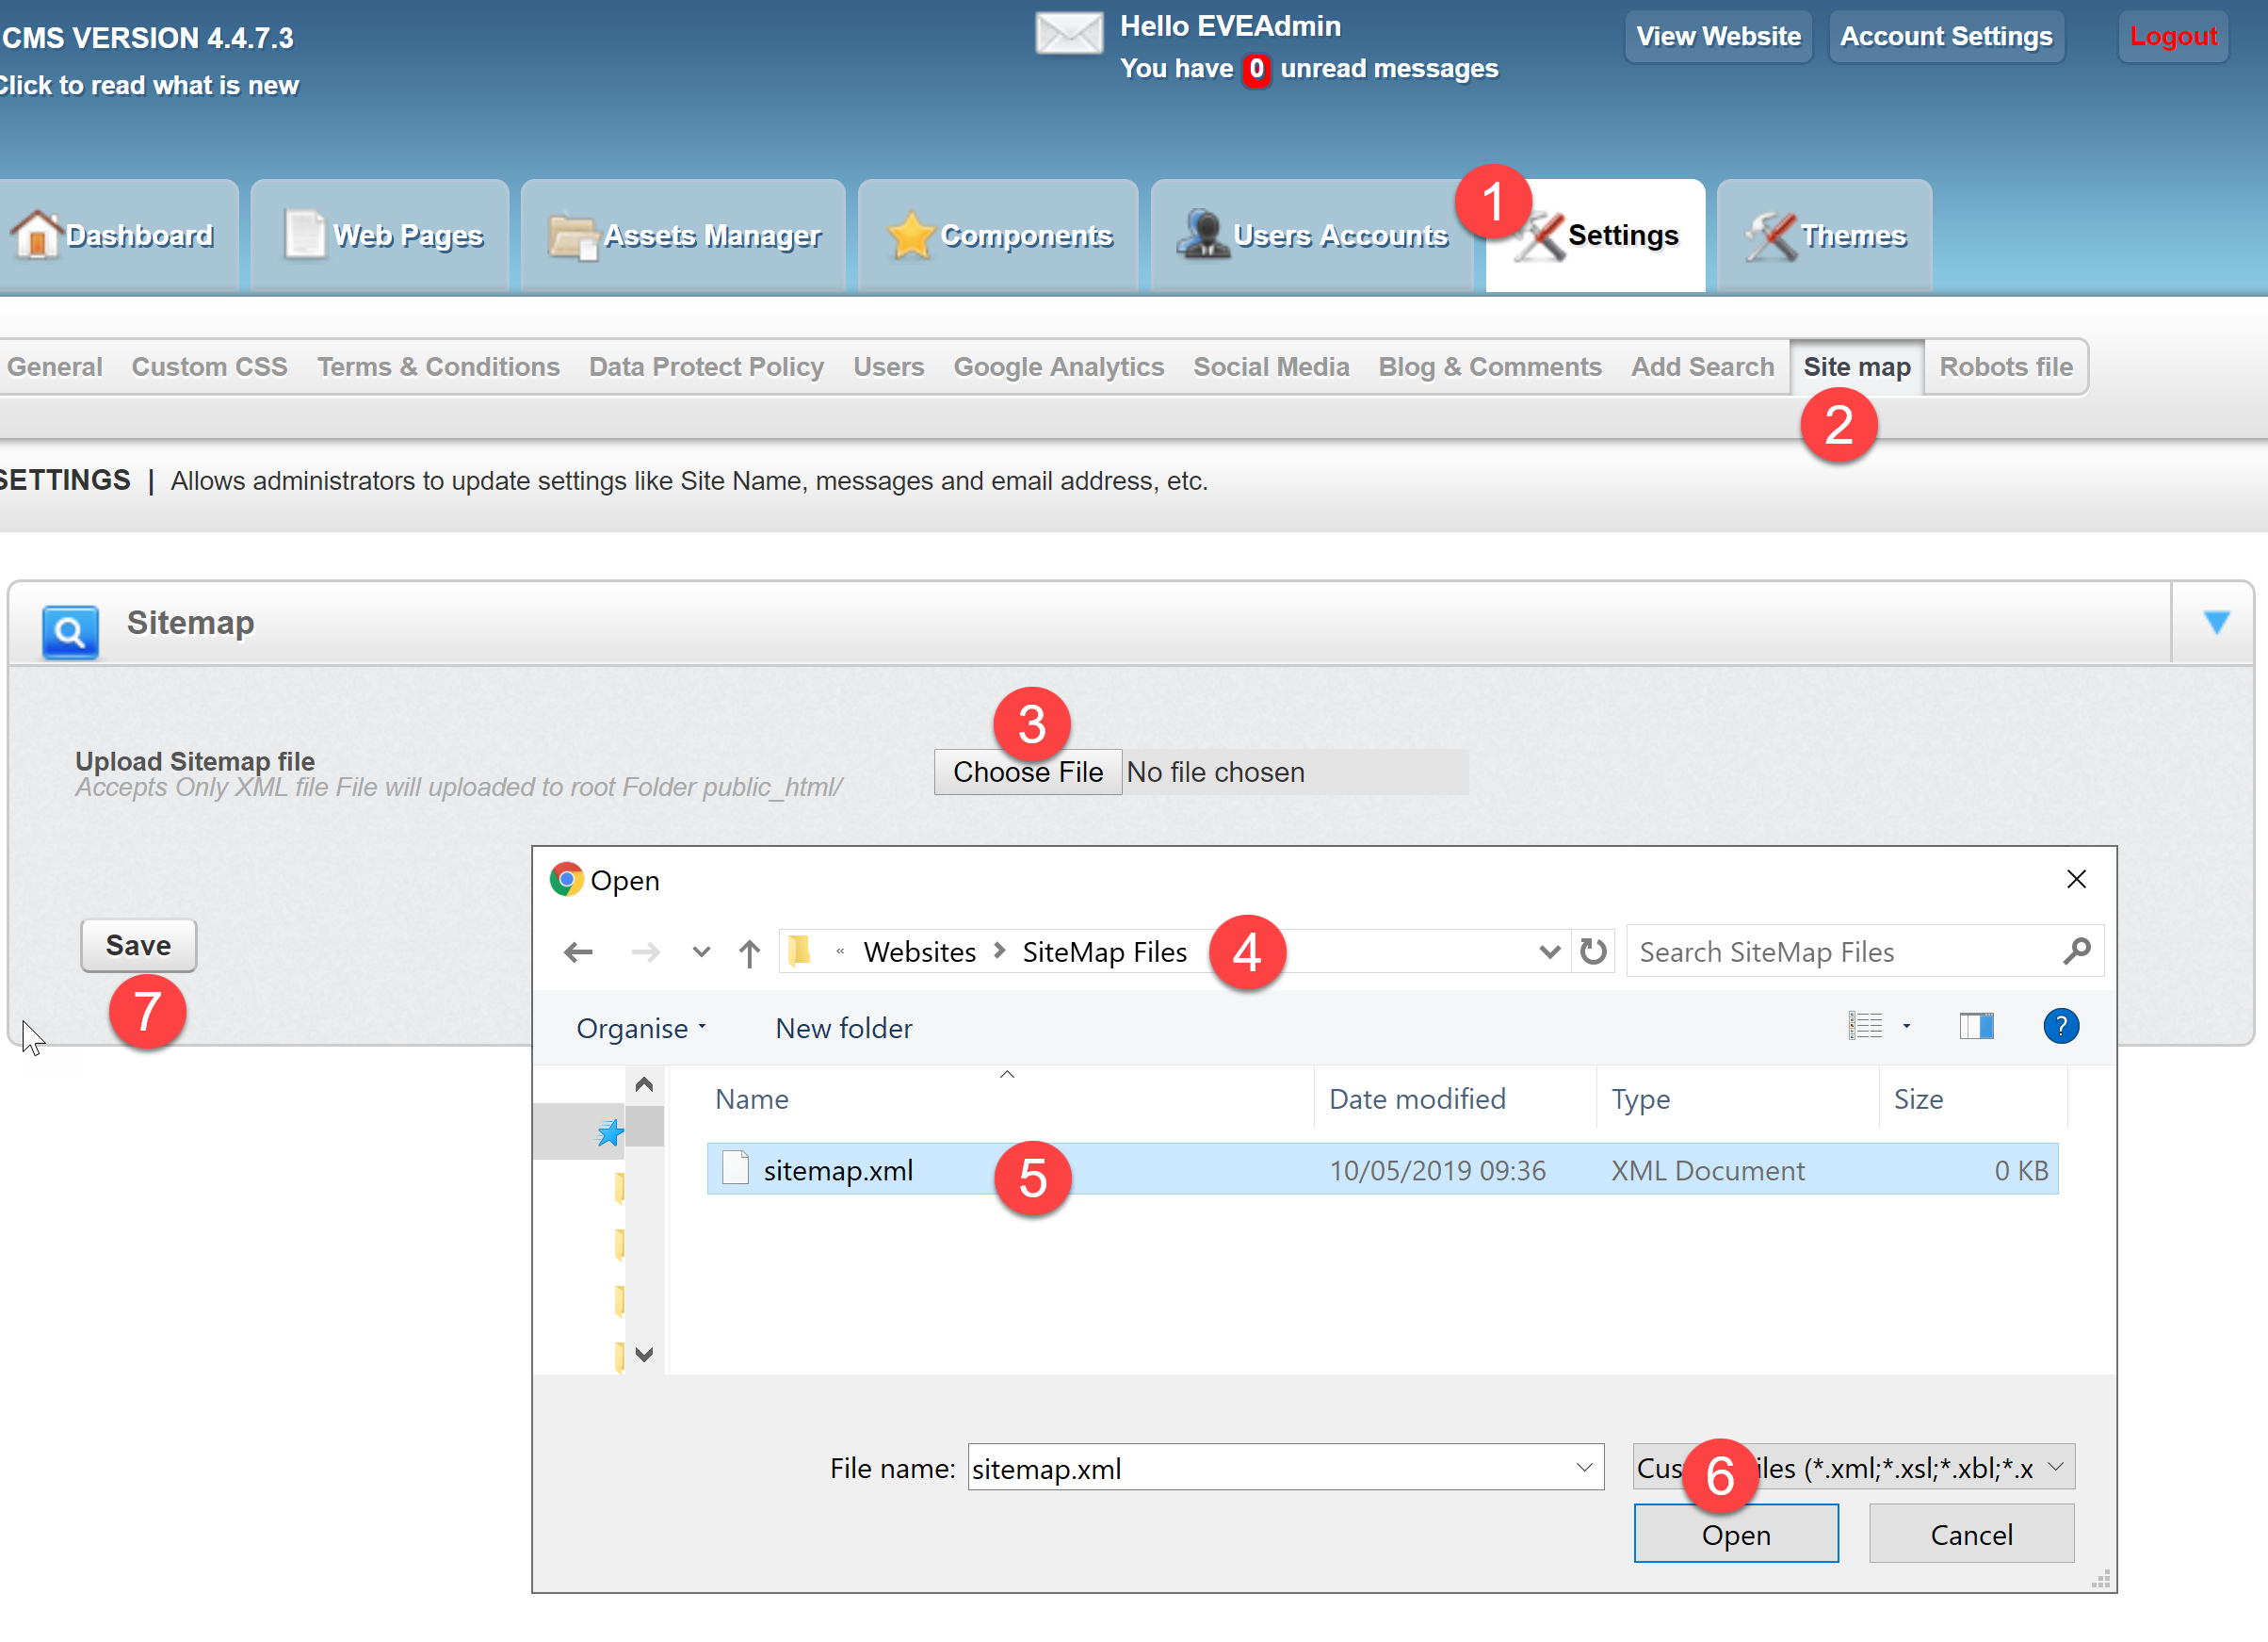
Starting from version 4.4.7.3, the CMS allows you to upload your sitemap.xml file.
To upload the sitemap.xml file, please follow this procedure:
1) Login to your CMS and click the Settings tab
2) Click the Site map tab
3) Click Choose File
4) Browse your PC to the folder where the sitemap.xml file is saved
5) Select the file
6) Click open to upload the file
7) Click Save file to apply it to your website
Short codes are a new feature available to stores running any of the following EVE Packages:
Short codes will collect data from your EVE database and display them on your EVE Website. For example, if you wish to display a price list on a web page, you can use short codes. The price list will update dynamically, each time you amend a price on your EVE database.
Currently, this feature will work only with EVE stock items and return prices only.
To enable short codes, please follow this simple procedure.
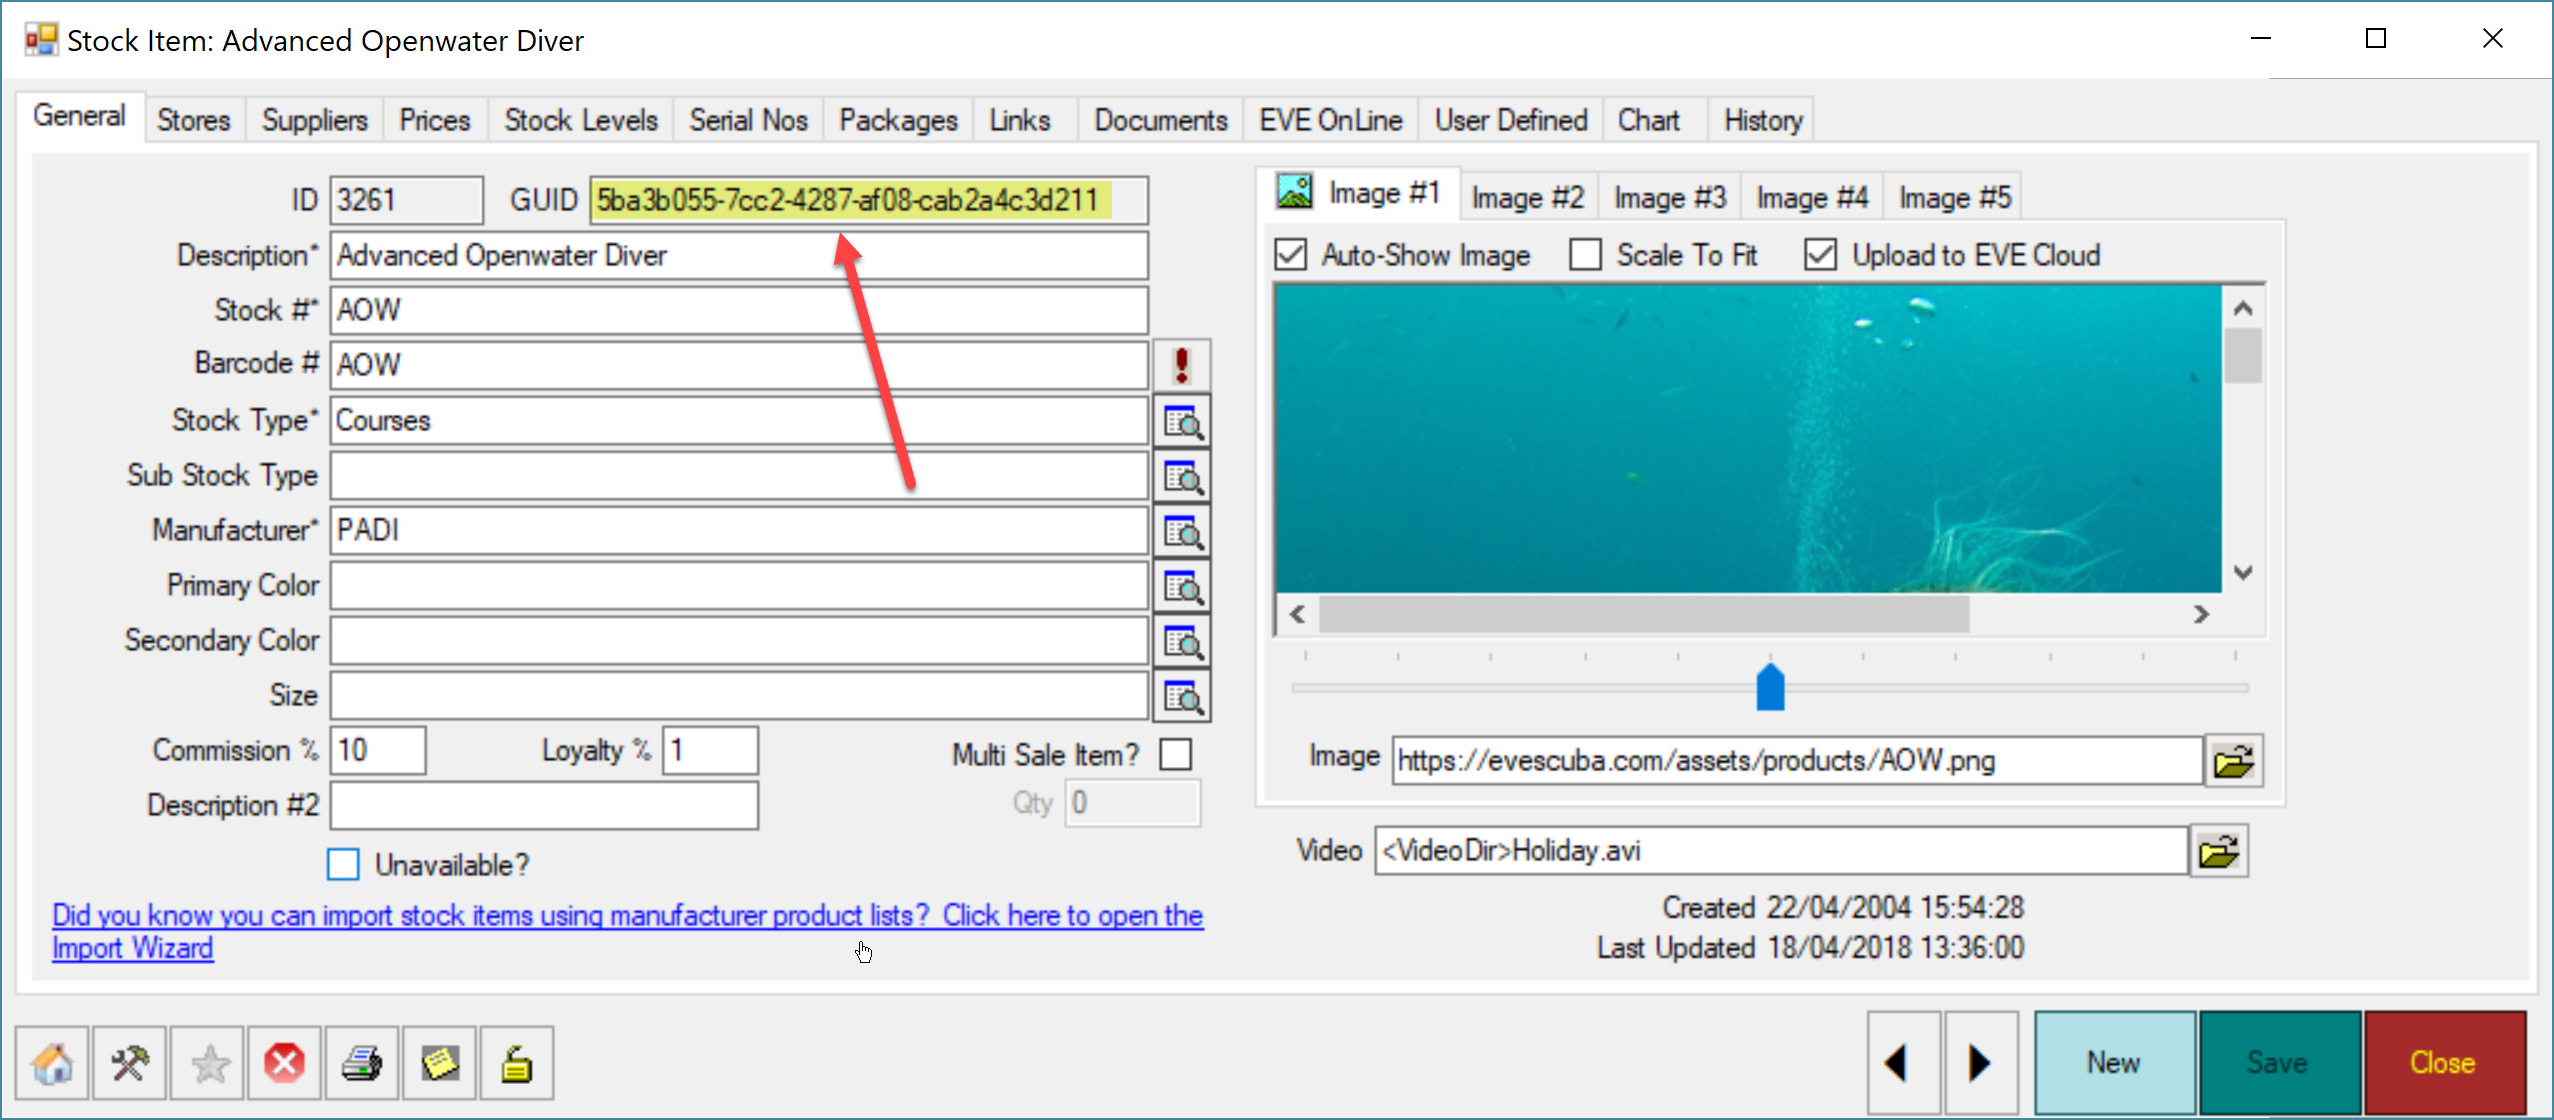
1) Open the stock item you wish to publish and copy the GUID field value
2) Login to your website CMS, open the web page where you wish to add short codes
3) In the Page Content Editor, add text as you see fit and click the Short Codes button
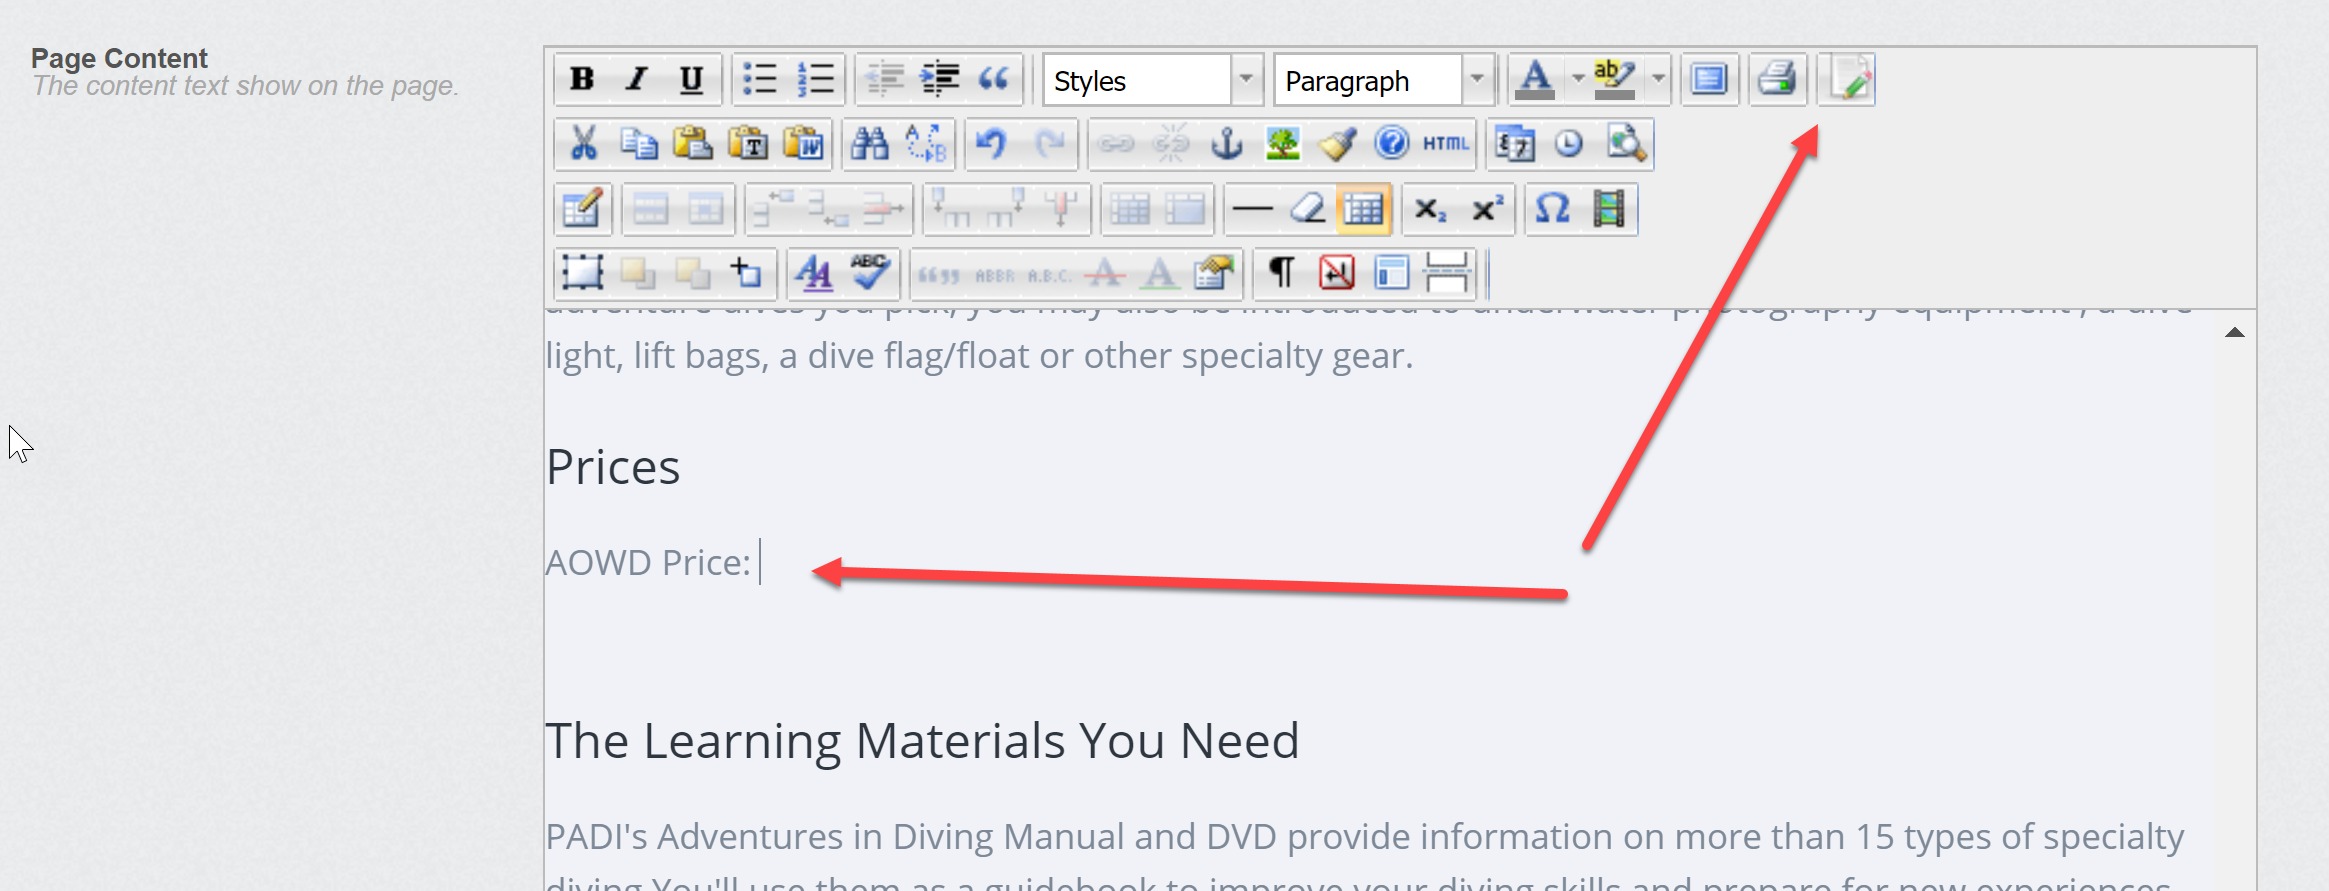
4) A dialogue box will open
A) In the ID field, enter the GUID you copied from EVE stock item
B) In the datatype field, enter stockitem
C) Click the drop down arrow and select the value you wish to display
D) Click Insert

5) The CMS will add a TAG to the page content. Save the page.
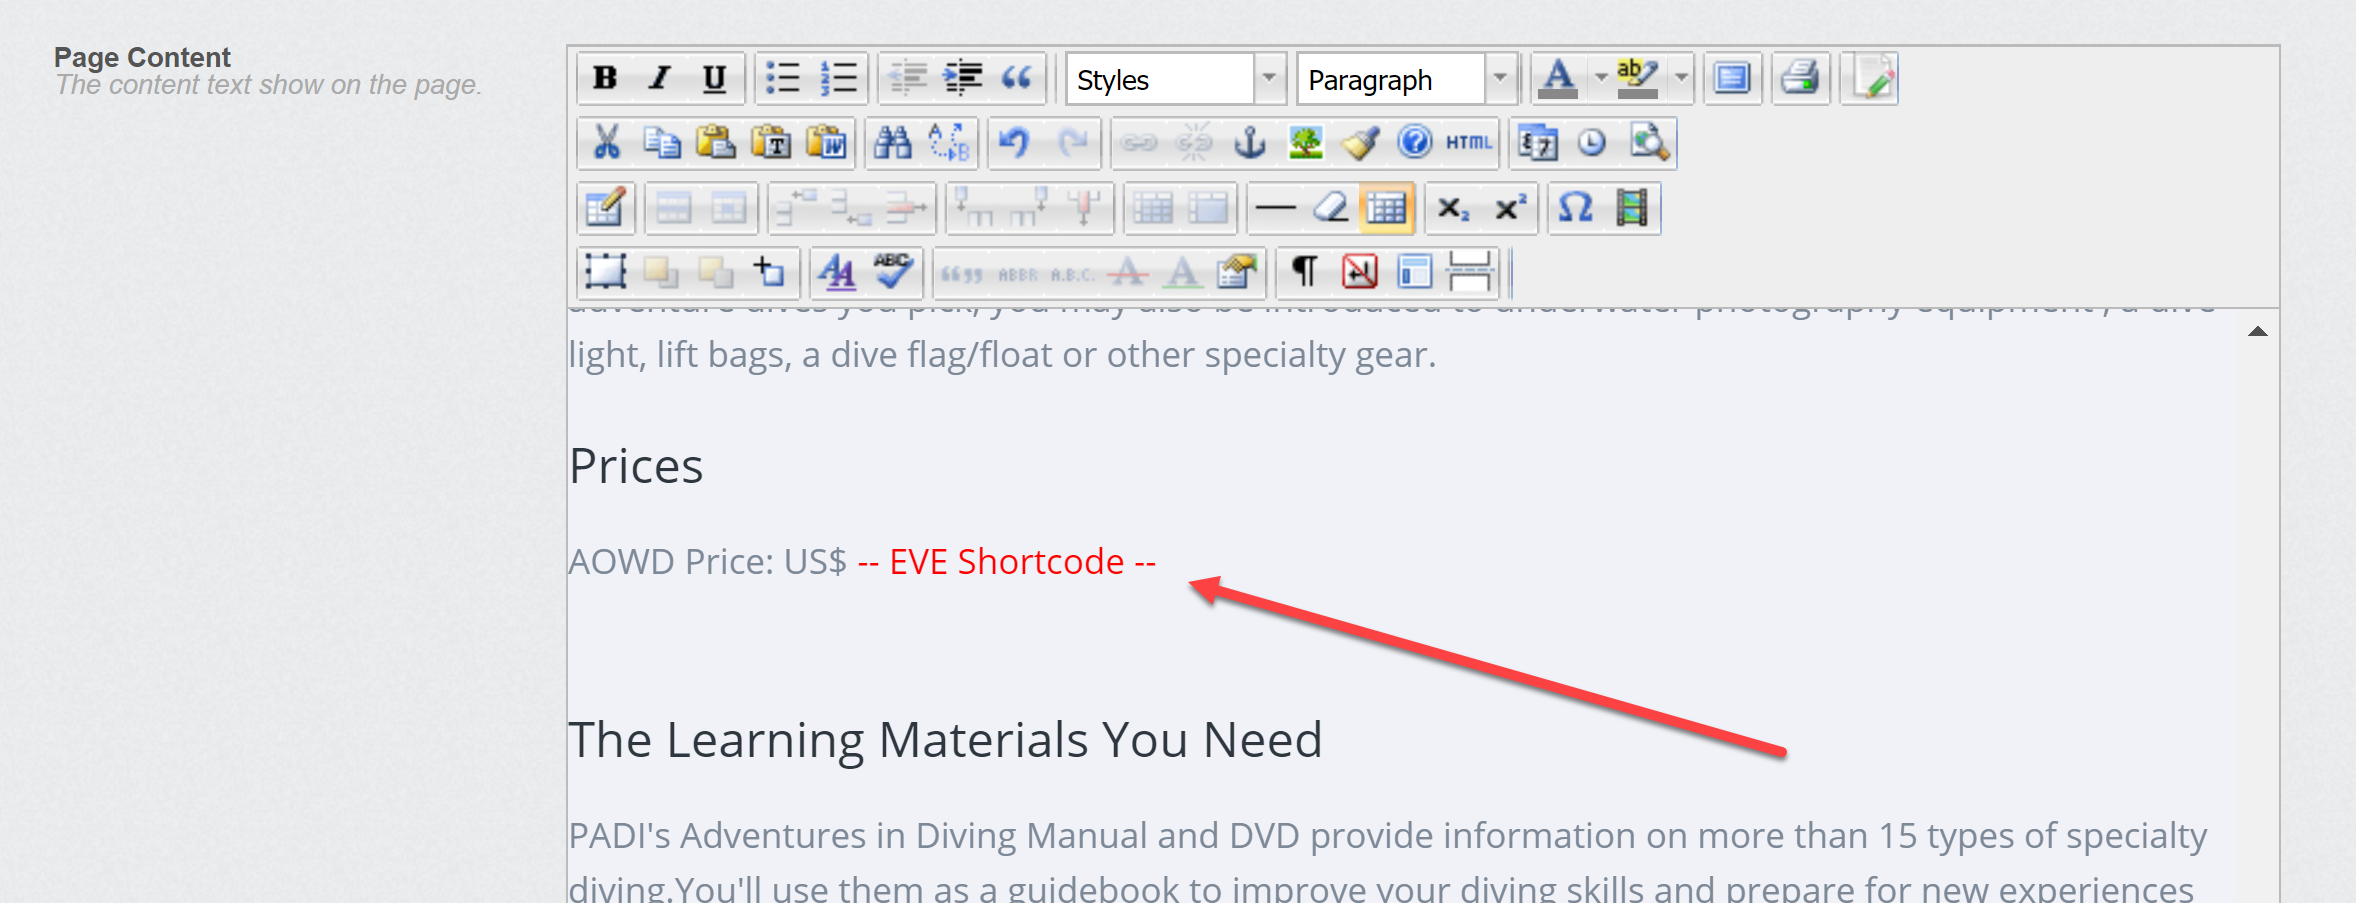
6) The website will display the corresponding price

GDPR
To add a Data Protection Policy to your EVE website you might first wish to download an example from the EVE Diving Website.
Log into the Downloads page.
Then look for the section towards the bottom of the page called GDPR.
Click the Download link –
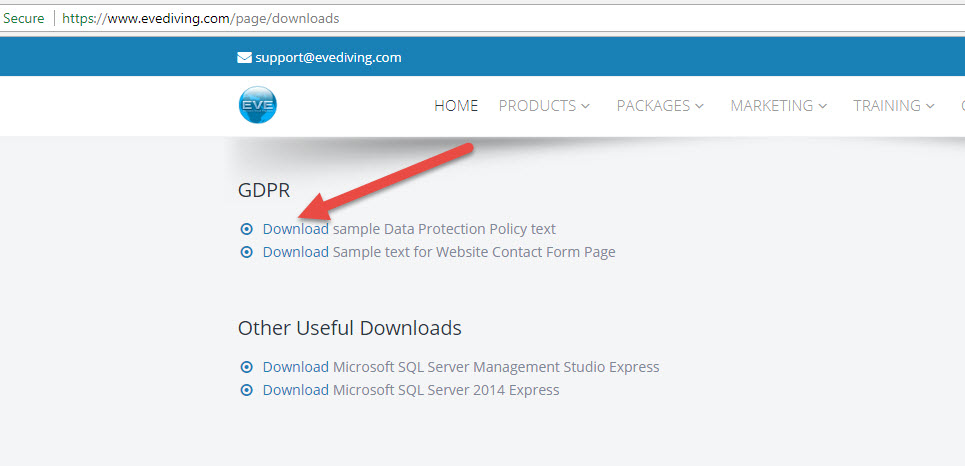
This will download to your designated Downloads page on your PC a Word Document.
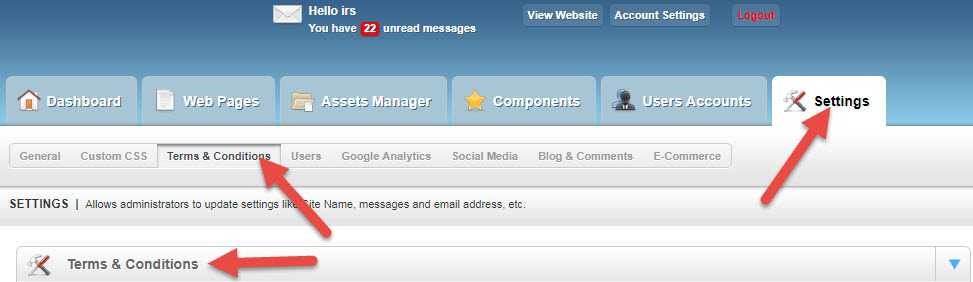
Next login to the CMS (Content Management System) of your EVE website.
Go to the Settings tab and then to Terms and Conditions:
Then copy the whole of the Word Document you downloaded into the Terms and Conditions box.
You can add this to the end of your current Terms and Conditions should you wish.
Ensure that you edit the 3 areas marked below:
- the Store Name
- the Date Last Updated
- the Company Name
- the member of staff responsible for data privacy
.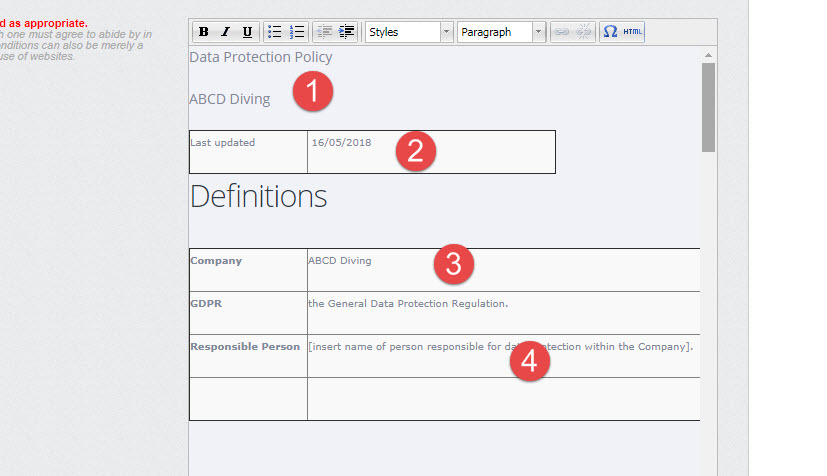
Them click Save at the bottom of the page.
Payment Methods
To setup PayPal as payment provider on the new EVE OnLine shop, please watch this video tutorial first.
To complete the setup, you will need your LiveClientID and your LiveSecret. Please follow this procedure to generate these 2 elements:
1. Login at https://developer.paypal.com
2. On the My Apps & Credentials page, scroll down until you see the “Create App” button and click it.
3. Enter “EVE Online” in the App Name box and click Create App.
4. You’ll see a page like below. Click on the Live button at the top right.
5. Copy and paste the Client ID and Secret into the LiveClientID and LiveSecret boxes respectively on the PayPal payment method in EVE (see below), in the tab corresponding to your OnLine shop.
6. Also, in EVE enter something in the Notes on the PayPal page such as “Checkout with PayPal”
7. Just enter info in LiveClientID and LiveSecret and Notes boxes.
8. Leave the other boxes blank.
NOTE. If you put anything in UseSandbox it tells EOL to use the Sandbox details!!
Purchases

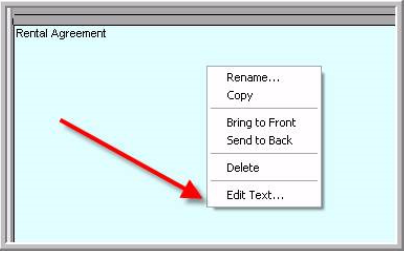
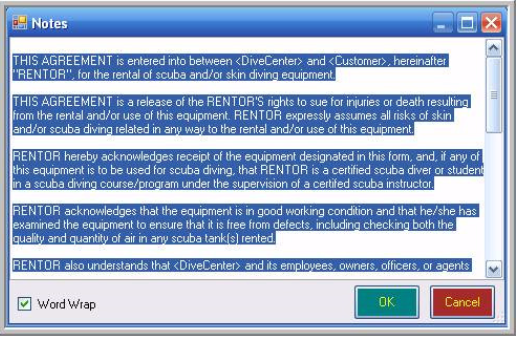
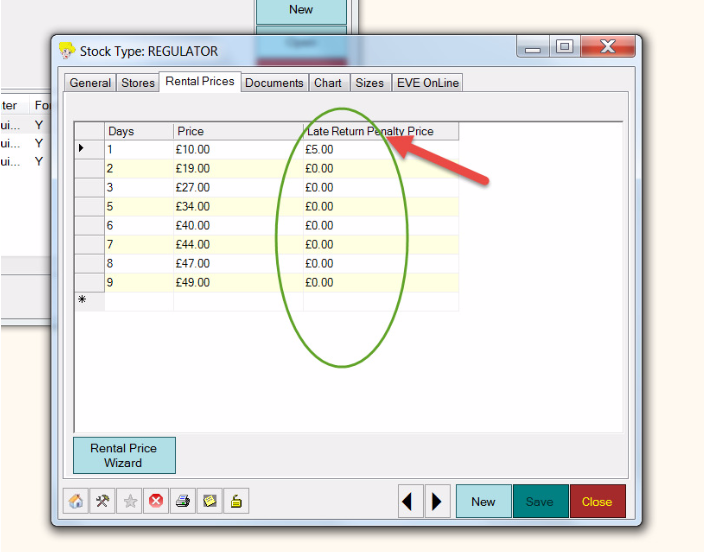
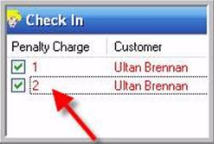
Rentals


Reports
Sales


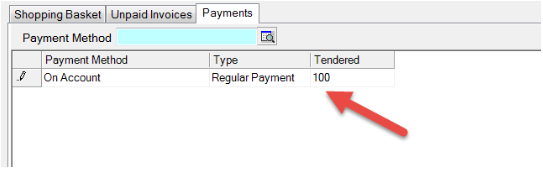
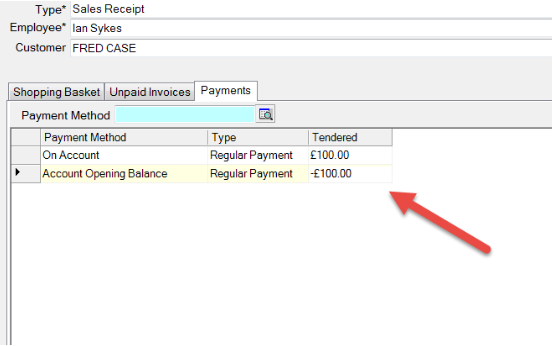
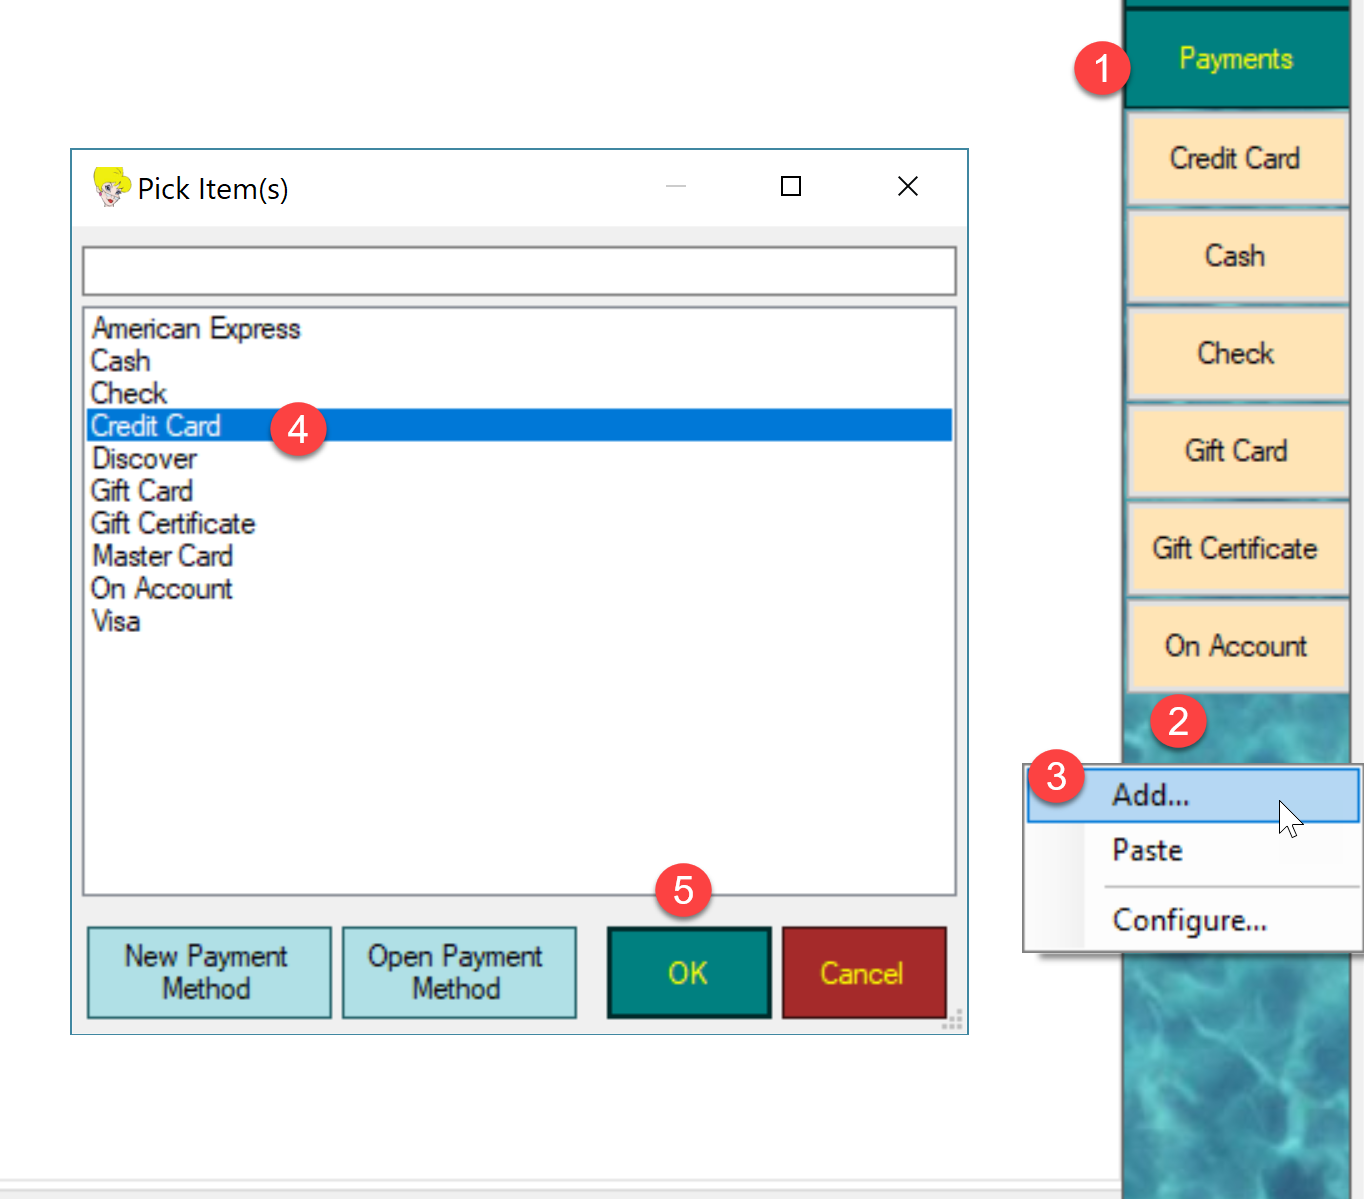
To add a Payment Method to the Cool Bar, please follow this procedure:
- Click Payments in the Cool Bar
- Right click on a blank area of the Cool Bar
- Click Add
- Click on the Payment Method you wish to add to the Cool Bar
- Click OK to save settings
Cayan provide 2 payment systems that can be used in EVE: Genius and Transport WEB. Genius uses a physical credit card device so your customers can swipe/insert/touch their credit card. Transport WEB is for card-not-present (phone) transactions so you can type the credit card details.
As a first step, please make sure you have properly setup the corresponding options, as outlined in the instructions.
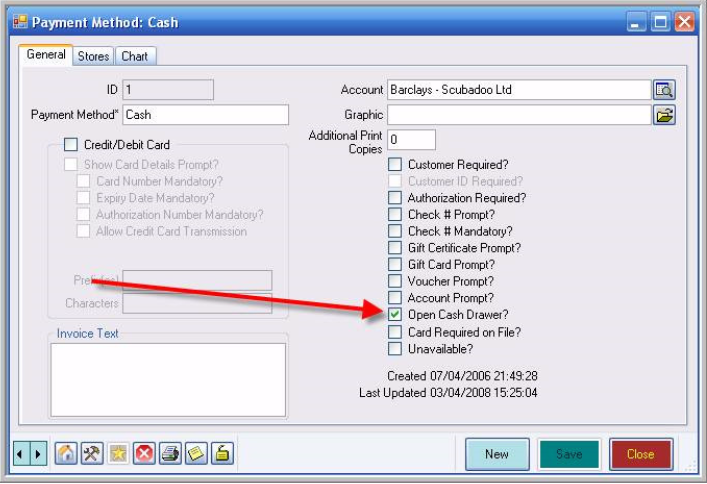
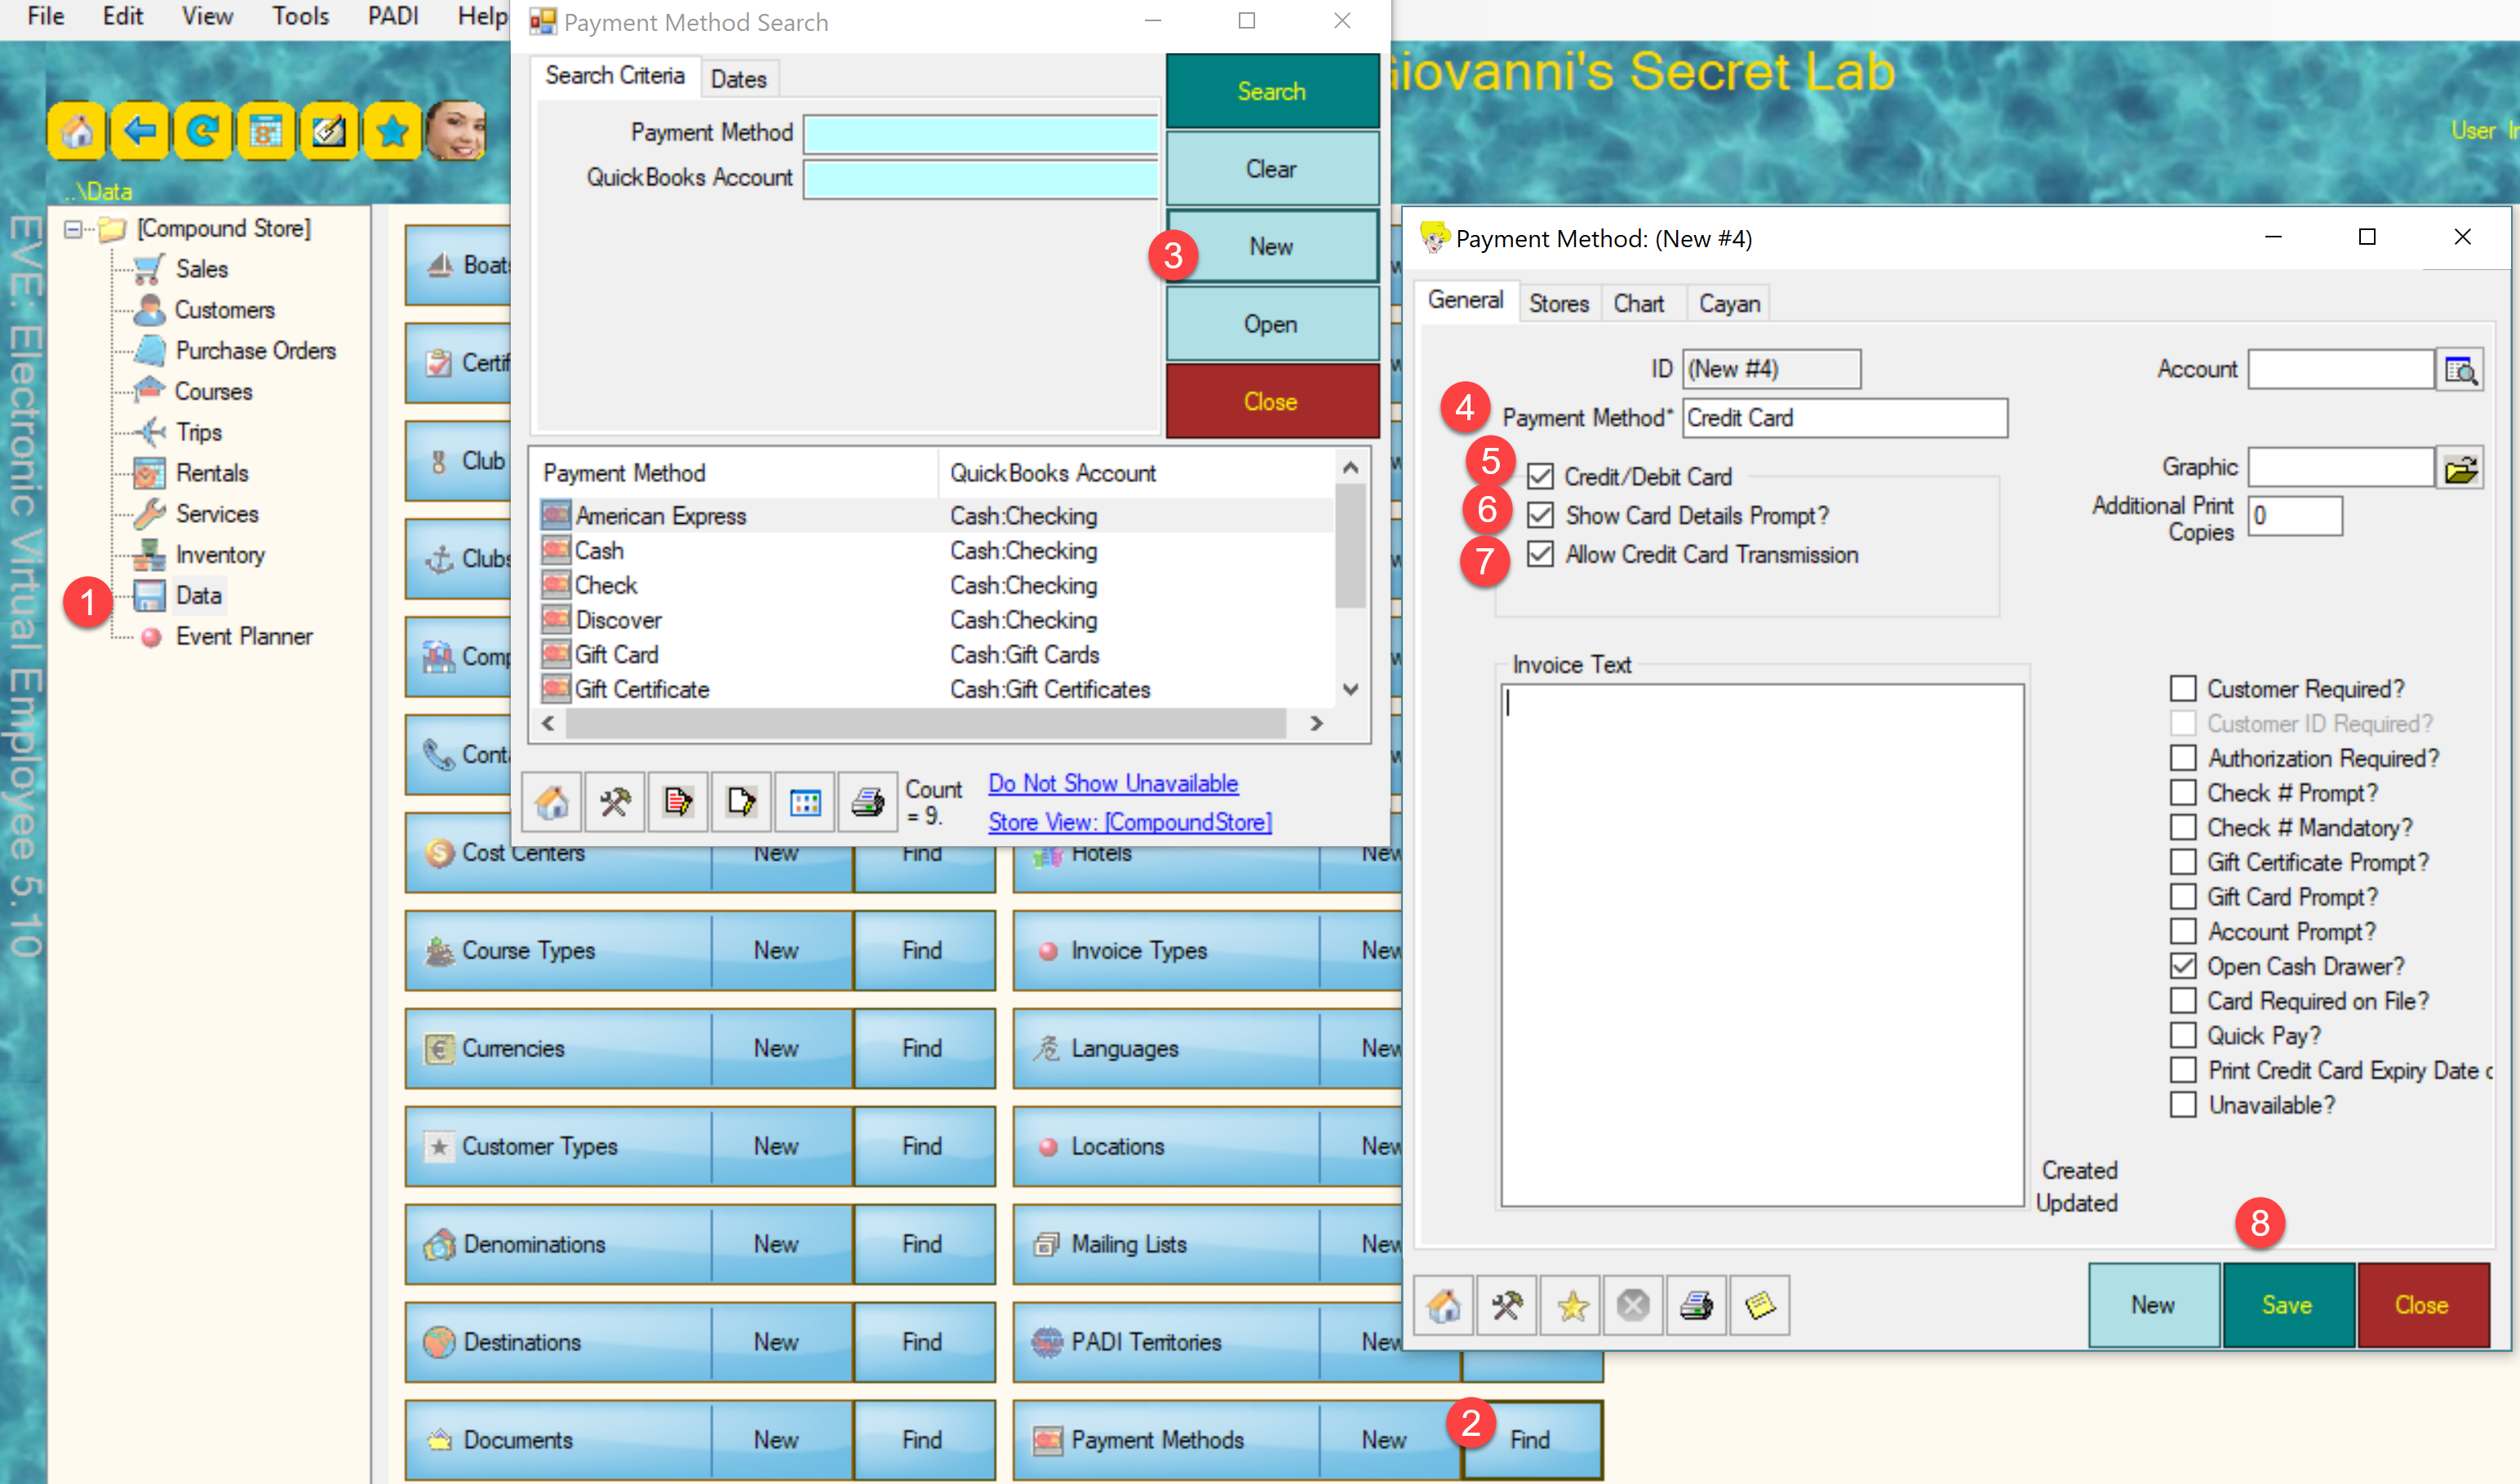
Then, verify whether your EVE setup already includes a payment method with the following settings or create a new one:
- Open EVE and click Data
- Go to Payment Methods and click Find
- If you need to create a new payment method, click New
- Type your payment method name. We recommend a generic Credit Card name, as both Genius and Transport Web can process different card types
- Check the Credit/Debit card box
- Check the Show Card Details Prompt box
- Check the Allow Credit Card Transmission box. These 3 boxes must be checked
- Save the settings
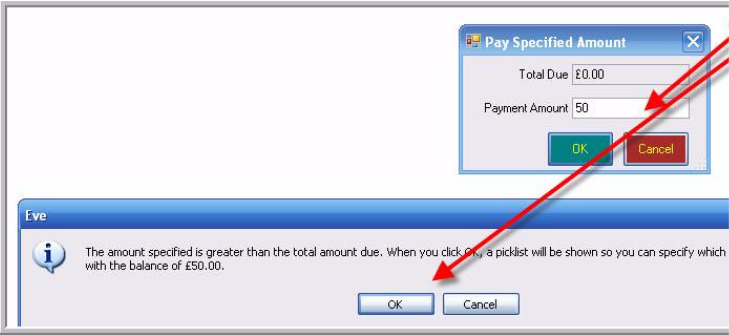
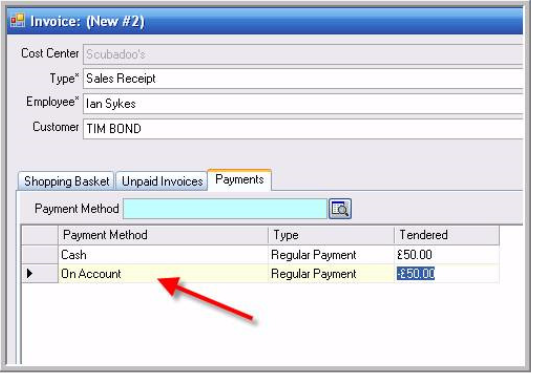
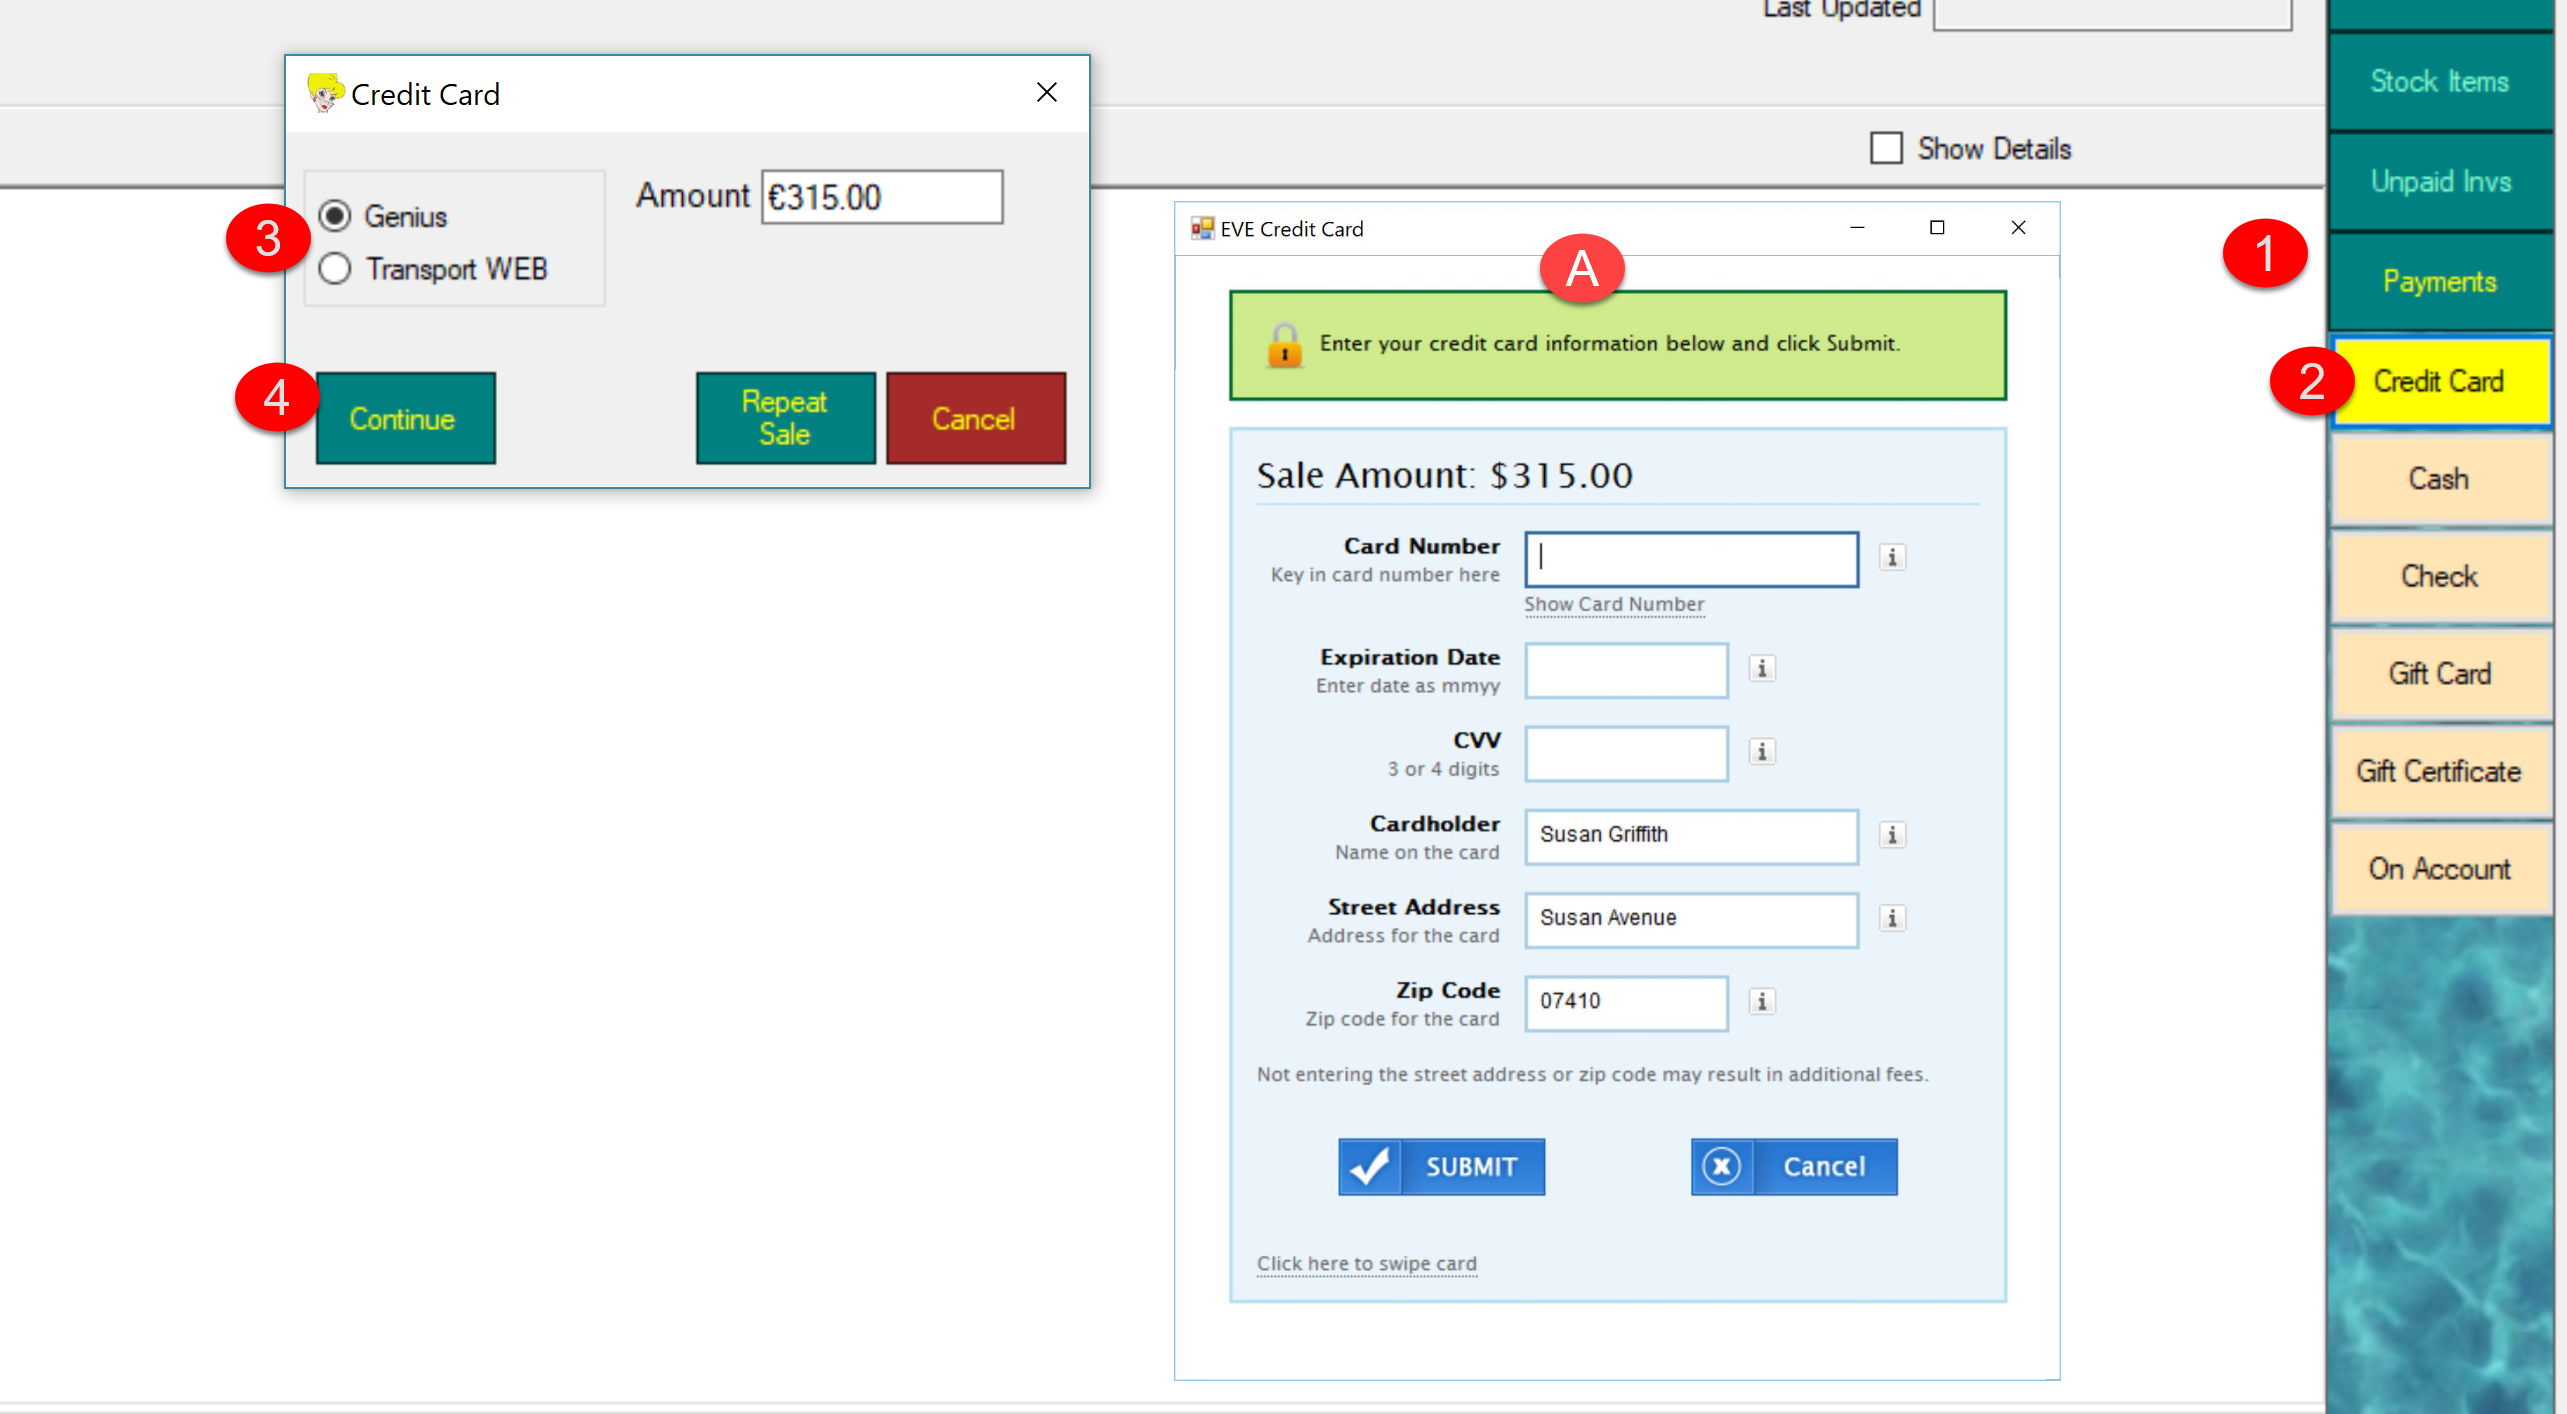
At the point of sale, after you have added all the stock items to the invoice, to take a payment using Genius/TransportWeb,
- Click on Payments
- Click on Credit Card
- By default, Genius will be selected. You can choose your preferred method. Use TransportWeb if the card is not present (e.g. you are processing a transaction over the phone).If you choose Transport Web, then form A
- Click Continue. If you have select TransportWeb, then form A will be displayed
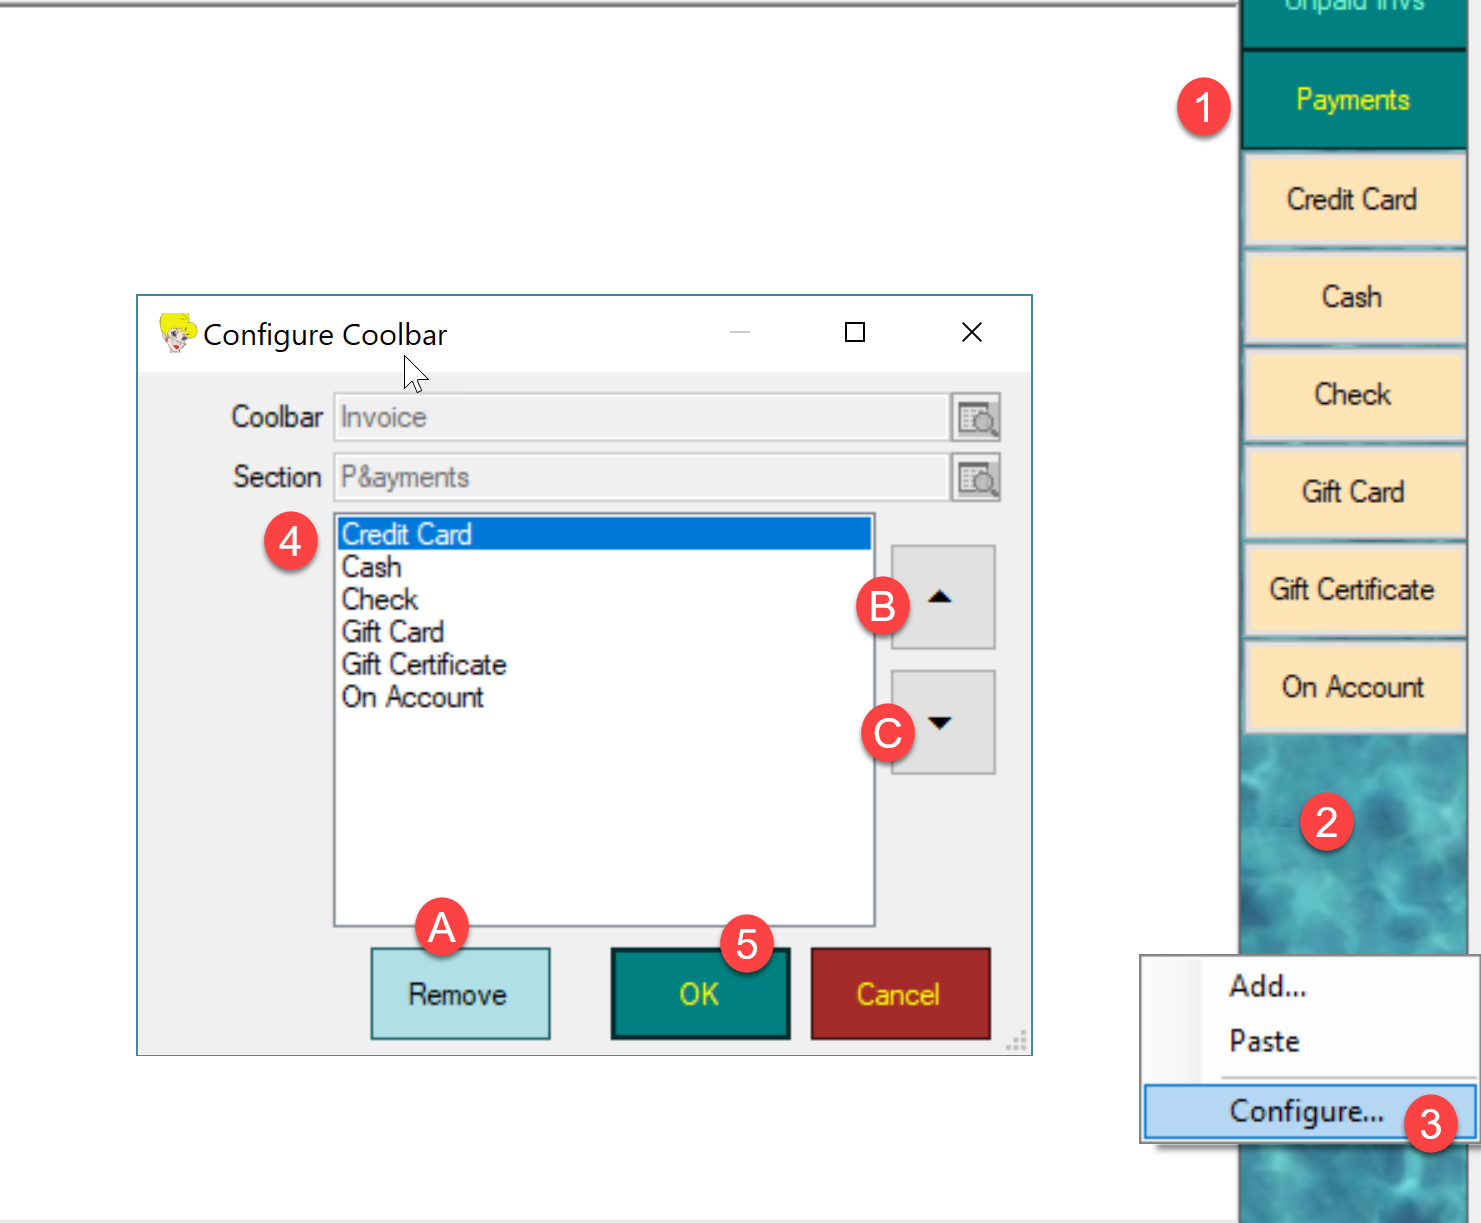
To setup payment methods in the Sales coolbar, please proceed as follows:
1) Click Payment in the Cool Bar
2) Right click on blank area of the Cool Bar
3) Click Configure
4) Click on the Payment Method you wish to setup
A) Click Remove to remove the Payment Method from the Cool Bar
B) Click Up to shift the Payment Method up in the list
C) Click Down to shift the Payment Method down in the list
5) Click OK to save new settings
Payment methods removed from the Cool Bar are still available to collect payment, but will no longer be listed in the Cool Bar.

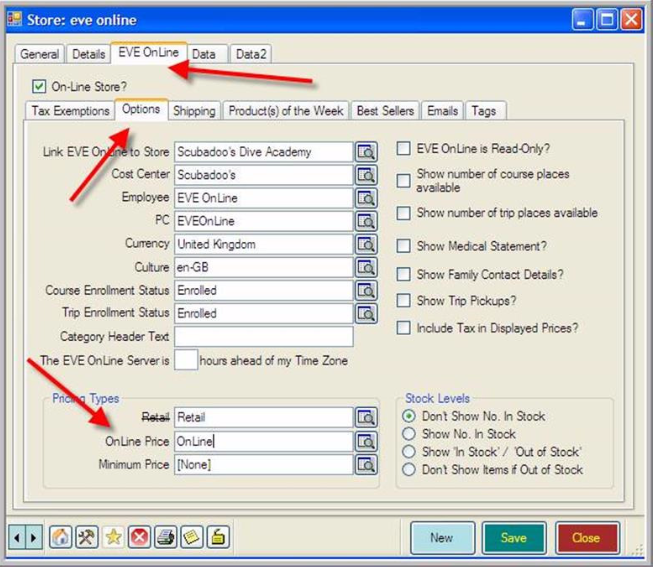
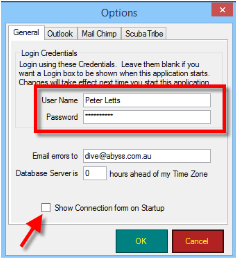
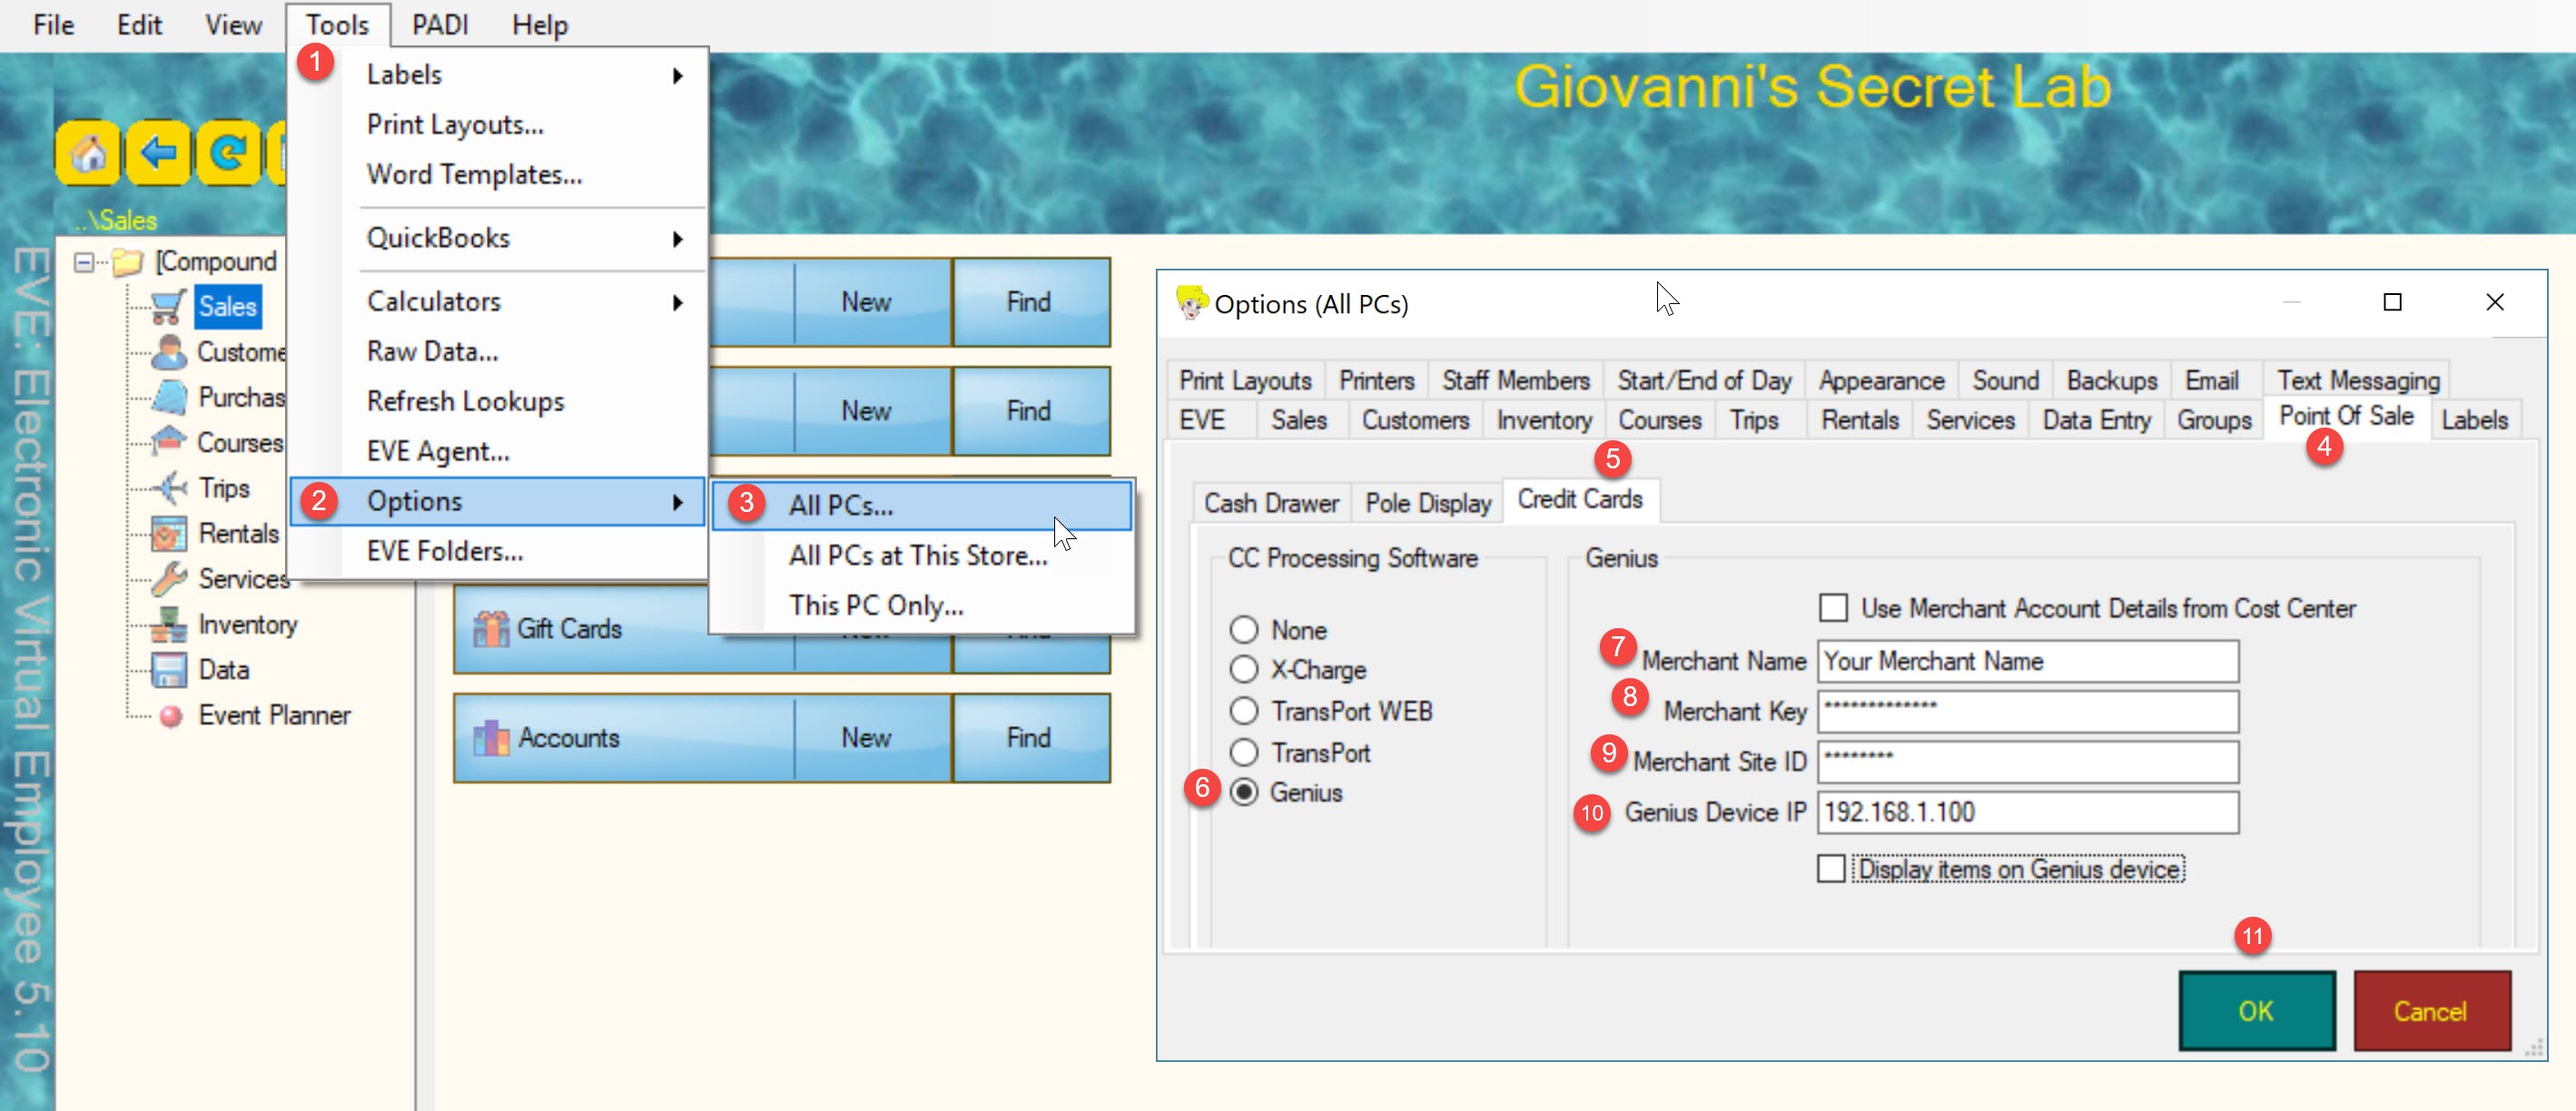
To setup a Genius/TransportWeb credit card payment, please follow this procedure:
1) Open EVE and click Tools
2) Select Options
3) Click “All PCs” if you want the same credit card account to be used on all PCs running EVE. Click “This PC Only” if you want to use just the active PC.”
4) Select the Point of Sale tab
5) Select the Credit Cards tab
6) Select either Genius or TransportWeb. Once you setup either system, settings will also apply to the other system
7) Enter your Merchant Name
8) Enter your Merchant Key
9) Enter Merchant Site ID. Please make sure Merchant Key and Merchant Site ID are not swapped by mistake, else login will fail
10) Enter your device local IP address. Cayan tech support will help you retrieve your device local IP address when you receive the device
11) Click OK
As a second step, please make sure you have properly setup your payment methods, as outlined in the instructions


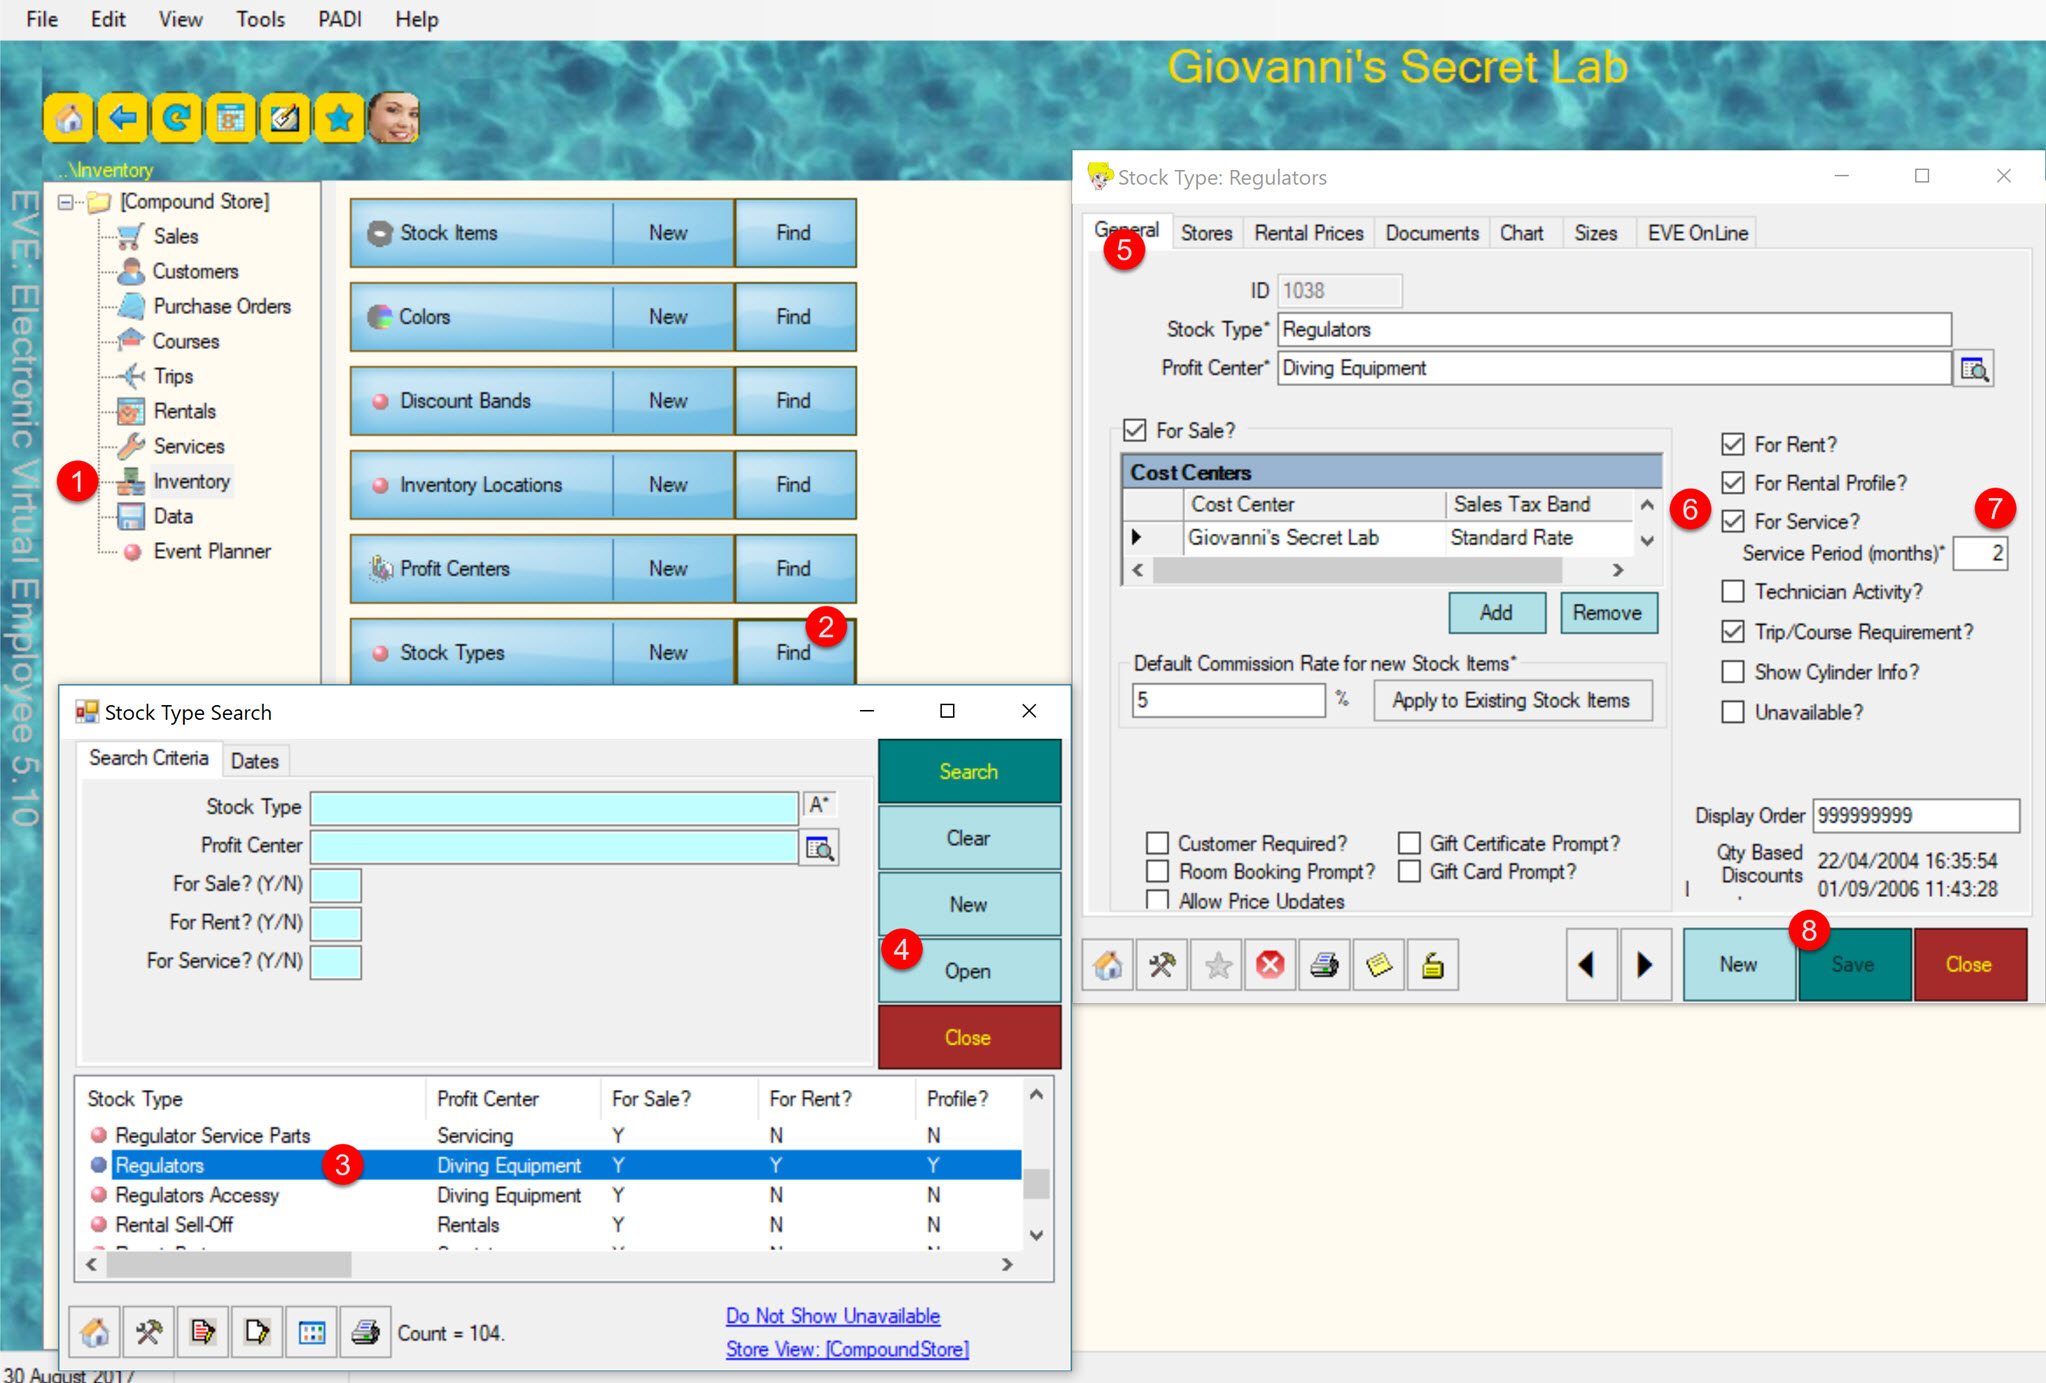
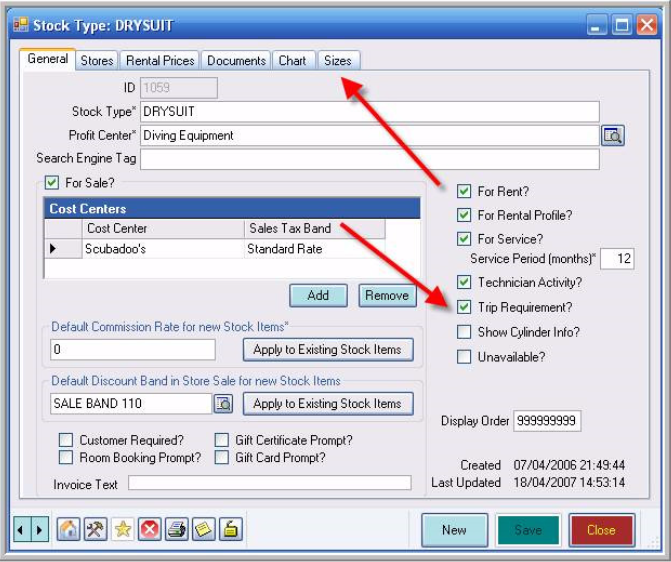
Servicing
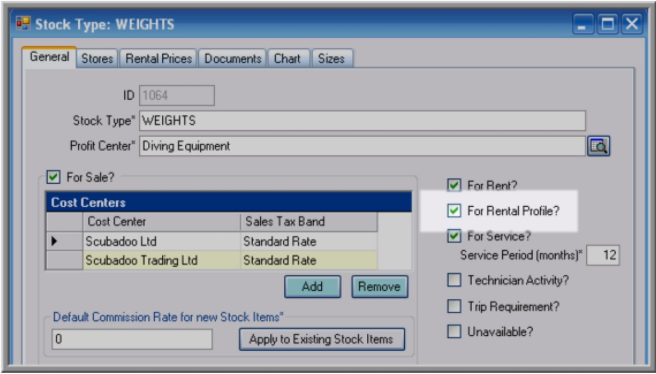
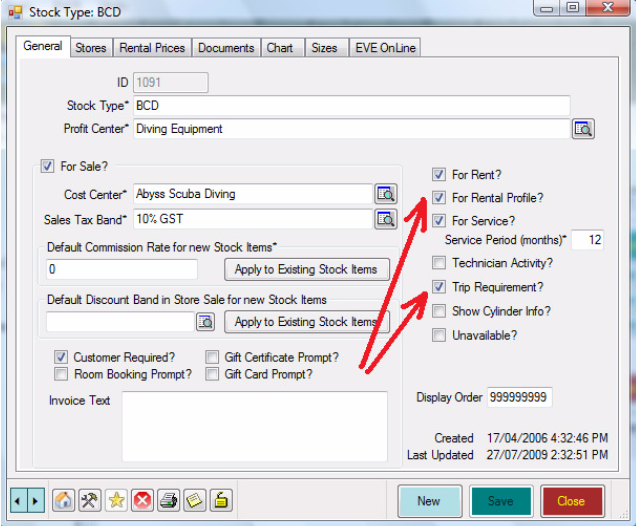
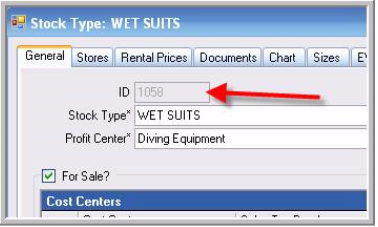
To change a service period, please follow this procedure:
- Go to the Inventory module
- Go to Stock Types and click on Find
- Select the Stock Type you wish to modify
- Click Open
- Select the General Tab
- Make sure the For Service box is checked
- Set the service period in months
- Save the changes
The procedure needs to be repeated for each Stock Type where you wish to modify the service period.
Setup, Settings and Options
This video will guide you through the process:
To check what EVE version is currently running in your setup, please follow this simple procedure:
- Open EVE and click Help
- Click About
- Verify EVE version number
- Verify EVE build number
- Click Close to close the window and return to normal operation
To find out what the latest version of EVE is, please login to our website or contact us

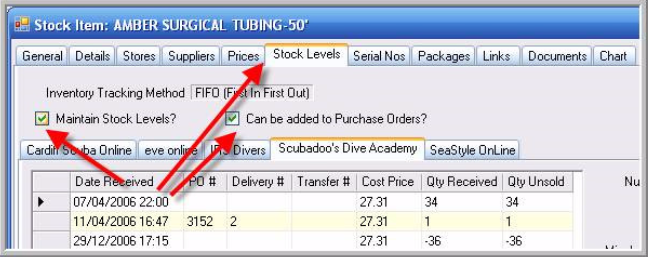
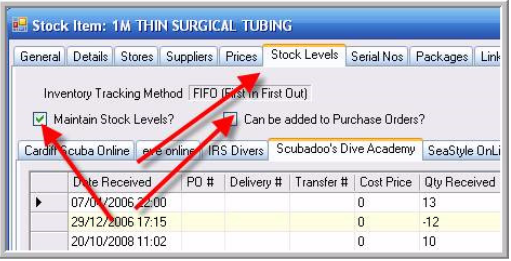
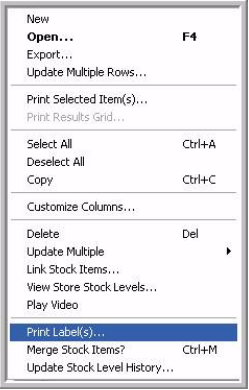
Stock & Inventory
In your inventory, you may have stock items that belong to the same stock type and are different only for the colour or the size.
These stock items can share the same description or image. To copy the image or description from the parent stock item to the children, follow the procedure outline below.
You will first assign a description to the Parent stock item
1) Launch EVE and click Inventory
2) Go to the Stock Item and click Find
3) Complete a Stock Item Search, by Stock Type and Manufacturer.
4) Double click on the Parent stock item
5) Click on the EVE OnLine tab
6) Click on the Product Details tab
7) Enter the Parent stock item description
8) Save the record
9) Stay in the EVE OnLine tab and click the Links Tab
10 ) Select the record for each child item you wish to update and right click on the selection
11) Click on Copy Parent’s note to children ( or copy parent’s image to children if you wish to copy the image)
12) Click OK
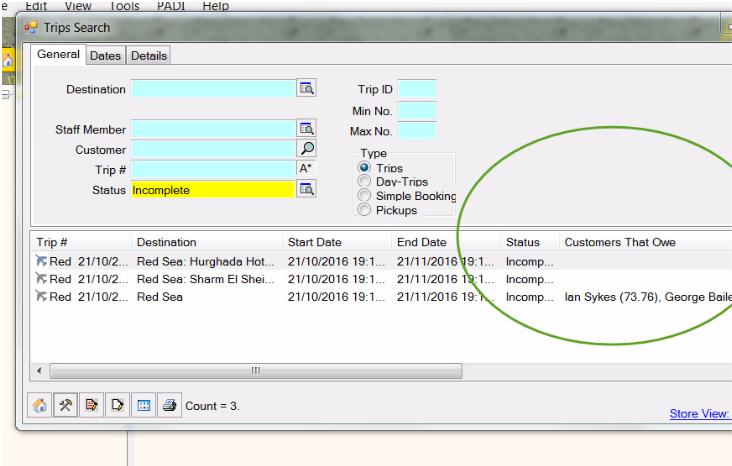
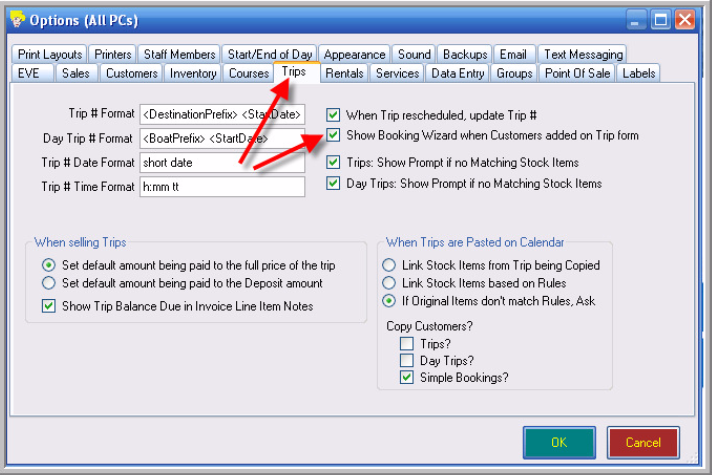
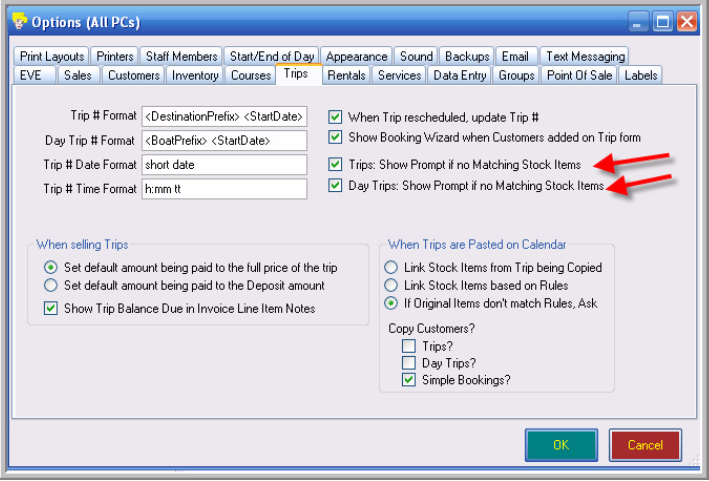
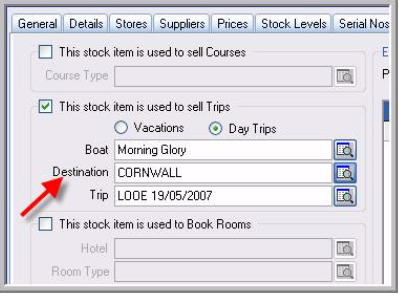
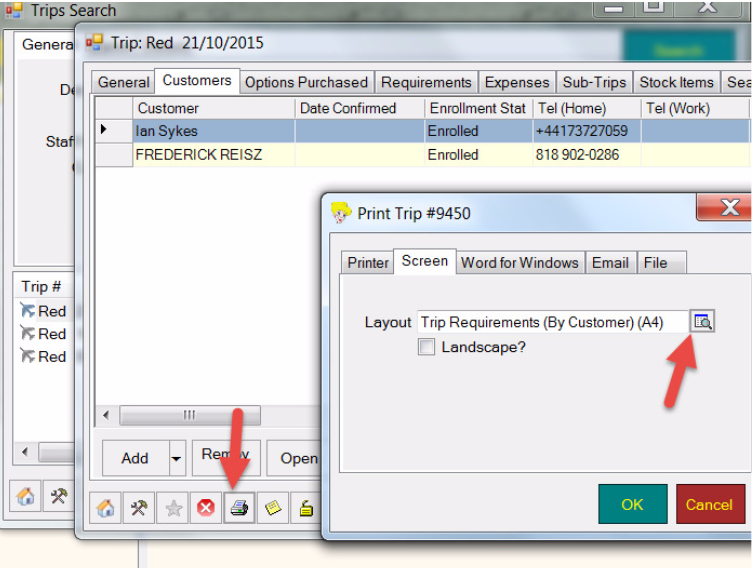
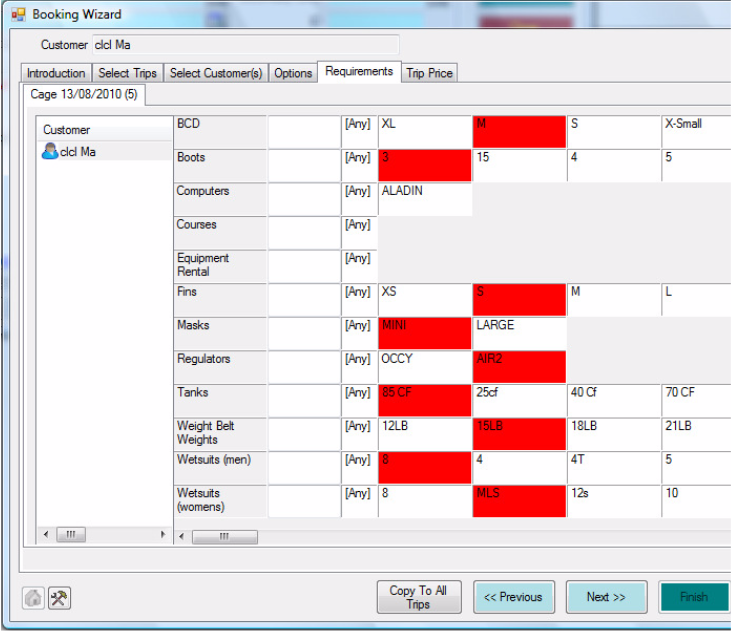
Trips

Troubleshooting
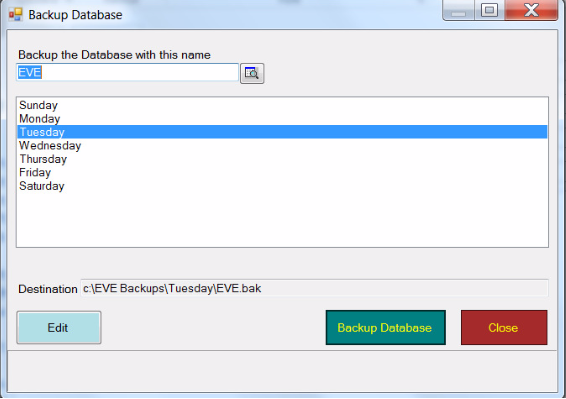
You can backup from the EVE DB Utilities program.
Then:
Then:
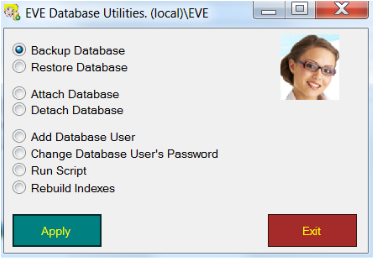
Then:

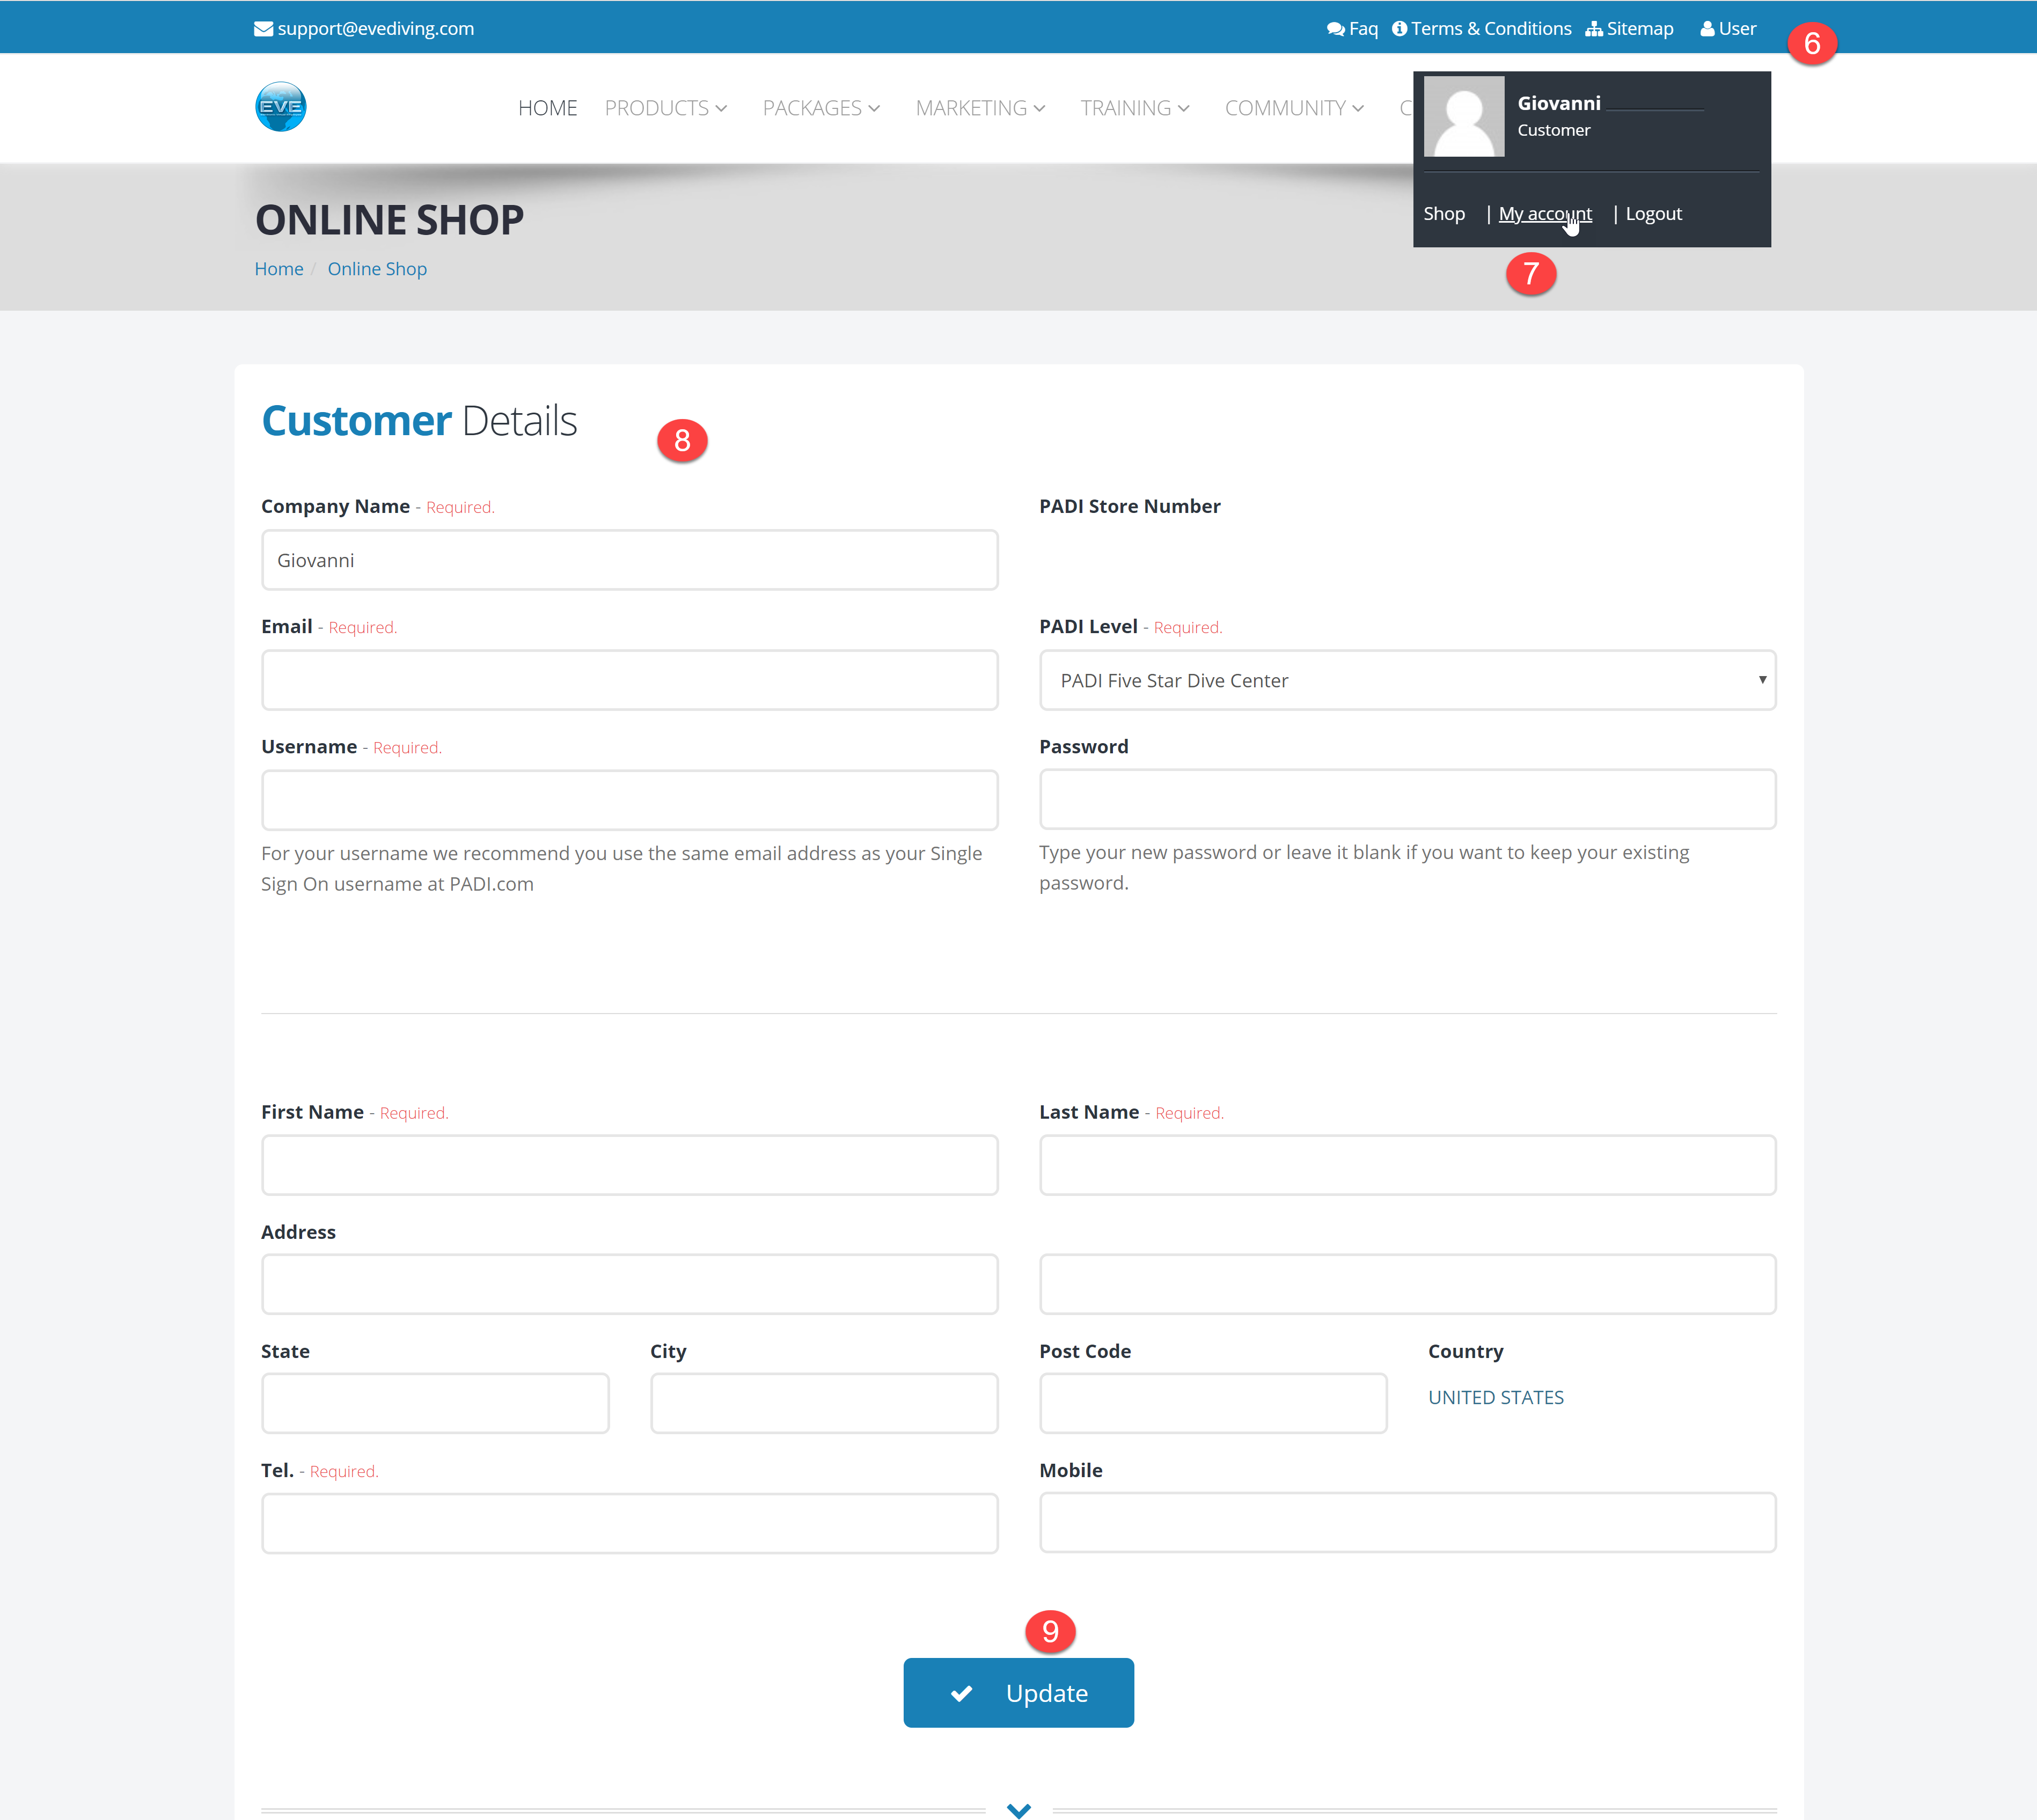
To update your contact details on our evediving.com website please follow this procedure:
1) Visit our website evediving.com
2) Click the Sign In link
3) Type your username
4) Type your password
5) Click the Sign In button
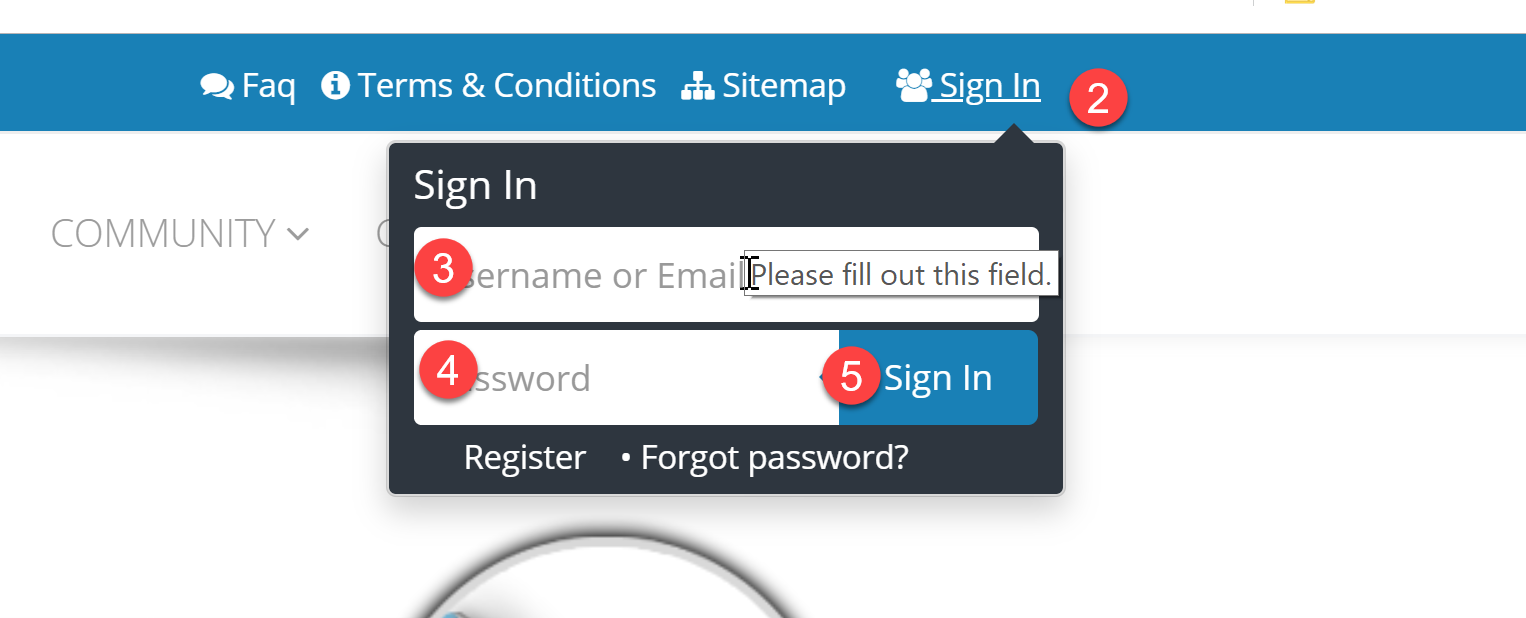
6) Click the User link
7) Click My Account
8) Fill in required fields. Fill in other fields as you see fit
9) Click Update
The setup of EVE on your desktop PC requires the installation of 2 components:
- EVE Server
- EVE client
In the unlikely case EVE setup wizard fails to install the server component, this tutorial will help you complete the procedure manually.
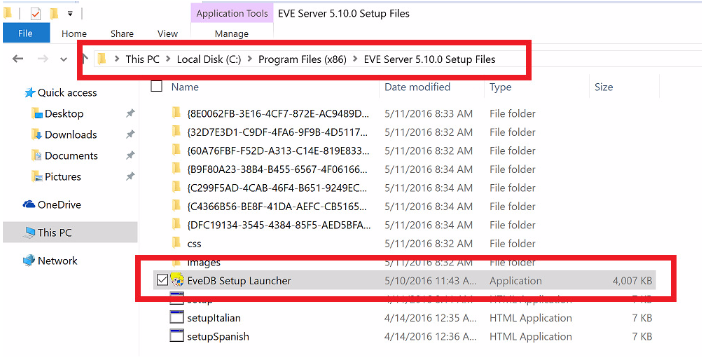
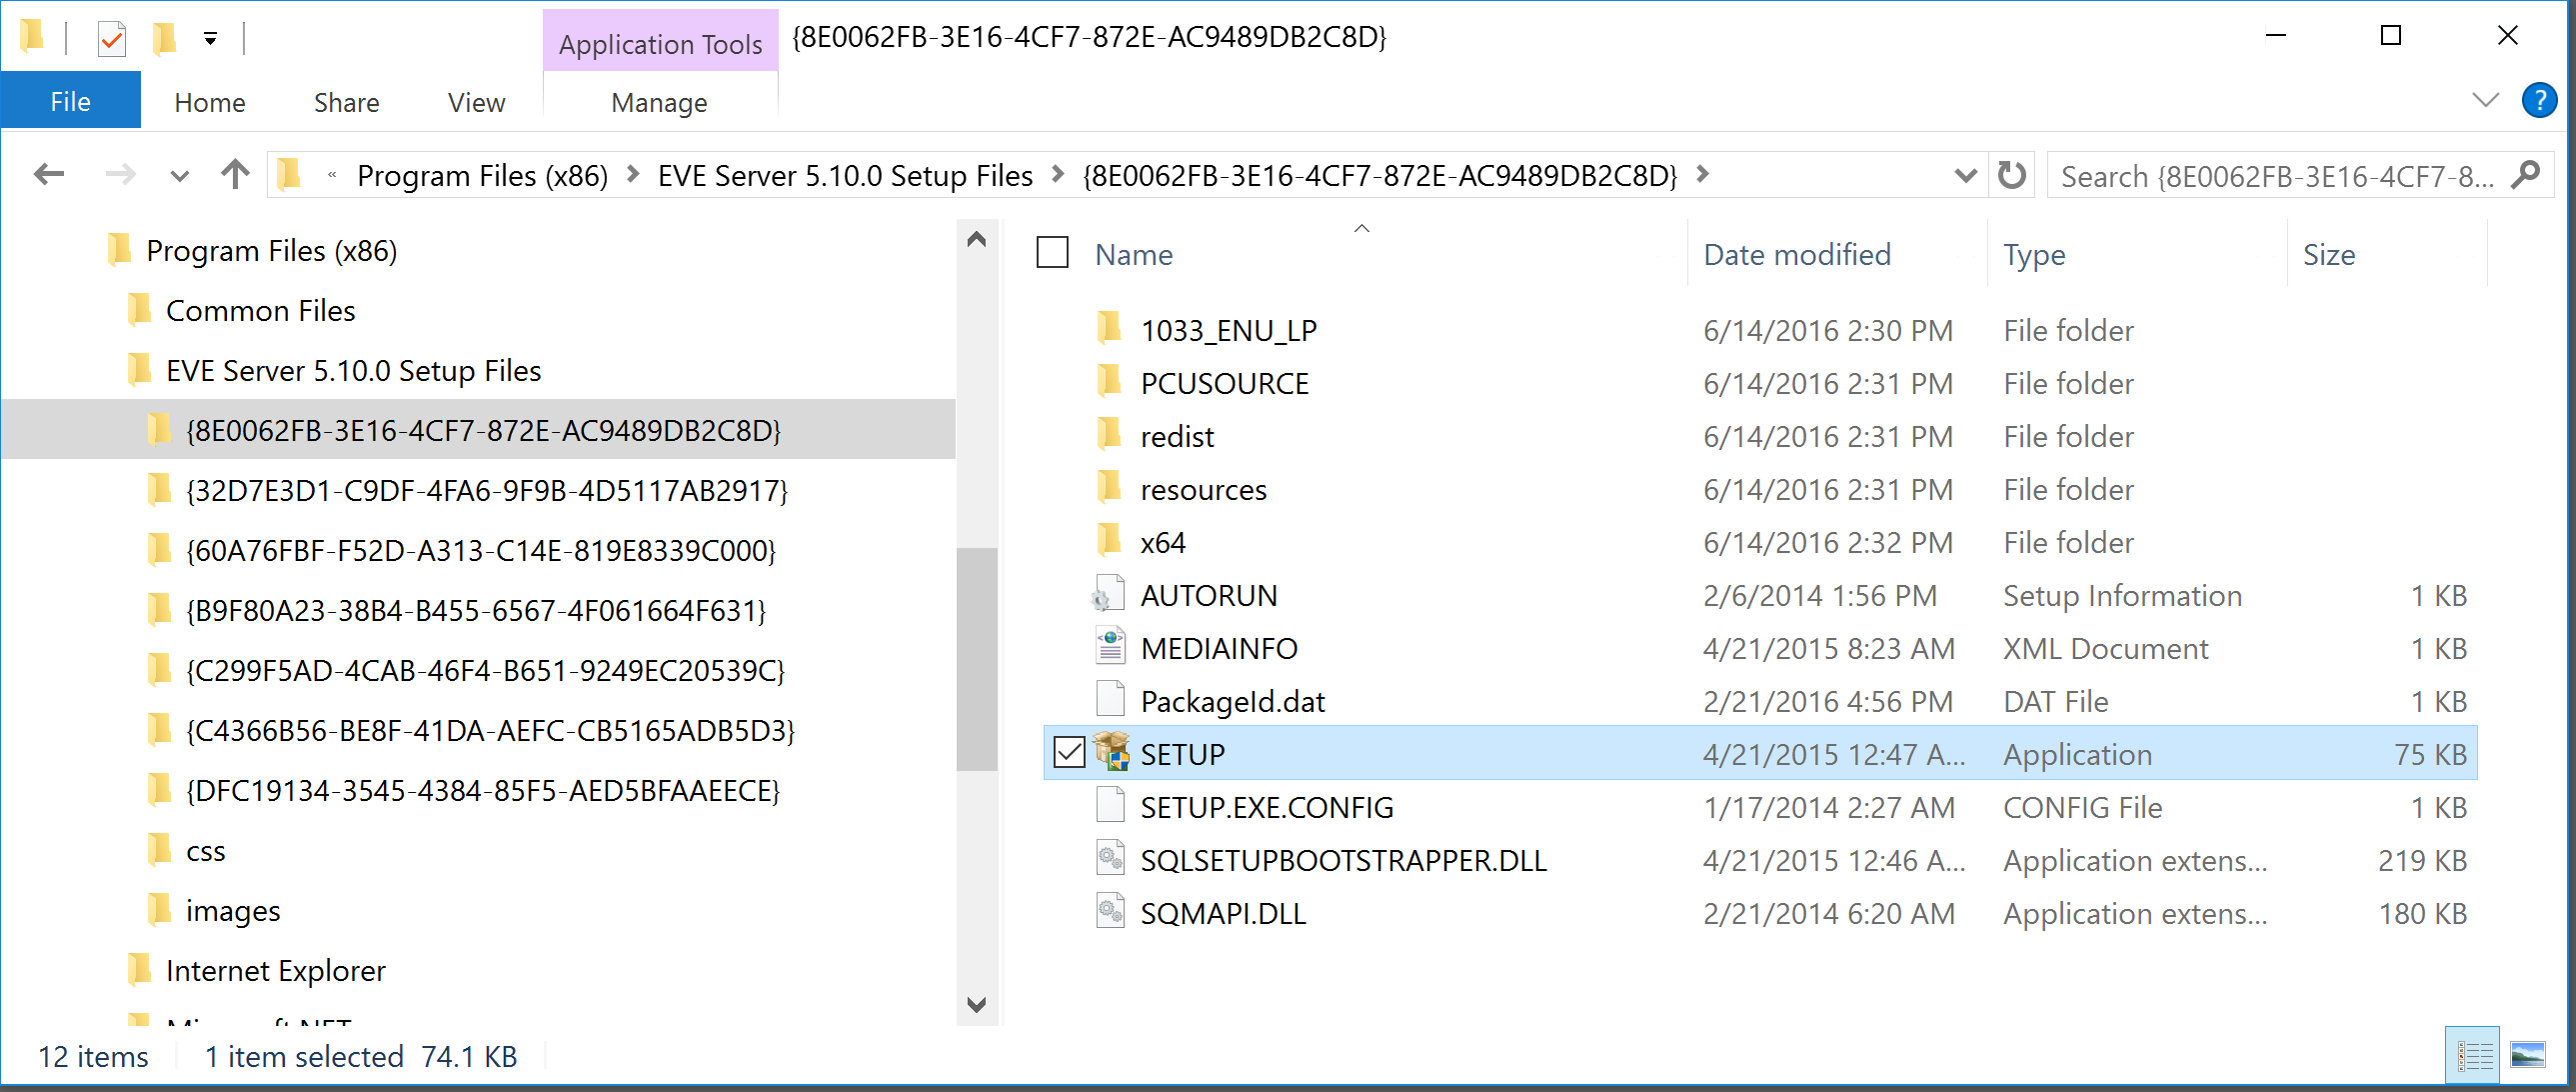
1) Open Windows Explorer
2) Browse your PC to C:\Program Files (x86)\EVE Server 5.XX Setup Files, where XX represents the value of the EVE version being installed
3) Open the folder named {8E0062FB-3E16-4CF7-872E-AC9489DB2C8D}”
4) Double click on the SETUP file to lauch the installation
5) Click on New SQL Server stand-alone installation or add features to existing installations

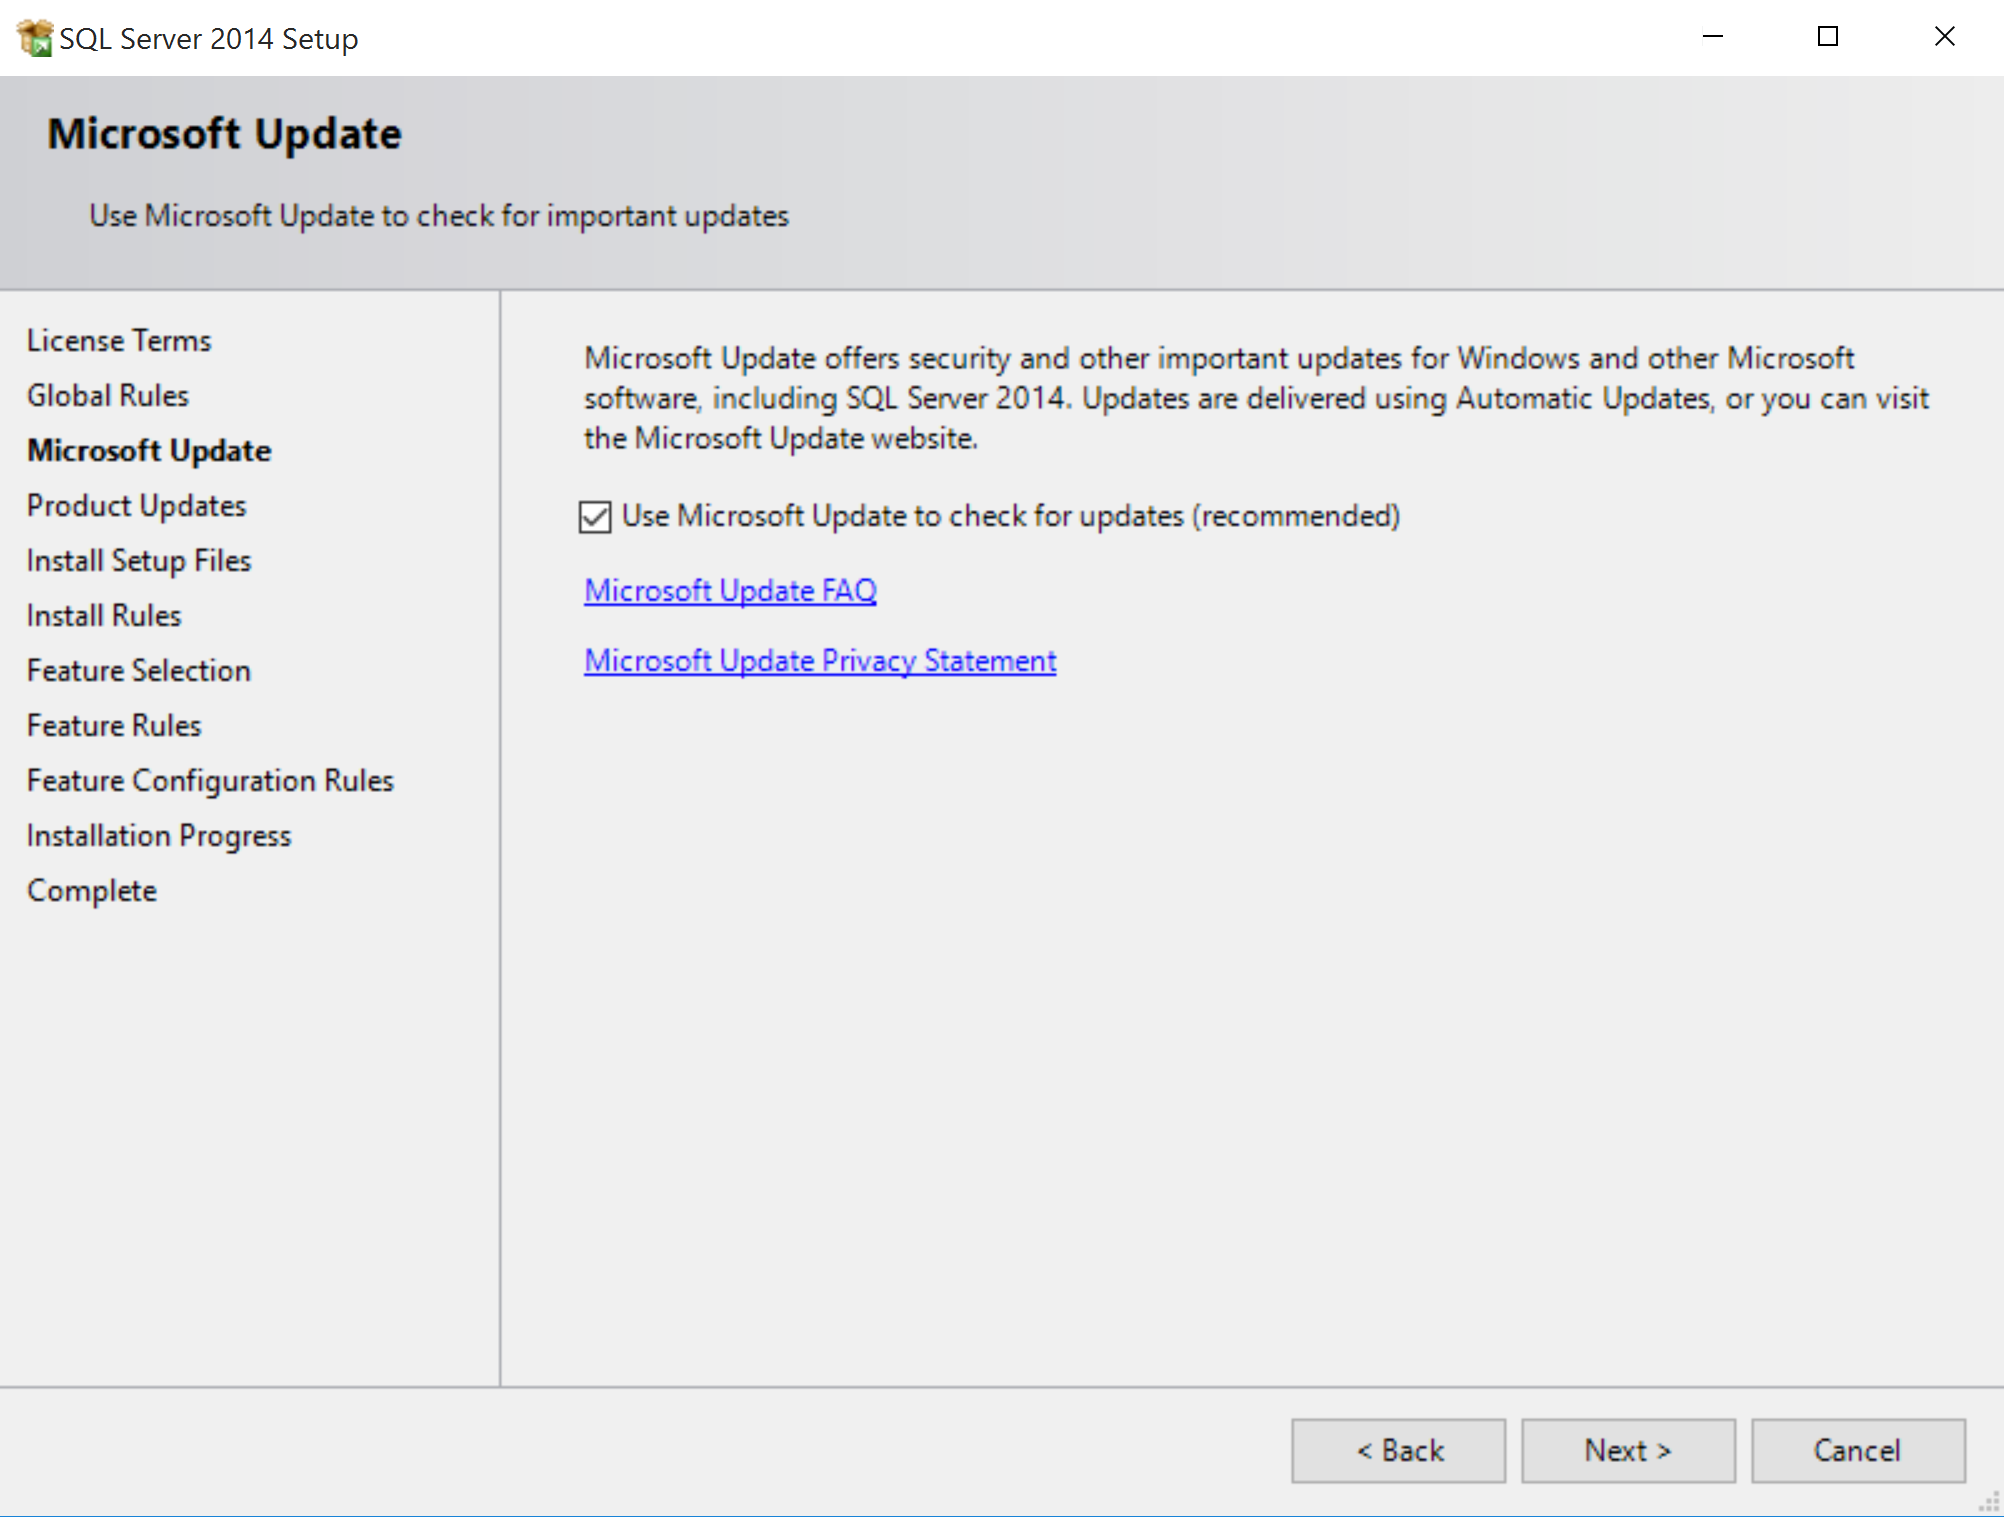
6) Check the I accept the licence terms and click Next

7) Click Next again
8) Check Options and installation folders. Click Next.

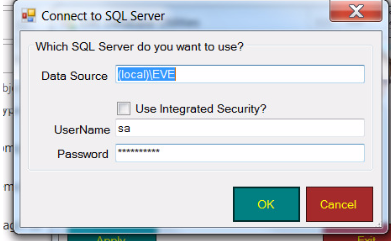
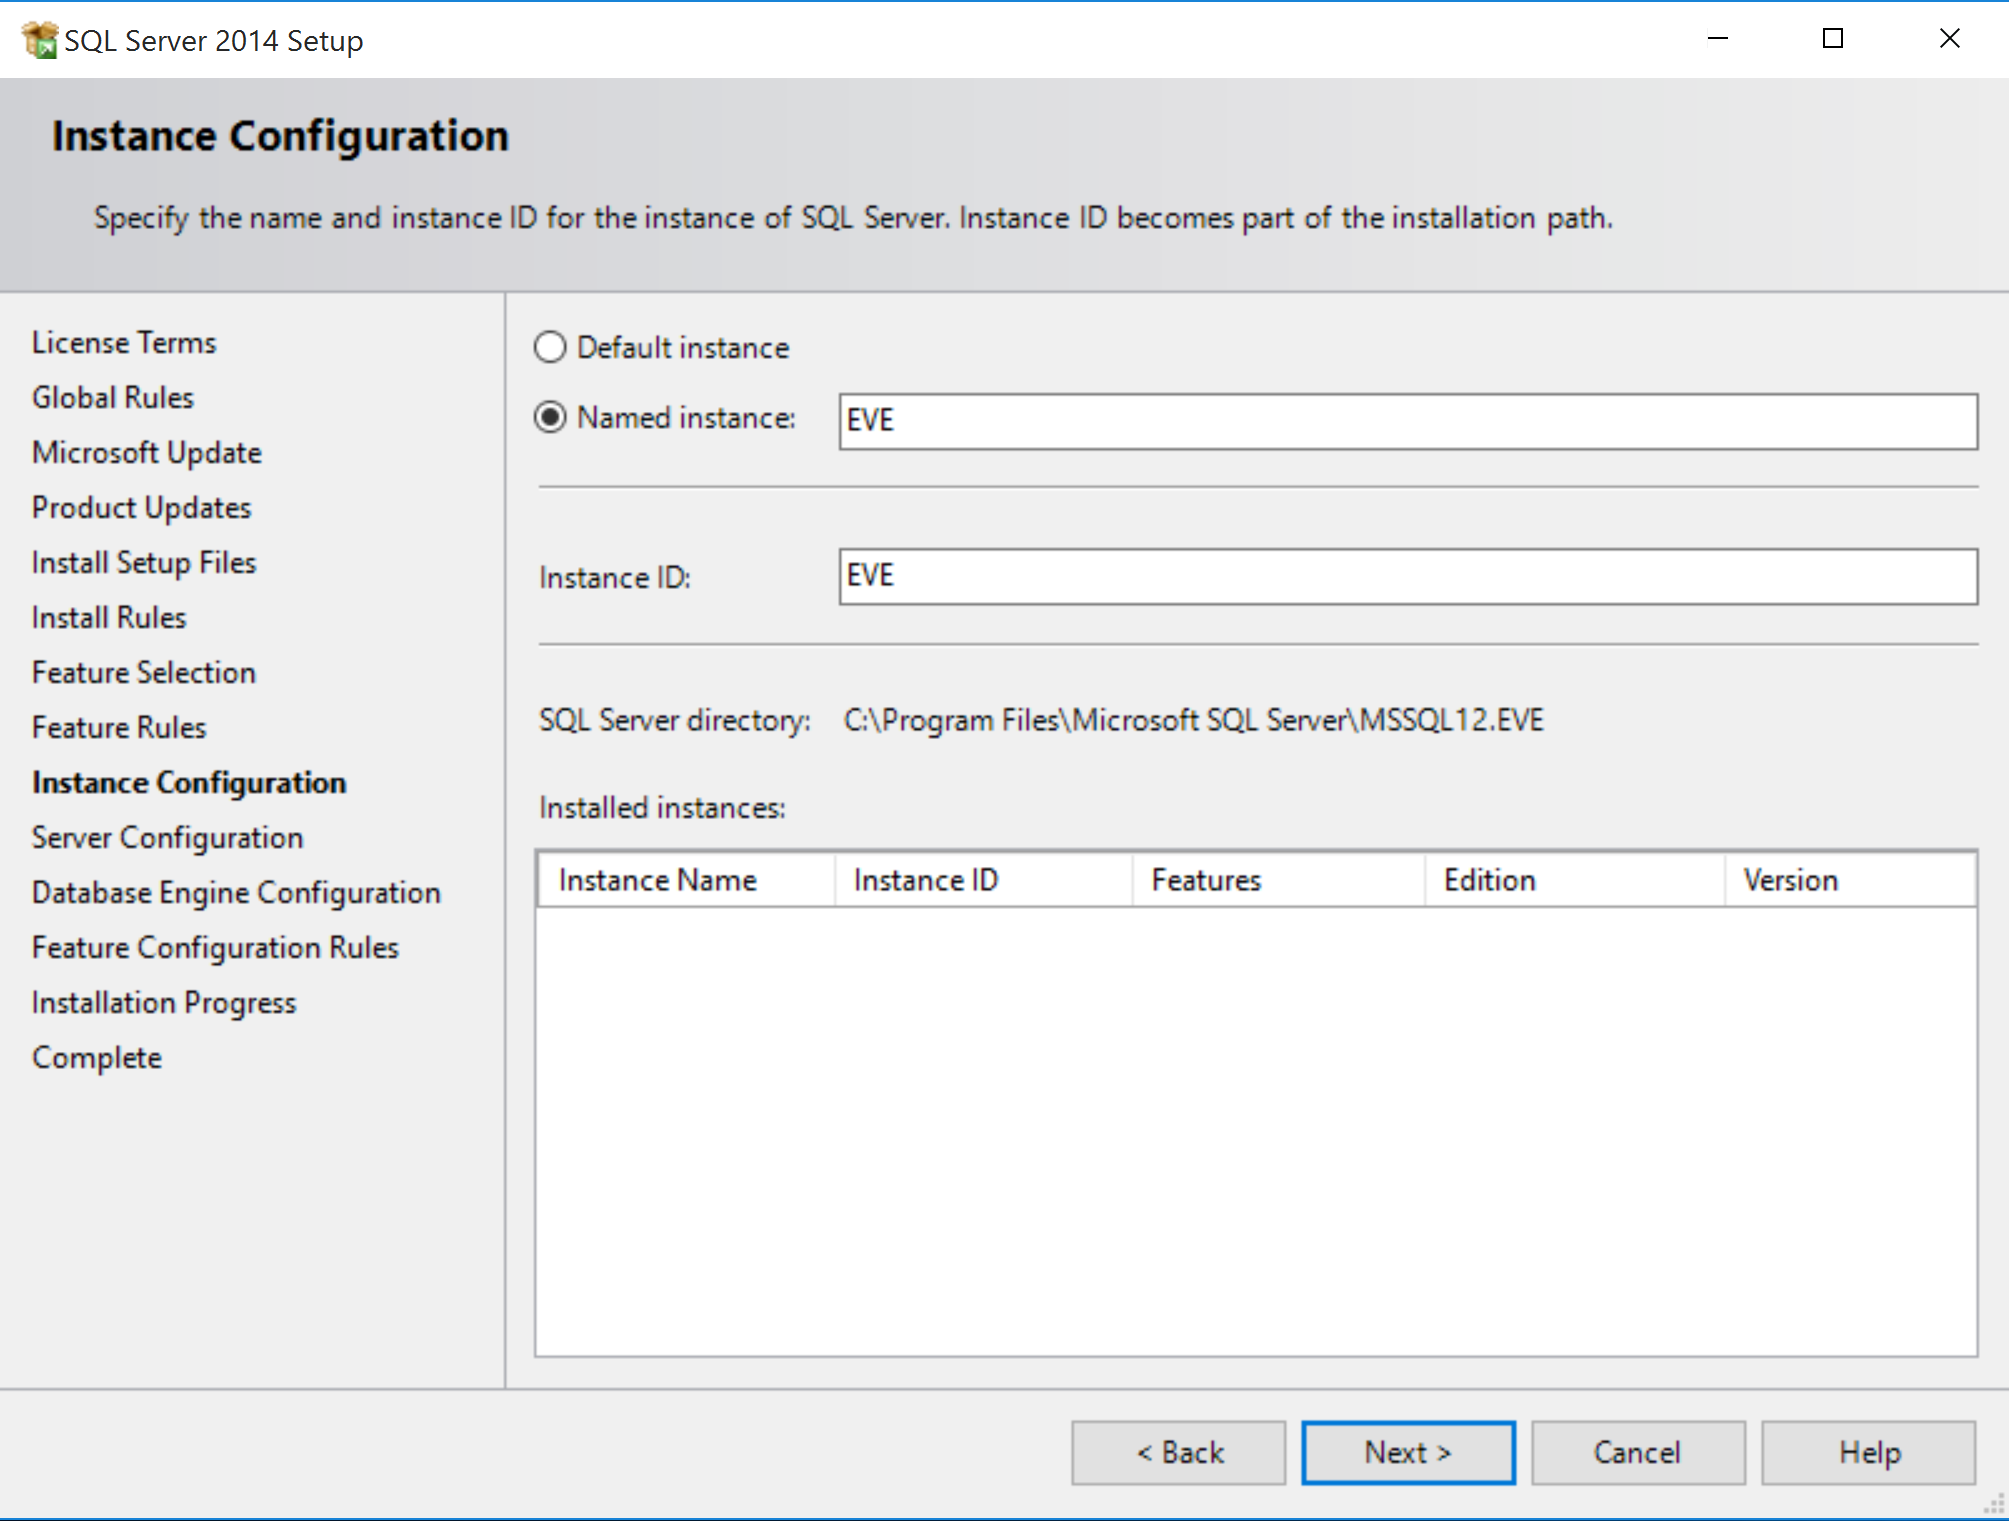
9) Select Named Instance EVE and set Instance ID to EVE. Click Next.
10) Click Next

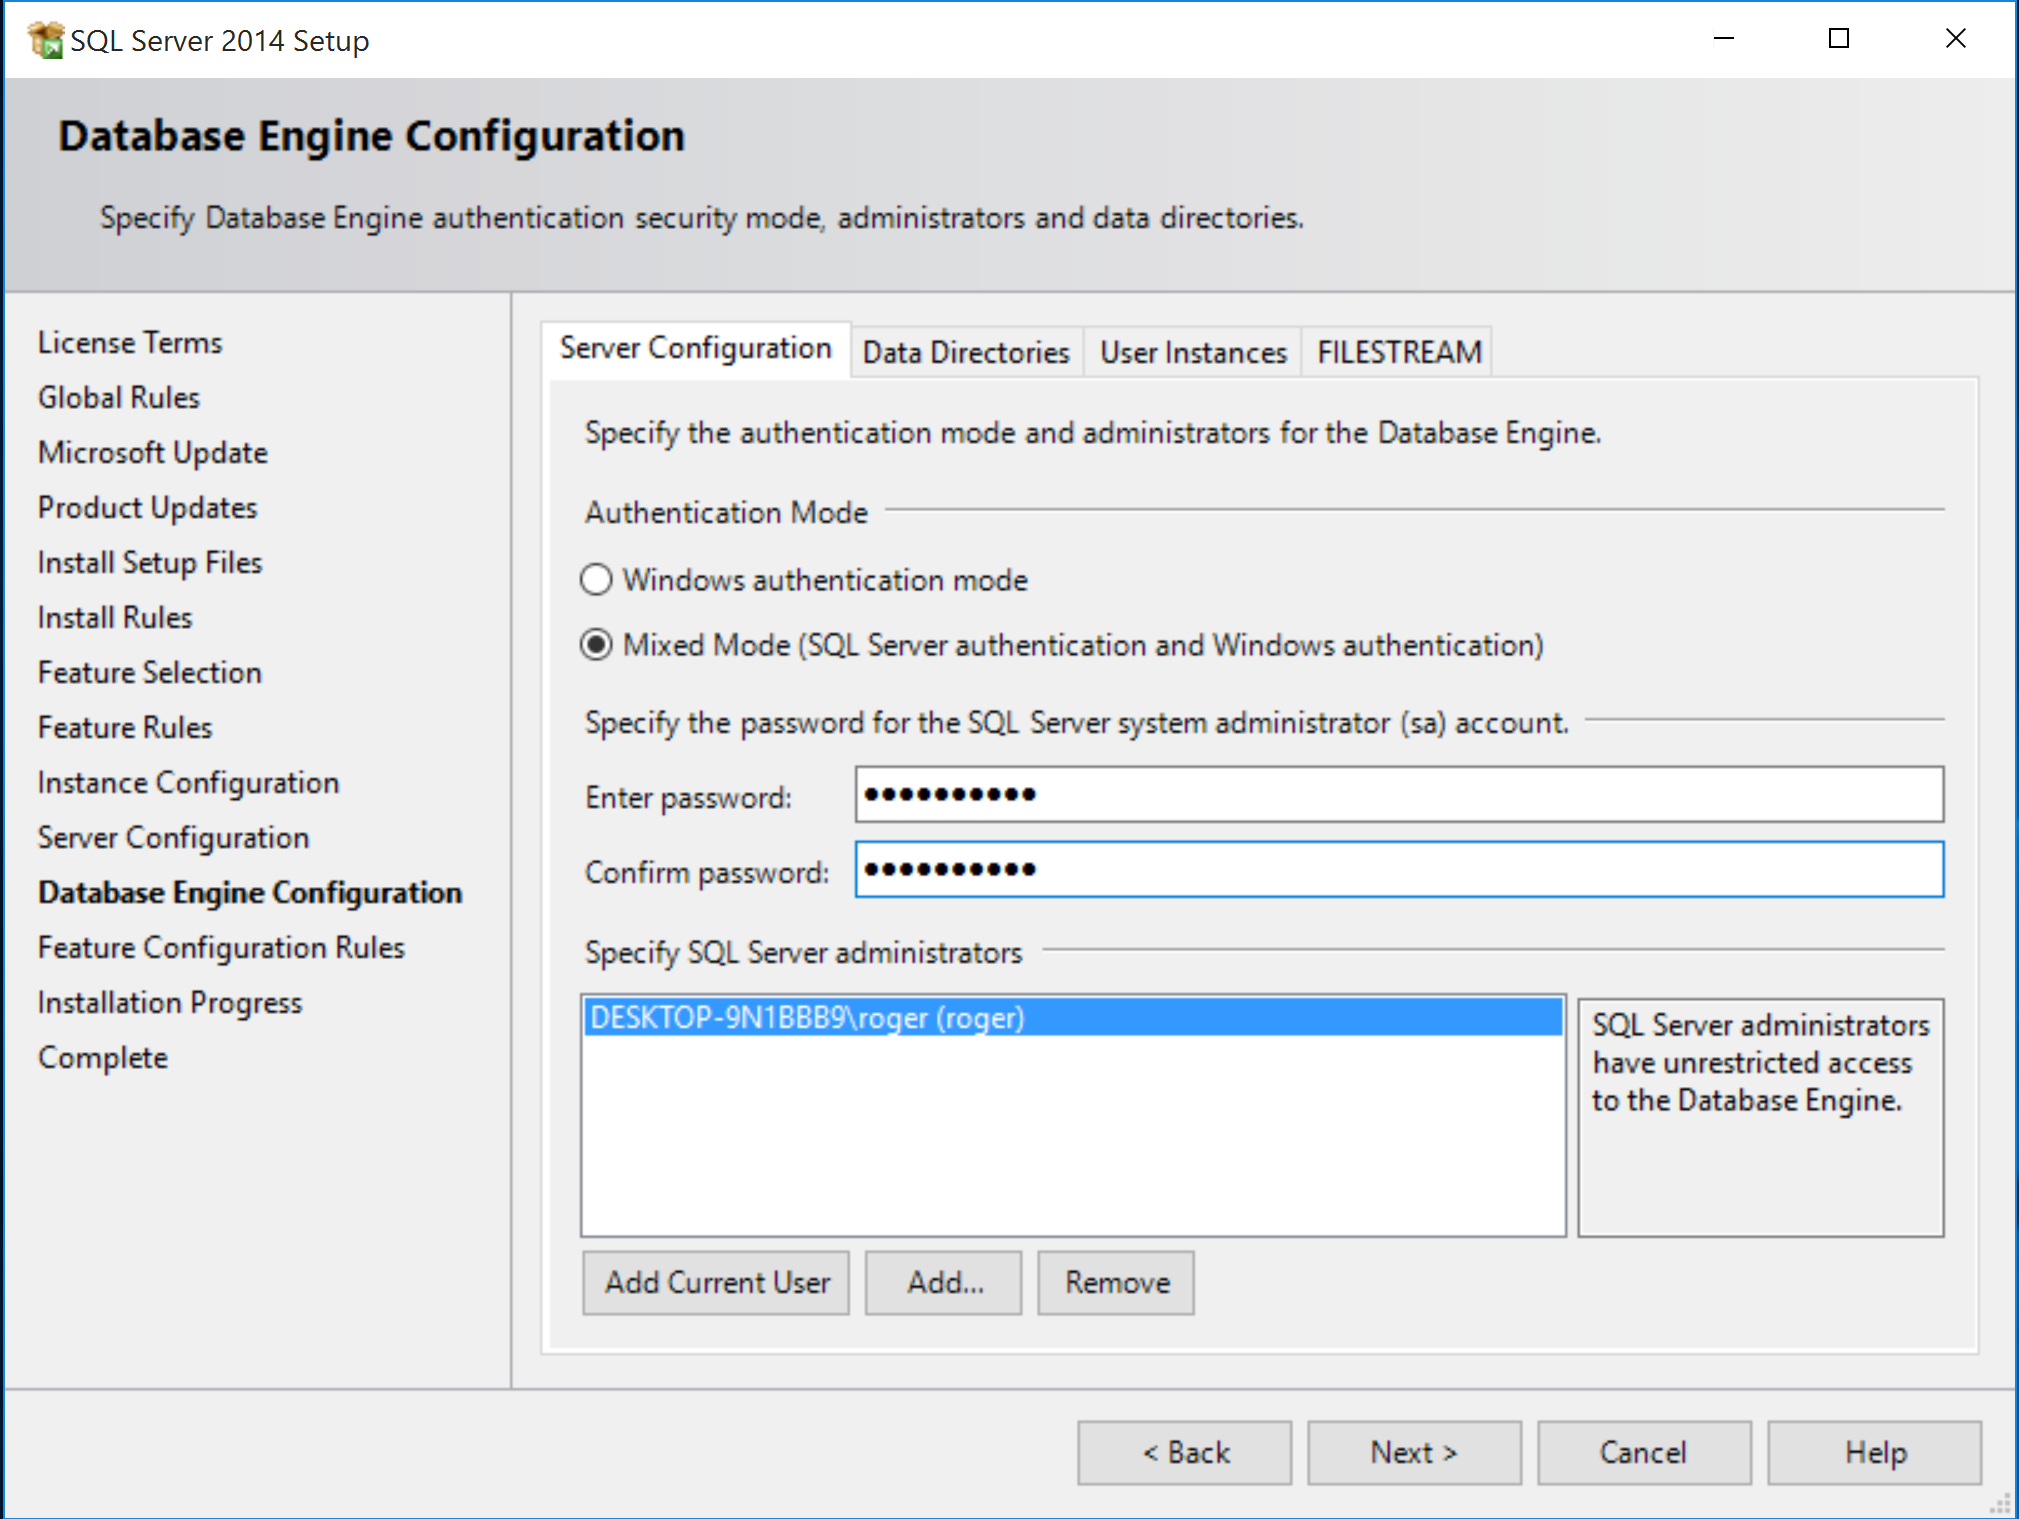
11) Check the Mixed Mode option and enter the password: Dracu1a_99 (Please note the digit 1) and click Next.
12) The setup is completed. Click Close and launch again EVE Setup Wizard to install EVE Client component

Updating Multiple Records
In your inventory, you may have stock items that belong to the same stock type and are different only for the colour or the size.
These stock items can share the same description or image. To copy the image or description from the parent stock item to the children, follow the procedure outline below.
You will first assign a description to the Parent stock item
1) Launch EVE and click Inventory
2) Go to the Stock Item and click Find
3) Complete a Stock Item Search, by Stock Type and Manufacturer.
4) Double click on the Parent stock item
5) Click on the EVE OnLine tab
6) Click on the Product Details tab
7) Enter the Parent stock item description
8) Save the record
9) Stay in the EVE OnLine tab and click the Links Tab
10 ) Select the record for each child item you wish to update and right click on the selection
11) Click on Copy Parent’s note to children ( or copy parent’s image to children if you wish to copy the image)
12) Click OK
Video Tutorials - Clubs
This video shows how to create an auto-email for club membership renewal reminders:
This video shows how to set up a dive club and club membership types:
Video Tutorials - Course/Calendar
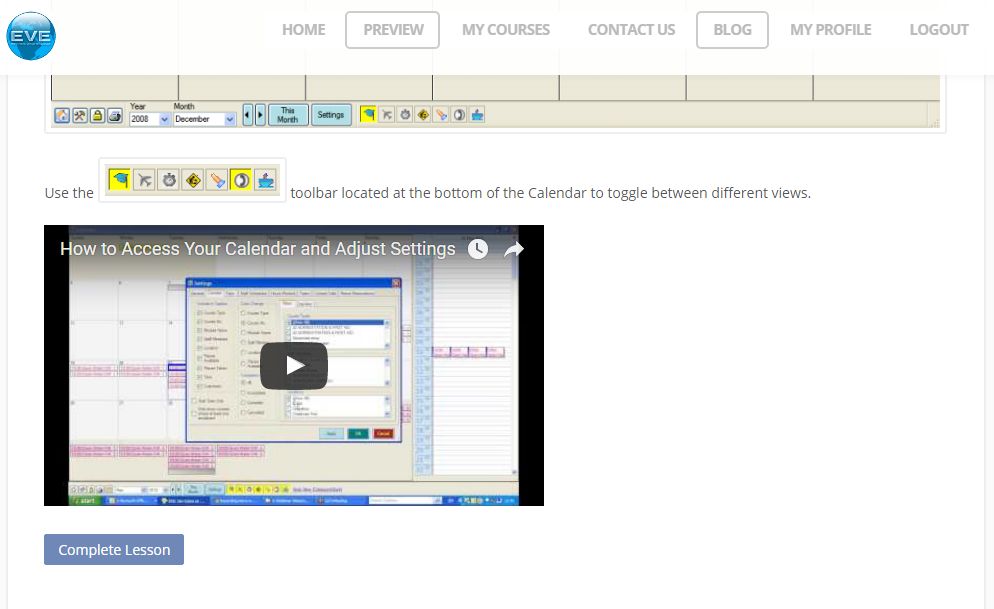
This video shows how to set up your EVE Calendar and how to adjust the settings:
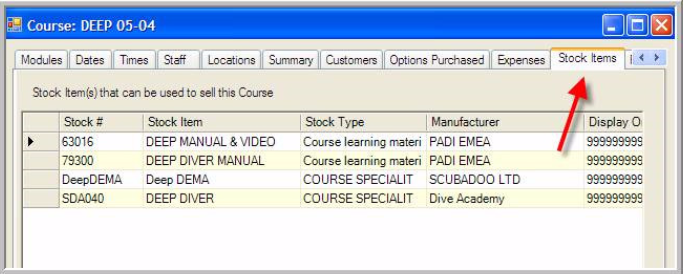
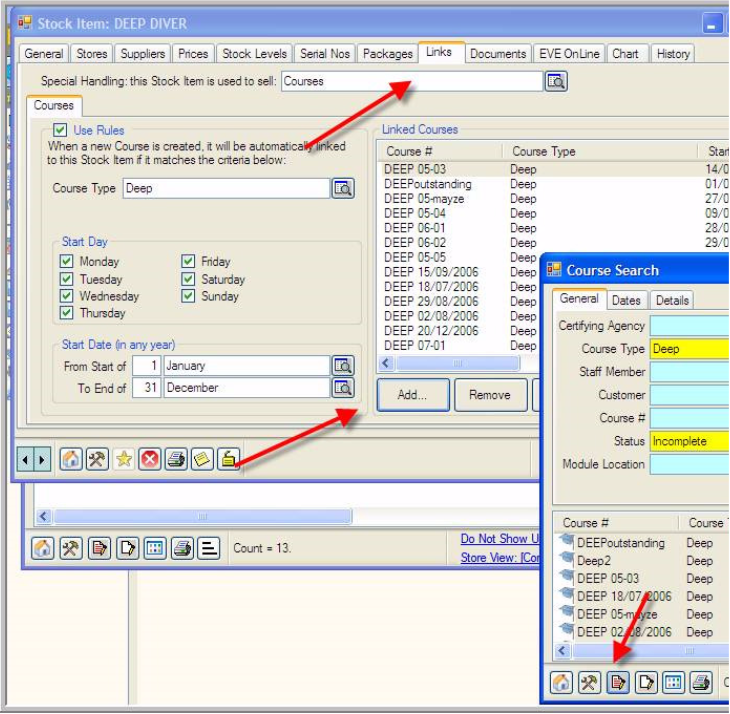
This video shows how to set up a stock item to sell a course:
Video Tutorials - Customers
This video shows how to find a customer and the customer record:
This video shows how to make Information Mandatory on a Customer Record:
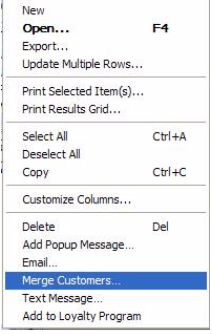
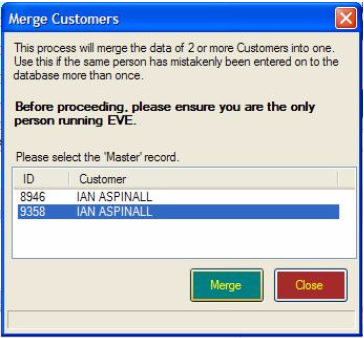
This video shows how to merge customer records using the auto merge and manual merge options:
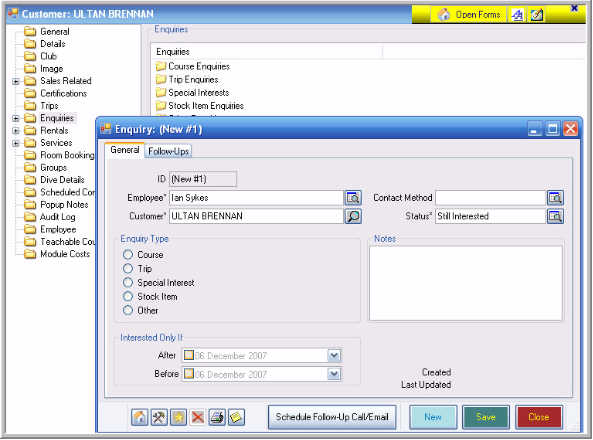
This video shows how to set up and manage customer enquiries and follow ups:
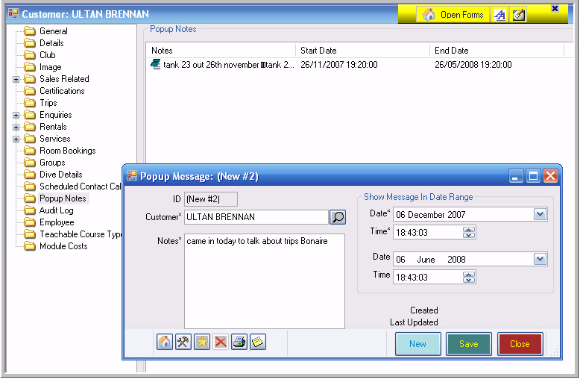
This video shows how to set up and use EVE for contact calls, reminders and popup notes:
This video shows how to use the customer search wizard for marketing:
This video shows how to set up and work out the value of an enquiry source:
Video Tutorials - Extras
Video Tutorials - Installation
This video shows how to import your PADI certification data from the file sent by PADI:
This video shows how to install the EVE Server Client onto your computer system:
This video shows how to install the EVE Server Component onto your computer system:
This video shows highlights some of the tools that EVE has to market to your customers:
This video shows how register and download EVE for the first time:
This video shows how to request your PADI certification data so that you can upload it into your EVE database:
This video shows what to expect when you set up EVE for the first time:
Video Tutorials - Inventory
This video shows how to create a flexible package of stock items for sale (equipment):
This video shows how to create a simple equipment package for sale:
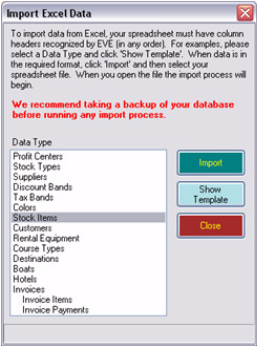
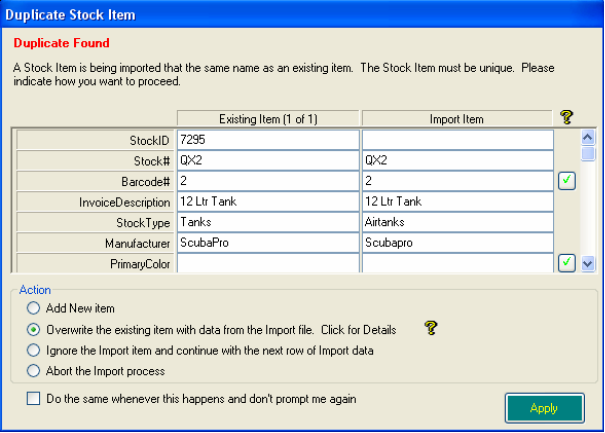
This video shows how to import a stock item import file into EVE
This video shows how to set up a supplier/manufacturer in EVE:
This video shows what a cost/profit centres and stock types/items are:
Video Tutorials - Marketing
This video shows how to create a MailChimp account and link it EVE:
This video shows how link the EVE Agent to your MailChimp account:
This video shows how to set up a new EVE Agent auto email campaign using MailChimp:
This video shows how to set up course promotions using the EVE Agent:
This video shows how to set up pre-course marketing emails using the EVE Agent:
Video Tutorials - Options
Video Tutorials - Rentals
This video shows how to gain an overview of your equipment rental:
Video Tutorials - Reports
This video shows how to use the Courses and Customers Reports under the file menu:
This video shows how to use the rentals and services reports under the file menu:
This video shows how to use the sales reports under the file menu:
This video shows how to use the sales search wizard with regard to invoices:
This video shows how to use the sales search wizard with regard to payments:
Video Tutorials - Sales
This video shows how to set up and use gift cards and gift certificates:
This video shows how to set up and use multi-sale items such as air cards:
This video shows how to set up different discount levels for different customer types:
This video shows how to set up stock types for servicing and servicing reminders:
https://youtu.be/3lyPyFNmXYo
This video shows how to set up your invoice template, the print action and eReceipt:
Video Tutorials - Servicing
This video shows how to complete a service booking and send it to an invoice:
This video shows how to send out automatic servicing reminders:
This video shows how to set up stock types for servicing and servicing reminders:
https://youtu.be/3lyPyFNmXYo
Video Tutorials - Trips
This video shows how to create an auto-email to be sent to trip customers: