FAQ Categories Archives: EVE Websites

EVE website popup form

This tutorial will provide you with the instructions to create a popup form on your EVE website.
The feature is available exclusively with an EVE Website.

The popup form will run the following automatic tasks:
1) Collect the Student data details, required to assign the free eLearning code
2) Create a customer record in EVE, for the student
3) Add the student to a generic course date, in EVE
4) Send the OW eLearning Section 1 free code to the student

To create the popup form:
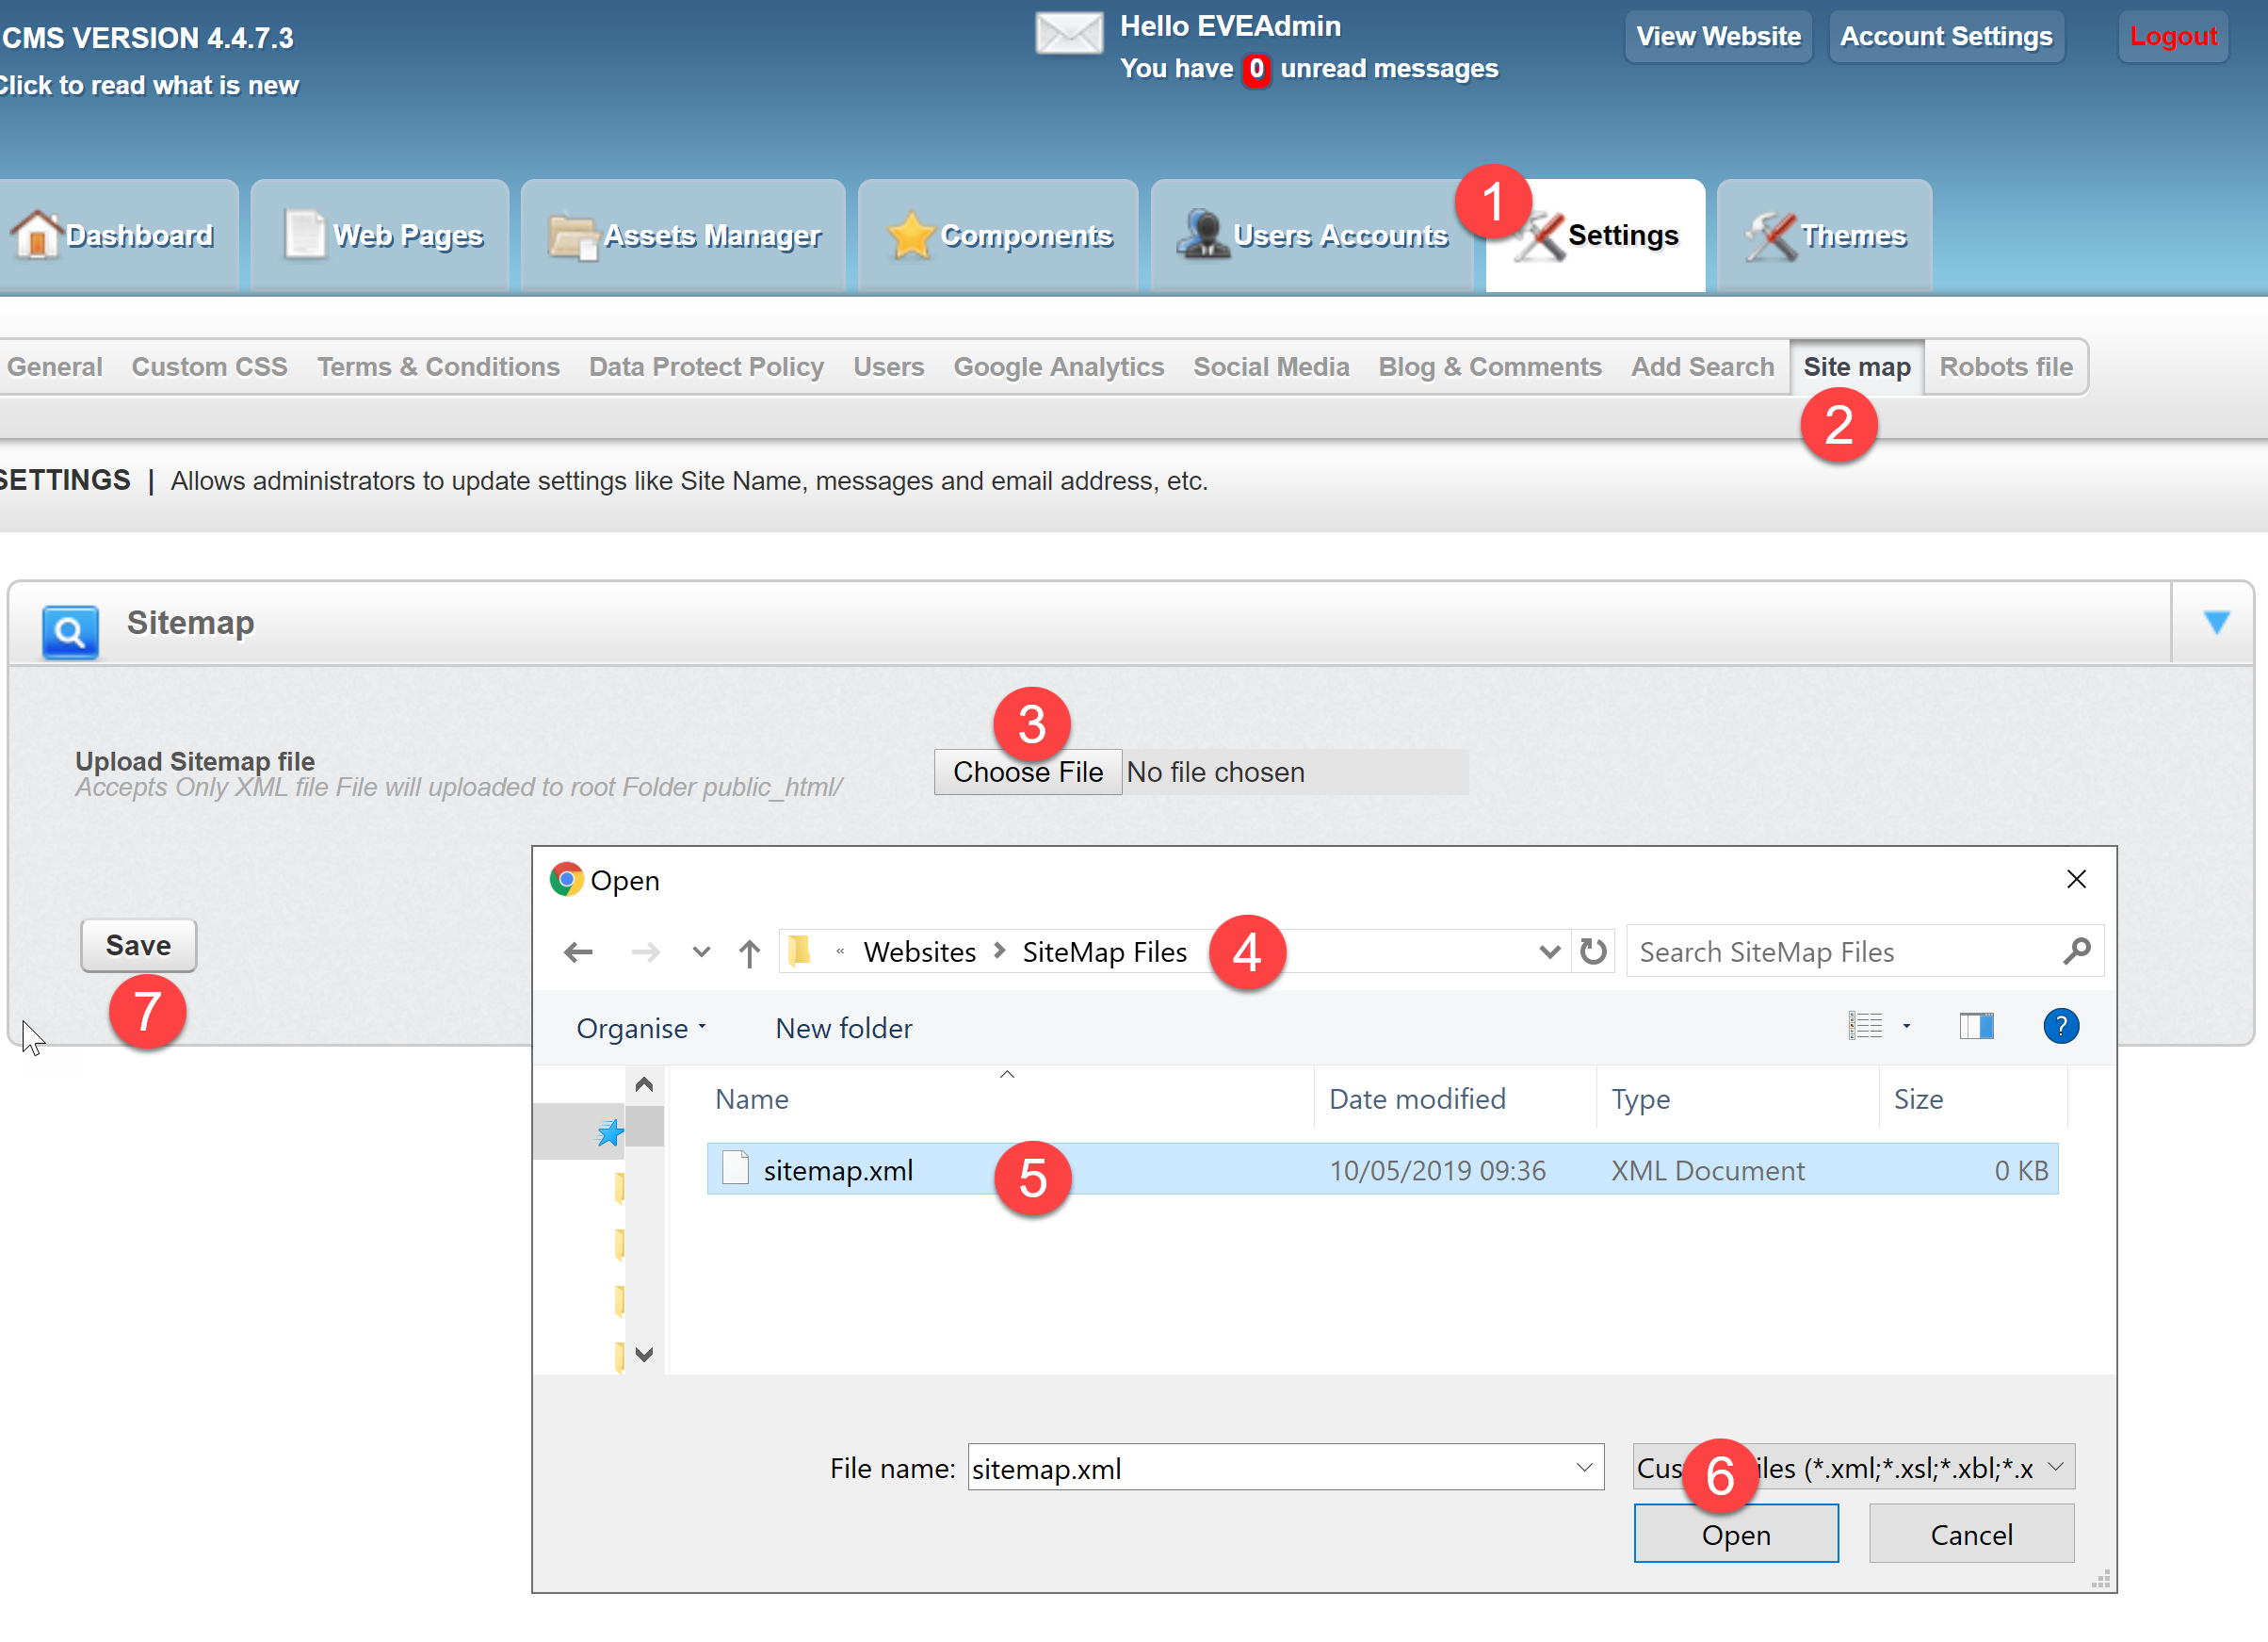
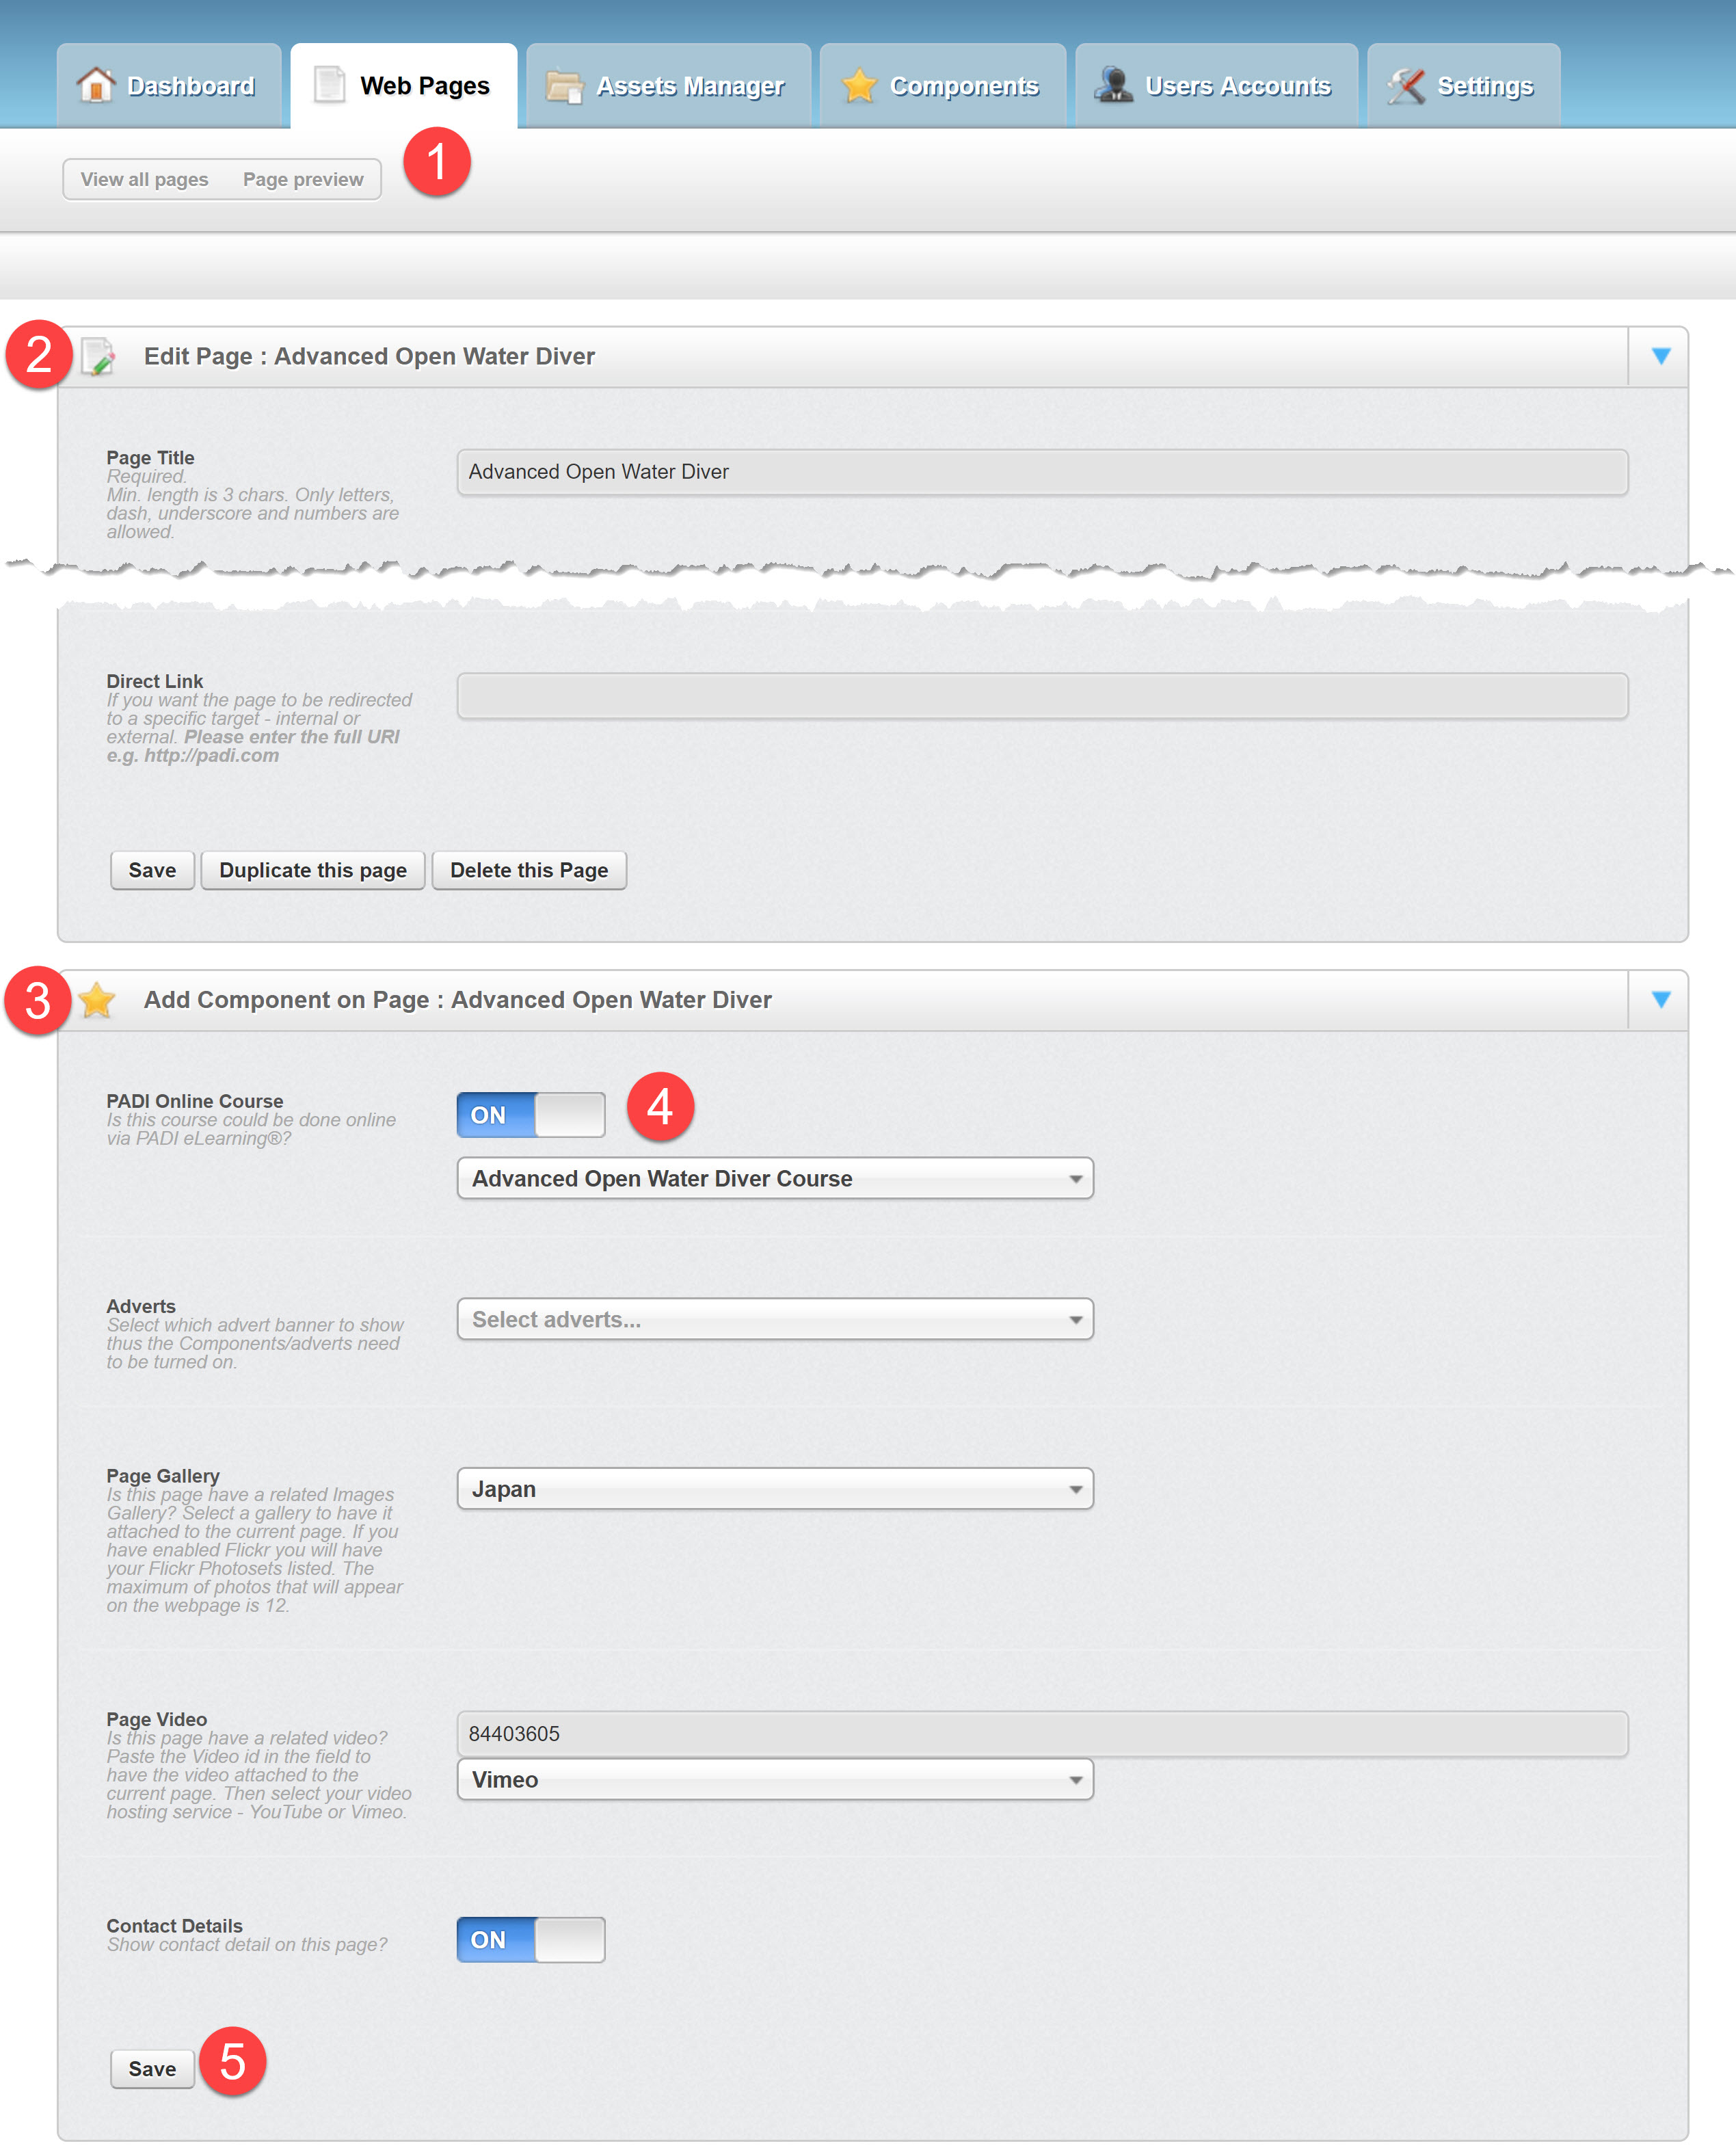
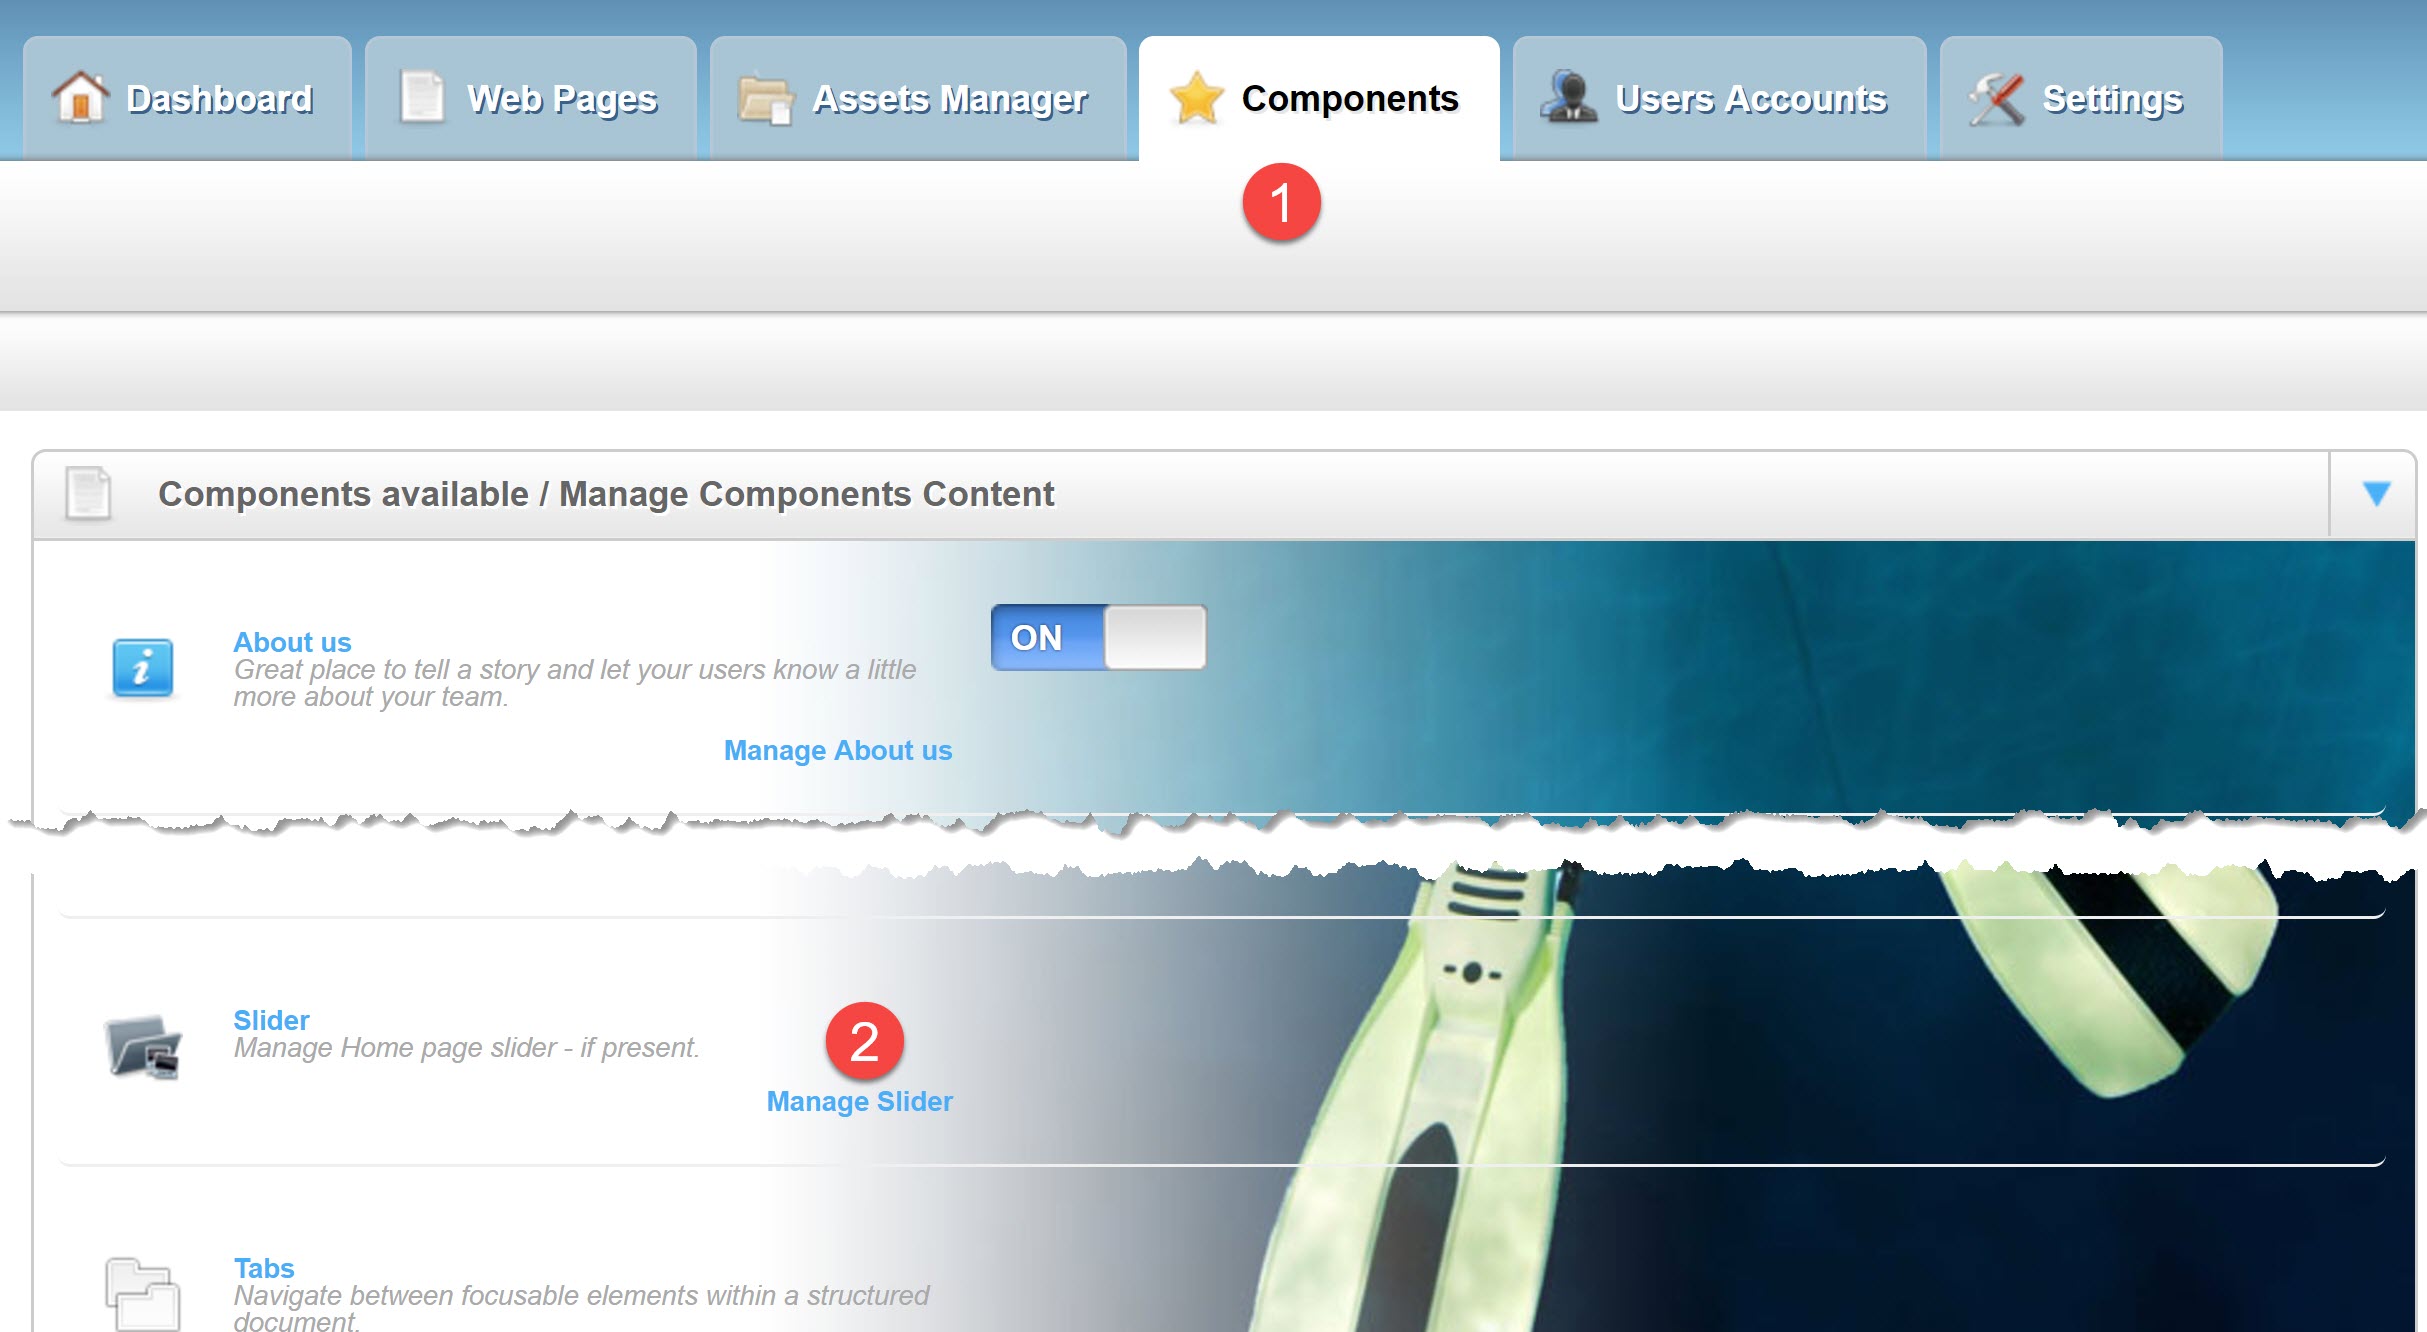
1) Launch your EVE website, login to the CMS and click the Components tab

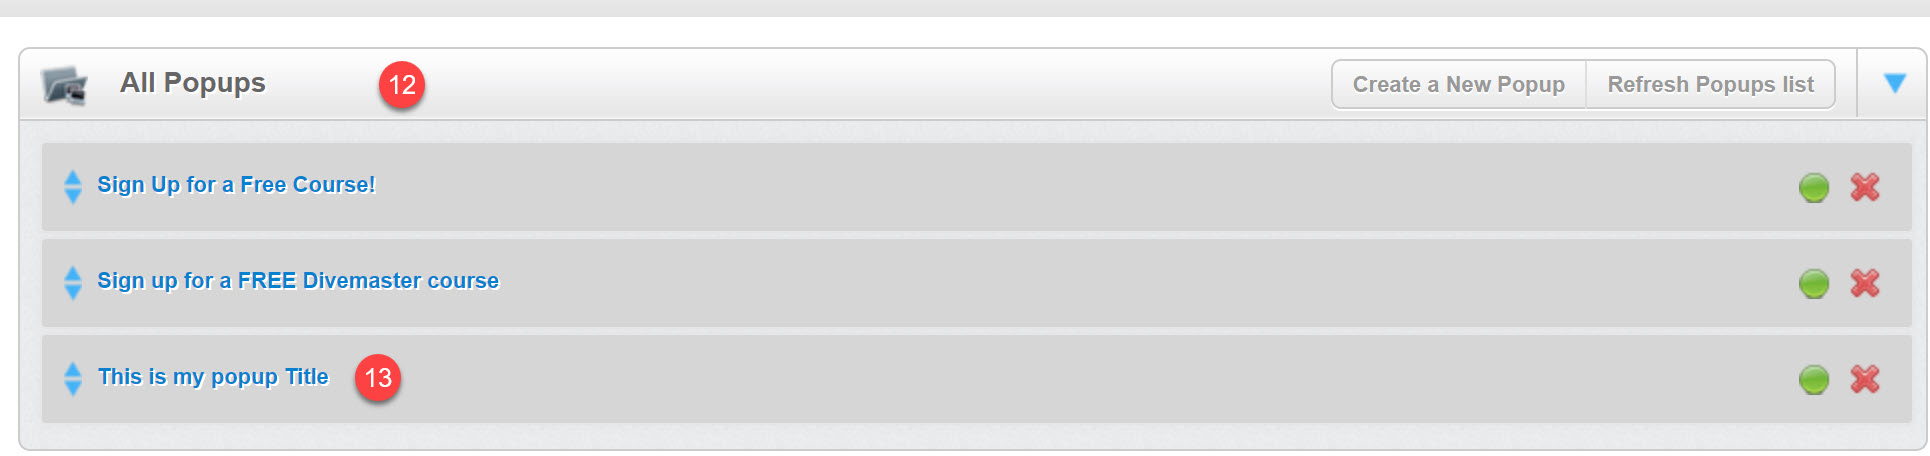
2) Scroll down and click on Manage popups

3) Click the Create a New Popup button

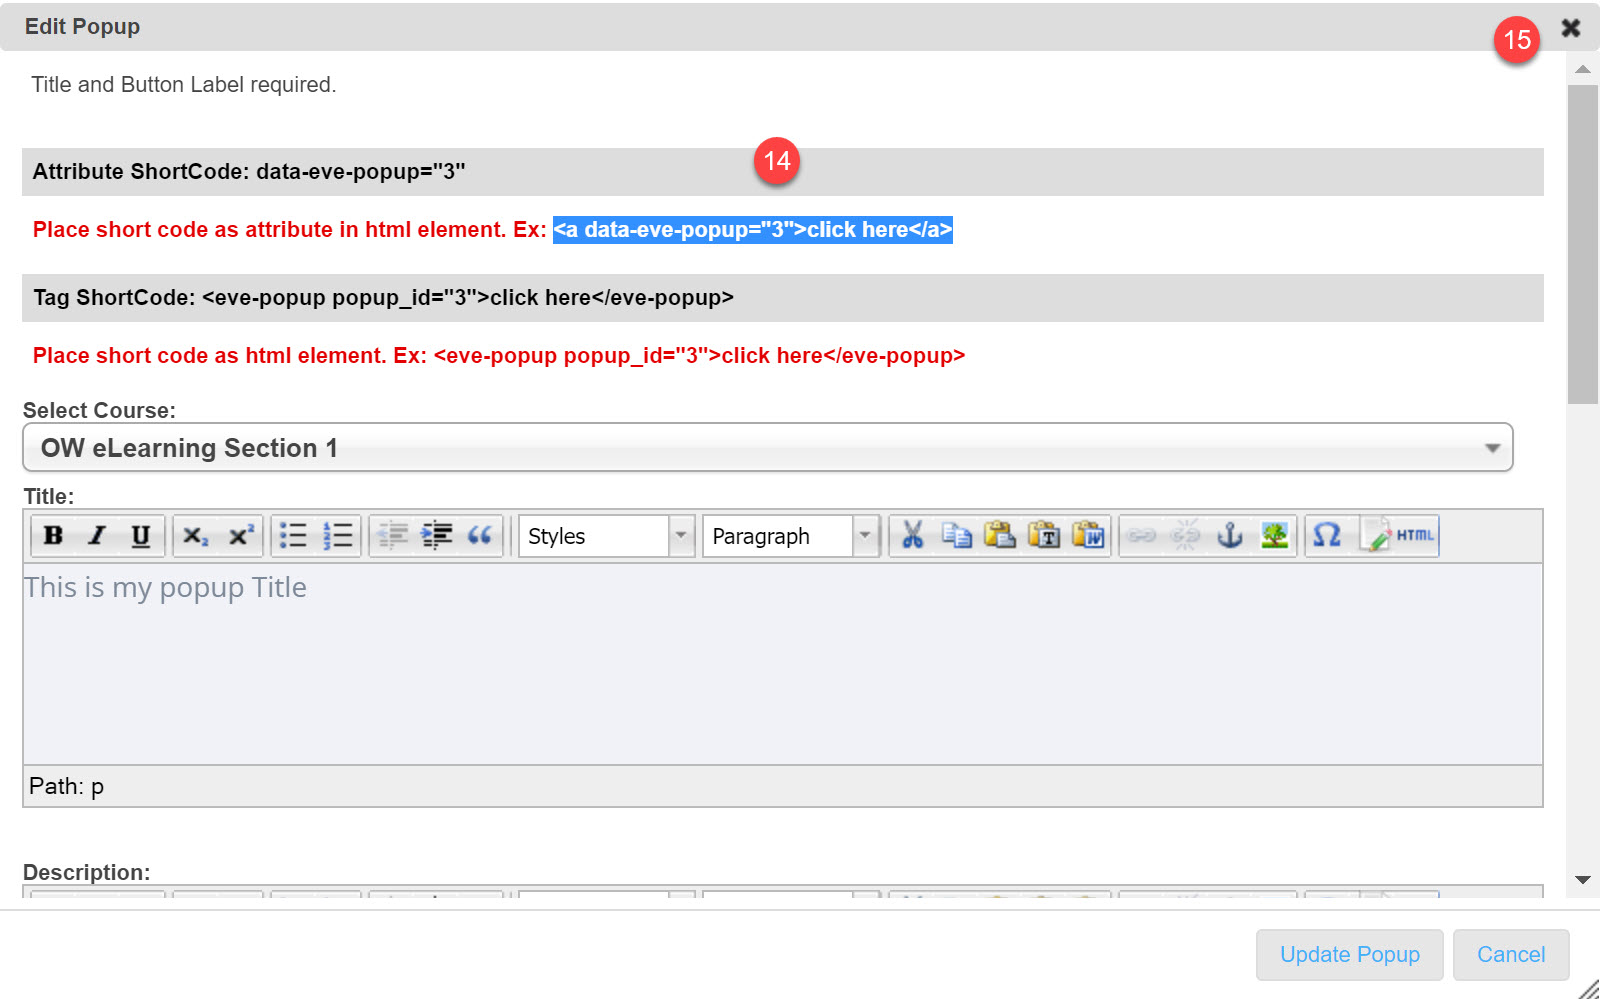
4) Set the Course type to OW eLearning Section 1 or any available free section
5) Set the popup Title
6) Set the popup description
7) Scroll down for further fields


8) Type the message to display on successfully submitting the popup
9) Type the button label. It can be set, for example, to Send or Submit
10) Type your Footer text
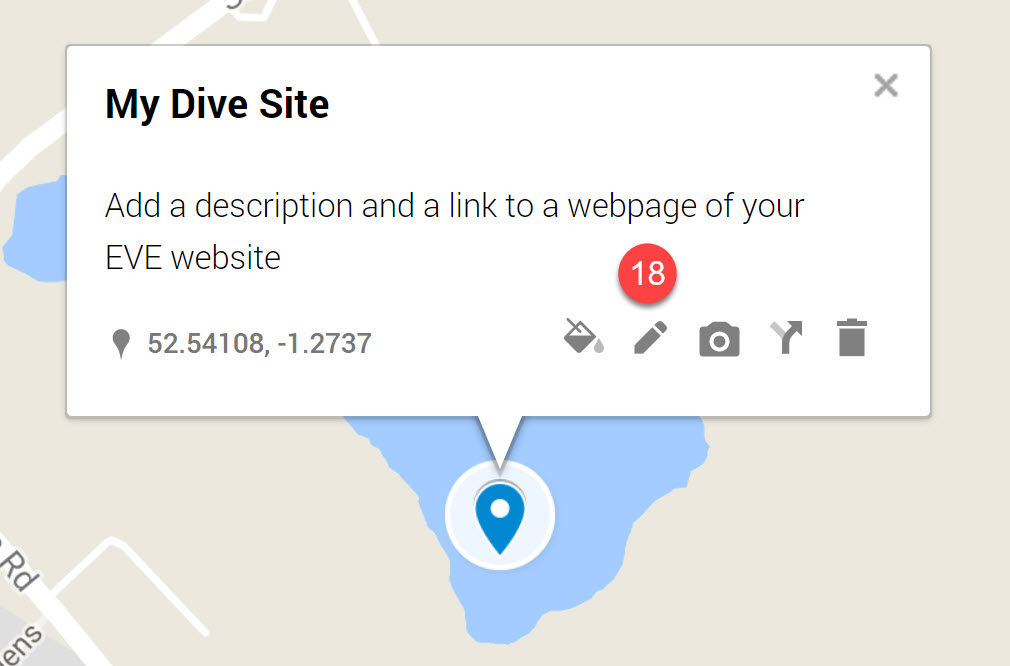
11) Click Update Popup


12) Return to the popup list
13) Click on your newly created popup record


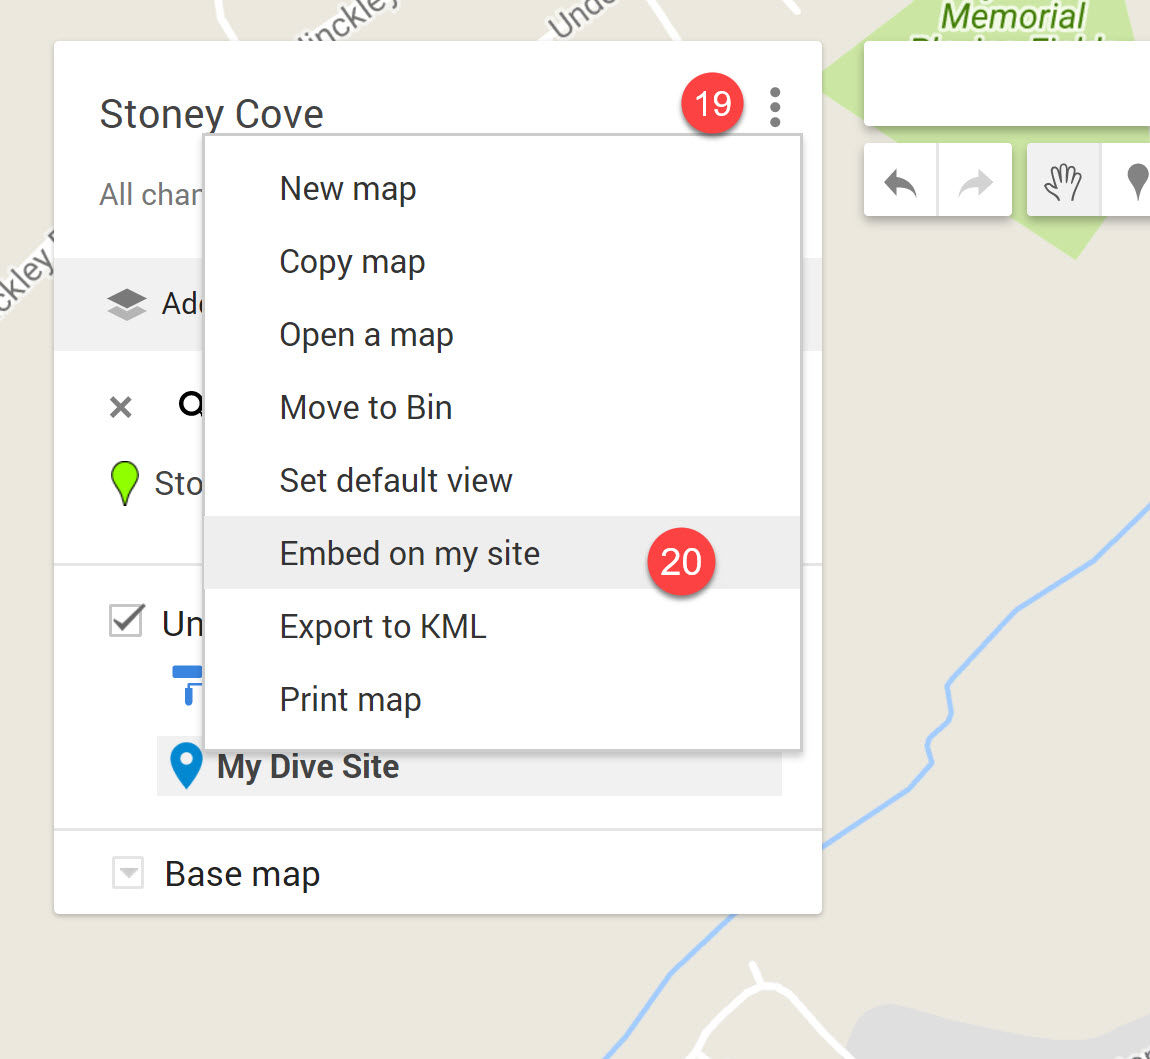
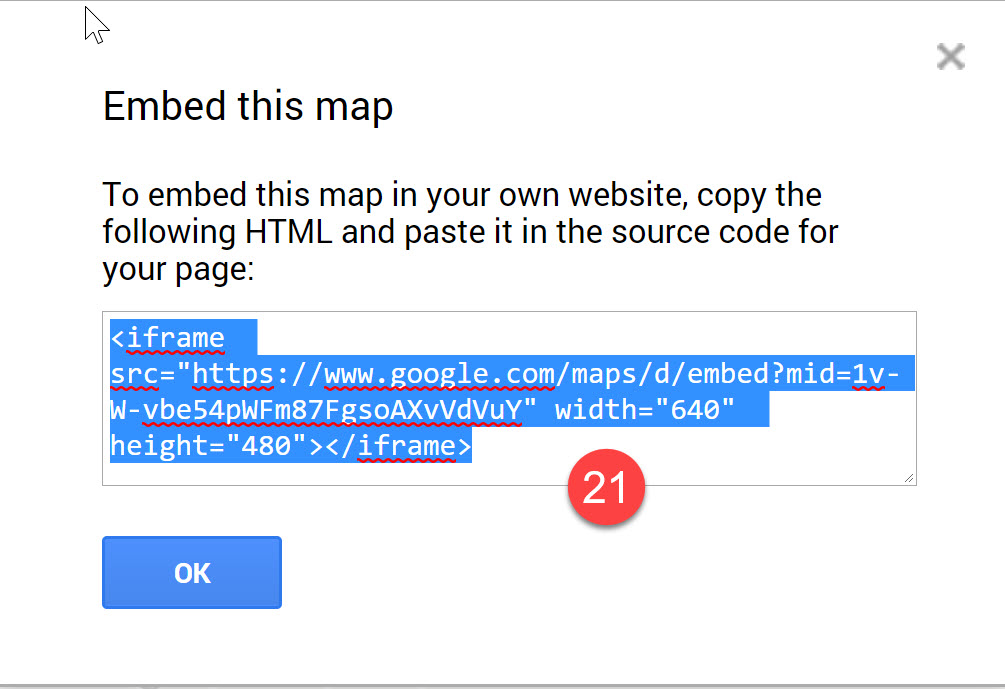
14) Select and copy the text highlighted in blue
15) Close the window


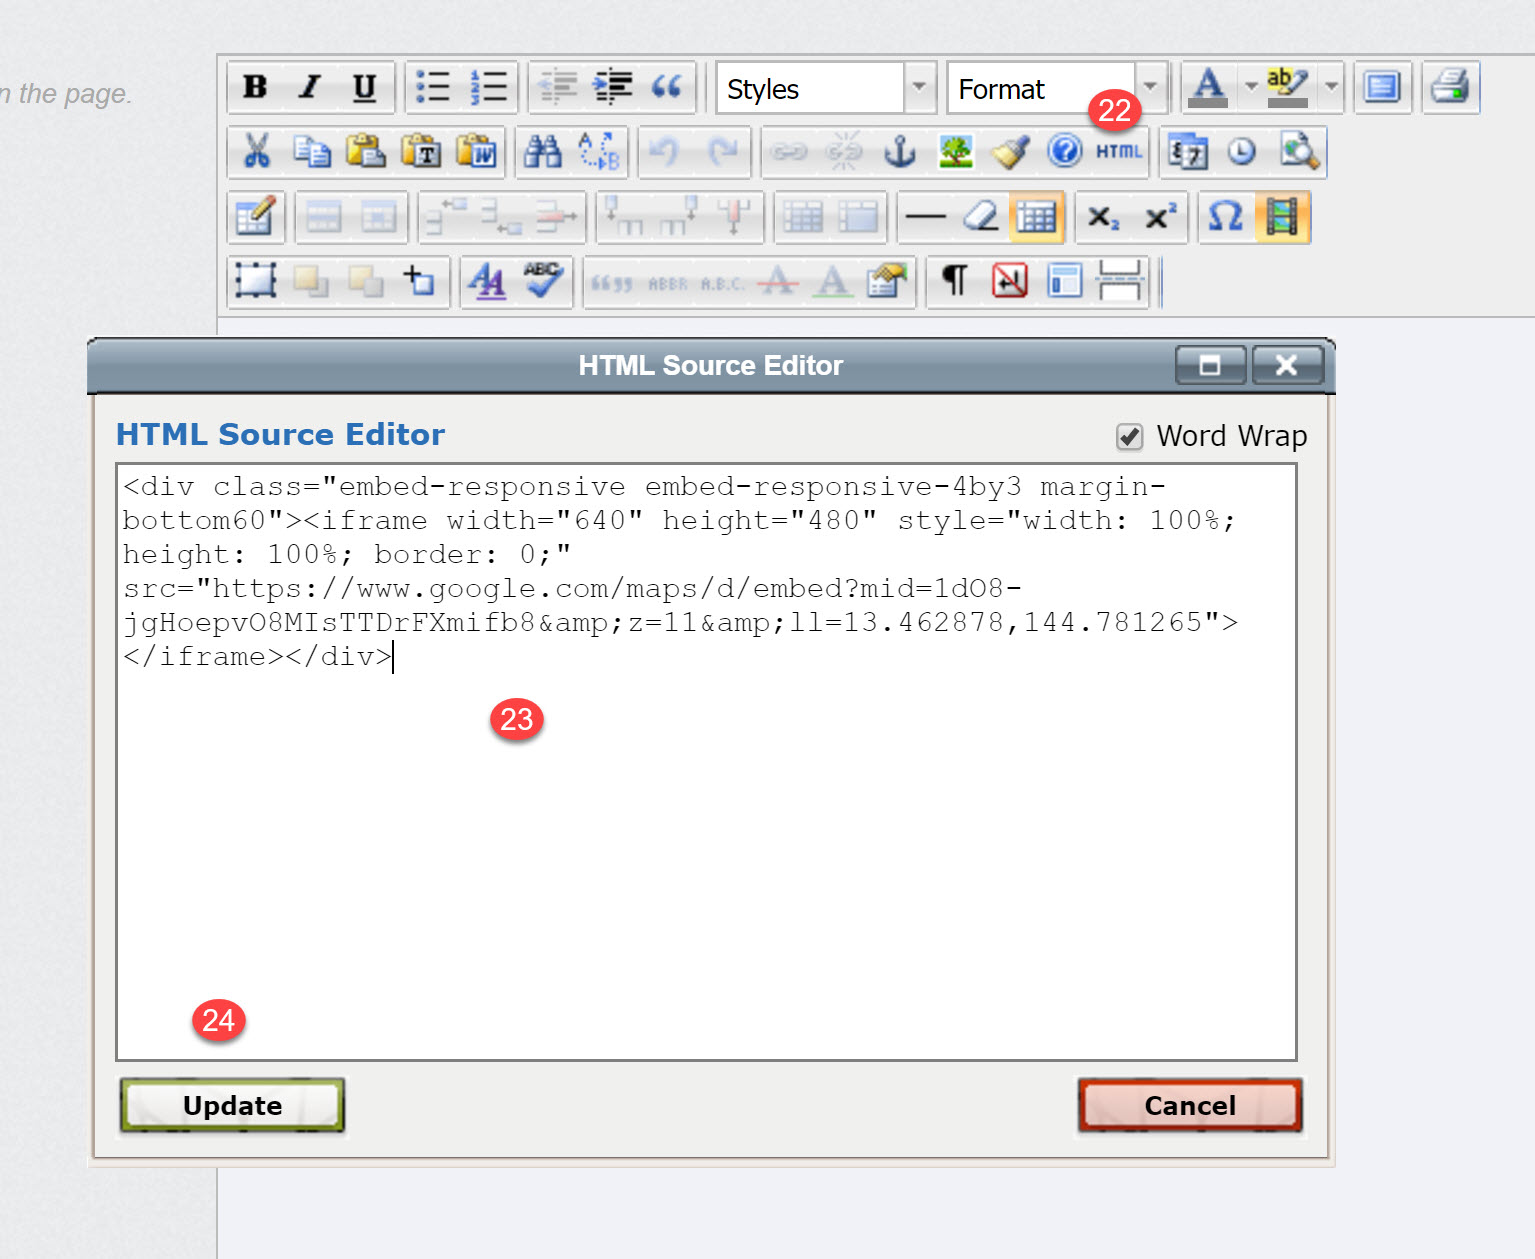
16) Go to Web Pages, open the page where you wish to add the popup and click the HTML button
17) Paste the copied text to the HTML Source Editor window
18) Click Update


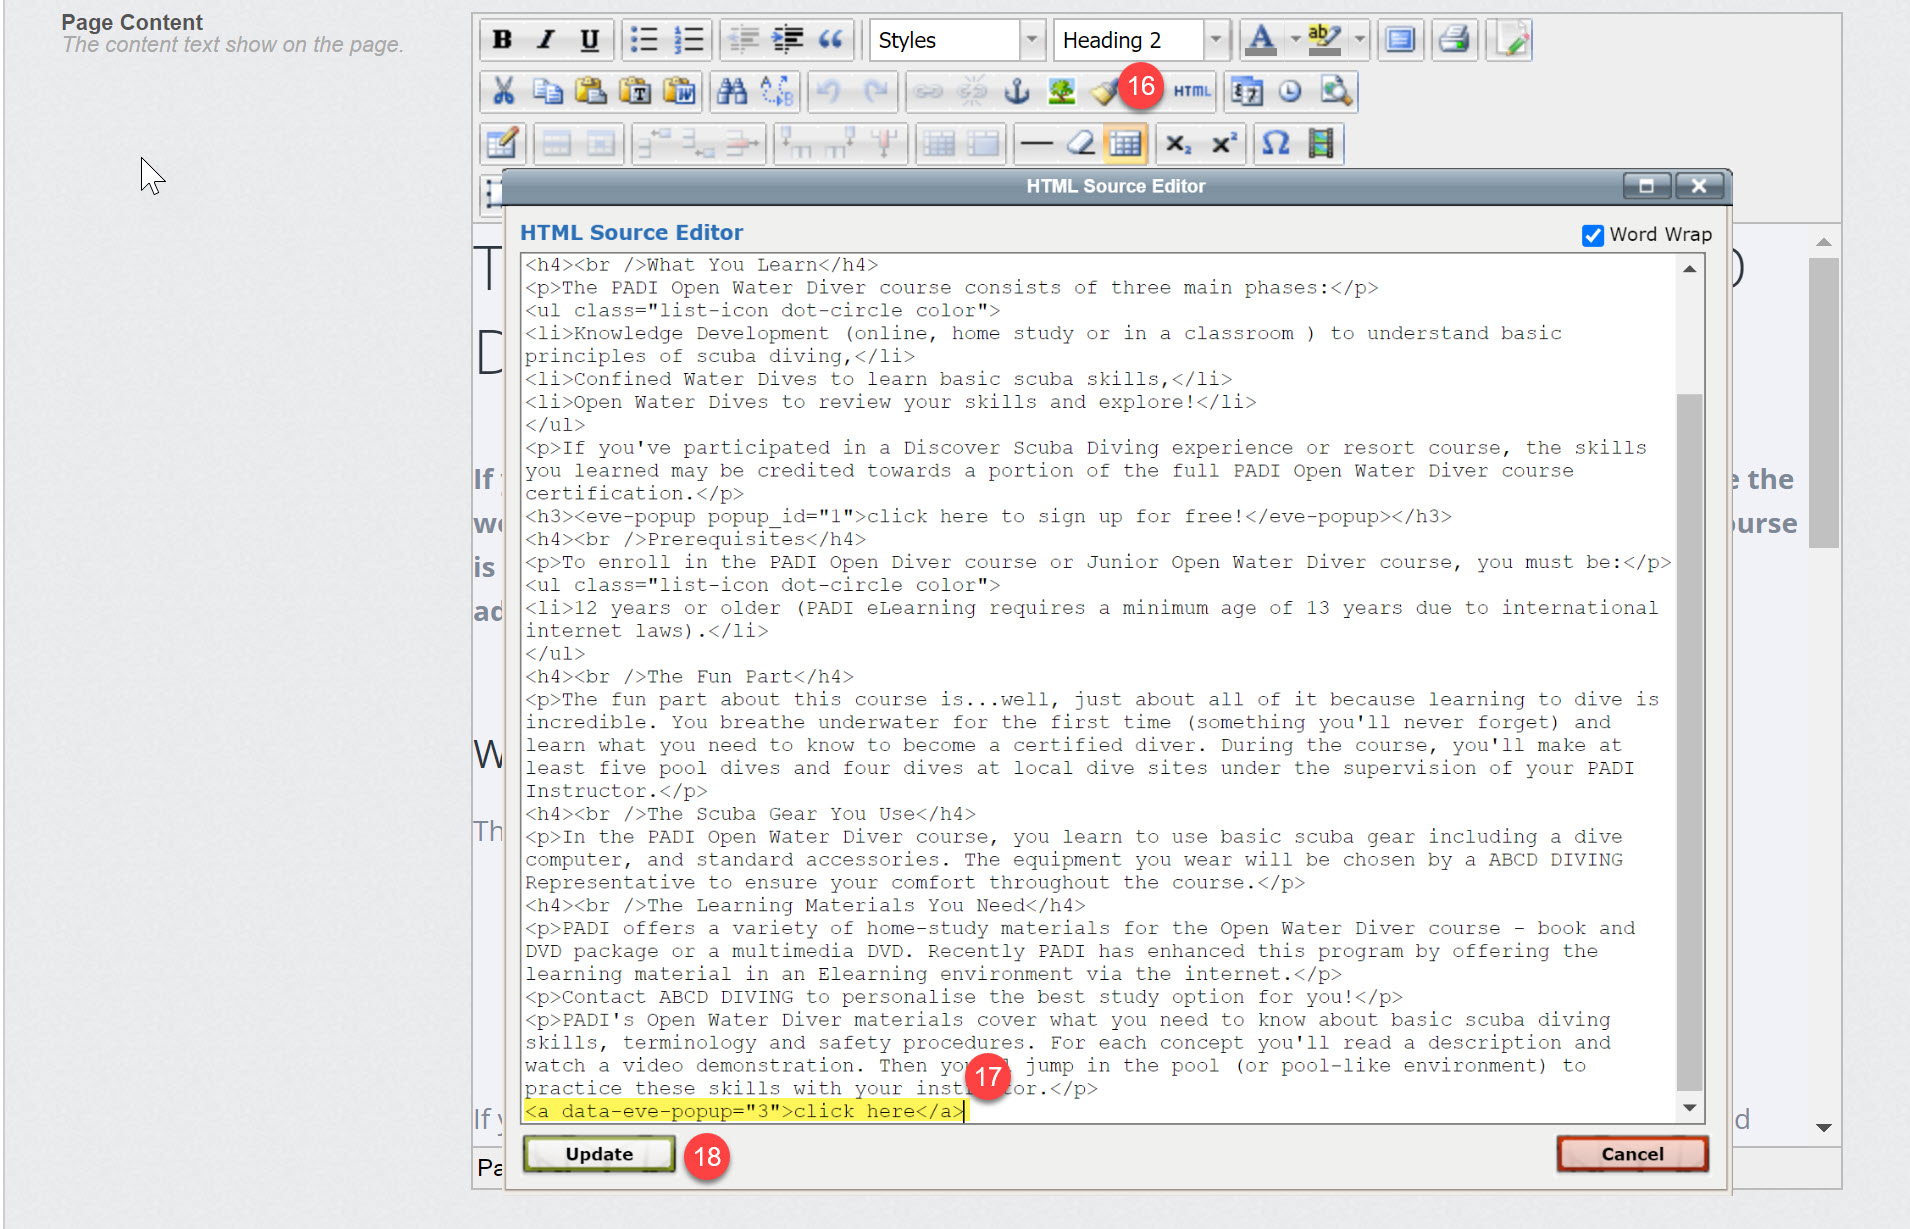
19) Save the page changes


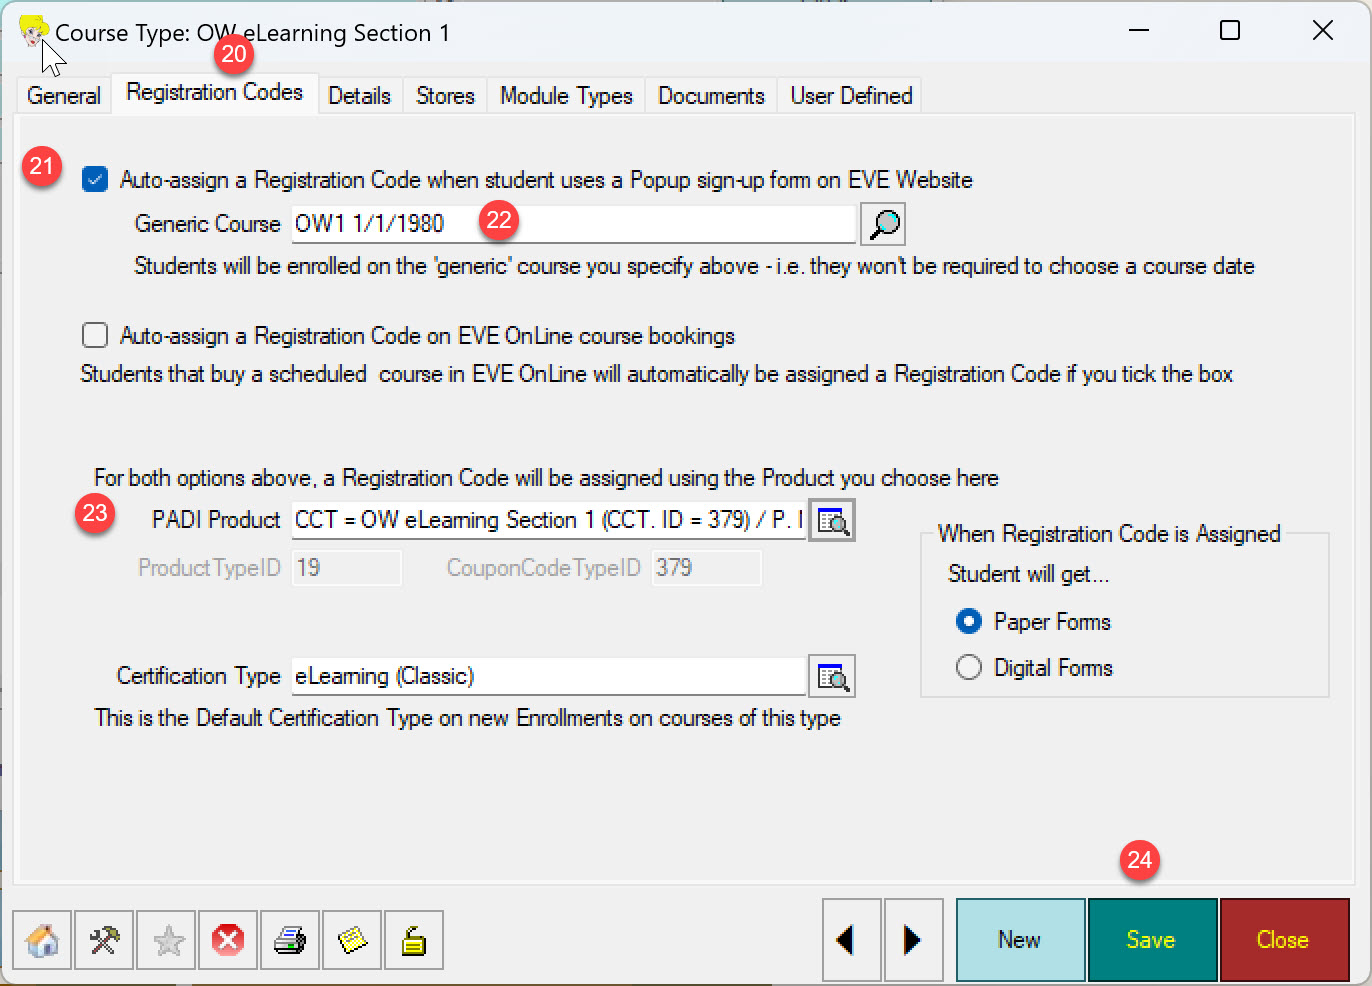
20) in EVE > Data > Course Types open the corresponding course type: OW eLearning Section 1
21) Check the Auto-assign a Registration Code when student uses a Popup sign-up form on EVE Website
22) Select the Generic Course Date
23) Select the Product Type by clicking the look up button
24) Save the newly applied settings


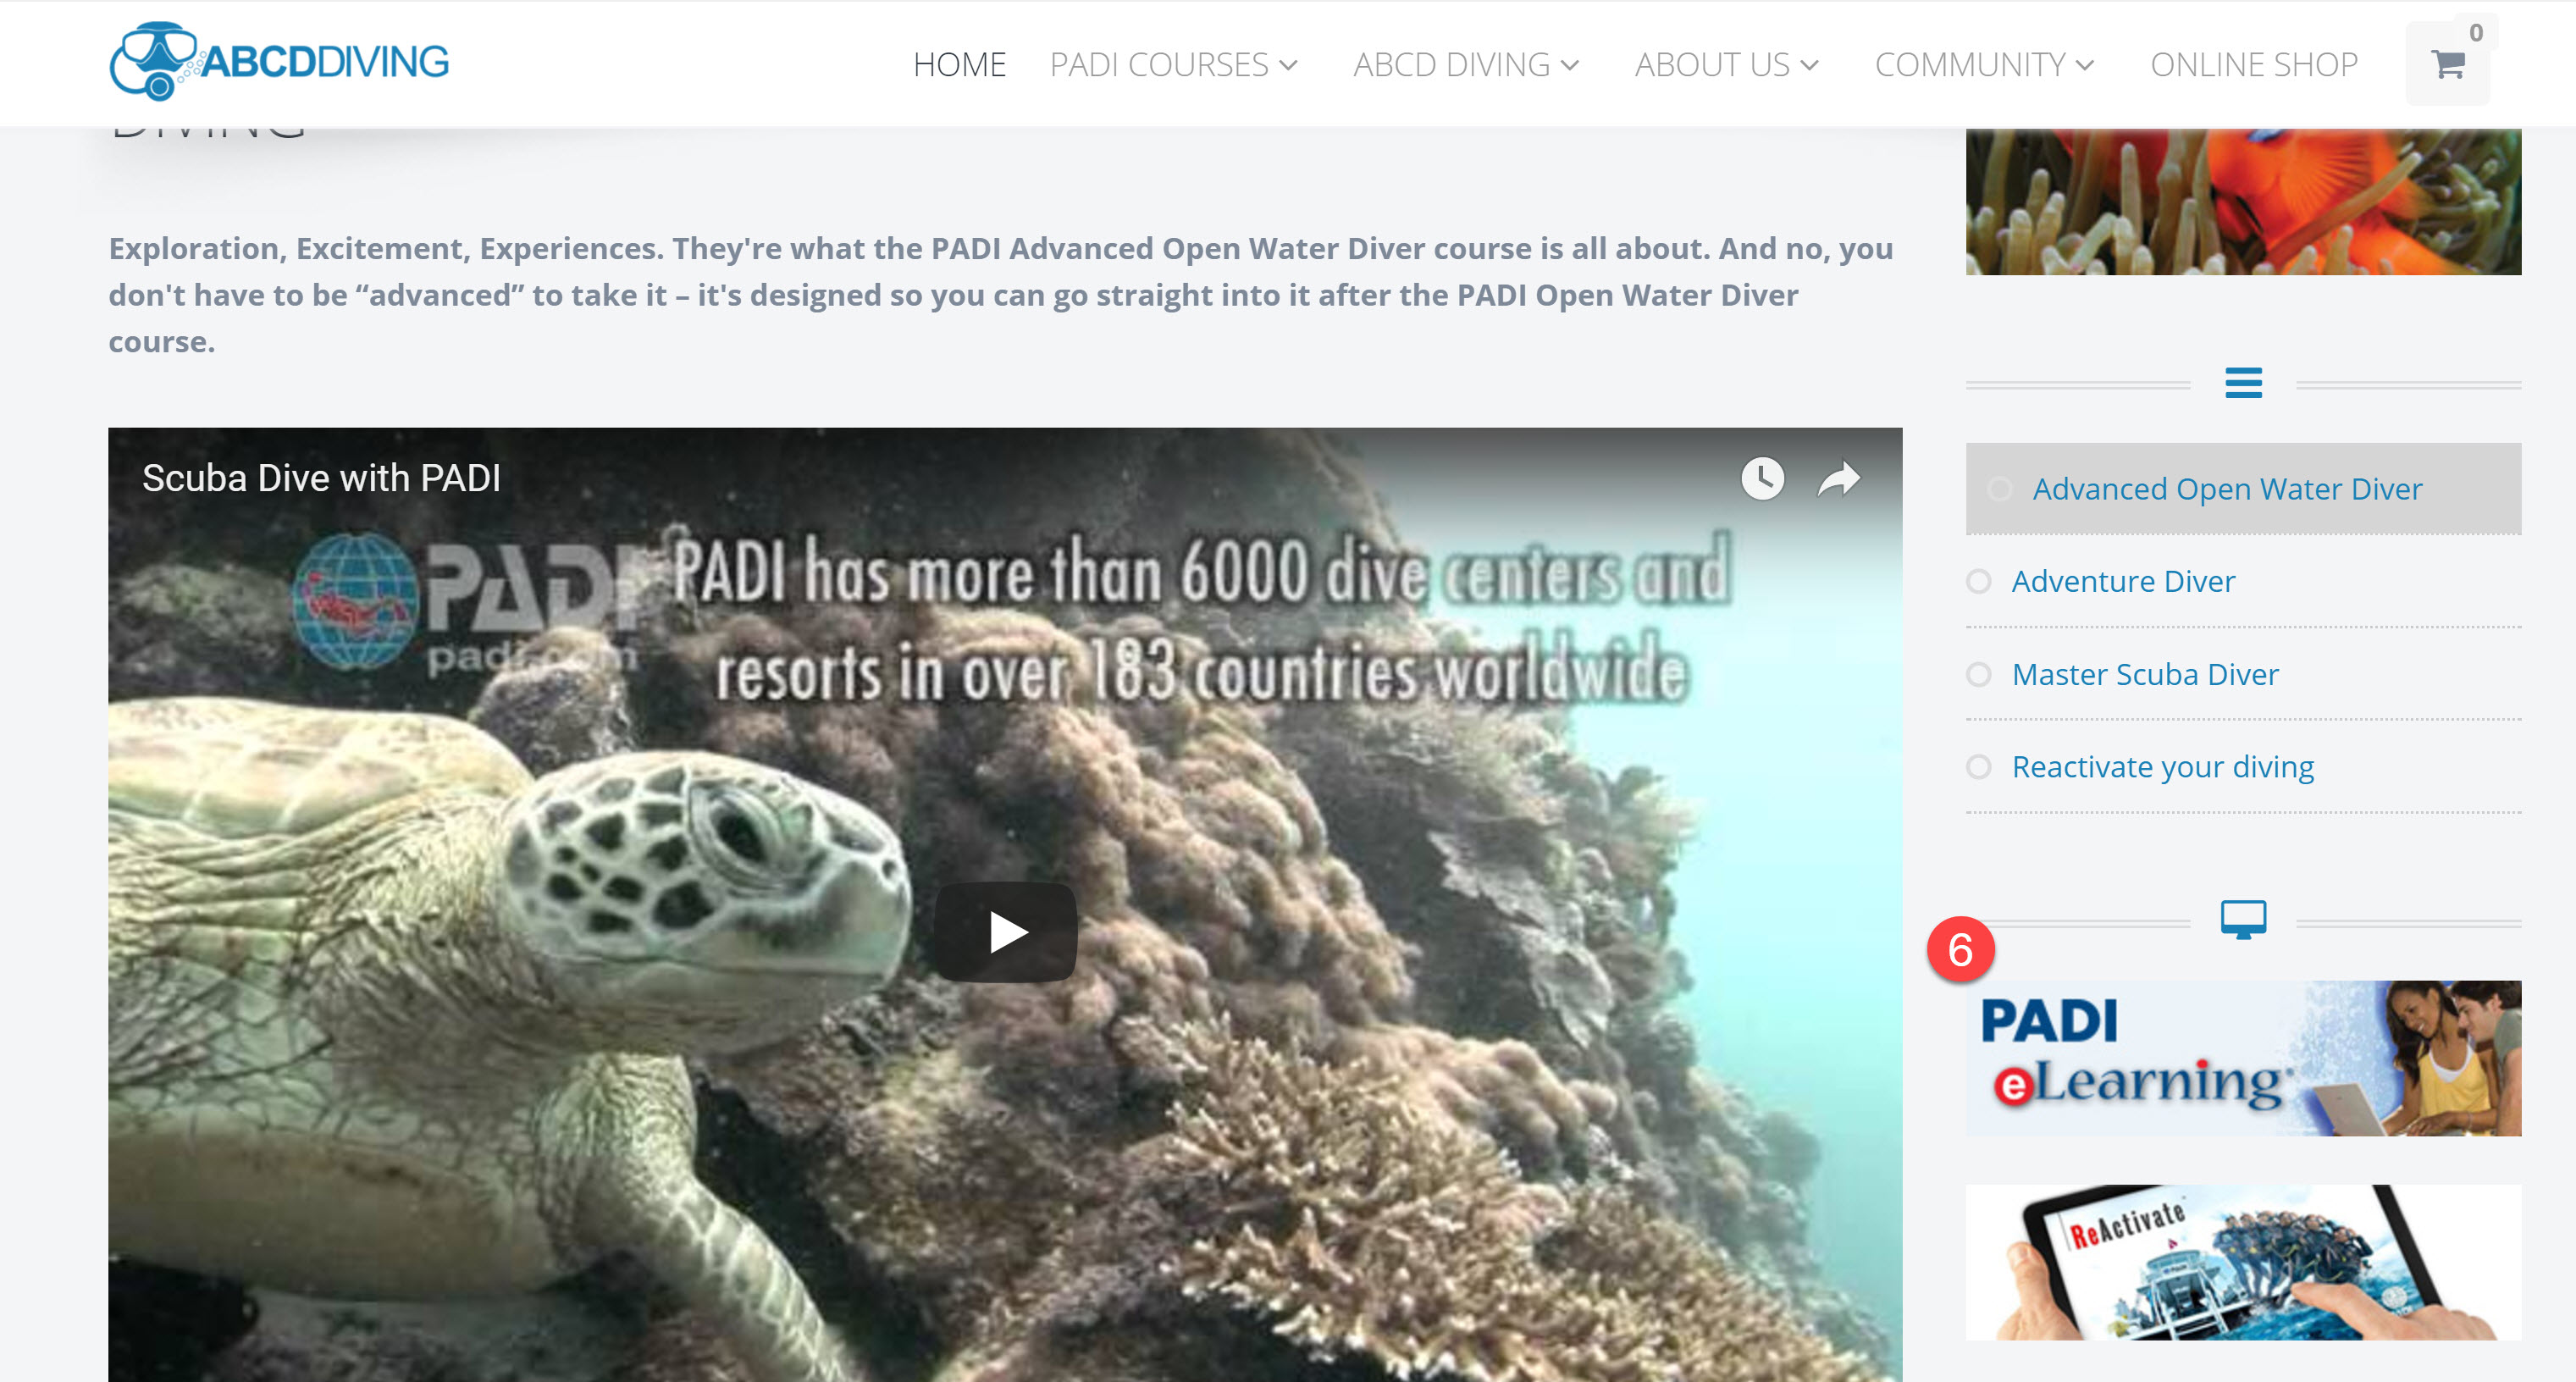
24) Return to your EVE website and open the page where you added the popup. It will display the corresponding link
25) When you click the link, the popup form will open

Click here to see it in action, on the EVE website of a successful PADI store.

Continue Reading

How do I upload the sitemap file?

Starting from version 4.4.7.3, the CMS allows you to upload your sitemap.xml file.

To upload the sitemap.xml file, please follow this procedure:

1)  Login to your CMS and click the Settings tab
2) Click the Site map tab
3) Click Choose File
4) Browse your PC to the folder where the sitemap.xml file is saved
5) Select the file
6) Click open to upload the file
7) Click Save file to apply it to your website


Continue Reading

How To Use ShortCodes

Short codes are a new feature available to stores running any of the following EVE Packages:

Short codes will collect data from your EVE database and display them on your EVE Website. For example, if you wish to display a price list on a web page, you can use short codes. The price list will update dynamically, each time you amend a price on your EVE database.

Currently, this feature will work only with EVE stock items and return prices only.

To enable short codes, please follow this simple procedure.

1) Open the stock item you wish to publish and copy the GUID field value


2) Login to your website CMS, open the web page where you wish to add short codes

3) In the Page Content Editor, add text as you see fit and click the Short Codes button

4) A dialogue box will open

A) In the ID field, enter the GUID you copied from EVE stock item

B) In the datatype field, enter stockitem

C) Click the drop down arrow and select the value you wish to display

D) Click Insert

5) The CMS will add a TAG to the page content. Save the page.


6) The website will display the corresponding price


Continue Reading

How do I link a course page to PADI eLearning?

Your EVE website template stores your PADI store number. The information is used to generate your unique link to PADI eLearning.

To add the corresponding link to a course web page, please follow this procedure:

1) Login to your CMS, go to Web Pages

2) Open the web page where you wish to add the elearning link

3) Scroll down to Add Component on Page section

4) Switch the PADI OnLine course ON

5) Save new settings


6) Browse your website to the page you edited. A PADI eLearning component will be displayed


Continue Reading

How do I edit the text of a slide?

To edit the text displayed on a slide or add a mobile image or a video, please follow this procedure:

1)  Login to your website CMS and go to the Components Tab

2) Scroll down and click on Manage Slider


3) Click on the title of the slide you wish to modify


4) Enter a title for the slide

5) Select a colour scheme, compatible with your website template

6) Enter a caption title

7) Enter a caption title 2

8) Use the editor tools to apply formats

9) Type your text

10) Select a mobile image. Mobile images must be uploaded to Assets Manager > MobileSliderImg folder first

11) Enter the ID of a YouTube video

12) Enter a link target

13) Enter a link label

14) Update your slide


Continue Reading

How can I embed a map of dive sites in my region?

To embed a map of dive sites in your region, follow this simple procedure:

1)  Open this link to Google Maps. The link requires login to your Google account. We recommend using the same account used for your      website.

2) Click on Create New Map


3) Click on Untitled Map to assign a name to the map

4) Assign a name to the map. A description is optional

5) Click the Save button


6) The map must be public to be embedded on your website. To set the map public, click on +Share

7) Click on Change

8) Select On – Public on the web

9) Click Save

10) Click DONE


11) Use the Search box and zoom buttons to limit the map to your local area


12) Click on Add Marker

13) Drag the cursor to the position of your dive site

14) Assign a name to your dive site

15) Add a brief description of your dive site. You can also add a link to a web page on your EVE website

16) Click Save.


17) Repeat steps from 12 to 16 for each dive site in your map

18) Use the Edit button if you wish to edit the description of each dive site


19) Click on the Options button

20) Select Embed on my site


21) Copy the HTML code highlighted in blue

22) Open your EVE website, login to the CMS and open the webpage where you wish to add the map. Click on the HTML editor button

23) Paste the embed code in the HTML editor

24) Click Update


25) Save the webpage


Browse your website to the corresponding web page. Your map is now embedded to your website.


Continue Reading

How do I set up a new Google Analytics account for my website

For use with your new website CMS and Reporting please be kind enough to set up a new Google account.
We will then use to increase the reporting functions on your new website.
You can set that up here:
https://accounts.google.com/signup
When you have done so, please let us have the details for that account –
email address and password – as we will need these to link that Google Analytics ac count to your new website.
We can assure you this information will never be shared by us with anyone but please, obviously, do make sure that the password you choose to create is not related in any way to any other passwords you may use for other reasons.
Continue Reading