FAQs

c Expand All C Collapse All

Sales

Notes at the bottom of the receipt layout – by default – are these 3 types of notes:
FAQSales6.1
They appear there from the info written:
a/ on any specific invoice:
FAQSales6.2
b/ on the Payment Method form in Data / Payment Methods
FAQSales6.3
c/ on any stock type form in Inventory / Stock Types:
FAQSales6.4
Category: Sales
First, a discountable Customer Type of Club Member should be set up.
Go to Data / Customer Types / Find to do this and place a check in the Discountable? box:
FAQSales7.1
Please note that clicking Forward will reveal pictures accurately if they don’t display properly here.
Then, click on the Discounts tab, then Add, then select which Stock Types and which Discount Band you wish to apply:
FAQSales7.2
Customers of that type will then automatically receive a discount of the specified amount when they purchase any of those items from you.
To create Discount Bands in general, go to Inventory / Discount Bands / New and then create the appropriate discount:
FAQSales7.3
The formulae are based on RP meaning Retail Price or TP meaning Trade Price.
Theses should be surrounded by square brackets – [ ] – and then the appropriate percentage added or subtracted.
For those items in Packages, you can either just not select Packages as a stock type that bears a discount… if you have packages in a separate stock type.
If not, you’ll need to go to each of the package stock items and manually set the price to the same as the standard retail price:
FAQSales7.4
Category: Sales
EVE supports cash drawers that:
• have a Serial interface, or
• have an OPOS (OLE for Point of Sale) driver, or
• can be opened using a ‘Pass Through’ command from the printer, or
• Microsoft POS for .Net
1/ You can select the Open Cash Drawer box in the payment methods that you want to result in the drawe r opening in Data / Payment Methods as below:
FAQSales5.1
Please note that clicking Forward will reveal pictures accurately if they don’t display properly here.
2/ Go to Tools / Options / This PC from the top menu in EVE and check settings.
The default settings are as below for a Serial connection:
FAQSales5.2
3/ There is an additional feature for Pass-Thru Drawers – see below:
FAQSales5.3
4/ And further information on this topic is also below:
FAQSales5.4
5/ Some people use Logic Controls cash drawers – www.logiccontrols.com
Category: Sales
Use the Sales Search Wizard for this.
On the Customers tab of that search wizard, start by selecting the customers as below:
FAQSales4.1
When you click that Add Course Customers button you can then select the customers on the courses, as in the example below:
FAQSales4.2
And:
FAQSales4.3
Select All of those results and Add them to the search.
Ensure you have this setting on the Payments / Items tab of the Sales Search Wizard:
FAQSales4.4
Results will include:
FAQSales4.5
Category: Sales

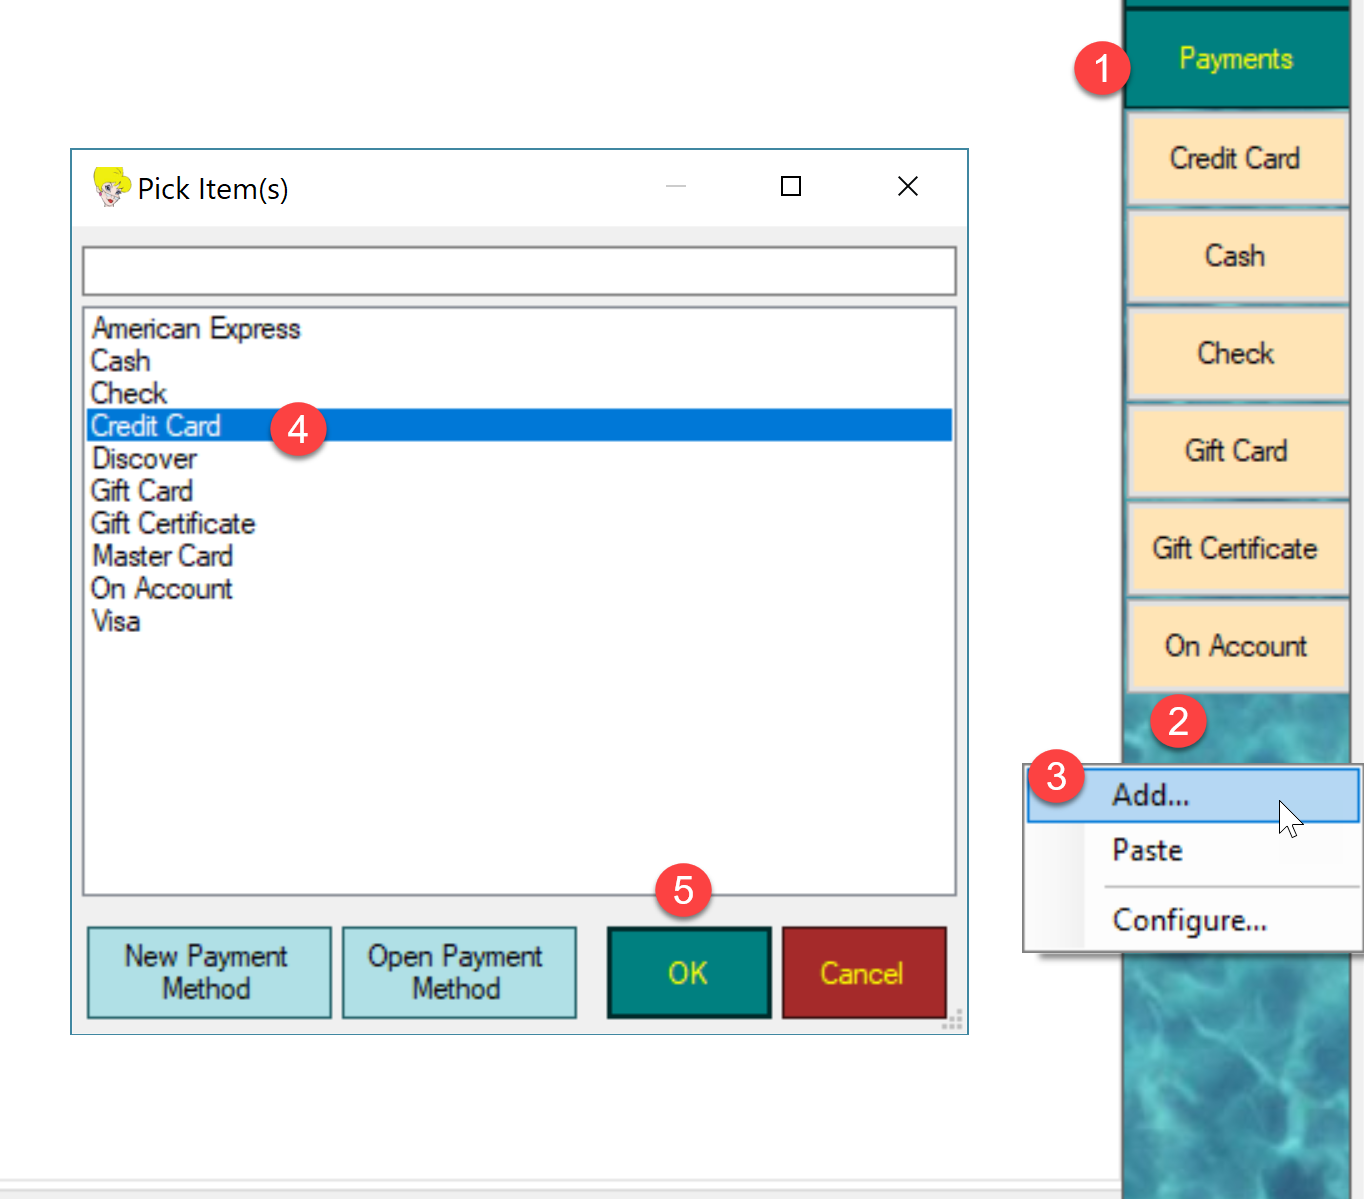
To add a Payment Method to the Cool Bar, please follow this procedure:

  1. Click Payments in the Cool Bar
  2. Right click on a blank area of the Cool Bar
  3. Click Add
  4. Click on the Payment Method you wish to add to the Cool Bar
  5. Click OK to save settings

Category: Sales

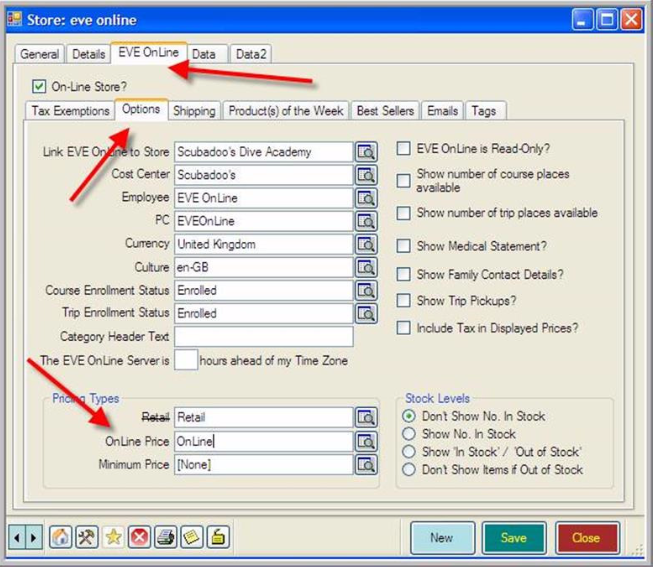
Cayan provide 2 payment systems that can be used in EVE: Genius and Transport WEB. Genius uses a physical credit card device so your customers can swipe/insert/touch their credit card. Transport WEB is for card-not-present (phone) transactions so you can type the credit card details.


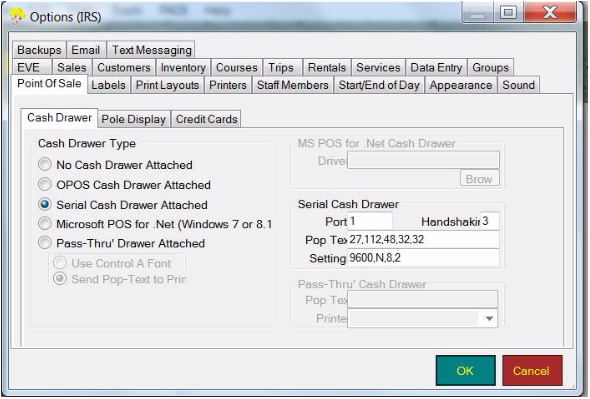
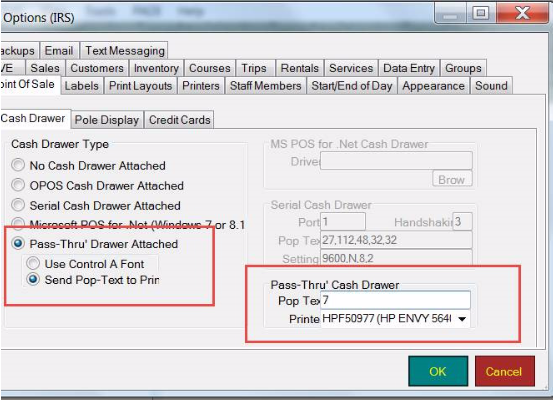
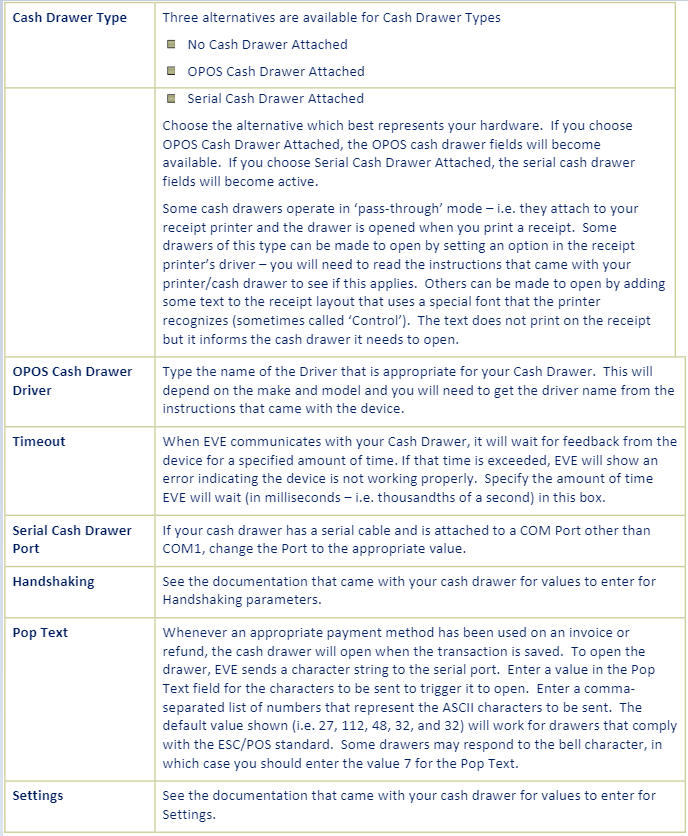
As a first step, please make sure you have properly setup the corresponding options, as outlined in the instructions.

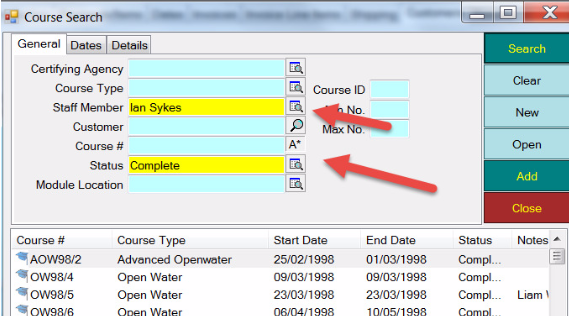
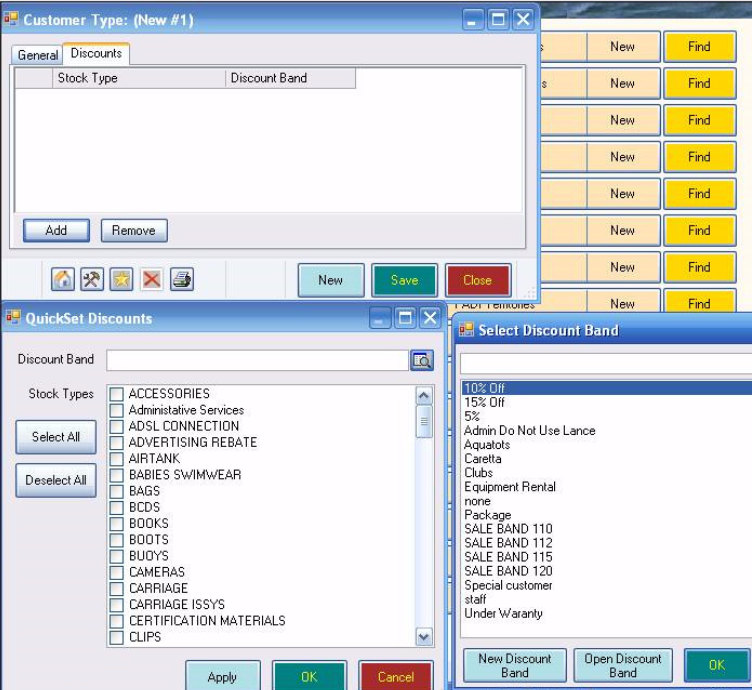
Then, verify whether your EVE setup already includes a payment method with the following settings or create a new one:

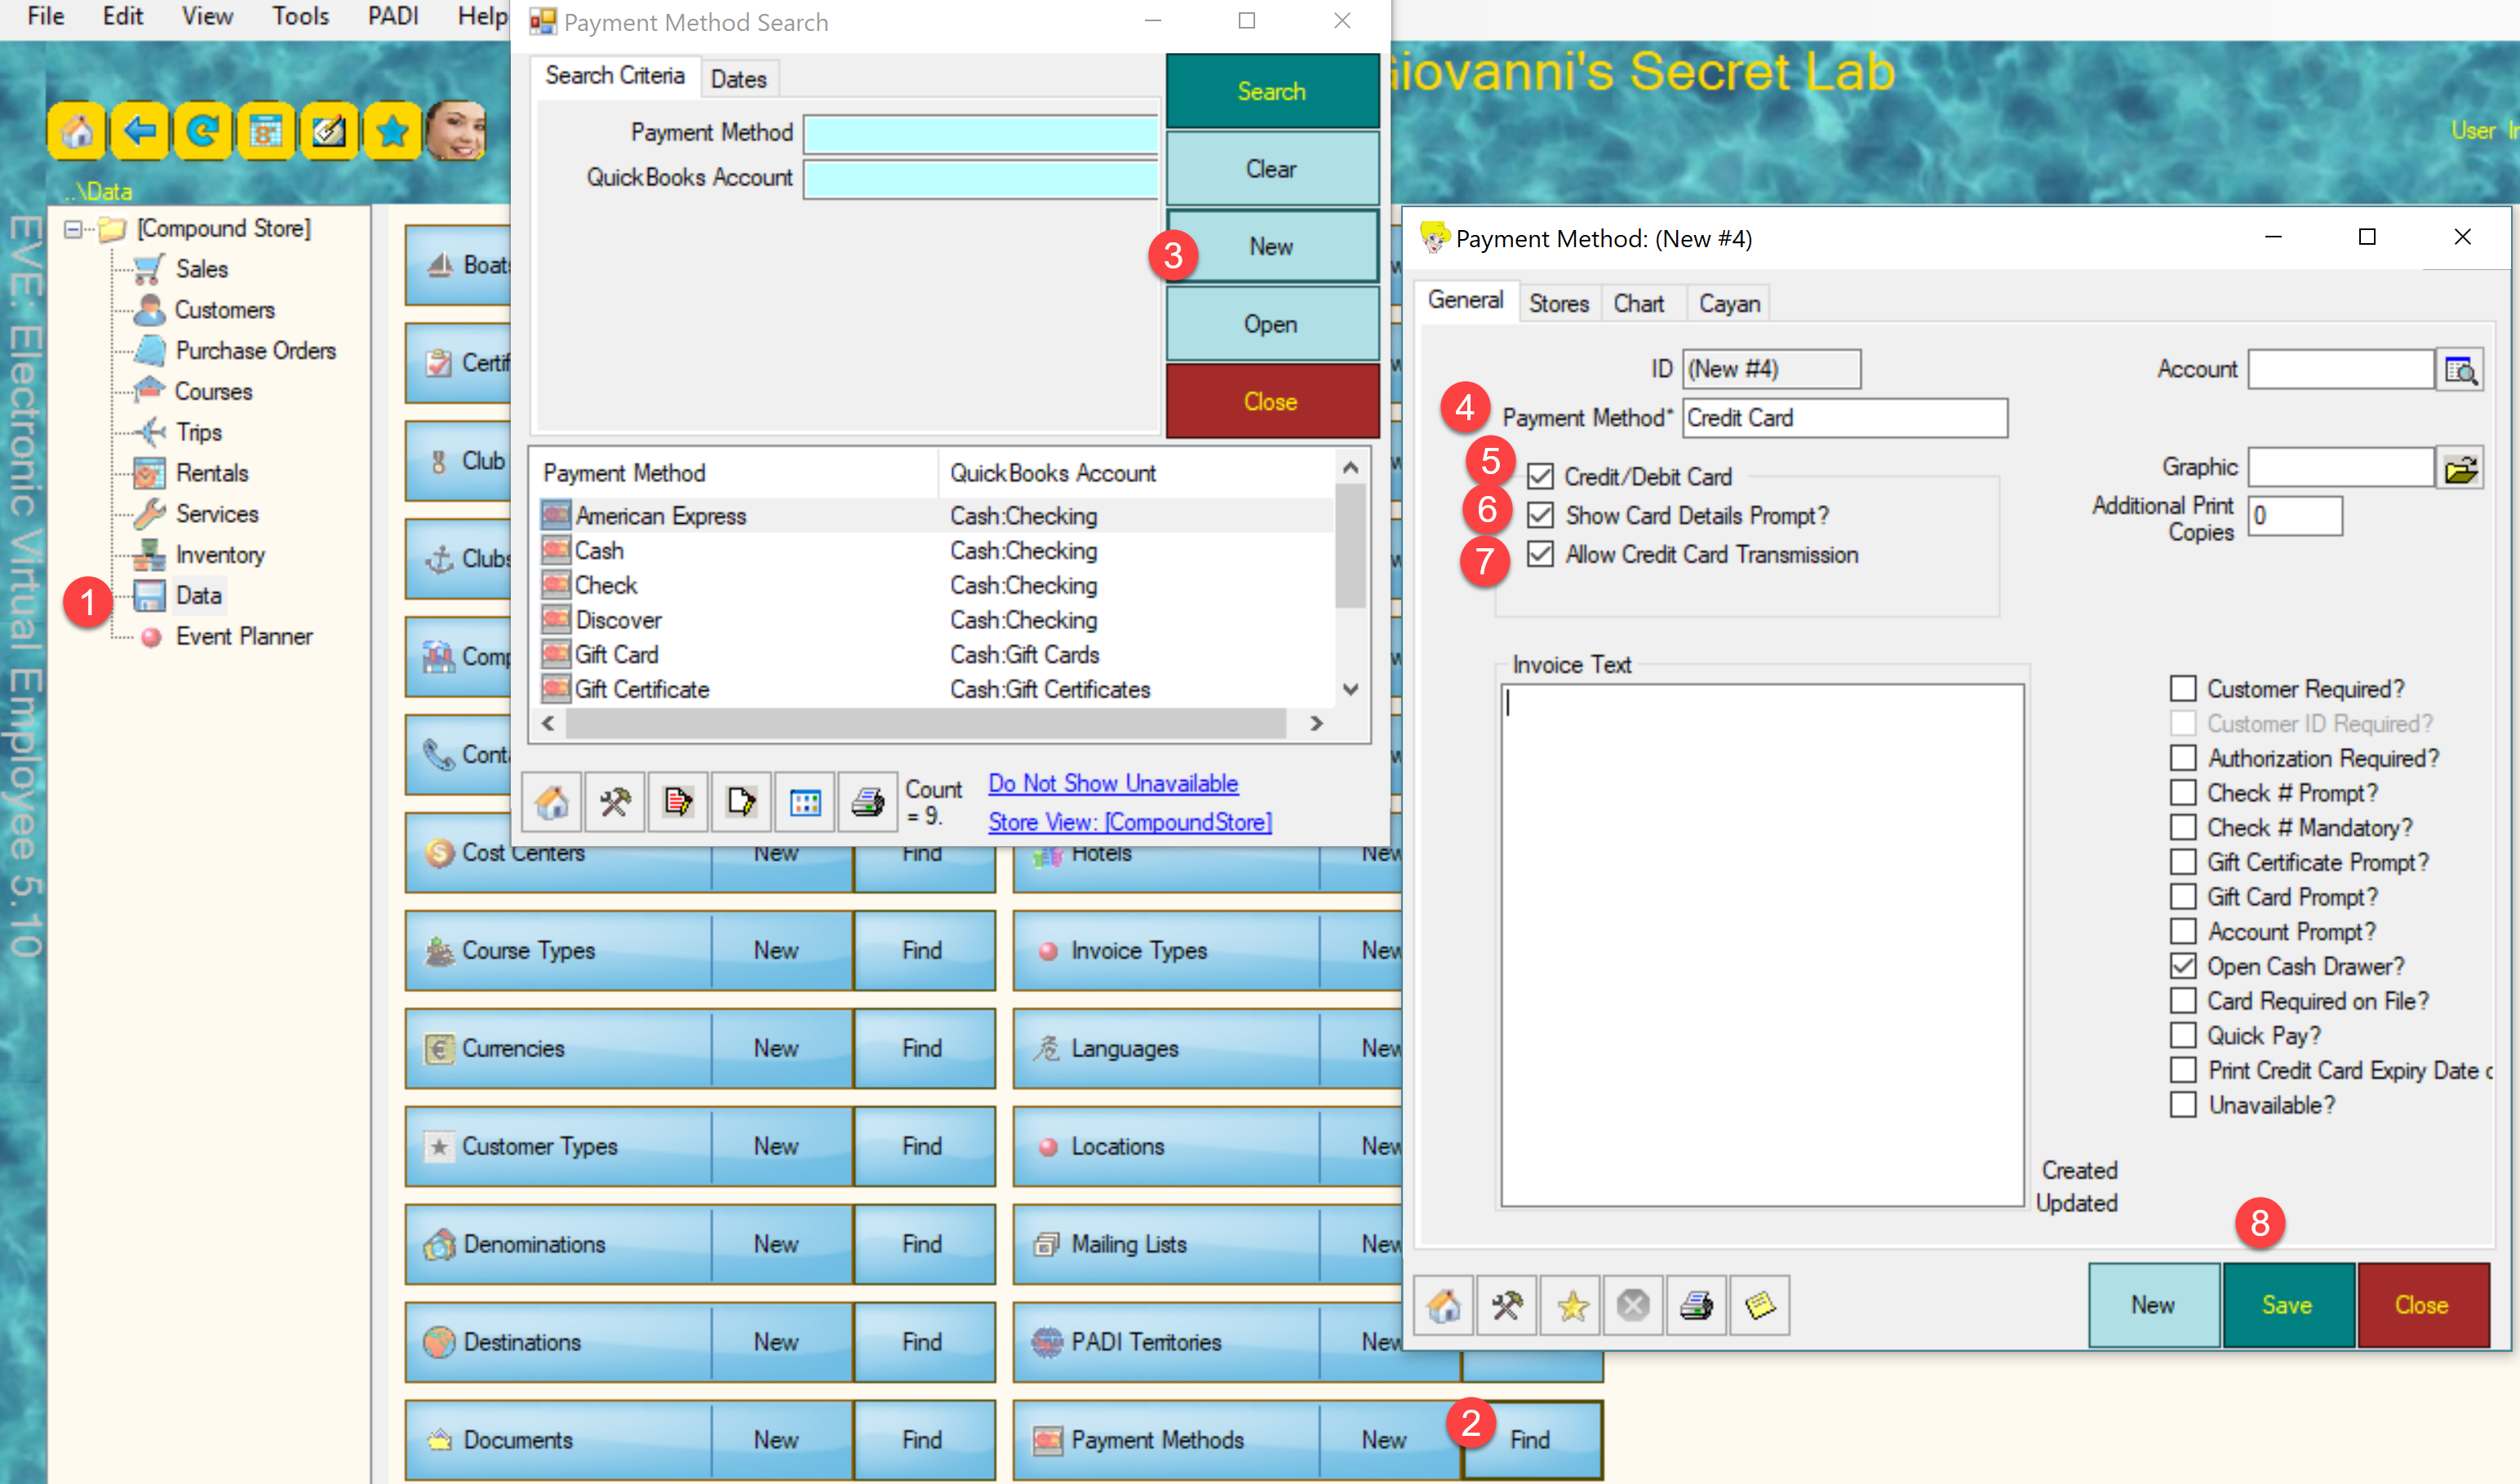
  1. Open EVE and click Data
  2. Go to Payment Methods and click Find
  3. If you need to create a new payment method, click New
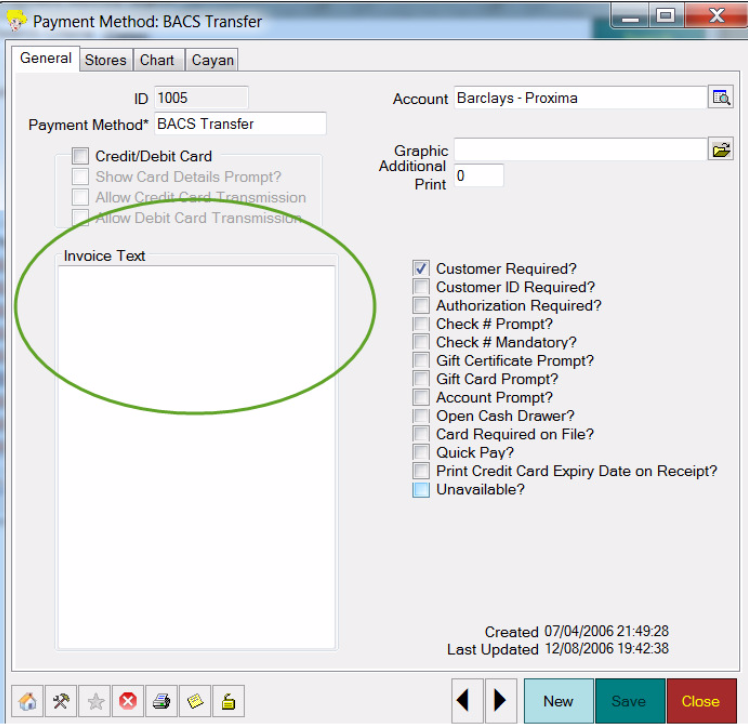
  4. Type your payment method name. We recommend a generic Credit Card name, as both Genius and Transport Web can process different card types
  5. Check the Credit/Debit card box
  6. Check the Show Card Details Prompt box
  7. Check the Allow Credit Card Transmission box. These 3 boxes must be checked
  8. Save the settings


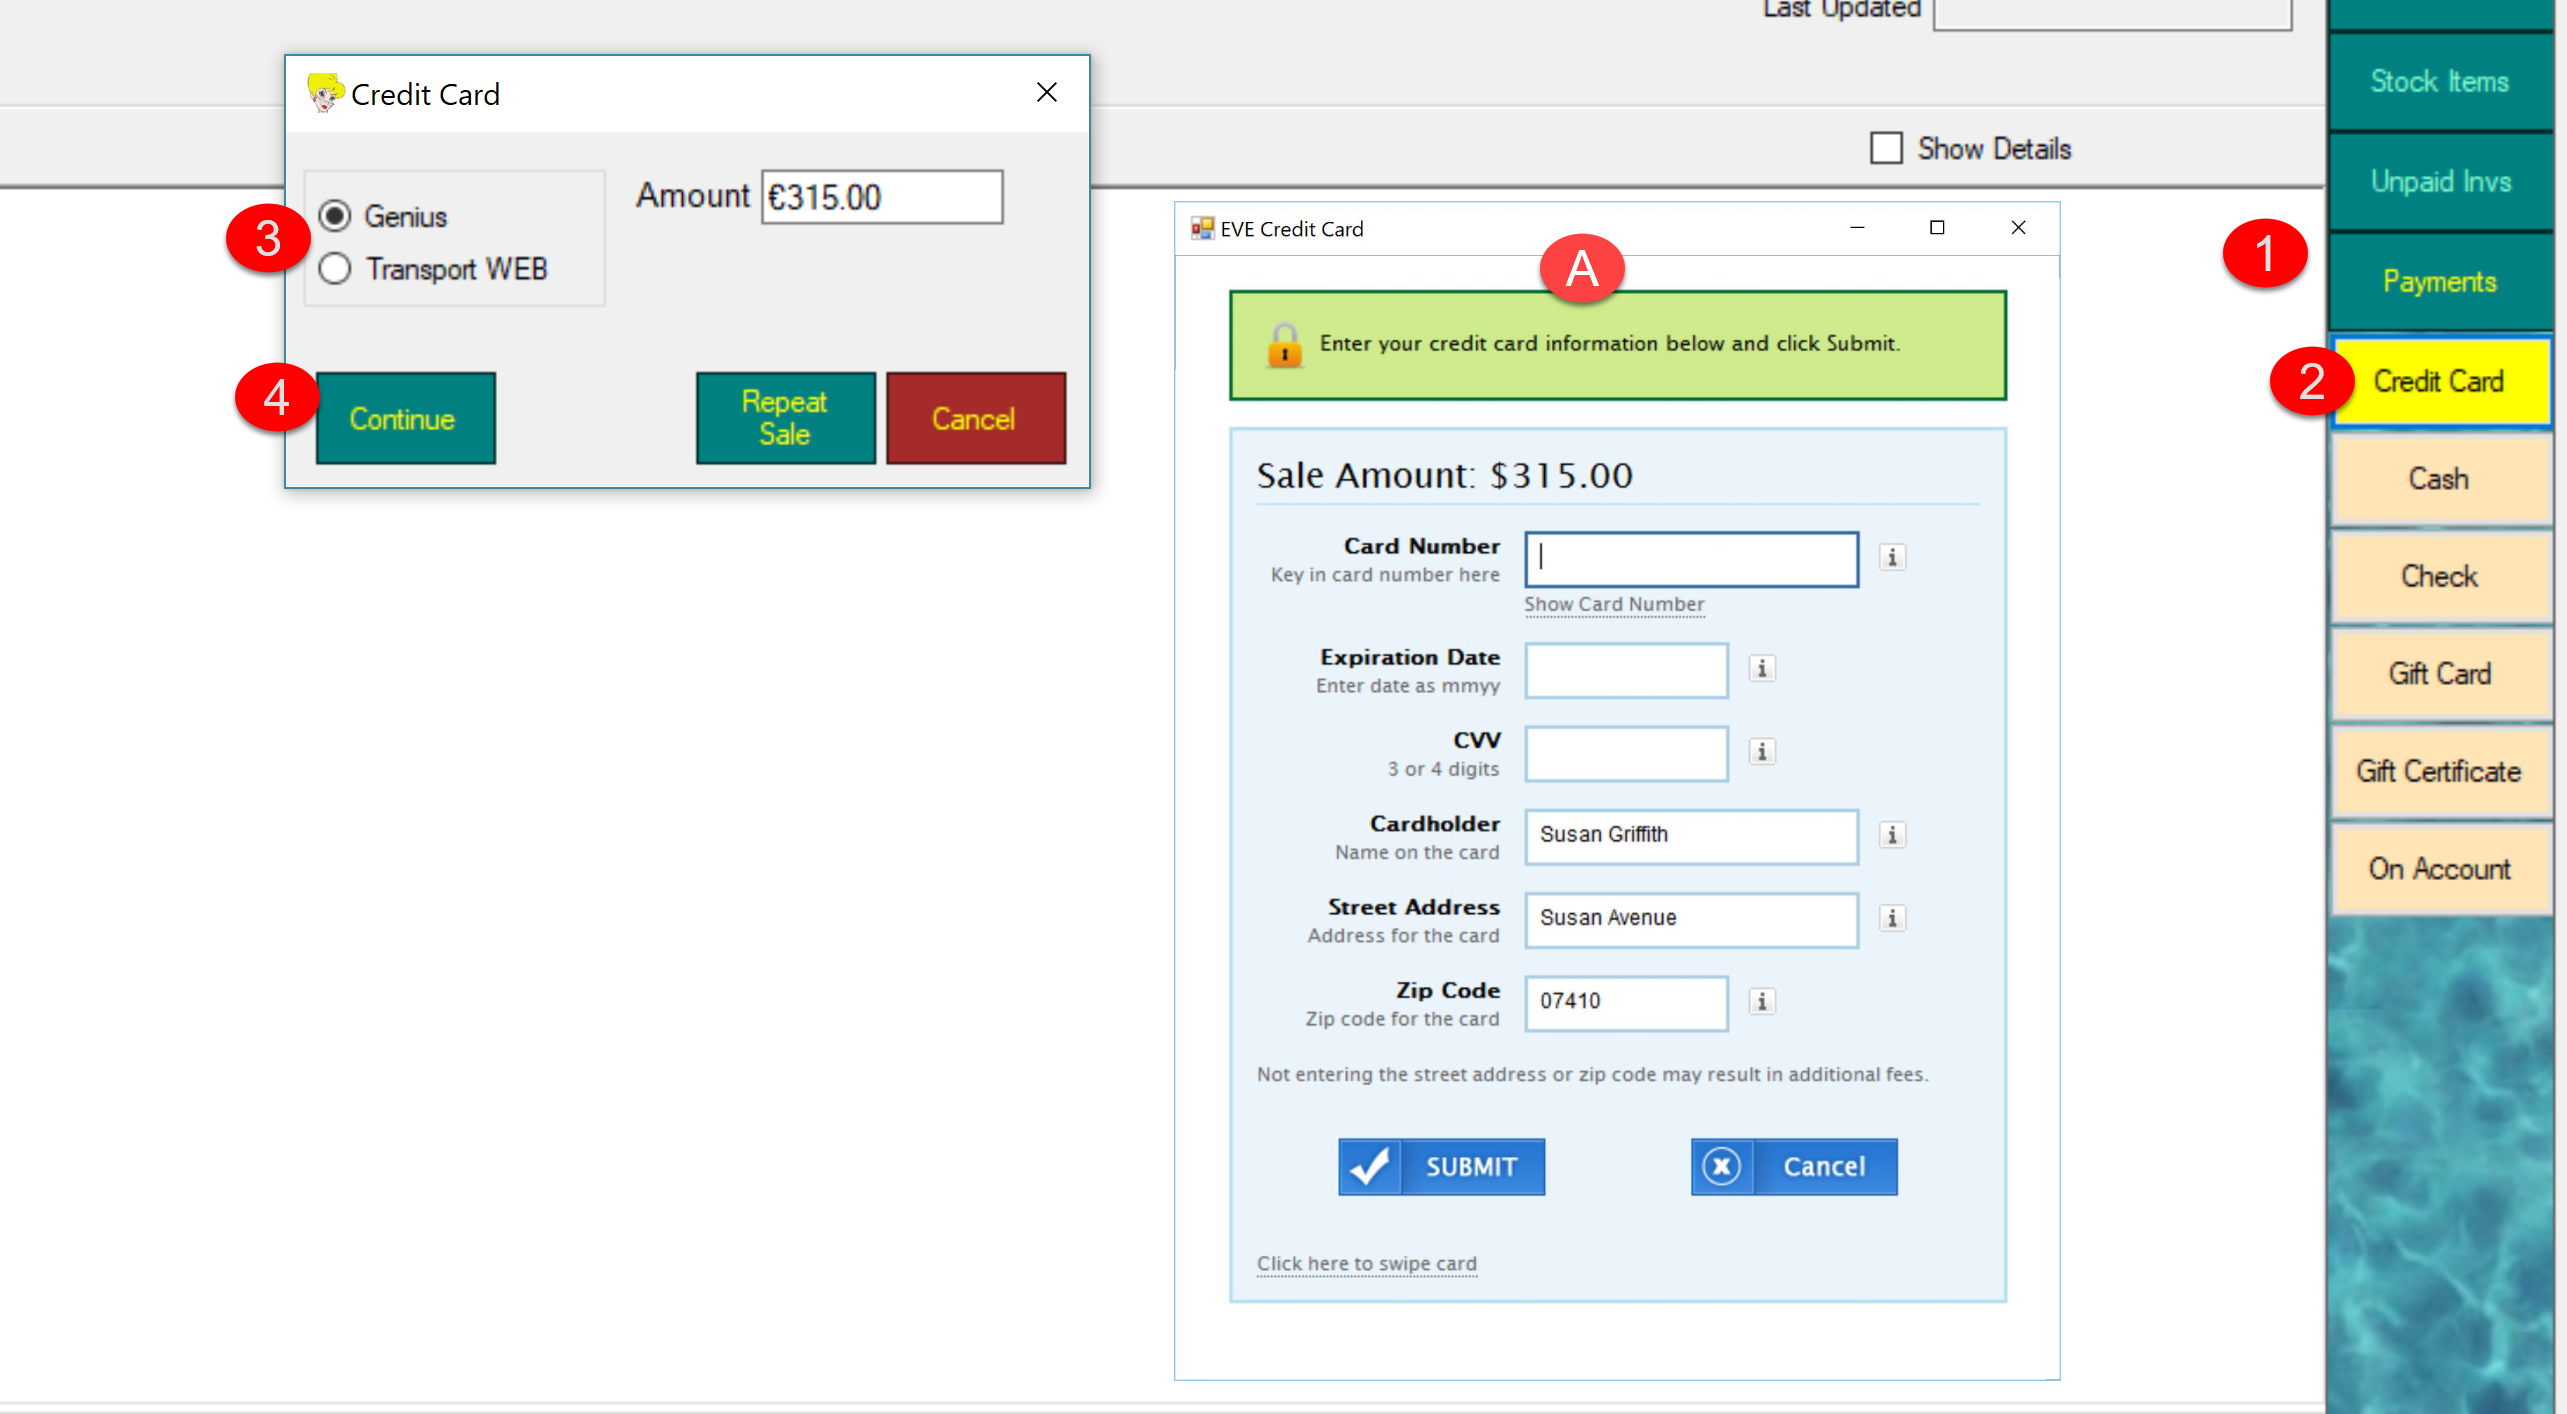
At the point of sale, after you have added all the stock items to the invoice, to take a payment using Genius/TransportWeb,

  1. Click on Payments
  2. Click on Credit Card
  3. By default, Genius will be selected. You can choose your preferred method. Use TransportWeb if the card is not present (e.g. you are processing a transaction over the phone).If you choose Transport Web, then form A
  4. Click Continue. If you have select TransportWeb, then form A will be displayed


Category: Sales

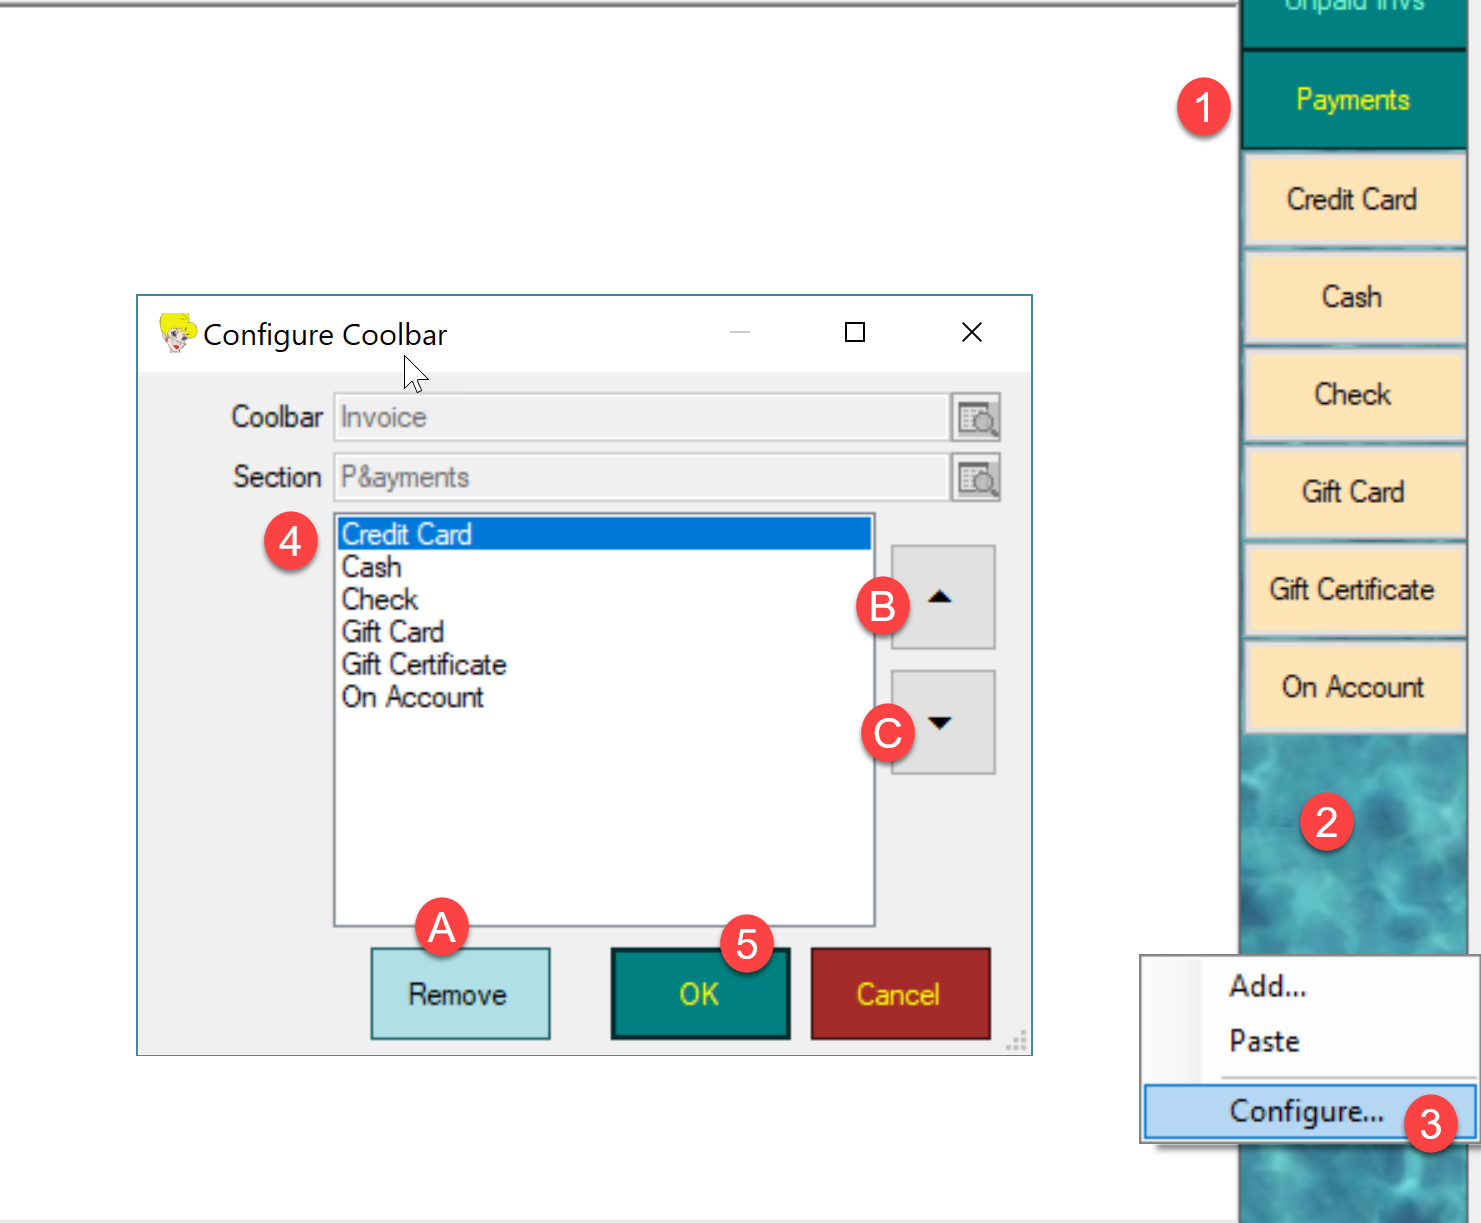
To setup payment methods in the Sales coolbar, please proceed as follows:

1) Click Payment in the Cool Bar

2) Right click on blank area of the Cool Bar

3) Click Configure

4) Click on the Payment Method you wish to setup

A) Click Remove to remove the Payment Method from the Cool Bar

B) Click Up to shift the Payment Method up in the list

C) Click Down to shift the Payment Method down in the list

5) Click OK to save new settings

Payment methods removed from the Cool Bar are still available to collect payment, but will no longer be listed in the Cool Bar.


Category: Sales
Go the the invoice and highlight the line with the stock item you need to create the order for.
Choose the Options button at the bottom left of the screen:
FAQSales8.1
Then select as below:
FAQSales8.2
Category: Sales
Open the print layout you’re using and set as below:
FAQSales9.1
Category: Sales
If you want to search for customers who bought a particular item then use the sales search wizard – accessed from File / Wizards on the top menu.
For example:FAQSales10.1
Then:
FAQSales10.2
You can then send a message to these customers by Export MailChimp as you would on the customer search wizard.
Category: Sales
You can send any customer their account statement either from their account record in their customer folder:
FAQSales11.1
or by selecting the customer under File / Reports / Sales.
Category: Sales
Different methods are required when setting Sale prices in the physical store and the online store in EVE
For the physical store:
First, create a new Customer Type called e.g. Store Sale – see screenshot below
FAQSales1.1
Then, you can set Store Sale prices for all Stock Items that you want in the Sale.
FAQSales1.2
You can activate those Sale prices by clicking Tools then Options then All PCs. Click Sales and set the Store Sale options.
FAQSales1.3
For more information on setting those discount bands see here:
How to Set Up Discount Bands
This video shows how to set up discount bands:
https://youtu.be/TbbjmBg1v-A
How to Set Up Different Discount Levels for Different Customer Types
This video shows how to set up different discount levels for different customer types:
https://youtu.be/polDT2YuMzA
For the online store
First step is to create a Customer Type called, say, Online.
Then, go to File / Wizards / Pricing Wizard from the top menu and choose the ‘generate retail prices’ option and then select as below:
FAQSales1.4
In this example all Online prices would be 5% less than your standard Retail prices.
Lastly, make sure that you’ve set the online store prices to use that OnLine price / customer type. You do that in the online store record in the Data module:
FAQSales1.5
Category: Sales

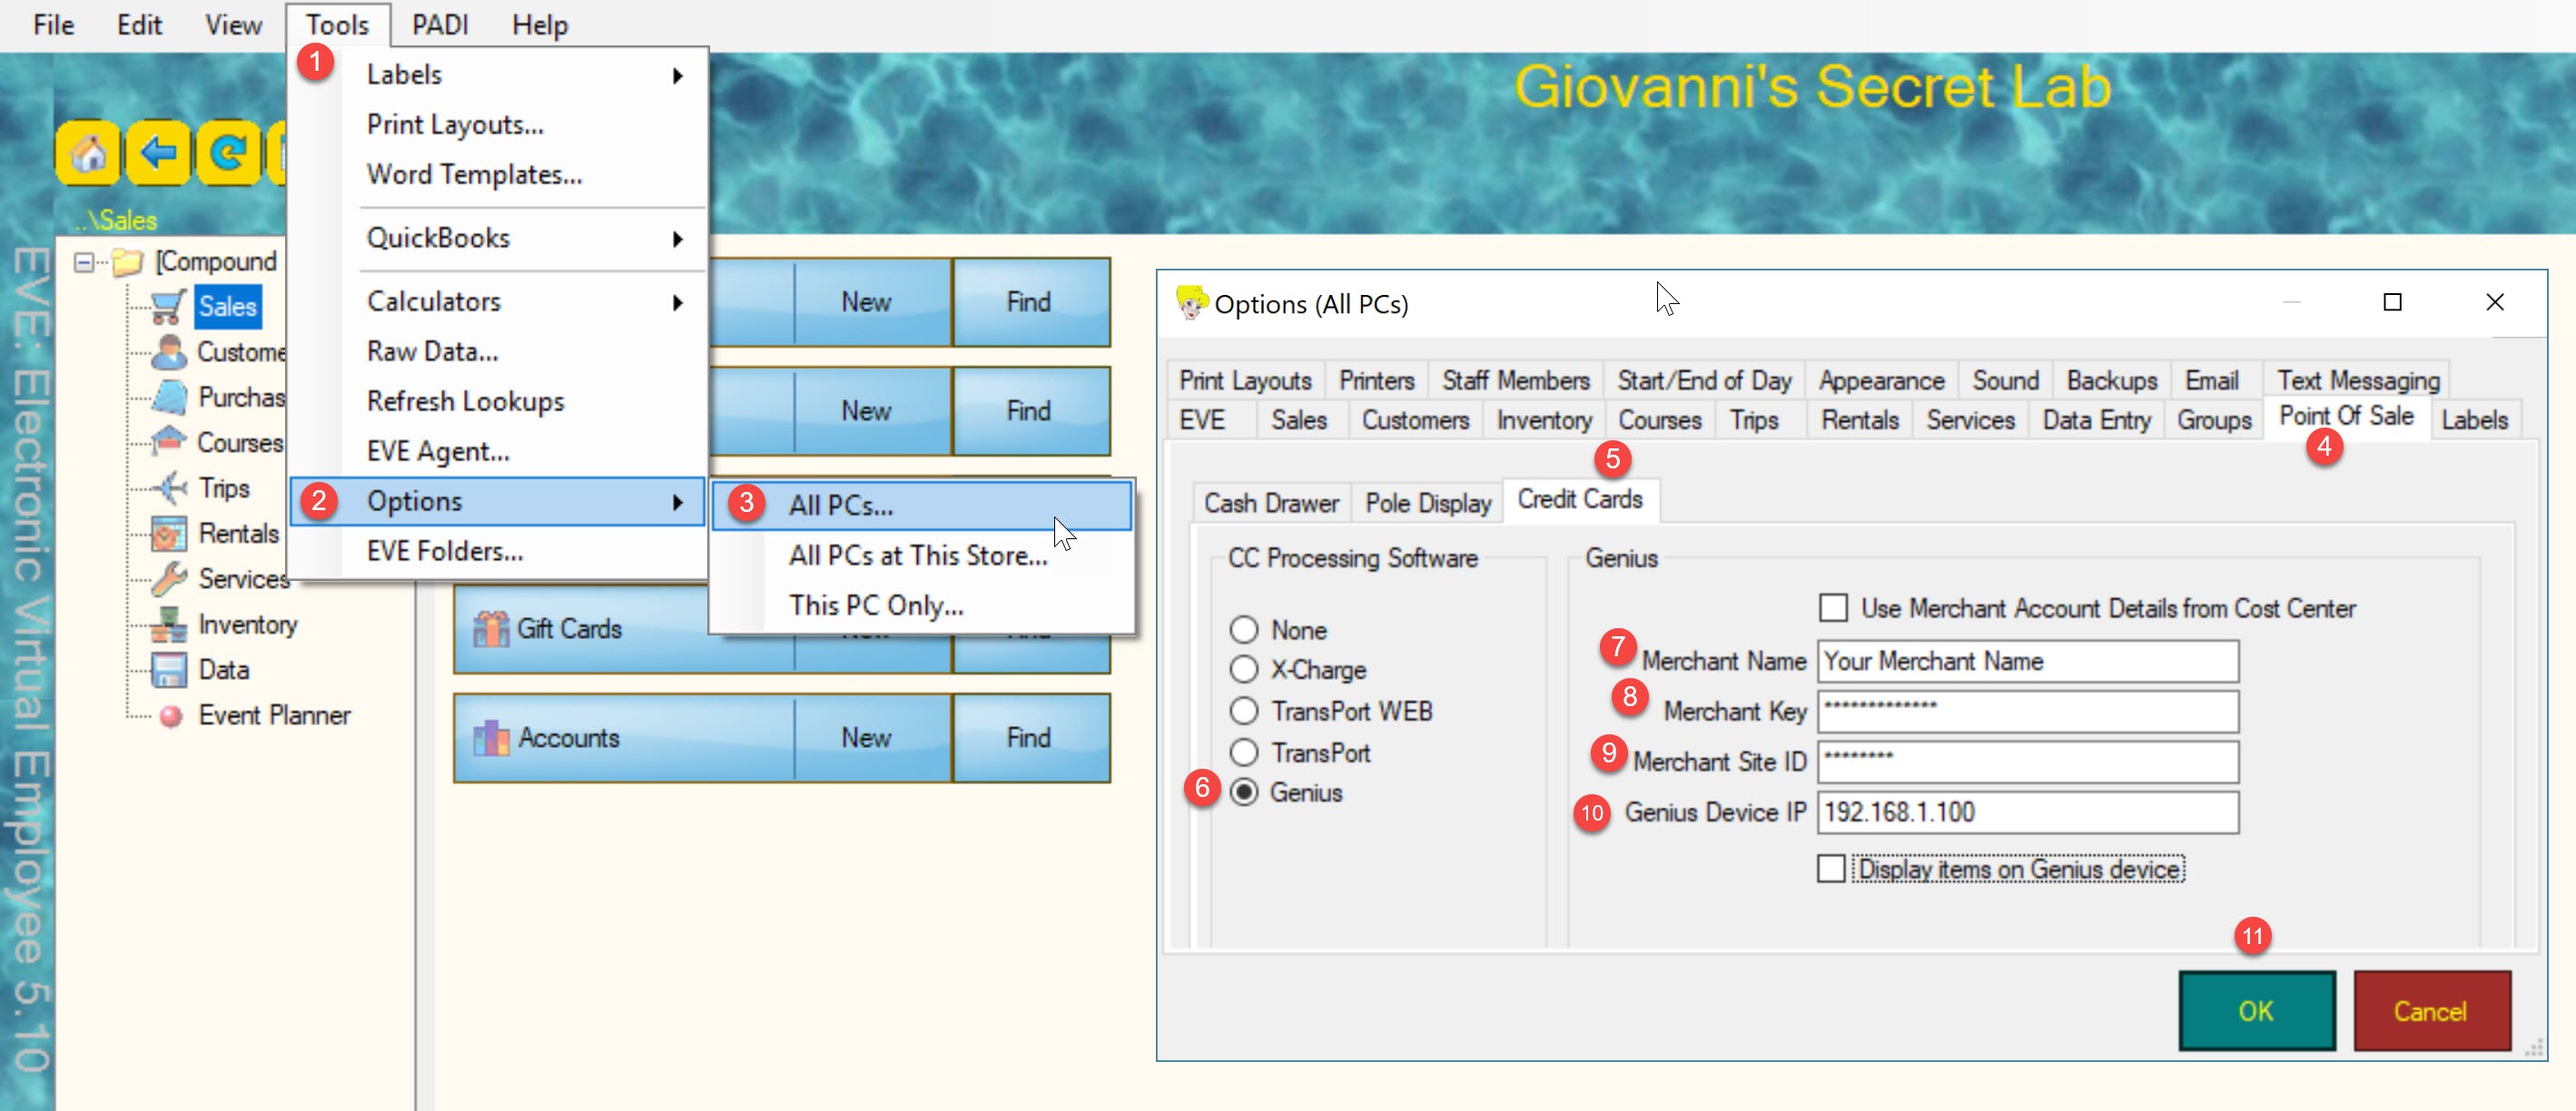
To setup a Genius/TransportWeb credit card payment, please follow this procedure:


1) Open EVE and click Tools

2) Select Options

3) Click “All PCs” if you want the same credit card account to be used on all PCs running EVE. Click “This PC Only” if you want to use just the active PC.”

4) Select the Point of Sale tab

5) Select the Credit Cards tab

6) Select either Genius or TransportWeb. Once you setup either system, settings will also apply to the other system

7) Enter your Merchant Name

8) Enter your Merchant Key

9) Enter Merchant Site ID. Please make sure Merchant Key and Merchant Site ID are not swapped by mistake, else login will fail

10) Enter your device local IP address. Cayan tech support will help you retrieve your device local IP address when you receive the device

11) Click OK


As a second step, please make sure you have properly setup your payment methods, as outlined in the instructions


Category: Sales
Use the Sales Search Wizard for this.
On the Customers tab of that search wizard, start by selecting the customers as below:
FAQSales2.1
When you click that Add Course Customers button you can then select the customers on the courses, as in the example below:
FAQSales2.2
And:
FAQSales2.3
Select All of those results and Add them to the search.
Ensure you have this setting on the Payments / Items tab of the Sales Search Wizard:
FAQSales2.4
Results will include:
FAQSales2.5
Category: Sales
What are Cost/Profit Centres and Stock Type Items?
This video shows what a cost/profit centres and stock types/items are:
https://youtu.be/YLMd1Fi64bs
Category: Sales